Network Installation Guide
Page 1
Network Installation Guide WorkForce® 610 Series Artisan® 710 Series
Network Installation Guide WorkForce® 610 Series Artisan® 710 Series
Network Installation Guide
Page 24
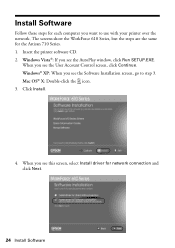
... screen, go to use with your printer over the network. Click Install. 4. Windows® XP: When you see this screen, select Install driver for the Artisan 710 Series. 1. When you see the User Account Control screen, click Continue. Mac OS® X: Double-click the icon. 3. The screens show the WorkForce 610...
... screen, go to use with your printer over the network. Click Install. 4. Windows® XP: When you see this screen, select Install driver for the Artisan 710 Series. 1. When you see the User Account Control screen, click Continue. Mac OS® X: Double-click the icon. 3. The screens show the WorkForce 610...
Quick Guide
Page 1
Artisan® 710 Series Quick Guide Basic Copying, Printing, and Scanning Maintenance Solving Problems
Artisan® 710 Series Quick Guide Basic Copying, Printing, and Scanning Maintenance Solving Problems
Quick Guide
Page 4
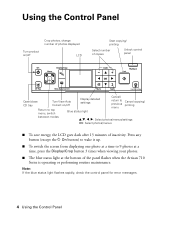
... u,d, l, r: Select photos/menus/settings OK: Select photos/menus ■ To save energy, the LCD goes dark after 13 minutes of the panel flashes when the Artisan 710 Series is operating or performing routine maintenance. Note: If the blue status light flashes rapidly, check the control panel for error messages. 4 Using the Control Panel
... u,d, l, r: Select photos/menus/settings OK: Select photos/menus ■ To save energy, the LCD goes dark after 13 minutes of the panel flashes when the Artisan 710 Series is operating or performing routine maintenance. Note: If the blue status light flashes rapidly, check the control panel for error messages. 4 Using the Control Panel
Quick Guide
Page 5
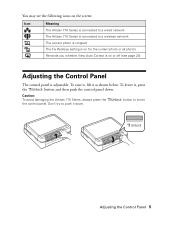
... current photo or all photos Reminds you whether View Auto Correct is on or off (see the following icons on the screen: Icon Meaning The Artisan 710 Series is connected to a wired network The Artisan 710 Series is adjustable. Caution: To avoid damaging the Artisan 710 Series, always press the the control panel.
... current photo or all photos Reminds you whether View Auto Correct is on or off (see the following icons on the screen: Icon Meaning The Artisan 710 Series is connected to a wired network The Artisan 710 Series is adjustable. Caution: To avoid damaging the Artisan 710 Series, always press the the control panel.
Quick Guide
Page 6
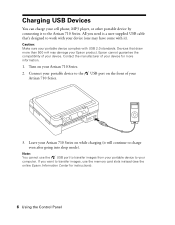
...manufacturer of your device for instructions). 6 Using the Control Panel Note: You cannot use the memory card slots instead (see the online Epson Information Center for more than 500 mA may have come with USB 2.0 standards. If you need is a user-supplied USB cable that...connecting it will continue to charge even after going into sleep mode). Epson cannot guarantee the compatibility of your computer. Leave your Artisan 710 Series on your portable device complies with it). All you want to the Artisan 710 Series. Turn on while charging (it to transfer images, use the ...
...manufacturer of your device for instructions). 6 Using the Control Panel Note: You cannot use the memory card slots instead (see the online Epson Information Center for more than 500 mA may have come with USB 2.0 standards. If you need is a user-supplied USB cable that...connecting it will continue to charge even after going into sleep mode). Epson cannot guarantee the compatibility of your computer. Leave your Artisan 710 Series on your portable device complies with it). All you want to the Artisan 710 Series. Turn on while charging (it to transfer images, use the ...

Quick Guide
Page 7
... your online Epson Information Center for detailed information about sheet capacity for 4 × 6 or 5 × 7-inch photo paper. Squeeze the edge guides and slide them out. Note: Load letterhead or pre-printed paper face-down, with the glossy or printable side face-down. Loading Paper 7 Loading Paper Your Artisan 710 Series has two paper...
... your online Epson Information Center for detailed information about sheet capacity for 4 × 6 or 5 × 7-inch photo paper. Squeeze the edge guides and slide them out. Note: Load letterhead or pre-printed paper face-down, with the glossy or printable side face-down. Loading Paper 7 Loading Paper Your Artisan 710 Series has two paper...
Quick Guide
Page 17
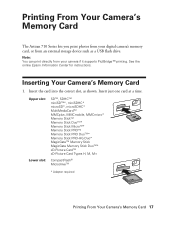
Insert the card into the correct slot, as a USB flash drive. Inserting Your Camera's Memory Card 1. Printing From Your Camera's Memory Card The Artisan 710 Series lets you print photos from an external storage device such as shown. Note: You can print directly from your digital camera's memory card, or from ... Memory Stick DuoTM* xD-Picture CardTM xD-Picture Card Types H, M, M+ CompactFlash® MicrodriveTM * Adapter required Printing From Your Camera's Memory Card 17 See the online Epson Information Center for instructions.
Insert the card into the correct slot, as a USB flash drive. Inserting Your Camera's Memory Card 1. Printing From Your Camera's Memory Card The Artisan 710 Series lets you print photos from an external storage device such as shown. Note: You can print directly from your digital camera's memory card, or from ... Memory Stick DuoTM* xD-Picture CardTM xD-Picture Card Types H, M, M+ CompactFlash® MicrodriveTM * Adapter required Printing From Your Camera's Memory Card 17 See the online Epson Information Center for instructions.
Quick Guide
Page 18
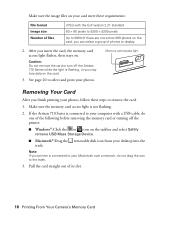
... disk icon from your photos, follow these requirements: File format Image size Number of the following before removing the memory card or turning off the Artisan 710 Series while the light is connected to your computer with the Exif version 2.21 standard 80 × 80 pixels to 9200 × 9200 pixels Up to... Removing Your Card After you can select a group of its slot. 18 Printing From Your Camera's Memory Card See page 20 to display. 2. If the Artisan 710 Series is flashing, or you may lose data on the card, you finish printing your desktop into the trash.
... disk icon from your photos, follow these requirements: File format Image size Number of the following before removing the memory card or turning off the Artisan 710 Series while the light is connected to your computer with the Exif version 2.21 standard 80 × 80 pixels to 9200 × 9200 pixels Up to... Removing Your Card After you can select a group of its slot. 18 Printing From Your Camera's Memory Card See page 20 to display. 2. If the Artisan 710 Series is flashing, or you may lose data on the card, you finish printing your desktop into the trash.
Quick Guide
Page 19
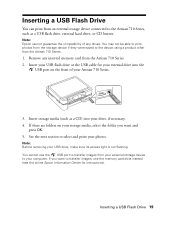
You may not be able to print photos from the Artisan 710 Series. 2. Remove any drives. See the next section to select and print your drive, if necessary. 4. You cannot use the memory card slots instead (see the online Epson Information Center for your external drive into your photos. If you... want to transfer images, use the USB port to transfer images from an external storage device connected to the Artisan 710 Series, such as a CD) into the USB port ...
You may not be able to print photos from the Artisan 710 Series. 2. Remove any drives. See the next section to select and print your drive, if necessary. 4. You cannot use the memory card slots instead (see the online Epson Information Center for your external drive into your photos. If you... want to transfer images, use the USB port to transfer images from an external storage device connected to the Artisan 710 Series, such as a CD) into the USB port ...
Quick Guide
Page 22
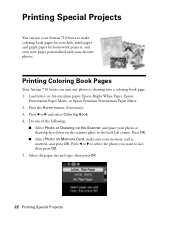
...to select the photo you want to make sure your favorite photos. or A4-size plain paper, Epson Bright White Paper, Epson Presentation Paper Matte, or Epson Premium Presentation Paper Matte. 2. Press the Home button, if necessary. 3. Press OK. ■... Select Photo on the scanner glass, in the back left corner. Select the paper size and type, then press OK. 22 Printing Special Projects Load letter- Printing Coloring Book Pages Your Artisan 710 Series can use your Artisan 710 Series...
...to select the photo you want to make sure your favorite photos. or A4-size plain paper, Epson Bright White Paper, Epson Presentation Paper Matte, or Epson Premium Presentation Paper Matte. 2. Press the Home button, if necessary. 3. Press OK. ■... Select Photo on the scanner glass, in the back left corner. Select the paper size and type, then press OK. 22 Printing Special Projects Load letter- Printing Coloring Book Pages Your Artisan 710 Series can use your Artisan 710 Series...
Quick Guide
Page 23
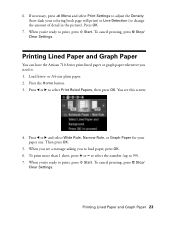
... than 1 sheet, press + or - To cancel printing, press y Stop/ Clear Settings. When you need it. 1. Printing Lined Paper and Graph Paper You can have the Artisan 710 Series print lined paper or graph paper whenever you 're ready to change the amount of detail in the picture). Press the Home button. 3. If necessary...
... than 1 sheet, press + or - To cancel printing, press y Stop/ Clear Settings. When you need it. 1. Printing Lined Paper and Graph Paper You can have the Artisan 710 Series print lined paper or graph paper whenever you 're ready to change the amount of detail in the picture). Press the Home button. 3. If necessary...
Quick Guide
Page 26
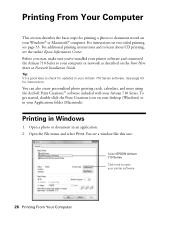
... Your Computer Open the File menu and select Print. Open a photo or document in your Applications folder (Macintosh). You see a window like this one: Select EPSON Artisan 710 Series Click here to learn about CD printing, see page 33. To get started, double-click the Print Creations icon on your Windows® or Macintosh...
... Your Computer Open the File menu and select Print. Open a photo or document in your Applications folder (Macintosh). You see a window like this one: Select EPSON Artisan 710 Series Click here to learn about CD printing, see page 33. To get started, double-click the Print Creations icon on your Windows® or Macintosh...
Quick Guide
Page 27
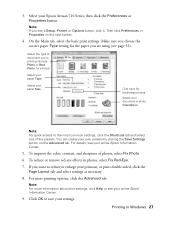
...information about print settings, click Help or see your document or photo Orientation Note: For quick access to reduce or enlarge your Epson Artisan 710 Series, then click the Preferences or Properties button. Click OK to save your own presets by clicking the Save Settings button on the... For more printing options, click the Advanced tab. Note: If you choose the correct paper Type setting for borderless photos Select your online Epson Information Center. 5. Make sure you see page 32). To improve the color, contrast, and sharpness of the presets. 3. Select your ...
...information about print settings, click Help or see your document or photo Orientation Note: For quick access to reduce or enlarge your Epson Artisan 710 Series, then click the Preferences or Properties button. Click OK to save your own presets by clicking the Save Settings button on the... For more printing options, click the Advanced tab. Note: If you choose the correct paper Type setting for borderless photos Select your online Epson Information Center. 5. Make sure you see page 32). To improve the color, contrast, and sharpness of the presets. 3. Select your ...

Quick Guide
Page 28
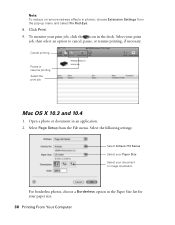
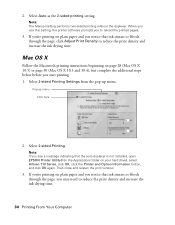
Select EPSON Artisan 710 Click to expand the Print window, if necessary. 28 Printing From Your Computer Mac OS X 10.5 1. Select your print job. Open a photo or document in an application. 2. Click d to expand 4. 10. Click OK or Print to start printing. This window appears and shows the progress of your Epson Artisan 710 Series as the Printer setting. Check ink cartridge status Cancel printing Printing With a Macintosh See the section below for your Mac OS® operating system. Open the File menu and select Print. 3.
Select EPSON Artisan 710 Click to expand the Print window, if necessary. 28 Printing From Your Computer Mac OS X 10.5 1. Select your print job. Open a photo or document in an application. 2. Click d to expand 4. 10. Click OK or Print to start printing. This window appears and shows the progress of your Epson Artisan 710 Series as the Printer setting. Check ink cartridge status Cancel printing Printing With a Macintosh See the section below for your Mac OS® operating system. Open the File menu and select Print. 3.
Quick Guide
Page 30
... option in an application. 2. Select your print job, click the icon in photos, choose Extension Settings from the File menu. Select the following settings: Select Artisan 710 Series Select your Paper Size Select your paper size. 30 Printing From Your Computer Select Page Setup from the pop-up menu and select Fix Red...
... option in an application. 2. Select your print job, click the icon in photos, choose Extension Settings from the File menu. Select the following settings: Select Artisan 710 Series Select your Paper Size Select your paper size. 30 Printing From Your Computer Select Page Setup from the pop-up menu and select Fix Red...
Quick Guide
Page 32
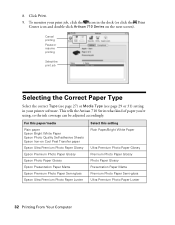
... the Print Center icon and double-click Artisan 710 Series on Cool Peel Transfer paper Epson Ultra Premium Photo Paper Glossy Epson Premium Photo Paper Glossy Epson Photo Paper Glossy Epson Presentation Paper Matte Epson Premium Photo Paper Semi-gloss Epson Ultra Premium Photo Paper Luster Select this setting...Print. 9. To monitor your printer software. For this paper/media Plain paper Epson Bright White Paper Epson Photo Quality Self-adhesive Sheets Epson Iron-on the next screen). This tells the Artisan 710 Series what kind of paper you're using, so the ink coverage can be adjusted...
... the Print Center icon and double-click Artisan 710 Series on Cool Peel Transfer paper Epson Ultra Premium Photo Paper Glossy Epson Premium Photo Paper Glossy Epson Photo Paper Glossy Epson Presentation Paper Matte Epson Premium Photo Paper Semi-gloss Epson Ultra Premium Photo Paper Luster Select this setting...Print. 9. To monitor your printer software. For this paper/media Plain paper Epson Bright White Paper Epson Photo Quality Self-adhesive Sheets Epson Iron-on the next screen). This tells the Artisan 710 Series what kind of paper you're using, so the ink coverage can be adjusted...
Quick Guide
Page 34
... a message indicating that ink smears or bleeds through the page, you notice that the auto duplexer is not installed, open EPSON Printer Utility3 (in the Applications folder on your hard drive), select Artisan 710 Series, click OK, click the Printer and Option Information button, and click OK again. If you're printing on page...
... a message indicating that ink smears or bleeds through the page, you notice that the auto duplexer is not installed, open EPSON Printer Utility3 (in the Applications folder on your hard drive), select Artisan 710 Series, click OK, click the Printer and Option Information button, and click OK again. If you're printing on page...

Quick Guide
Page 35
You can also scan from your computer and save them as shown on your application. or USB-connected computer. Or you can start Epson Scan directly from your Artisan 710 Series control panel and send the images to a memory card or to your image to a file. 1. Then open the File menu, choose Import or Acquire...
You can also scan from your computer and save them as shown on your application. or USB-connected computer. Or you can start Epson Scan directly from your Artisan 710 Series control panel and send the images to a memory card or to your image to a file. 1. Then open the File menu, choose Import or Acquire...
Quick Guide
Page 38
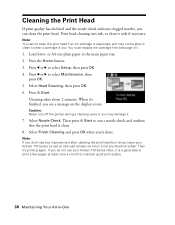
...Press the Home button. 3. Press x Start. Caution: Never turn off the printer during a cleaning cycle or you do not use your Artisan 710 Series turned on the display screen. You must replace the cartridge first (see a message on and wait at least once a month to maintain good... r to select Maintenance, then press OK. 5. If you may not be able to let any improvement after cleaning the print head four times, leave your Artisan 710 Series often, it . 7. Select Head Cleaning, then press OK. 6. Note: If you see page 41). 1. Load letter- Press l or r to select...
...Press the Home button. 3. Press x Start. Caution: Never turn off the printer during a cleaning cycle or you do not use your Artisan 710 Series turned on the display screen. You must replace the cartridge first (see a message on and wait at least once a month to maintain good... r to select Maintenance, then press OK. 5. If you may not be able to let any improvement after cleaning the print head four times, leave your Artisan 710 Series often, it . 7. Select Head Cleaning, then press OK. 6. Note: If you see page 41). 1. Load letter- Press l or r to select...


