Basics
Page 37
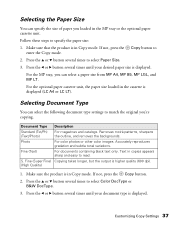
... is displayed. Press the u or d button several times to read. Customizing Copy Settings 37 If not, press the Copy button to specify the paper size: 1. For the optional paper cassette unit, the paper size loaded in copies appears sharp and easy to select Paper Size. 3. Selecting Document Type You can select the following document type settings to select Color DocType or B&W DocType. 3. S. For the MP tray, you 're copying. Photo For color photos or other color images. Press...
... is displayed. Press the u or d button several times to read. Customizing Copy Settings 37 If not, press the Copy button to specify the paper size: 1. For the optional paper cassette unit, the paper size loaded in copies appears sharp and easy to select Paper Size. 3. Selecting Document Type You can select the following document type settings to select Color DocType or B&W DocType. 3. S. For the MP tray, you 're copying. Photo For color photos or other color images. Press...
Basics
Page 56
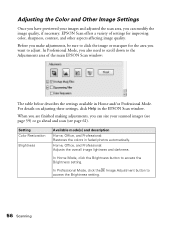
... the Image Adjustment button to access the Brightness setting. Home, Office, and Professional: Adjusts the overall image lightness and darkness. For details on adjusting these settings, click Help in faded photos automatically. Setting Color Restoration Brightness Available mode(s) and description Home, Office, and Professional: Restores the colors in the EPSON Scan window. Adjusting the Color and Other Image Settings Once you have previewed your images and adjusted the scan area, you can size...
... the Image Adjustment button to access the Brightness setting. Home, Office, and Professional: Adjusts the overall image lightness and darkness. For details on adjusting these settings, click Help in faded photos automatically. Setting Color Restoration Brightness Available mode(s) and description Home, Office, and Professional: Restores the colors in the EPSON Scan window. Adjusting the Color and Other Image Settings Once you have previewed your images and adjusted the scan area, you can size...
Basics
Page 72
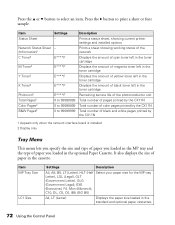
... in the toner cartridge Remaining service life of the photoconductor unit Total number of pages printed by the CX11N Total number of color pages printed by the CX11N Total number of black and white pages printed by the CX11N 1 Appears only when the network interface board is installed 2 Display only Tray Menu This menu lets you specify the size and type of paper you loaded in the MP tray and the type of paper in the standard and optional paper cassettes. 72 Using the Control Panel
... in the toner cartridge Remaining service life of the photoconductor unit Total number of pages printed by the CX11N Total number of color pages printed by the CX11N Total number of black and white pages printed by the CX11N 1 Appears only when the network interface board is installed 2 Display only Tray Menu This menu lets you specify the size and type of paper you loaded in the MP tray and the type of paper in the standard and optional paper cassettes. 72 Using the Control Panel
Basics
Page 74
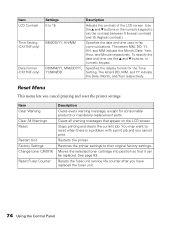
...mandatory-replacement parts. See page 83. Reset Menu This menu lets you have replaced the fuser unit. 74 Using the Control Panel Item Clear Warning Clear All Warnings Reset Restart Unit Factory Settings Change toner C/M/Y/K Reset Fuser Counter Description Clears every warning message, except for the Time Setting. Moves the selected toner cartridge into position so that appear on the LCD screen. To specify the date and time use the u and d buttons, or numeric keypad. Resets the fuser unit service life counter after you cancel printing and reset the printer settings. The letters...
...mandatory-replacement parts. See page 83. Reset Menu This menu lets you have replaced the fuser unit. 74 Using the Control Panel Item Clear Warning Clear All Warnings Reset Restart Unit Factory Settings Change toner C/M/Y/K Reset Fuser Counter Description Clears every warning message, except for the Time Setting. Moves the selected toner cartridge into position so that appear on the LCD screen. To specify the date and time use the u and d buttons, or numeric keypad. Resets the fuser unit service life counter after you cancel printing and reset the printer settings. The letters...
Basics
Page 76
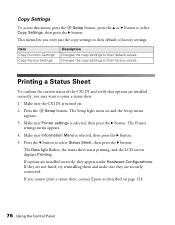
... Configurations. Printing a Status Sheet To confirm the current status of the CX11N and verify that options are installed correctly, you reset just the copy settings to their default or factory settings. Make sure the CX11N is selected, then press the r button. Item Copy Function Settings Copy Factory Settings Description Changes the copy settings to print a status sheet. 1. Press the Setup button. This menu lets you may want to their default values. Changes the copy settings to their factory values. The Setup light turns on page 128. 76 Using the Control Panel Make...
... Configurations. Printing a Status Sheet To confirm the current status of the CX11N and verify that options are installed correctly, you reset just the copy settings to their default or factory settings. Make sure the CX11N is selected, then press the r button. Item Copy Function Settings Copy Factory Settings Description Changes the copy settings to print a status sheet. 1. Press the Setup button. This menu lets you may want to their default values. Changes the copy settings to their factory values. The Setup light turns on page 128. 76 Using the Control Panel Make...

Basics
Page 102
... for connecting instructions. • Your application software is not set up correctly. The Print light is garbled • The interface cable may be securely connected. incorrect Printout is on the Consumables Info Settings window. Make sure both ends. Printing Problems Operation Problems Problem Solution The Print light does • Turn off ) product to ready status. The CX11N does not Press the x B&W Start or x Color Start button to switch the print (Print light off the CX11N, connect the power...
... for connecting instructions. • Your application software is not set up correctly. The Print light is garbled • The interface cable may be securely connected. incorrect Printout is on the Consumables Info Settings window. Make sure both ends. Printing Problems Operation Problems Problem Solution The Print light does • Turn off ) product to ready status. The CX11N does not Press the x B&W Start or x Color Start button to switch the print (Print light off the CX11N, connect the power...
Basics
Page 108
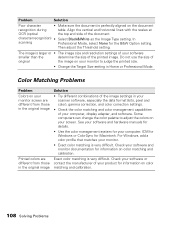
... top and side of original the image on your computer, display adapter, and software. In scanning Professional Mode, select None for information on color matching and calibration. 108 Solving Problems Problem Solution Poor character • Make sure the document is very difficult. Do not use the size of the document. Check your monitor to adjust the colors on your software and monitor documentation for the B&W Option setting.
... top and side of original the image on your computer, display adapter, and software. In scanning Professional Mode, select None for information on color matching and calibration. 108 Solving Problems Problem Solution Poor character • Make sure the document is very difficult. Do not use the size of the document. Check your monitor to adjust the colors on your software and monitor documentation for the B&W Option setting.
Basics
Page 111
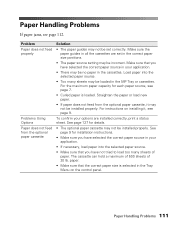
... cassettes are installed correctly, print a status sheet. Make sure that the correct paper size is loaded. Paper Handling Problems If paper jams, see page 7. • Curled paper is selected in your options are set correctly. Problem Paper does not feed properly Problems Using Options Paper does not feed from the optional paper cassette, it , see page 9. The cassette can hold a maximum of 500 sheets of paper. See page 9 for each paper source, see page 112. For the maximum paper capacity for installation instructions. • Make sure...
... cassettes are installed correctly, print a status sheet. Make sure that the correct paper size is loaded. Paper Handling Problems If paper jams, see page 7. • Curled paper is selected in your options are set correctly. Problem Paper does not feed properly Problems Using Options Paper does not feed from the optional paper cassette, it , see page 9. The cassette can hold a maximum of 500 sheets of paper. See page 9 for each paper source, see page 112. For the maximum paper capacity for installation instructions. • Make sure...

Basics
Page 135
... message unless such message clearly contains in response to a telephone line. A compliant telephone cord and modular plug is resolved. 8. To be used to determine the number of this terminal equipment Model EU-96 causes harm to the telephone network, the telephone company will be connected to an incoming call. Connection to state tariffs. (Contact the state public utility commission, public service...
... message unless such message clearly contains in response to a telephone line. A compliant telephone cord and modular plug is resolved. 8. To be used to determine the number of this terminal equipment Model EU-96 causes harm to the telephone network, the telephone company will be connected to an incoming call. Connection to state tariffs. (Contact the state public utility commission, public service...
Product Information Guide
Page 3
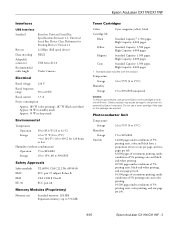
... Expansion memory: up to the printer not covered by Epson's warranty. Photoconductor Unit Temperature Storage Humidity Storage Unit life 32 to 95°F (0 to 35°C) 15 to 80% RH 14,000 pages under conditions of 5% printing ratio, color and black have a proportion of 5% printing ratio, color printing, and one page per job. 8/05 Epson AcuLaser CX11N/CX11NF - 3 Other products may cause damage to 576 MB Toner Cartridges Colors Cyan, magenta, yellow, black Cartridge life Black Standard...
... Expansion memory: up to the printer not covered by Epson's warranty. Photoconductor Unit Temperature Storage Humidity Storage Unit life 32 to 95°F (0 to 35°C) 15 to 80% RH 14,000 pages under conditions of 5% printing ratio, color and black have a proportion of 5% printing ratio, color printing, and one page per job. 8/05 Epson AcuLaser CX11N/CX11NF - 3 Other products may cause damage to 576 MB Toner Cartridges Colors Cyan, magenta, yellow, black Cartridge life Black Standard...
Product Information Guide
Page 4
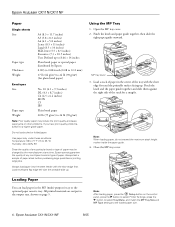
... control panel, press the r button to select Printer Settings, press the d button to select Tray Menu, and match the MP Tray Size and MP Type settings to the loaded paper size. 4 - Load a stack of paper in the MP (multi-purpose) tray or the optional paper cassette tray. Note: When loading paper, do not exceed the maximum stack height marker inside the paper guide. 4. Epson AcuLaser CX11N/CX11NF 8/05 Always test a sample of paper stock before purchasing large quantities or printing large jobs. Open...
... control panel, press the r button to select Printer Settings, press the d button to select Tray Menu, and match the MP Tray Size and MP Type settings to the loaded paper size. 4 - Load a stack of paper in the MP (multi-purpose) tray or the optional paper cassette tray. Note: When loading paper, do not exceed the maximum stack height marker inside the paper guide. 4. Epson AcuLaser CX11N/CX11NF 8/05 Always test a sample of paper stock before purchasing large quantities or printing large jobs. Open...
Product Information Guide
Page 7
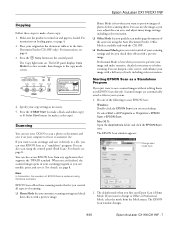
... loading paper, see page 8. The EPSON Scan window changes. 8/05 Epson AcuLaser CX11N/CX11NF - 7 For instructions, see page 8. Specify your system. 1. You can size the image as a "standalone" program. Press the Copy button on the document table or in your image and make a color copy). You can also scan using Windows examples. Scanned images are finished, the scanned image opens in the Auto Document Feeder (CX11NF only). Place your CX11N to make extensive, detailed corrections to a file, you total control...
... loading paper, see page 8. The EPSON Scan window changes. 8/05 Epson AcuLaser CX11N/CX11NF - 7 For instructions, see page 8. Specify your system. 1. You can size the image as a "standalone" program. Press the Copy button on the document table or in your image and make a color copy). You can also scan using Windows examples. Scanned images are finished, the scanned image opens in the Auto Document Feeder (CX11NF only). Place your CX11N to make extensive, detailed corrections to a file, you total control...

Product Information Guide
Page 8
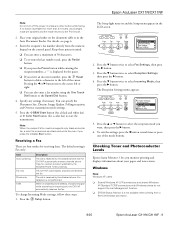
... a USB cable or a network cable as the "source" first. EPSON Scan starts scanning. Faxing (CX11NF Only) Sending a Basic Fax 1. Make sure the CX11NF is set in the Auto Document Feeder (CX11NF only; Mac OS X: Open the Applications folder, select the program folder, and click the program icon. 2. Select your originals on the document table (see a message on your scanning program help for each scan mode. Before using...
... a USB cable or a network cable as the "source" first. EPSON Scan starts scanning. Faxing (CX11NF Only) Sending a Basic Fax 1. Make sure the CX11NF is set in the Auto Document Feeder (CX11NF only; Mac OS X: Open the Applications folder, select the program folder, and click the program icon. 2. Select your originals on the document table (see a message on your scanning program help for each scan mode. Before using...
Product Information Guide
Page 9
... changes made are four modes for a certain duration specified by the attached phone. The default setting is received by the Attached Phone Timeout setting. Fax reception is not available when printing from the numeric keypad on and the Setup menu appears in the Auto Document Feeder. The Setup light turns on the control panel. Windows Note: Windows XP users ❏ Shared Windows XP LPR connections and shared Windows XP Standard TCP/IP connections...
... changes made are four modes for a certain duration specified by the attached phone. The default setting is received by the Attached Phone Timeout setting. Fax reception is not available when printing from the numeric keypad on and the Setup menu appears in the Auto Document Feeder. The Setup light turns on the control panel. Windows Note: Windows XP users ❏ Shared Windows XP LPR connections and shared Windows XP Standard TCP/IP connections...
Product Information Guide
Page 11
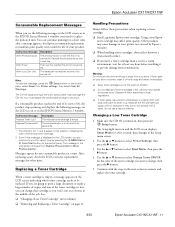
... service life. After replacing a part, check the LCD screen for replacement messages for the color of them on , then press the Setup button. Make sure the CX11N is displayed in the LCD screen, you can cause a fire or explosion if they may affect print quality. Continue with a new one hour before installing it away from Printer settings, then select Clear All Warnings. Use the u or d button to remove and replace the toner cartridge. 8/05 Epson AcuLaser CX11N/CX11NF - 11 Changing a Low Toner Cartridge...
... service life. After replacing a part, check the LCD screen for replacement messages for the color of them on , then press the Setup button. Make sure the CX11N is displayed in the LCD screen, you can cause a fire or explosion if they may affect print quality. Continue with a new one hour before installing it away from Printer settings, then select Clear All Warnings. Use the u or d button to remove and replace the toner cartridge. 8/05 Epson AcuLaser CX11N/CX11NF - 11 Changing a Low Toner Cartridge...
Start Here Card
Page 2
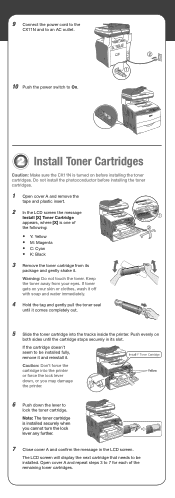
... screen will display the next cartridge that needs to be installed. Push evenly on before installing the toner cartridges. 1 Open cover A and remove the tape and plastic insert. 2 In the LCD screen the message Install [X] Toner Cartridge appears, where [X] is one of the remaining toner cartridges. Caution: Don't force the cartridge into the tracks inside the printer. Warning: Do not touch the toner. Note: The toner cartridge is turned on both sides until...
... screen will display the next cartridge that needs to be installed. Push evenly on before installing the toner cartridges. 1 Open cover A and remove the tape and plastic insert. 2 In the LCD screen the message Install [X] Toner Cartridge appears, where [X] is one of the remaining toner cartridges. Caution: Don't force the cartridge into the tracks inside the printer. Warning: Do not touch the toner. Note: The toner cartridge is turned on both sides until...
Start Here Card
Page 8
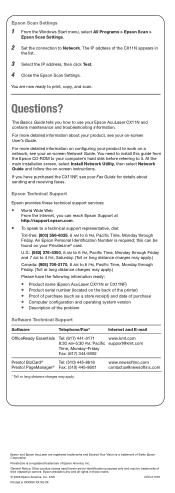
... CPD-21376 Printed in the list. 3 Select the IP address, then click Test. 4 Close the Epson Scan Settings. The Basics Guide tells you have the following information ready: • Product name (Epson AcuLaser CX11N or CX11NF) • Product serial number (located on -screen User's Guide. If you how to Network. At the main installation screen, select Install Network Utility, then select Network Guide and follow the on your Fax Guide for identification...
... CPD-21376 Printed in the list. 3 Select the IP address, then click Test. 4 Close the Epson Scan Settings. The Basics Guide tells you have the following information ready: • Product name (Epson AcuLaser CX11N or CX11NF) • Product serial number (located on -screen User's Guide. If you how to Network. At the main installation screen, select Install Network Utility, then select Network Guide and follow the on your Fax Guide for identification...

Fax Guide
Page 5
...: Notes contain important information about printing, scanning, and copying, see your computer's hard disk before referring to set up your product and installing your software see your on -screen User's Guide. You need to install this guide from the software CD-ROM to access the fax mode and settings. Introduction 5 For information about your Epson AcuLaser® CX11NF, and how to your Start Here sheet. It also tells you...
...: Notes contain important information about printing, scanning, and copying, see your computer's hard disk before referring to set up your product and installing your software see your on -screen User's Guide. You need to install this guide from the software CD-ROM to access the fax mode and settings. Introduction 5 For information about your Epson AcuLaser® CX11NF, and how to your Start Here sheet. It also tells you...
Fax Guide
Page 58
.... A plug and jack used to connect this equipment Model EU-96, for repair or warranty information, please contact EPSON AMERICA, INC. 800-556-6025. But if advance notice isn't practical, the telephone company will be provided to make changes in a margin at the top or bottom of each transmitted page or on public coin phone service provided by the ACTA...
.... A plug and jack used to connect this equipment Model EU-96, for repair or warranty information, please contact EPSON AMERICA, INC. 800-556-6025. But if advance notice isn't practical, the telephone company will be provided to make changes in a margin at the top or bottom of each transmitted page or on public coin phone service provided by the ACTA...
Product Brochure
Page 2
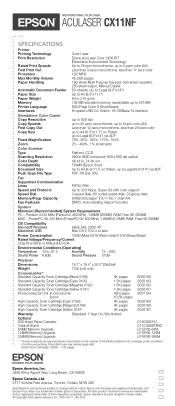
MULTIFUNCTIONAL COLOR LASER EPSON® ACULASER® CX11NF SPECIFICATIONS Printer Printing Technology Print Resolution Rated Print Speeds First Print Out Processor Max Monthly Volume Paper Handling Automatic Document Feeder Paper Size Paper Weight Memory Printer Language Interfaces Color Laser Epson AcuLaser Color 2400 RIT (Resolution Improvement Technology) Up to 25 ppm monochrome, up to 5 ppm color (A4) Less than 9 secs monochrome, less than 29 secs color up to Legal (8.5"x14") via ADF PDF, Tiff and JPG Fax Supported Communication Lines Speed...
MULTIFUNCTIONAL COLOR LASER EPSON® ACULASER® CX11NF SPECIFICATIONS Printer Printing Technology Print Resolution Rated Print Speeds First Print Out Processor Max Monthly Volume Paper Handling Automatic Document Feeder Paper Size Paper Weight Memory Printer Language Interfaces Color Laser Epson AcuLaser Color 2400 RIT (Resolution Improvement Technology) Up to 25 ppm monochrome, up to 5 ppm color (A4) Less than 9 secs monochrome, less than 29 secs color up to Legal (8.5"x14") via ADF PDF, Tiff and JPG Fax Supported Communication Lines Speed...


