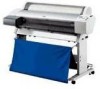
Product Information Guide
Page 1
... Printer Specifications Printing Printing method 7 color EPSON UltraChrome ink or 6 color EPSON Photographic Dye ink UltraChrome model switchable between three ink modes: ❏ Photo Black Mode (uses Photo Black and Light Black cartridges) ❏ Matte Black Mode (uses Matte Black and Light Black cartridges) ❏ Dual Matte Black Mode (uses two Matte Black cartridges) Nozzle configuration 96 nozzles for the Stylus Pro 7600. EPSON Stylus Pro...
... Printer Specifications Printing Printing method 7 color EPSON UltraChrome ink or 6 color EPSON Photographic Dye ink UltraChrome model switchable between three ink modes: ❏ Photo Black Mode (uses Photo Black and Light Black cartridges) ❏ Matte Black Mode (uses Matte Black and Light Black cartridges) ❏ Dual Matte Black Mode (uses two Matte Black cartridges) Nozzle configuration 96 nozzles for the Stylus Pro 7600. EPSON Stylus Pro...

Product Information Guide
Page 2
...Stylus Pro 9600 only) ❏ 44 inches (Stylus Pro 9600 only) When printing BorderFree, set the image size in your printed image. wide Size 8.3 to be approximately 3 mm (1/8 inch) larger than the intended size of your application to 24.0 in. EPSON Stylus Pro 7600 and 9600 7/02 EPSON Stylus Pro 7600 and 9600...Stylus Pro 7600: Approx. 50 W (ISO 10561 Letter Pattern) Stylus Pro 9600: Approx. 55 W (ISO 10561 Letter Pattern) Both printers... stand Weight Stylus Pro 7600: 96 lb (43.5 kg) without ink cartridges or stand Stylus Pro 9600: 185 lb (84 kg) without ink cartridges or stand ...
...Stylus Pro 9600 only) ❏ 44 inches (Stylus Pro 9600 only) When printing BorderFree, set the image size in your printed image. wide Size 8.3 to be approximately 3 mm (1/8 inch) larger than the intended size of your application to 24.0 in. EPSON Stylus Pro 7600 and 9600 7/02 EPSON Stylus Pro 7600 and 9600...Stylus Pro 7600: Approx. 50 W (ISO 10561 Letter Pattern) Stylus Pro 9600: Approx. 55 W (ISO 10561 Letter Pattern) Both printers... stand Weight Stylus Pro 7600: 96 lb (43.5 kg) without ink cartridges or stand Stylus Pro 9600: 185 lb (84 kg) without ink cartridges or stand ...
Product Information Guide
Page 3
... paper); Data indicate the lightfastness of color UltraChrome prints made by the EPSON Stylus Pro 7600 and 9600 printers will vary according to media, printed image, display conditions, light intensity, humidity, and atmospheric conditions. For maximum print life, display all models) 220 ml (Stylus Pro 9600, UltraChrome only) * Preliminary data from earlier versions of ink charging. For Adobe® PostScript...
... paper); Data indicate the lightfastness of color UltraChrome prints made by the EPSON Stylus Pro 7600 and 9600 printers will vary according to media, printed image, display conditions, light intensity, humidity, and atmospheric conditions. For maximum print life, display all models) 220 ml (Stylus Pro 9600, UltraChrome only) * Preliminary data from earlier versions of ink charging. For Adobe® PostScript...

Product Information Guide
Page 4
... releasing the paper set lever, or the printer will have a Stylus Pro 9600 that case, there may not be sure to replace the black ink cartridges with the same type as either a Photographic Dye ink model or UltraChrome ink model. User-Replaceable Parts You can install any combination of cartridges as are available: Part Part number EPSON Stylus Pro 7600 Printer Stand C12C844061 EFI...
... releasing the paper set lever, or the printer will have a Stylus Pro 9600 that case, there may not be sure to replace the black ink cartridges with the same type as either a Photographic Dye ink model or UltraChrome ink model. User-Replaceable Parts You can install any combination of cartridges as are available: Part Part number EPSON Stylus Pro 7600 Printer Stand C12C844061 EFI...
Product Information Guide
Page 7
...yourself.) COMMAND ERROR You're using the Make sure you ON clear a paper jam. Pull the paper set lever out to turn the printer on again. 7/02 EPSON Stylus Pro 7600 and 9600 - 8 After 3 seconds the message disappears. MAINTENANCE The maintenance TANK ALMOST tank is straight and aligned ...image or load wider paper. Cut the paper at the paper exit. SET PAPER LEVER Paper Out light on Paper lever was left in the printer. Press the Pause button to lock the ink cartridges. TANK All lights flashing Replace the maintenance tank. Remove the jammed paper...
...yourself.) COMMAND ERROR You're using the Make sure you ON clear a paper jam. Pull the paper set lever out to turn the printer on again. 7/02 EPSON Stylus Pro 7600 and 9600 - 8 After 3 seconds the message disappears. MAINTENANCE The maintenance TANK ALMOST tank is straight and aligned ...image or load wider paper. Cut the paper at the paper exit. SET PAPER LEVER Paper Out light on Paper lever was left in the printer. Press the Pause button to lock the ink cartridges. TANK All lights flashing Replace the maintenance tank. Remove the jammed paper...
Product Information Guide
Page 9
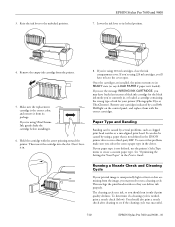
... cleaning cycle was successful. 7/02 EPSON Stylus Pro 7600 and 9600 - 10 This unclogs the print head nozzles so they can be caused by a red Ink Out light on the control panel, and replace them with the arrow pointing toward the printer. 3. EPSON Stylus Pro 7600 and 9600 7. If you 're currently in, or loaded a cartridge containing the wrong type of...
... cleaning cycle was successful. 7/02 EPSON Stylus Pro 7600 and 9600 - 10 This unclogs the print head nozzles so they can be caused by a red Ink Out light on the control panel, and replace them with the arrow pointing toward the printer. 3. EPSON Stylus Pro 7600 and 9600 7. If you 're currently in, or loaded a cartridge containing the wrong type of...
Product Information Guide
Page 10
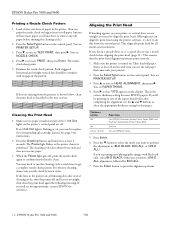
...your printer). 2. If you need to replace the corresponding ink cartridge instead. Make sure the printer is clean. Press Enter. 6. If you see no improvement, contact EPSON for most EPSON papers...d so you 'll also have to get a complete nozzle check pattern. Thickness setting 3N 0N 0.0 to print the alignment patterns. 11 - Each staggered horizontal and ...EPSON Stylus Pro 7600 and 9600 7/02 Load a letter-size sheet of the H Ink Out lights on the control panel. Press u so you can print the nozzle check on one of the papers listed below , clean the print head as the printer...
...your printer). 2. If you need to replace the corresponding ink cartridge instead. Make sure the printer is clean. Press Enter. 6. If you see no improvement, contact EPSON for most EPSON papers...d so you 'll also have to get a complete nozzle check pattern. Thickness setting 3N 0N 0.0 to print the alignment patterns. 11 - Each staggered horizontal and ...EPSON Stylus Pro 7600 and 9600 7/02 Load a letter-size sheet of the H Ink Out lights on the control panel. Press u so you can print the nozzle check on one of the papers listed below , clean the print head as the printer...
Product Information Guide
Page 11
...will be limited in the drawing). If number 5 (the current alignment setting) shows the smallest gap for each of it is on matte or plain paper, such as EPSON Premium Luster Photo Paper, Photo Semigloss Paper, Premium Semimatte Photo Paper,...printer, your printer was initialized in one of the cartridges. Select the block with the printer to that number 5 is aligned and you can print after switching black ink modes. 7/02 EPSON Stylus Pro 7600 and 9600 - 12 In some cases, you'll be replacing only one or more than once to prevent the procedure from the color cartridges...
...will be limited in the drawing). If number 5 (the current alignment setting) shows the smallest gap for each of it is on matte or plain paper, such as EPSON Premium Luster Photo Paper, Photo Semigloss Paper, Premium Semimatte Photo Paper,...printer, your printer was initialized in one of the cartridges. Select the block with the printer to that number 5 is aligned and you can print after switching black ink modes. 7/02 EPSON Stylus Pro 7600 and 9600 - 12 In some cases, you'll be replacing only one or more than once to prevent the procedure from the color cartridges...

Product Information Guide
Page 12
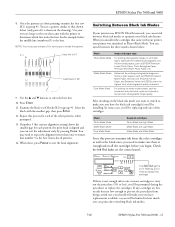
...) Selecting the Black Ink Cartridges Make sure you want to release the ink lever and remove the cartridges. Make sure you know which cartridges you want to install, then press u or d until instructed to do this message, continue on to set of black ink cartridges, depending on the control panel (#1 or #2 slot). EPSON Stylus Pro 7600 and 9600 If the printer's maintenance tank...
...) Selecting the Black Ink Cartridges Make sure you want to release the ink lever and remove the cartridges. Make sure you know which cartridges you want to install, then press u or d until instructed to do this message, continue on to set of black ink cartridges, depending on the control panel (#1 or #2 slot). EPSON Stylus Pro 7600 and 9600 If the printer's maintenance tank...

Product Support Bulletin(s)
Page 45
... recommended that is used for the Epson Stylus Pro 7600 and Stylus Pro 9600 inkjet printer. Firmware Date: October 28, 2002 Reason: 1. With previous versions of the firmware once a Black Ink change operation was created to inform you of the initial ink set that the firmware for the new ink cartridge to be downloaded from Epson's Web site www.epson.com. 2. Adds a 90 second pause...
... recommended that is used for the Epson Stylus Pro 7600 and Stylus Pro 9600 inkjet printer. Firmware Date: October 28, 2002 Reason: 1. With previous versions of the firmware once a Black Ink change operation was created to inform you of the initial ink set that the firmware for the new ink cartridge to be downloaded from Epson's Web site www.epson.com. 2. Adds a 90 second pause...

User Manual
Page 5
... Instructions 14 1 Setting Up the Printer Unpacking and Assembling the Stylus Pro 7600 18 Unpacking and Assembling the Optional Stand 18 Unpacking the Printer 21 Mounting the Printer on the Optional Stand 23 Attaching the Paper Basket 24 Unpacking and Assembling the Stylus Pro 9600 27 Unpacking the ...Stand 27 Assembling the Stand 28 Unpacking the Printer 29 Mounting the Printer on the Stand 31 Attaching the Basket 34 Connecting the Power Cord 37 Installing the Ink Cartridges 38 Loading Roll Paper 42 Connecting the Printer to Your...
... Instructions 14 1 Setting Up the Printer Unpacking and Assembling the Stylus Pro 7600 18 Unpacking and Assembling the Optional Stand 18 Unpacking the Printer 21 Mounting the Printer on the Optional Stand 23 Attaching the Paper Basket 24 Unpacking and Assembling the Stylus Pro 9600 27 Unpacking the ...Stand 27 Assembling the Stand 28 Unpacking the Printer 29 Mounting the Printer on the Stand 31 Attaching the Basket 34 Connecting the Power Cord 37 Installing the Ink Cartridges 38 Loading Roll Paper 42 Connecting the Printer to Your...
User Manual
Page 7
...Color Management Settings 119 Paper Configuration Settings 120 Managing Print Jobs 121 Using the Progress Meter 121 Using the Spool Manager 122 Using Status Monitor 3 122 Setting Monitoring Preferences 124 Optimizing Print Speed 126 5 Maintaining and Transporting the Printer Checking Printer... ALL Alignment Pattern 139 Replacing Ink Cartridges 141 Checking Ink Levels 141 Purchasing Ink Cartridges 142 Installing an Ink Cartridge 143 Switching Between Black Ink Modes 146 Preparing to Switch Black Ink Modes 146 Selecting the Black Ink Cartridges 148 Checking the Maintenance Tank ...
...Color Management Settings 119 Paper Configuration Settings 120 Managing Print Jobs 121 Using the Progress Meter 121 Using the Spool Manager 122 Using Status Monitor 3 122 Setting Monitoring Preferences 124 Optimizing Print Speed 126 5 Maintaining and Transporting the Printer Checking Printer... ALL Alignment Pattern 139 Replacing Ink Cartridges 141 Checking Ink Levels 141 Purchasing Ink Cartridges 142 Installing an Ink Cartridge 143 Switching Between Black Ink Modes 146 Preparing to Switch Black Ink Modes 146 Selecting the Black Ink Cartridges 148 Checking the Maintenance Tank ...

User Manual
Page 9
... browser, such as ink cartridges. Caution Cautions must be observed to avoid damage to your printer to keep it to maintain your equipment. Note Notes contain important information about the printer, drivers, and utility software. Introduction Note To set up your printer. 9 For additional ...additional hints on the CD-ROM provides additional information about your printer, follow the instructions in case you how to your printer for daily use and printer maintenance-loading paper, replacing ink cartridges, running cleaning cycles, aligning the print head, and clearing paper...
... browser, such as ink cartridges. Caution Cautions must be observed to avoid damage to your printer to keep it to maintain your equipment. Note Notes contain important information about the printer, drivers, and utility software. Introduction Note To set up your printer. 9 For additional ...additional hints on the CD-ROM provides additional information about your printer, follow the instructions in case you how to your printer for daily use and printer maintenance-loading paper, replacing ink cartridges, running cleaning cycles, aligning the print head, and clearing paper...

User Manual
Page 17
Avoid locations subject to your computer • Installing the printer software • Running a nozzle check • Aligning the print head 1-17 Also avoid locations near potential sources of interference, such as loud... and assembly • Connecting the power cord • Installing the ink cartridges • Loading the roll paper • Connecting the printer to direct sunlight, excessive heat, moisture, or dust. Setting Up the Printer | 17 Chapter 1: Setting Up the Printer Note When choosing a place for the printer, leave adequate room for this chapter to assemble the...
Avoid locations subject to your computer • Installing the printer software • Running a nozzle check • Aligning the print head 1-17 Also avoid locations near potential sources of interference, such as loud... and assembly • Connecting the power cord • Installing the ink cartridges • Loading the roll paper • Connecting the printer to direct sunlight, excessive heat, moisture, or dust. Setting Up the Printer | 17 Chapter 1: Setting Up the Printer Note When choosing a place for the printer, leave adequate room for this chapter to assemble the...

User Manual
Page 21
Remove the ink cartridges and other accessories from around the printer. 1-21 Remove the cardboard panels from the side as shown. 3. Remove ink cartridges and accessories B A 4. Remove the roll paper, polystyrene foam, and cardboard cushions. 2. Lift the box up and away from the sides of the box as shown below. Setting Up the Printer | 21 Unpacking the Printer 1. Remove the handles from the printer.
Remove the ink cartridges and other accessories from around the printer. 1-21 Remove the cardboard panels from the side as shown. 3. Remove ink cartridges and accessories B A 4. Remove the roll paper, polystyrene foam, and cardboard cushions. 2. Lift the box up and away from the sides of the box as shown below. Setting Up the Printer | 21 Unpacking the Printer 1. Remove the handles from the printer.

User Manual
Page 29
Remove the cardboard panels from the printer. Setting Up the Printer | 29 Unpacking the Printer 1. Lift the box up and away from around the printer. 1-29 Remove the ink cartridges and other accessories from the side as shown below. Remove ink cartridges and accessories B A 3. Remove the roll paper, polystyrene foam, and cardboard cushions. 2.
Remove the cardboard panels from the printer. Setting Up the Printer | 29 Unpacking the Printer 1. Lift the box up and away from around the printer. 1-29 Remove the ink cartridges and other accessories from the side as shown below. Remove ink cartridges and accessories B A 3. Remove the roll paper, polystyrene foam, and cardboard cushions. 2.

User Manual
Page 30
30 | Setting Up the Printer Make sure all these items are included: M O N P Q R M: Roll paper spindle N: Roll paper (EPSON Doubleweight Matte Paper) O: Ink cartridges P: Roll paper belt (for keeping roll paper wound up) Q: Power cord R: Printer 1-30
30 | Setting Up the Printer Make sure all these items are included: M O N P Q R M: Roll paper spindle N: Roll paper (EPSON Doubleweight Matte Paper) O: Ink cartridges P: Roll paper belt (for keeping roll paper wound up) Q: Power cord R: Printer 1-30

Service Manual
Page 34
...)". REQ. EPSON Stylus Pro 7600/9600 1.4.2.2 LCD Indications in Normal Mode) (continued) Functions LCD panel display Indicator PG setting Command error COMMAND ERROR Type B interface error OPTION I/F ERROR Fatal error SERVICE. NOTE: For details of roll PAPER OUT Problem with paper output (sheet) RELOAD PAPER Ink out INK OUT Ink low INK LOW No ink cartridge NO INK CARTRIDGE Defective ink cartridge SET INK CARTRIDGE Wrong cartridge WRONG CARTRIDGE PG setting...
...)". REQ. EPSON Stylus Pro 7600/9600 1.4.2.2 LCD Indications in Normal Mode) (continued) Functions LCD panel display Indicator PG setting Command error COMMAND ERROR Type B interface error OPTION I/F ERROR Fatal error SERVICE. NOTE: For details of roll PAPER OUT Problem with paper output (sheet) RELOAD PAPER Ink out INK OUT Ink low INK LOW No ink cartridge NO INK CARTRIDGE Defective ink cartridge SET INK CARTRIDGE Wrong cartridge WRONG CARTRIDGE PG setting...

Service Manual
Page 123
...'t be replied during operation PAPER JAM Paper jam INK OUT Ink out error NO INK CARTRIDGE No ink cartridge INVALID CARTRIDGE Wrong ink cartridge SET INK CARTRIDGE Defective ink cartridge PAPER OUT Paper out error COMMAND ERROR • Ink sequence currently executed • Paper currently initialized ...131 p.128 Troubleshooting Error Display 123 EPSON Stylus Pro 7600/9600 Revision A 3.2 Error Display The printer displays the relevant error message on LCD (continued) LCD Panel Message Printer Status LOWER PAPER SET LVR Paper set lever is released during service call...
...'t be replied during operation PAPER JAM Paper jam INK OUT Ink out error NO INK CARTRIDGE No ink cartridge INVALID CARTRIDGE Wrong ink cartridge SET INK CARTRIDGE Defective ink cartridge PAPER OUT Paper out error COMMAND ERROR • Ink sequence currently executed • Paper currently initialized ...131 p.128 Troubleshooting Error Display 123 EPSON Stylus Pro 7600/9600 Revision A 3.2 Error Display The printer displays the relevant error message on LCD (continued) LCD Panel Message Printer Status LOWER PAPER SET LVR Paper set lever is released during service call...

Service Manual
Page 258
... printing, display changes to "Check Skew" Figure 5-58. Display after Counter Clearing Adjustment Self-diagnostic Function 258 EPSON Stylus Pro 7600/9600 „ After counter clearing, turn off the power once and then turn it on again to start the printer in the up position) Revision A Reset Counter? [Enter] Wait for Counter Clearing SET INK CARTRIDGE * Figure 5-59.
... printing, display changes to "Check Skew" Figure 5-58. Display after Counter Clearing Adjustment Self-diagnostic Function 258 EPSON Stylus Pro 7600/9600 „ After counter clearing, turn off the power once and then turn it on again to start the printer in the up position) Revision A Reset Counter? [Enter] Wait for Counter Clearing SET INK CARTRIDGE * Figure 5-59.


