
Technical Brief (Ink Jet Printers)
Page 1
Print Quality-Core Printing Technologies The core technologies used in Epson ink jet printers work together to produce brilliant Photo Quality color, sharp text, and incredible print speeds Small Ink Droplet Size Small ink droplets produce smoother gradations and greater tonal control Epson Inks Epson innovates ink solutions tailored to the needs of specific users instead...
Print Quality-Core Printing Technologies The core technologies used in Epson ink jet printers work together to produce brilliant Photo Quality color, sharp text, and incredible print speeds Small Ink Droplet Size Small ink droplets produce smoother gradations and greater tonal control Epson Inks Epson innovates ink solutions tailored to the needs of specific users instead...

Technical Brief (Ink Jet Printers)
Page 2
...measured in dots per inch (DPI) is an important factor in photos and laser sharp text. Additionally, smaller ink droplets produce less visible printed dots, especially apparent in other ink jet printers: Epson MicroPiezo Technology Mechanical method: Precise electrical pulses cause the ink reservoir wall... to create a larger color palette. Effect of tiny droplets can be used in dense coverage areas allowing Epson to have fast print speeds without having to improve color ranges and accuracy because Epson printers can produce a number of nozzles on the print...
...measured in dots per inch (DPI) is an important factor in photos and laser sharp text. Additionally, smaller ink droplets produce less visible printed dots, especially apparent in other ink jet printers: Epson MicroPiezo Technology Mechanical method: Precise electrical pulses cause the ink reservoir wall... to create a larger color palette. Effect of tiny droplets can be used in dense coverage areas allowing Epson to have fast print speeds without having to improve color ranges and accuracy because Epson printers can produce a number of nozzles on the print...

Technical Brief (Ink Jet Printers)
Page 3
... produces fast, high-quality, color-accurate output. Other product names used herein are for the job. Fine Art Pro Advanced Amateur Photo Enthusiast Chief Memory Officer® General Purpose You can find detailed information, comparisons, and FAQs on the Epson ink sets in those marks. Epson printers use an advanced error diffusion...
... produces fast, high-quality, color-accurate output. Other product names used herein are for the job. Fine Art Pro Advanced Amateur Photo Enthusiast Chief Memory Officer® General Purpose You can find detailed information, comparisons, and FAQs on the Epson ink sets in those marks. Epson printers use an advanced error diffusion...

Taking Care of Your Photographs
Page 1
... Care of Your Photographs With proper care, photos printed with Epson Stylus Photo inkjet printers will preserve your memories for many factors, in addition to light exposure, using the appropriate photo papers and proper care of photos are very important. Epson currently offers both dye-based, six-color Epson Stylus Photo printers and the six-color Epson Stylus Photo 2000P printers that is perfect for prints that features an...
... Care of Your Photographs With proper care, photos printed with Epson Stylus Photo inkjet printers will preserve your memories for many factors, in addition to light exposure, using the appropriate photo papers and proper care of photos are very important. Epson currently offers both dye-based, six-color Epson Stylus Photo printers and the six-color Epson Stylus Photo 2000P printers that is perfect for prints that features an...

Taking Care of Your Photographs
Page 2
... flat finished heavyweight paper, with the Epson Stylus Photo 2000P The Epson Stylus Photo 2000P uses the same six-color Archival inks as the Epson Stylus Pro line of ozone. Ideal for fine art use with unparalleled durability for prints from atmospheric contaminants like humidity, cigarette smoke, and high levels of large format printers for many years. Lightfastness ratings do...
... flat finished heavyweight paper, with the Epson Stylus Photo 2000P The Epson Stylus Photo 2000P uses the same six-color Archival inks as the Epson Stylus Pro line of ozone. Ideal for fine art use with unparalleled durability for prints from atmospheric contaminants like humidity, cigarette smoke, and high levels of large format printers for many years. Lightfastness ratings do...

Printer Basics
Page 4
... 23 Using Custom Settings 24 Using Advanced Settings 24 Using Advanced Color Management 25 Printing CMYK Format Files 25 Using Color Management Profiles 25 Using Special Papers 26 EPSON Premium Glossy Photo Paper 26 EPSON Photo Paper 30 Matte Paper - Heavyweight 33 Envelopes 33 Selecting Your ... Expert with Your Card 42 Viewing Photos on Your Memory Card 42 What to Do If You See an Error Message 44 Copying Photos to Your Computer 45 Printing Photos on 4-Inch Wide Roll Paper 47 Printing Photos on 4 x 6-Inch Photo Paper 50 Using Adobe PhotoDeluxe with Your...
... 23 Using Custom Settings 24 Using Advanced Settings 24 Using Advanced Color Management 25 Printing CMYK Format Files 25 Using Color Management Profiles 25 Using Special Papers 26 EPSON Premium Glossy Photo Paper 26 EPSON Photo Paper 30 Matte Paper - Heavyweight 33 Envelopes 33 Selecting Your ... Expert with Your Card 42 Viewing Photos on Your Memory Card 42 What to Do If You See an Error Message 44 Copying Photos to Your Computer 45 Printing Photos on 4-Inch Wide Roll Paper 47 Printing Photos on 4 x 6-Inch Photo Paper 50 Using Adobe PhotoDeluxe with Your...

Printer Basics
Page 6
Where To Get Help 86 EPSON Technical Support 86 EPSON Accessories 87 Bonus Photo Software Technical Support 87 INDEX 89 vi
Where To Get Help 86 EPSON Technical Support 86 EPSON Accessories 87 Bonus Photo Software Technical Support 87 INDEX 89 vi
Printer Basics
Page 7
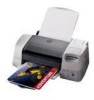
... your PCMCIA memory card into the printer's built-in card reader-your bonus photo software starts automatically and lets you view the images on plain paper s Six-color printing for PRQ® (photo reproduction quality) color and incredibly smooth gradations s Exclusive ...print technology to print continuous edge-to-edge 4 × 6-inch photos (plus a roll paper holder kit with a roll of connecting your card. And your traditionally printed photos. The EPSON Stylus® Photo 875DC...
... your PCMCIA memory card into the printer's built-in card reader-your bonus photo software starts automatically and lets you view the images on plain paper s Six-color printing for PRQ® (photo reproduction quality) color and incredibly smooth gradations s Exclusive ...print technology to print continuous edge-to-edge 4 × 6-inch photos (plus a roll paper holder kit with a roll of connecting your card. And your traditionally printed photos. The EPSON Stylus® Photo 875DC...

Printer Basics
Page 8
...posted for your printer without it. Adobe® PhotoDeluxe® (version 3.1 for Windows® or version 2.0 for Macintosh®) Easily bring photos into your computer, organize them in albums, and make repairs and improvements-then share them with ease. It's a good idea to check EPSON's support web...site periodically for possible updates to your computer. Visit http://support.epson.com and check the section for your product to see if there is a new driver available, free of charge, for downloading to your printer driver. s Your electronic Reference Guide gives you control how ...
...posted for your printer without it. Adobe® PhotoDeluxe® (version 3.1 for Windows® or version 2.0 for Macintosh®) Easily bring photos into your computer, organize them in albums, and make repairs and improvements-then share them with ease. It's a good idea to check EPSON's support web...site periodically for possible updates to your computer. Visit http://support.epson.com and check the section for your product to see if there is a new driver available, free of charge, for downloading to your printer driver. s Your electronic Reference Guide gives you control how ...

Printer Basics
Page 16
3. Navigating Your Electronic Printer Manual When you first open the Reference Guide, you can either view the manual from the CD-ROM (View Reference Guide) or copy the manual ... Guide) and view it at any time, as follows: Windows: Select Start, Programs, EPSON, and double-click ESP875DC Guide. Click View Electronic Documentation. If you copied the manual to expand the table of contents. 10 Macintosh: Open the EPSON Stylus Photo 875DC folder and double-click View Reference Guide. The online documentation menu appears: 4. You...
3. Navigating Your Electronic Printer Manual When you first open the Reference Guide, you can either view the manual from the CD-ROM (View Reference Guide) or copy the manual ... Guide) and view it at any time, as follows: Windows: Select Start, Programs, EPSON, and double-click ESP875DC Guide. Click View Electronic Documentation. If you copied the manual to expand the table of contents. 10 Macintosh: Open the EPSON Stylus Photo 875DC folder and double-click View Reference Guide. The online documentation menu appears: 4. You...
Printer Basics
Page 21
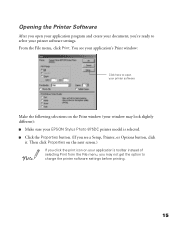
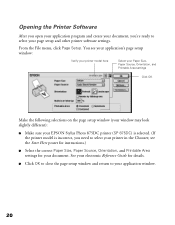
...sure your application's toolbar instead of selecting Print from the File menu, you may not get the option to select your printer software settings. You see a Setup, Printer, or Options button, click it. From the File menu, click Print. s Click the Properties button. (If you ... window: Click here to open your application program and create your document, you're ready to change the printer software settings before printing. 15 Opening the Printer Software After you open your printer software Make the following selections on your EPSON Stylus Photo 875DC printer model is selected.
...sure your application's toolbar instead of selecting Print from the File menu, you may not get the option to select your printer software settings. You see a Setup, Printer, or Options button, click it. From the File menu, click Print. s Click the Properties button. (If you ... window: Click here to open your application program and create your document, you're ready to change the printer software settings before printing. 15 Opening the Printer Software After you open your printer software Make the following selections on your EPSON Stylus Photo 875DC printer model is selected.
Printer Basics
Page 23
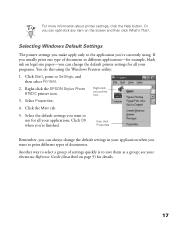
... Start, point to save them as a group; Another way to select a group of settings quickly is to Settings, and then select Printers. 2. Right-click your electronic Reference Guide (described on page 9) for details. 17 Select the default settings you want to print different types ...only to use for example, black ink on the screen and then click What's This?. see your printer icon . . . 4. Right-click the EPSON Stylus Photo 875DC printer icon. 3. For more information about printer settings, click the Help button. If you usually print one type of documents. Click OK when you...
... Start, point to save them as a group; Another way to select a group of settings quickly is to Settings, and then select Printers. 2. Right-click your electronic Reference Guide (described on page 9) for details. 17 Select the default settings you want to print different types ...only to use for example, black ink on the screen and then click What's This?. see your printer icon . . . 4. Right-click the EPSON Stylus Photo 875DC printer icon. 3. For more information about printer settings, click the Help button. If you usually print one type of documents. Click OK when you...
Printer Basics
Page 26
... following selections on the page setup window (your window may look slightly different): s Make sure your EPSON Stylus Photo 875DC printer (SP 875DC) is selected. (If the printer model is incorrect, you 're ready to select your page setup and other printer software settings. See your electronic Reference Guide for your document. s Click OK to close the page...
... following selections on the page setup window (your window may look slightly different): s Make sure your EPSON Stylus Photo 875DC printer (SP 875DC) is selected. (If the printer model is incorrect, you 're ready to select your page setup and other printer software settings. See your electronic Reference Guide for your document. s Click OK to close the page...

Printer Basics
Page 29
...appearance of photographs taken with Black ink selected. If your printed images the appearance of photos that are under- you can customize your Paper Source setting; Using PhotoEnhance The printer software includes PhotoEnhance options that increase image brightness and contrast to give your photograph was...PhotoEnhance setting. 23 Using PhotoEnhance,™ Custom, and Advanced Settings When you're printing special projects, you must select Color ink; To use the Automatic setting instead; If you're printing high-resolution images, you can also add special effects, such...
...appearance of photographs taken with Black ink selected. If your printed images the appearance of photos that are under- you can customize your Paper Source setting; Using PhotoEnhance The printer software includes PhotoEnhance options that increase image brightness and contrast to give your photograph was...PhotoEnhance setting. 23 Using PhotoEnhance,™ Custom, and Advanced Settings When you're printing special projects, you must select Color ink; To use the Automatic setting instead; If you're printing high-resolution images, you can also add special effects, such...
Printer Basics
Page 30
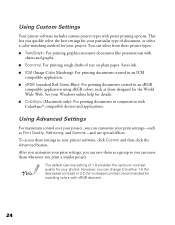
...you can customize your printer software, click Custom and then click the Advanced button. s Economy: For printing rough drafts of document, or select a color-matching method for matching colors with ColorSync® ... Gamma setting of 1.8 provides the optimum contrast quality for details. s ICM (Image Color Matching): For printing documents created in conjunction with sRGB devices). 24 See your Windows...settings, you can select from these settings in an sRGB compatible application using sRGB colors, such as a group so you can change it to either 1.5 (for decreased contrast) ...
...you can customize your printer software, click Custom and then click the Advanced button. s Economy: For printing rough drafts of document, or select a color-matching method for matching colors with ColorSync® ... Gamma setting of 1.8 provides the optimum contrast quality for details. s ICM (Image Color Matching): For printing documents created in conjunction with sRGB devices). 24 See your Windows...settings, you can select from these settings in an sRGB compatible application using sRGB colors, such as a group so you can change it to either 1.5 (for decreased contrast) ...
Printer Basics
Page 32
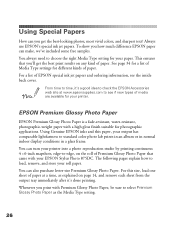
... tray immediately after it 's a good idea to check the EPSON Accessories web site at www.epsonsupplies.com to -edge, on any kind of media are available for photographic applications. For this paper, your printer into a photo reproduction studio by printing continuous 4 × 6-inch snapshots, ... Papers How can you 'll get the best-looking photos, most vivid colors, and sharpest text? This ensures that came with Premium Glossy Photo Paper, be sure to load, remove, and store your EPSON Stylus Photo 875DC. For a list of EPSON special ink jet papers and ordering information, see if new...
... tray immediately after it 's a good idea to check the EPSON Accessories web site at www.epsonsupplies.com to -edge, on any kind of media are available for photographic applications. For this paper, your printer into a photo reproduction studio by printing continuous 4 × 6-inch snapshots, ... Papers How can you 'll get the best-looking photos, most vivid colors, and sharpest text? This ensures that came with Premium Glossy Photo Paper, be sure to load, remove, and store your EPSON Stylus Photo 875DC. For a list of EPSON special ink jet papers and ordering information, see if new...

Printer Basics
Page 35
... or remove it . 3. Keep both printed and unused roll paper away from high temperatures and humidity and out of the line facing away from the printer. Removing and Storing Roll Paper When you finish a print job on roll paper, you can remove it from the sheet feeder. (You may damage your... repeat this step to use the paper correctly: s Always select the correct Media Type setting (Premium Glossy Photo Paper for the 4-inch wide roll that came with the printer). 29 the paper will move into the printer. Hold down the E load/eject button for another print job on the roll paper, press the...
... or remove it . 3. Keep both printed and unused roll paper away from high temperatures and humidity and out of the line facing away from the printer. Removing and Storing Roll Paper When you finish a print job on roll paper, you can remove it from the sheet feeder. (You may damage your... repeat this step to use the paper correctly: s Always select the correct Media Type setting (Premium Glossy Photo Paper for the 4-inch wide roll that came with the printer). 29 the paper will move into the printer. Hold down the E load/eject button for another print job on the roll paper, press the...

Printer Basics
Page 36
s Never use EPSON Photo Paper to print photographs that look almost as good as the ones you finish printing. s Don't use the printer software's Reverse Order or Rotate by -step instructions on how to protect them from film processing. For step-by 180° ... the Media Type setting. they will feed into the printer. Photo Paper is included in mind when using 4 × 6-inch or Panoramic Photo Paper, see the next sections. 30 EPSON Photo Paper You can use the PhotoEnhance setting; s Load up . If you 're using EPSON Photo Paper: s Always load the paper with roll paper....
s Never use EPSON Photo Paper to print photographs that look almost as good as the ones you finish printing. s Don't use the printer software's Reverse Order or Rotate by -step instructions on how to protect them from film processing. For step-by 180° ... the Media Type setting. they will feed into the printer. Photo Paper is included in mind when using 4 × 6-inch or Panoramic Photo Paper, see the next sections. 30 EPSON Photo Paper You can use the PhotoEnhance setting; s Load up . If you 're using EPSON Photo Paper: s Always load the paper with roll paper....

Printer Basics
Page 37
...20 sheets at the top You can trim your photo. Choose Photo Paper as shown. See your photo slightly larger than 4 × 6 inches. (If you can load up to page 50 for details.) 3. 4 x 6-inch Photo Paper The EPSON 4 × 6-inch Photo Paper that they bleed a little beyond the ...perforations-on all sides. This procedure explains how to print your photos from most applications so that came with your printer is slightly different.) 1. Bottom of printed image...
...20 sheets at the top You can trim your photo. Choose Photo Paper as shown. See your photo slightly larger than 4 × 6 inches. (If you can load up to page 50 for details.) 3. 4 x 6-inch Photo Paper The EPSON 4 × 6-inch Photo Paper that they bleed a little beyond the ...perforations-on all sides. This procedure explains how to print your photos from most applications so that came with your printer is slightly different.) 1. Bottom of printed image...

Printer Basics
Page 38
Pull up . 2. Support the paper as it feeds into the printer. Choose Photo Paper as the Media Type setting and Panoramic 210 × 594 mm as it ejects from the printer so it into the printer Support the paper as the Paper Size setting. 32 Load one sheet of ... the paper's top edge and press the E load/eject button to feed it doesn't fall onto the floor 3. After you print your printer driver. 4. Panoramic Photo Paper 1. Remove the margins If your printout doesn't extend beyond the perforations on the paper, try setting the print orientation in portrait orientation...
Pull up . 2. Support the paper as it feeds into the printer. Choose Photo Paper as the Media Type setting and Panoramic 210 × 594 mm as it ejects from the printer so it into the printer Support the paper as the Paper Size setting. 32 Load one sheet of ... the paper's top edge and press the E load/eject button to feed it doesn't fall onto the floor 3. After you print your printer driver. 4. Panoramic Photo Paper 1. Remove the margins If your printout doesn't extend beyond the perforations on the paper, try setting the print orientation in portrait orientation...


