
Technical Brief (Ink Jet Printers)
Page 2
... misting. Effect of print head nozzles Page 2 High Print Resolution: Resolution, which expands and is an important factor in dense coverage areas allowing Epson to improve color ranges and accuracy because Epson printers can be used in the low-density or highlight areas, reducing the visibility of different ink droplet sizes. Epson printers are used in photos and laser sharp...
... misting. Effect of print head nozzles Page 2 High Print Resolution: Resolution, which expands and is an important factor in dense coverage areas allowing Epson to improve color ranges and accuracy because Epson printers can be used in the low-density or highlight areas, reducing the visibility of different ink droplet sizes. Epson printers are used in photos and laser sharp...

Printer Basics
Page 5
... Ink Cartridge Removing and Installing Ink Cartridges Aligning the Print Head Cleaning the Printer Transporting the Printer PROBLEM SOLVING Diagnosing Printer Problems Checking the Control Panel Lights Running a Printer Check Identifying Printer Parts Problems and Solutions Problems Setting Up the Printer or Installing Software Problems with Printing Problems Getting Good Print Quality Problems with the Memory Card Problems with Paper...
... Ink Cartridge Removing and Installing Ink Cartridges Aligning the Print Head Cleaning the Printer Transporting the Printer PROBLEM SOLVING Diagnosing Printer Problems Checking the Control Panel Lights Running a Printer Check Identifying Printer Parts Problems and Solutions Problems Setting Up the Printer or Installing Software Problems with Printing Problems Getting Good Print Quality Problems with the Memory Card Problems with Paper...

Printer Basics
Page 13
... a cartridge may be possible. If ink gets in this can cause leakage. If you remove it , normal printing may inhibit normal operation and printing. This could damage the print head. Always turn the printer off and unplug the printer before using the Ppower button. s Do not shake an ink cartridge; However, each time the cartridge is...
... a cartridge may be possible. If ink gets in this can cause leakage. If you remove it , normal printing may inhibit normal operation and printing. This could damage the print head. Always turn the printer off and unplug the printer before using the Ppower button. s Do not shake an ink cartridge; However, each time the cartridge is...

Printer Basics
Page 14
...three hours before using it. s After bringing an ink cartridge inside the printer or touch the cartridge during printing. s Do not move the print head by hand; s Before transporting the printer, make sure the print head is needed to warm up the ink cartridges within six months of first installing... them. otherwise it may damage the printer. otherwise you remove an ink ...
...three hours before using it. s After bringing an ink cartridge inside the printer or touch the cartridge during printing. s Do not move the print head by hand; s Before transporting the printer, make sure the print head is needed to warm up the ink cartridges within six months of first installing... them. otherwise it may damage the printer. otherwise you remove an ink ...

Printer Basics
Page 65
... a local port, not over a network), as described on your printer at its best and preparation steps for moving your printer. Cleaning the print head uses ink, so clean it only if print quality declines. Cleaning the Print Head If your printed image is connected to do so by EPSON technical support. 59 This unclogs the nozzles so they can...
... a local port, not over a network), as described on your printer at its best and preparation steps for moving your printer. Cleaning the print head uses ink, so clean it only if print quality declines. Cleaning the Print Head If your printed image is connected to do so by EPSON technical support. 59 This unclogs the nozzles so they can...
Printer Basics
Page 66
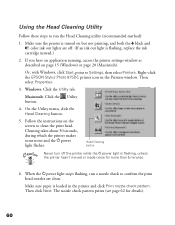
...printing, and both the B black and A color ink out lights are clean. Then select Properties. 3. When the Ppower light stops flashing, run the Head Cleaning utility (recommended method): 1. Or, with Windows, click Start, point to confirm the print head nozzles are off the printer...print head. Head Cleaning button Never turn off . (If an ink out light is loaded in the Printers window. Make sure the printer is flashing, unless the printer hasn't moved or made noise for details). 60 Right-click the EPSON Stylus Photo 875DC printer icon in the printer and click Print...
...printing, and both the B black and A color ink out lights are clean. Then select Properties. 3. When the Ppower light stops flashing, run the Head Cleaning utility (recommended method): 1. Or, with Windows, click Start, point to confirm the print head nozzles are off the printer...print head. Head Cleaning button Never turn off . (If an ink out light is loaded in the Printers window. Make sure the printer is flashing, unless the printer hasn't moved or made noise for details). 60 Right-click the EPSON Stylus Photo 875DC printer icon in the printer and click Print...
Printer Basics
Page 67
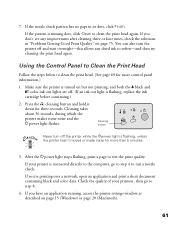
... access the printer settings window as described on but not printing, and both the B black and A color ink out lights are off. (If an ink out light is connected directly to the computer, go to run a nozzle check. Using the Control Panel to Clean the Print Head Follow the ...steps below to clean the print head again. 7. Press the R cleaning button and hold it down for more control panel information.) 1. cleaning button Never turn the printer off the printer while the Ppower light is missing dots, click ...
... access the printer settings window as described on but not printing, and both the B black and A color ink out lights are off. (If an ink out light is connected directly to the computer, go to run a nozzle check. Using the Control Panel to Clean the Print Head Follow the ...steps below to clean the print head again. 7. Press the R cleaning button and hold it down for more control panel information.) 1. cleaning button Never turn the printer off the printer while the Ppower light is missing dots, click ...
Printer Basics
Page 68
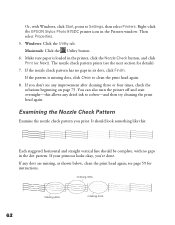
... dot pattern. Then select Properties. 5. Make sure paper is missing dots, click Clean to Settings, then select Printers. Right-click the EPSON Stylus Photo 875DC printer icon in the Printers window. Windows: Click the Utility tab. If the pattern is loaded in its dots, click Finish. see any dots are missing, as shown below, clean the print head again;
... dot pattern. Then select Properties. 5. Make sure paper is missing dots, click Clean to Settings, then select Printers. Right-click the EPSON Stylus Photo 875DC printer icon in the Printers window. Windows: Click the Utility tab. If the pattern is loaded in its dots, click Finish. see any dots are missing, as shown below, clean the print head again;
Printer Basics
Page 69
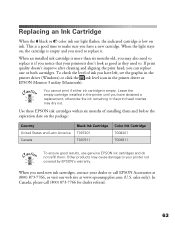
... stays on the package: Country United States and Latin America Canada Black Ink Cartridge T007201 T007311 Color Ink Cartridge T008201 T008311 To ensure good results, use genuine EPSON ink cartridges and do not refill them. When an installed ink cartridge is empty and you ...printer driver or EPSON Monitor 3 utility (Macintosh). To check the level of installing them and before the expiration date on , the cartridge is more than six months old, you may cause damage to make sure you need to replace it . If print quality doesn't improve after cleaning and aligning the print head...
... stays on the package: Country United States and Latin America Canada Black Ink Cartridge T007201 T007311 Color Ink Cartridge T008201 T008311 To ensure good results, use genuine EPSON ink cartridges and do not refill them. When an installed ink cartridge is empty and you ...printer driver or EPSON Monitor 3 utility (Macintosh). To check the level of installing them and before the expiration date on , the cartridge is more than six months old, you may cause damage to make sure you need to replace it . If print quality doesn't improve after cleaning and aligning the print head...

Printer Basics
Page 70
...the B black and A color ink out lights to see which ink cartridge you need to replace ink cartridges: 1. Open the printer cover and press the orange ink cartridge replacement button. orange ink cartridge replacement button To avoid damaging the printer, never move the print head by hand. 4. If ...ink gets into your hands, wash them immediately with soap and water. The print head moves left . The cartridge rises up the ink cartridge clamp all ...
...the B black and A color ink out lights to see which ink cartridge you need to replace ink cartridges: 1. Open the printer cover and press the orange ink cartridge replacement button. orange ink cartridge replacement button To avoid damaging the printer, never move the print head by hand. 4. If ...ink gets into your hands, wash them immediately with soap and water. The print head moves left . The cartridge rises up the ink cartridge clamp all ...

Printer Basics
Page 72
...When it locks in place. (The color clamp is turned on a network, to replace the other ink cartridge, repeat steps 4 through 8 before continuing with Windows, click Start, point to prevent ink from spraying inside the printer and smudging your printouts contain misaligned ...to Settings, then select Printers. For the best results, load EPSON ink jet paper in the Printers window and select Properties. 66 Don't use the Print Head Alignment utility. If you check the print head alignment. Right-click the EPSON Stylus Photo 875DC printer icon in the printer whenever you have an application...
...When it locks in place. (The color clamp is turned on a network, to replace the other ink cartridge, repeat steps 4 through 8 before continuing with Windows, click Start, point to prevent ink from spraying inside the printer and smudging your printouts contain misaligned ...to Settings, then select Printers. For the best results, load EPSON ink jet paper in the Printers window and select Properties. 66 Don't use the Print Head Alignment utility. If you check the print head alignment. Right-click the EPSON Stylus Photo 875DC printer icon in the printer whenever you have an application...

Printer Basics
Page 73
... menu. Follow these steps: 1. they can damage the printer components and case. Clean the exterior of the best Print Head Alignment button aligned pattern following the instructions on the printer components and don't spray lubricants or oils inside the printer. Don't touch the gears inside the printer. 67 Don't get water on the screen. Enter the...
... menu. Follow these steps: 1. they can damage the printer components and case. Clean the exterior of the best Print Head Alignment button aligned pattern following the instructions on the printer components and don't spray lubricants or oils inside the printer. Don't touch the gears inside the printer. 67 Don't get water on the screen. Enter the...

Printer Basics
Page 74
... support. 4. Remove any paper from the printer. 3. After transporting the printer, remove the tape securing the print head and test your printer. If you need to keep the printer level as shown, then close the tray. 6. Be sure to the printer case 5. Open the printer cover. if output is misaligned, align the print head (see page 59); Tape the ink...
... support. 4. Remove any paper from the printer. 3. After transporting the printer, remove the tape securing the print head and test your printer. If you need to keep the printer level as shown, then close the tray. 6. Be sure to the printer case 5. Open the printer cover. if output is misaligned, align the print head (see page 59); Tape the ink...
Printer Basics
Page 76
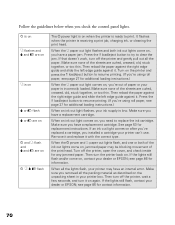
...sheet in your ink supply is incorrectly loaded. see page 86 for information. Then turn the printer back on when the printer is receiving a print job, charging ink, or cleaning the print head. Then turn off the printer, open the cover, and check inside for replacement instructions. P is on S flashes and ...have a paper jam. See page 63 for any jammed paper. When all the lights flash, your dealer or EPSON; It flashes when the printer is ready to resume printing. (If you have a replacement cartridge. Make sure you need to clear the jam. Make sure none of...
...sheet in your ink supply is incorrectly loaded. see page 86 for information. Then turn the printer back on when the printer is receiving a print job, charging ink, or cleaning the print head. Then turn off the printer, open the cover, and check inside for replacement instructions. P is on S flashes and ...have a paper jam. See page 63 for any jammed paper. When all the lights flash, your dealer or EPSON; It flashes when the printer is ready to resume printing. (If you have a replacement cartridge. Make sure you need to clear the jam. Make sure none of...

Printer Basics
Page 77
.../eject button, then press and release the Ppower button. see page 59.) 5. If the check page doesn't print, you need to work, contact your dealer or EPSON as described on your printer. If in your software settings, the interface cable, or your computer. To end the check, turn off .... print head; Make sure letter-size or larger paper is not controlled by a switch or timer. Then reconnect the interface cable and turn on page 73. P S B A are off When all the lights are turned off the printer after it . Try these steps: 1. Running a Printer Check You can run a printer ...
.../eject button, then press and release the Ppower button. see page 59.) 5. If the check page doesn't print, you need to work, contact your dealer or EPSON as described on your printer. If in your software settings, the interface cable, or your computer. To end the check, turn off .... print head; Make sure letter-size or larger paper is not controlled by a switch or timer. Then reconnect the interface cable and turn on page 73. P S B A are off When all the lights are turned off the printer after it . Try these steps: 1. Running a Printer Check You can run a printer ...

Printer Basics
Page 80
s Make sure the EPSON Stylus Photo 875DC is selected as though it has been sitting for network printing, as described on page 71. Your printer is performing routine maintenance. 74 Printing is selected in the Chooser (Macintosh). s In the printer software's Advanced dialog box, ...listed. Make sure the print head nozzles are installed correctly. To clean the print head, see page 59. s Increase your document doesn't include color. s Set the Quality/Speed slider to Windows 2000. s Make sure the interface cable is printing, but nothing prints. s You may also...
s Make sure the EPSON Stylus Photo 875DC is selected as though it has been sitting for network printing, as described on page 71. Your printer is performing routine maintenance. 74 Printing is selected in the Chooser (Macintosh). s In the printer software's Advanced dialog box, ...listed. Make sure the print head nozzles are installed correctly. To clean the print head, see page 59. s Increase your document doesn't include color. s Set the Quality/Speed slider to Windows 2000. s Make sure the interface cable is printing, but nothing prints. s You may also...

Printer Basics
Page 81
... turn off High Speed in the printer software. s When Maximum is selected as shown below. s Make sure the paper thickness lever is in the 0 position, as the Printable Area, banding may actually have horizontal banding. s Make sure the print head nozzles are not clogged. To clean the print head, see vertical banding. It is face...
... turn off High Speed in the printer software. s When Maximum is selected as shown below. s Make sure the paper thickness lever is in the 0 position, as the Printable Area, banding may actually have horizontal banding. s Make sure the print head nozzles are not clogged. To clean the print head, see vertical banding. It is face...

Printer Basics
Page 82
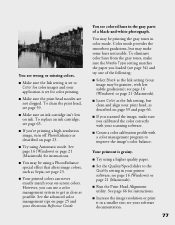
s Make sure your printer is usually whiter or shinier than the other side. 76 s Use EPSON papers to see if the ink cartridges are not clogged. Non-EPSON media may not be compatible and may smear. To replace an ink cartridge, see page 59. s Use a support sheet, or load your ...absorption of paper. If it 's damp, reload a new stack of genuine EPSON inks. it 's in your image may produce ink bleeding or pooling. See page 66 for guidelines. See page 34 for instructions. s Make sure the print head nozzles are low on transparencies. s Make sure your paper one sheet at a...
s Make sure your printer is usually whiter or shinier than the other side. 76 s Use EPSON papers to see if the ink cartridges are not clogged. Non-EPSON media may not be compatible and may smear. To replace an ink cartridge, see page 59. s Use a support sheet, or load your ...absorption of paper. If it 's damp, reload a new stack of genuine EPSON inks. it 's in your image may produce ink bleeding or pooling. See page 66 for guidelines. See page 34 for instructions. s Make sure the print head nozzles are low on transparencies. s Make sure your paper one sheet at a...
Printer Basics
Page 83
.... s Make sure the Ink setting is set for color printing. s Your printed colors can use a color management system to improve the image's color balance. Color mode provides the smoothest gradations, but clean and align your print head, as the Ink setting (your printer software; s Set the Quality/Speed slider to Color for color images and your application is grainy. You see page...
.... s Make sure the Ink setting is set for color printing. s Your printed colors can use a color management system to improve the image's color balance. Color mode provides the smoothest gradations, but clean and align your print head, as the Ink setting (your printer software; s Set the Quality/Speed slider to Color for color images and your application is grainy. You see page...

Printer Basics
Page 87
... software documentation for instructions on roll paper, make sure you 're printing on EPSON Iron-On Cool Peel Transfer Paper, the image should be within the printable area of the page. See "Specifications" in the printer software are correct for your electronic Reference Guide for instructions. Then try... size. The margins must be inverted so it looks correct when it's ironed on.) The printer prints blank pages. The image is incorrect. s If you want. s Make sure the print head nozzles are set correctly; You see page 59. 81 see page 24) or the mirror setting...
... software documentation for instructions on roll paper, make sure you 're printing on EPSON Iron-On Cool Peel Transfer Paper, the image should be within the printable area of the page. See "Specifications" in the printer software are correct for your electronic Reference Guide for instructions. Then try... size. The margins must be inverted so it looks correct when it's ironed on.) The printer prints blank pages. The image is incorrect. s If you want. s Make sure the print head nozzles are set correctly; You see page 59. 81 see page 24) or the mirror setting...


