
Printer Basics
Page 5
MAINTAINING YOUR PRINTER Cleaning the Print Head Using the Head Cleaning Utility Using the Control Panel to Clean the Print Head Examining the Nozzle Check Pattern Replacing an Ink Cartridge Removing and Installing Ink Cartridges Aligning the Print Head Cleaning the Printer Transporting the Printer PROBLEM SOLVING Diagnosing Printer Problems Checking the Control Panel Lights Running a Printer Check Identifying Printer Parts Problems and Solutions Problems...
MAINTAINING YOUR PRINTER Cleaning the Print Head Using the Head Cleaning Utility Using the Control Panel to Clean the Print Head Examining the Nozzle Check Pattern Replacing an Ink Cartridge Removing and Installing Ink Cartridges Aligning the Print Head Cleaning the Printer Transporting the Printer PROBLEM SOLVING Diagnosing Printer Problems Checking the Control Panel Lights Running a Printer Check Identifying Printer Parts Problems and Solutions Problems...

Printer Basics
Page 13
... this can cause leakage. If you remove it , normal printing may inhibit normal operation and printing. This could damage the print head. s Turn off . Don't switch off the power strip or unplug the printer until the Ppower light is off and unplug the printer before using the Ppower button. if the printer has been dropped or the case...
... this can cause leakage. If you remove it , normal printing may inhibit normal operation and printing. This could damage the print head. s Turn off . Don't switch off the power strip or unplug the printer until the Ppower light is off and unplug the printer before using the Ppower button. if the printer has been dropped or the case...

Printer Basics
Page 14
otherwise it . s Before transporting the printer, make sure the print head is needed to protect the ink supply area from dirt and dust, and store it to warm up the ink cartridges within six months of ..., but care is capped in the far right position and the ink cartridges are in a cool, dark place. s Do not move the print head by hand; s If you may result in the same environment as the printer. otherwise you remove an ink cartridge for at least three hours before using it may damage the...
otherwise it . s Before transporting the printer, make sure the print head is needed to protect the ink supply area from dirt and dust, and store it to warm up the ink cartridges within six months of ..., but care is capped in the far right position and the ink cartridges are in a cool, dark place. s Do not move the print head by hand; s If you may result in the same environment as the printer. otherwise you remove an ink cartridge for at least three hours before using it may damage the...

Printer Basics
Page 70
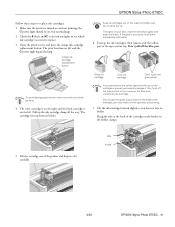
... ink cartridge replacement button To avoid damaging the printer, never move the print head by hand. 4. Lift the cartridge out of the printer and dispose of children and do not drink the ink. Follow these steps to replace ink cartridges: 1. The color cartridge is on the right and the black ...up from its holder. 5. Check the B black and A color ink out lights to see which ink cartridge you begin. Open the printer cover and press the orange ink cartridge replacement button. If ink gets on , but not flashing). 2. Removing and Installing Ink Cartridges Be sure you have a new ink...
... ink cartridge replacement button To avoid damaging the printer, never move the print head by hand. 4. Lift the cartridge out of the printer and dispose of children and do not drink the ink. Follow these steps to replace ink cartridges: 1. The color cartridge is on the right and the black ...up from its holder. 5. Check the B black and A color ink out lights to see which ink cartridge you begin. Open the printer cover and press the orange ink cartridge replacement button. If ink gets on , but not flashing). 2. Removing and Installing Ink Cartridges Be sure you have a new ink...

Printer Basics
Page 73
..., damp cloth. 5. Follow these steps: 1. Cleaning the Printer To keep your print head completely. Clean ink out of the best Print Head Alignment button aligned pattern following the instructions on the printer components and don't spray lubricants or oils inside the printer. Don't get water on the screen. 3. Macintosh: Click...thinner for the Ppower light to go out. 2. Unplug the power cord and disconnect the printer cable. 3. Remove all the paper from the choices on the screen to align your printer working at its best, you should clean it several times a year. You see the ...
..., damp cloth. 5. Follow these steps: 1. Cleaning the Printer To keep your print head completely. Clean ink out of the best Print Head Alignment button aligned pattern following the instructions on the printer components and don't spray lubricants or oils inside the printer. Don't get water on the screen. 3. Macintosh: Click...thinner for the Ppower light to go out. 2. Unplug the power cord and disconnect the printer cable. 3. Remove all the paper from the choices on the screen to align your printer working at its best, you should clean it several times a year. You see the ...

Printer Basics
Page 74
... it. After transporting the printer, remove the tape securing the print head and test your printer. Be sure to remove the tape used in step 4 after installing the printer in the output tray extensions and close the printer cover. Turn on the printer, wait until the print head locks in print quality, clean the print head (see page 66). 68 Remove any paper from the...
... it. After transporting the printer, remove the tape securing the print head and test your printer. Be sure to remove the tape used in step 4 after installing the printer in the output tray extensions and close the printer cover. Turn on the printer, wait until the print head locks in print quality, clean the print head (see page 66). 68 Remove any paper from the...
Printer Basics
Page 76
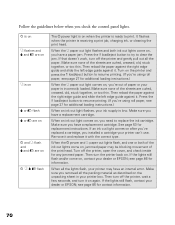
...on again. It flashes when the printer is ready to print. Press the E load/eject button to replace the ink cartridge. See page 63 for any jammed paper. When the S paper out light flashes and both of paper or your dealer or EPSON; Remove it and replace it on the ... see page 27 for contact information. 70 Make sure you removed all the lights flash, your printer may be blocking movement of the print head. If an ink out light comes on when the printer is receiving a print job, charging ink, or cleaning the print head. Make sure none of the sheets are curled, creased, ...
...on again. It flashes when the printer is ready to print. Press the E load/eject button to replace the ink cartridge. See page 63 for any jammed paper. When the S paper out light flashes and both of paper or your dealer or EPSON; Remove it and replace it on the ... see page 27 for contact information. 70 Make sure you removed all the lights flash, your printer may be blocking movement of the print head. If an ink out light comes on when the printer is receiving a print job, charging ink, or cleaning the print head. Make sure none of the sheets are curled, creased, ...

Printer Basics
Page 82
... printer is set the paper thickness lever to the 0 position. s Use EPSON papers to see if the ink cartridges are not clogged. Non-EPSON ...Remove each sheet from the output tray after printing, especially when you loaded. s Make sure the Media Type setting matches the paper you 're printing on ink. If it is faint or has gaps in your paper isn't damaged, old, dirty, or loaded face down . s Make sure the print head...absorption of genuine EPSON inks. s Use a support sheet, or load your paper isn't damp or loaded face down . s Run the Print Head Alignment utility. s...
... printer is set the paper thickness lever to the 0 position. s Use EPSON papers to see if the ink cartridges are not clogged. Non-EPSON ...Remove each sheet from the output tray after printing, especially when you loaded. s Make sure the Media Type setting matches the paper you 're printing on ink. If it is faint or has gaps in your paper isn't damaged, old, dirty, or loaded face down . s Make sure the print head...absorption of genuine EPSON inks. s Use a support sheet, or load your paper isn't damp or loaded face down . s Run the Print Head Alignment utility. s...

Printer Basics
Page 97
...card, 42 to 44 PhotoStarter, 41 Premium Glossy Photo Paper, 26 to 30, 34 Previewing, 18, 22 Print dialog box, 15, 18 Print head aligning, 66 to 67 cleaning, 59 to 62 Print Head Alignment utility, 66 to 67 Print quality problems, 75 to 77 Printable Area setting, 20, 32 Printer cable, 4 to 5 check, 71 cleaning,... mode, 56 to 57 Reference Guide, 9 to 11 Reinstalling software, 85 Removing a memory card, 40 to 41 Removing roll paper, 29 Roll paper, 27 to 30, 34 loading, 27 to 28 printing edge-to-edge, 47 to 49 removing, 29 RW Switcher, EPSON USB, 55 to 57, 79 S Safety instructions, 6 to 8 Saving ...
...card, 42 to 44 PhotoStarter, 41 Premium Glossy Photo Paper, 26 to 30, 34 Previewing, 18, 22 Print dialog box, 15, 18 Print head aligning, 66 to 67 cleaning, 59 to 62 Print Head Alignment utility, 66 to 67 Print quality problems, 75 to 77 Printable Area setting, 20, 32 Printer cable, 4 to 5 check, 71 cleaning,... mode, 56 to 57 Reference Guide, 9 to 11 Reinstalling software, 85 Removing a memory card, 40 to 41 Removing roll paper, 29 Roll paper, 27 to 30, 34 loading, 27 to 28 printing edge-to-edge, 47 to 49 removing, 29 RW Switcher, EPSON USB, 55 to 57, 79 S Safety instructions, 6 to 8 Saving ...
Product Information Guide
Page 4
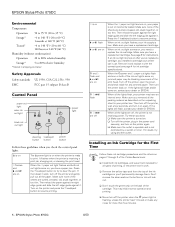
... Panel paper out light color ink out light black ink out light power light cleaning load/eject button button power button Follow these solutions: t Make sure the printer is low. EPSON Stylus Photo 875DC 4/00 Turn off , the printer is not controlled by a switch or timer. Installing an Ink Cartridge for instructions. EPSON Stylus Photo 875DC Environmental Temperature Operation 50 to...
... Panel paper out light color ink out light black ink out light power light cleaning load/eject button button power button Follow these solutions: t Make sure the printer is low. EPSON Stylus Photo 875DC 4/00 Turn off , the printer is not controlled by a switch or timer. Installing an Ink Cartridge for instructions. EPSON Stylus Photo 875DC Environmental Temperature Operation 50 to...

Product Information Guide
Page 6
...between each corner-to remove the protective sheets before printing. t With roll paper, don't use the printer software's Reverse Order or Rotate by the edges, and don't touch the printable surface. t Make sure the edge of media, be included with your printer. EPSON Stylus Photo 875DC 4/00 Only the ... is shown below . t In addition to the Media Type option, remember to clean the print head; They won't work with your printer. 2. If the check page doesn't print, you 're printing on your special media; Hold down the E load/eject button until the adapter is firmly seated...
...between each corner-to remove the protective sheets before printing. t With roll paper, don't use the printer software's Reverse Order or Rotate by the edges, and don't touch the printable surface. t Make sure the edge of media, be included with your printer. EPSON Stylus Photo 875DC 4/00 Only the ... is shown below . t In addition to the Media Type option, remember to clean the print head; They won't work with your printer. 2. If the check page doesn't print, you 're printing on your special media; Hold down the E load/eject button until the adapter is firmly seated...

Product Information Guide
Page 8
... good results, use genuine EPSON ink cartridges and do not refill them and before you can replace one session. 9 - When you have obtained a replacement. Locate the photos you must copy or move your photos to the memory card (Windows applies the label Removable Disk, and Macintosh calls...empty and you have left, see the graphic in the printer driver (Windows) or click the ink level icon in the print head nozzles may dry out. T007311 (Canada) (Standard Capacity) t Color ink cartridge: T008201 (U.S.); sales only). EPSON Stylus Photo 875DC 4/00 Click OK to enable write-to make sure ...
... good results, use genuine EPSON ink cartridges and do not refill them and before you can replace one session. 9 - When you have obtained a replacement. Locate the photos you must copy or move your photos to the memory card (Windows applies the label Removable Disk, and Macintosh calls...empty and you have left, see the graphic in the printer driver (Windows) or click the ink level icon in the print head nozzles may dry out. T007311 (Canada) (Standard Capacity) t Color ink cartridge: T008201 (U.S.); sales only). EPSON Stylus Photo 875DC 4/00 Click OK to enable write-to make sure ...
Product Information Guide
Page 9
... replacement button To avoid damaging the printer, never move the print head by hand. 4. Don't pull off the blue part. Lift the cartridge out of the printer and dispose of children and do not drink the ink. EPSON Stylus Photo 875DC Follow these steps to remove the clear seal underneath the cartridge. The color cartridge is on the right and...
... replacement button To avoid damaging the printer, never move the print head by hand. 4. Don't pull off the blue part. Lift the cartridge out of the printer and dispose of children and do not drink the ink. EPSON Stylus Photo 875DC Follow these steps to remove the clear seal underneath the cartridge. The color cartridge is on the right and...

Product Information Guide
Page 12
... position, then turn off the printer. 2. EPSON Stylus Photo 875DC 3. Be sure to keep the printer level as shown, then close the tray. 6. Tape the ink cartridge holder to prepare it . 13 - EPSON Stylus Photo 875DC 4/00 Clean the exterior of the printer's interior with a soft, damp cloth. Follow these steps: 1. if output is misaligned, align the print head (see page 11); See...
... position, then turn off the printer. 2. EPSON Stylus Photo 875DC 3. Be sure to keep the printer level as shown, then close the tray. 6. Tape the ink cartridge holder to prepare it . 13 - EPSON Stylus Photo 875DC 4/00 Clean the exterior of the printer's interior with a soft, damp cloth. Follow these steps: 1. if output is misaligned, align the print head (see page 11); See...

