User Replaceable Parts List
Page 1
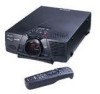
...5mm Plugs) PS/2 Mouse Cable Serial Mouse Cable Mac Mouse Cable Lamp-PowerLite 5500/7500 (ELPLP06) Lamp-PowerLite 5550/7550 (ELPLP07) Remote Control(5500/5550/7500/7550) Lens Cap with String User's Manual ELP-5500c/7500c User's Manual ELP-5550c/7550c Soft Carrying Case Hand Strap PART NUMBER 201 7328 201 6048 600... 0073 600 1982 754 4059 103 8266 754 1203 754 1679 754 4060 754 4062 Order user replaceable parts from an Epson authorized parts distributor. ---- Locate an Epson Authorized Service Center to order user replaceable parts by using the "Help me find..." tool in the right column of ...
...5mm Plugs) PS/2 Mouse Cable Serial Mouse Cable Mac Mouse Cable Lamp-PowerLite 5500/7500 (ELPLP06) Lamp-PowerLite 5550/7550 (ELPLP07) Remote Control(5500/5550/7500/7550) Lens Cap with String User's Manual ELP-5500c/7500c User's Manual ELP-5550c/7550c Soft Carrying Case Hand Strap PART NUMBER 201 7328 201 6048 600... 0073 600 1982 754 4059 103 8266 754 1203 754 1679 754 4060 754 4062 Order user replaceable parts from an Epson authorized parts distributor. ---- Locate an Epson Authorized Service Center to order user replaceable parts by using the "Help me find..." tool in the right column of ...
Product Brochure
Page 2
... Analog RGB Sync. signal level Separate H, V Composite Sync. SP ECI F IC ATION S Projection System EPSON Original Prism technology LCD Panel Seiko Epson SVGA 0.9" Poly-Silicon TFT Active-matrix Number of Pixels 1,440,000 pixels (800 x 600) x 3 panels Pixel Arrangement Stripe Lens Manual zoom lens, focus 1:3:1 zoom, F=1.7- 2.0, f=38- 49mm Lamp UHE (Ultra High Efficiency) 120W (user...
... Analog RGB Sync. signal level Separate H, V Composite Sync. SP ECI F IC ATION S Projection System EPSON Original Prism technology LCD Panel Seiko Epson SVGA 0.9" Poly-Silicon TFT Active-matrix Number of Pixels 1,440,000 pixels (800 x 600) x 3 panels Pixel Arrangement Stripe Lens Manual zoom lens, focus 1:3:1 zoom, F=1.7- 2.0, f=38- 49mm Lamp UHE (Ultra High Efficiency) 120W (user...

Product Information Guide
Page 6
.... Lift up the handle and pull out the lamp assembly. 6. Related Documentation CPD 8299 EPSON PowerLite 5550C/7550C User's Guide CPD 8319 EPSON PowerLite 5550C/7550C Portable Guide TBD EPSON PowerLite 5550C/7550C Multimedia Projector Service Manual PL-ELP5550C EPSON PowerLite 5550C Multimedia Projector Parts Price List PL-ELP7550 EPSON PowerLite 7550C Multimedia Projector Parts Price List Optional Accessories The following optional accessories are available for Macintosh (includes...
.... Lift up the handle and pull out the lamp assembly. 6. Related Documentation CPD 8299 EPSON PowerLite 5550C/7550C User's Guide CPD 8319 EPSON PowerLite 5550C/7550C Portable Guide TBD EPSON PowerLite 5550C/7550C Multimedia Projector Service Manual PL-ELP5550C EPSON PowerLite 5550C Multimedia Projector Parts Price List PL-ELP7550 EPSON PowerLite 7550C Multimedia Projector Parts Price List Optional Accessories The following optional accessories are available for Macintosh (includes...

User Manual
Page 5
Contents Introduction 1 Optional Accessories 3 About This Manual 4 Safety Instructions 5 Where to Get Help 7 Electronic Support Services 7 Automated Telephone Services 8 1 Setting Up the Projector 11 Unpacking the Projector 12 Additional Components 14 Attaching the Hand Strap 16 Installing the Remote Control Batteries 18 Where to Place the Projector 19 Connecting the Power Cord 21 v
Contents Introduction 1 Optional Accessories 3 About This Manual 4 Safety Instructions 5 Where to Get Help 7 Electronic Support Services 7 Automated Telephone Services 8 1 Setting Up the Projector 11 Unpacking the Projector 12 Additional Components 14 Attaching the Hand Strap 16 Installing the Remote Control Batteries 18 Where to Place the Projector 19 Connecting the Power Cord 21 v

User Manual
Page 12
... 6, "Troubleshooting," describes how to interpret your projector, and how to use the EPSON PowerLite 5550C and PowerLite 7550C projectors. A Glossary and Index are provided at the end of the manual. 4 Introduction Chapter 3, "Adjusting Projector Settings," shows you encounter specific problems. Chapter 7, "Technical Specifications," lists the projector's technical specifications. Chapter 1, "Setting Up the Projector," gives step-by-step instructions for connecting...
... 6, "Troubleshooting," describes how to interpret your projector, and how to use the EPSON PowerLite 5550C and PowerLite 7550C projectors. A Glossary and Index are provided at the end of the manual. 4 Introduction Chapter 3, "Adjusting Projector Settings," shows you encounter specific problems. Chapter 7, "Technical Specifications," lists the projector's technical specifications. Chapter 1, "Setting Up the Projector," gives step-by-step instructions for connecting...

User Manual
Page 32
... cable (optional) Note: Computer configurations vary. Connect either end of the ports needed to connect your computer manual for the location of the projector's video cable to the computer's video port. 24 1 • Setting Up the Projector Disconnect the computer's monitor cable from the video port on . 2. Connect the other end of the...
... cable (optional) Note: Computer configurations vary. Connect either end of the ports needed to connect your computer manual for the location of the projector's video cable to the computer's video port. 24 1 • Setting Up the Projector Disconnect the computer's monitor cable from the video port on . 2. Connect the other end of the...

User Manual
Page 35
Connecting to a PC Laptop Computer This section describes how to connect the projector to your projector. 1. See your computer manual for the location of the video cable to connect your PC laptop with the projector's video, audio, and mouse cables. (You must connect the video cable; Connecting ... ports needed to the laptop's video (monitor) port. the audio and mouse cables are optional.) Connecting the projector's video cable Computer In port projector video cable Note: Laptop configurations vary. Turn off the projector and computer, if they're on. 2. Connect either end of the...
Connecting to a PC Laptop Computer This section describes how to connect the projector to your projector. 1. See your computer manual for the location of the video cable to connect your PC laptop with the projector's video, audio, and mouse cables. (You must connect the video cable; Connecting ... ports needed to the laptop's video (monitor) port. the audio and mouse cables are optional.) Connecting the projector's video cable Computer In port projector video cable Note: Laptop configurations vary. Turn off the projector and computer, if they're on. 2. Connect either end of the...

User Manual
Page 40
See your computer manual for the location of the projector's video cable to connect your Macintosh, if they're on. 2. Connect either end of the ports needed to the Computer In port. 32 1 • Setting Up the Projector Connecting the projector's video cable Computer Out port Computer In port Macintosh monitor adapter Macintosh desktop adapter projector video cable computer's monitor cable Note: Macintosh computer configurations vary. Turn off the projector and your projector. 1.
See your computer manual for the location of the projector's video cable to connect your Macintosh, if they're on. 2. Connect either end of the ports needed to the Computer In port. 32 1 • Setting Up the Projector Connecting the projector's video cable Computer Out port Computer In port Macintosh monitor adapter Macintosh desktop adapter projector video cable computer's monitor cable Note: Macintosh computer configurations vary. Turn off the projector and your projector. 1.

User Manual
Page 46
...if they're on connecting a video cable. 1. See your computer manual for additional information on . 2. Connecting the projector's video cable Computer Out port Computer In port Macintosh Video-out cable desktop adapter projector video cable Note: Some new PowerBooks may not match the illustration. ...PowerBook configurations vary, so the location of the projector's video cable to the computer without using a video-out cable. Turn off the projector and your computer's ports may let you connect the projector video cable directly to the projector's Computer In port. 38 1 • ...
...if they're on connecting a video cable. 1. See your computer manual for additional information on . 2. Connecting the projector's video cable Computer Out port Computer In port Macintosh Video-out cable desktop adapter projector video cable Note: Some new PowerBooks may not match the illustration. ...PowerBook configurations vary, so the location of the projector's video cable to the computer without using a video-out cable. Turn off the projector and your computer's ports may let you connect the projector video cable directly to the projector's Computer In port. 38 1 • ...

User Manual
Page 104
... you have to set the display to work with your ELP Link III kit to the serial port on both the laptop's screen and the projector. You may have a laptop, configure it to appear on the back of your computer's mouse port. 7. Go to page 96 to your computer. 5. Check your... the ELP Link III Cables 91 Connect the other end of the PS/2 mouse cable that came with an external mouse. 4. Note: If your laptop's manual for your ELP Link III kit instead of the main cable.
... you have to set the display to work with your ELP Link III kit to the serial port on both the laptop's screen and the projector. You may have a laptop, configure it to appear on the back of your computer's mouse port. 7. Go to page 96 to your computer. 5. Check your... the ELP Link III Cables 91 Connect the other end of the PS/2 mouse cable that came with an external mouse. 4. Note: If your laptop's manual for your ELP Link III kit instead of the main cable.

User Manual
Page 159
... may be any of the computer image is higher than 800 × 600 (PowerLite 5550C) or 1024 × 768 (PowerLite 7550C), the projector resizes the image. The problem may also need to the projector, there's no signal coming from the Resolution box. Make sure the connectors are ...NO SIGNAL is selected. If the computer's output resolution setting is displayed. If the computer output is not connected to modify your software manual for a different resolution. For a Macintosh with this resizing, choose a different display setting on the computer. For a Macintosh with ...
... may be any of the computer image is higher than 800 × 600 (PowerLite 5550C) or 1024 × 768 (PowerLite 7550C), the projector resizes the image. The problem may also need to the projector, there's no signal coming from the Resolution box. Make sure the connectors are ...NO SIGNAL is selected. If the computer's output resolution setting is displayed. If the computer output is not connected to modify your software manual for a different resolution. For a Macintosh with this resizing, choose a different display setting on the computer. For a Macintosh with ...
User Manual
Page 160
...the screen to a Macintosh, make sure that the image source is displayed. If your projector is turned off , then restart your computer and manually adjust the Tracking and Sync settings. The projector can 't access the projector menus. When you see page 153). Adjust the zoom and focus lens rings. If ...there is no video for 30 minutes, the projector goes into sleep mode and the lamp ...
...the screen to a Macintosh, make sure that the image source is displayed. If your projector is turned off , then restart your computer and manually adjust the Tracking and Sync settings. The projector can 't access the projector menus. When you see page 153). Adjust the zoom and focus lens rings. If ...there is no video for 30 minutes, the projector goes into sleep mode and the lamp ...
User Manual
Page 175
... Keyboard, assigning functions, 114 to 116 L Lamp light, 47, 66, 141 to 143 replacing, 134 to 136 specifications, 150 Language menu option, 77 Laptop, connecting projector to, 26 to 28 Launching the ELP Link III software, 98 to 100 Lens, cleaning, 132 Lights, status, 47, 65 to 66, 141 to 144... Logo creating, 78 to 80, 126 to 128 displaying, 77 Lumens, 149 M Macintosh, connecting projector to, 15, 29 to 40, 92 to 95 Macro, see Key Macro Main menu, displaying and hiding, 69 Maintenance, 131 to 136 Manual, using, 4 Mechanical specifications, 151 Menus About, 68 accessing, 69 Audio, 67, 75 to 76...
... Keyboard, assigning functions, 114 to 116 L Lamp light, 47, 66, 141 to 143 replacing, 134 to 136 specifications, 150 Language menu option, 77 Laptop, connecting projector to, 26 to 28 Launching the ELP Link III software, 98 to 100 Lens, cleaning, 132 Lights, status, 47, 65 to 66, 141 to 144... Logo creating, 78 to 80, 126 to 128 displaying, 77 Lumens, 149 M Macintosh, connecting projector to, 15, 29 to 40, 92 to 95 Macro, see Key Macro Main menu, displaying and hiding, 69 Maintenance, 131 to 136 Manual, using, 4 Mechanical specifications, 151 Menus About, 68 accessing, 69 Audio, 67, 75 to 76...

