
Installation Guide - ELPMBUNI Universal Mount Assembly
Page 2
... Adjustments ...- 19 Installing the Plastic Caps...- 20 - techsupport@mounts.com Installation Instructions Page - 3 - Customer Service - (800) 368-9700 Technical Support - Contact Premier Mounts In the event of missing and/or damage equipment, or technical...ELPMBUNI Table of Contents Warranty ...- 3 Contact Premier Mounts ...- 3 Warning Statements ...- 4 Parts List ...- 5 Installation Tools ...- 5 ELPMBUNI Universal Mount Assembly ...- 6 Projector Preparation ...- 7 Securing the Bracket to the Projector ...- 9 Leveling the Mounting bracket ...- 14 Securing the Upper Assembly Ceiling Plate...
... Adjustments ...- 19 Installing the Plastic Caps...- 20 - techsupport@mounts.com Installation Instructions Page - 3 - Customer Service - (800) 368-9700 Technical Support - Contact Premier Mounts In the event of missing and/or damage equipment, or technical...ELPMBUNI Table of Contents Warranty ...- 3 Contact Premier Mounts ...- 3 Warning Statements ...- 4 Parts List ...- 5 Installation Tools ...- 5 ELPMBUNI Universal Mount Assembly ...- 6 Projector Preparation ...- 7 Securing the Bracket to the Projector ...- 9 Leveling the Mounting bracket ...- 14 Securing the Upper Assembly Ceiling Plate...

Installation Guide - ELPMBUNI Universal Mount Assembly
Page 3
... chance of impact. PROPER INSTALLATION PROCEDURE BY QUALIFIED PERSONNEL AS OUTLINED IN THE INSTALLATIONS INSTRUCTIONS MUST BE ADHERED TO. Contact Premier Mounts with any other than wooden studs, use suitable hardware (which is to installation. A secure structure must be disconnected from dropping... may result in damage to the projector and/or damage to the projector and could result in damage to the mounting surface. THE INSTALLATION INSTRUCTIONS MUST BE READ TO PREVENT PERSONAL INJURY AND PROPERTY DAMAGE. Installation Manual KEEP THESE INSTALLATION INSTRUCTIONS...
... chance of impact. PROPER INSTALLATION PROCEDURE BY QUALIFIED PERSONNEL AS OUTLINED IN THE INSTALLATIONS INSTRUCTIONS MUST BE ADHERED TO. Contact Premier Mounts with any other than wooden studs, use suitable hardware (which is to installation. A secure structure must be disconnected from dropping... may result in damage to the projector and/or damage to the projector and could result in damage to the mounting surface. THE INSTALLATION INSTRUCTIONS MUST BE READ TO PREVENT PERSONAL INJURY AND PROPERTY DAMAGE. Installation Manual KEEP THESE INSTALLATION INSTRUCTIONS...

Installation Guide - ELPMBUNI Universal Mount Assembly
Page 4
... Screws (Qty 4) Portable Drill Pencil Level (Supplied) Stud Finder (Commercially Available) M5 Allen Wrench NOTE: Mounting screws will vary by projector. ELPMBUNI Parts List NOTE: This mount is not required for model specific hardware: Pages 10, 11, 12, and 13. Please see the following... hardware is included in the hardware pack but is shipped with the M3 x 16 Phillips screws. Upper Assembly (Qty 1) Mounting Bracket (Qty 1) Plastic Barrel Caps (Qty 4) M3 Flat Washers (Qty 4) Note: Must be used with all proper installation hardware and components....
... Screws (Qty 4) Portable Drill Pencil Level (Supplied) Stud Finder (Commercially Available) M5 Allen Wrench NOTE: Mounting screws will vary by projector. ELPMBUNI Parts List NOTE: This mount is not required for model specific hardware: Pages 10, 11, 12, and 13. Please see the following... hardware is included in the hardware pack but is shipped with the M3 x 16 Phillips screws. Upper Assembly (Qty 1) Mounting Bracket (Qty 1) Plastic Barrel Caps (Qty 4) M3 Flat Washers (Qty 4) Note: Must be used with all proper installation hardware and components....

Installation Guide - ELPMBUNI Universal Mount Assembly
Page 5
The number of legs E may vary depending on the number of mounting points found on the bottom of single and dual legs together as shown in Options 1 and 2. K M J L J L Installation Manual ELPMBUNI A NOTE: ... (2-piece) leg assemblies can be used as single leg or any combination C of your projector for your G projector. Page - 6 - ELPMBUNI Universal Mount Assembly A Single Wooden Stud Mounting Points B Solid Structure Mounting Points C Ceiling Plate D Allen Wrench E Height Adjustment Screws F Tension Knobs G Safety Knob H Security Screws I Leveling Barrels J Universal...
The number of legs E may vary depending on the number of mounting points found on the bottom of single and dual legs together as shown in Options 1 and 2. K M J L J L Installation Manual ELPMBUNI A NOTE: ... (2-piece) leg assemblies can be used as single leg or any combination C of your projector for your G projector. Page - 6 - ELPMBUNI Universal Mount Assembly A Single Wooden Stud Mounting Points B Solid Structure Mounting Points C Ceiling Plate D Allen Wrench E Height Adjustment Screws F Tension Knobs G Safety Knob H Security Screws I Leveling Barrels J Universal...

Installation Guide - ELPMBUNI Universal Mount Assembly
Page 6
NOTE: Review the projectors manufacture's operation manual and refer to the projector. Identify the number of mounting points and screw thread (pitch) size. 3. HANDLE WITH CARE AT ALL TIMES. Here you will enhance the quality of your ...as outlined in the installation instructions must be adhered to. Most projectors have either three or four mounting points and are M4 in serious personal injury and possible damage to the ceiling installation instruction. Mounting Points Inverted Projector Blanket, soft cloth etc Figure 1 Flat surface Installation Manual Page - 7 -...
NOTE: Review the projectors manufacture's operation manual and refer to the projector. Identify the number of mounting points and screw thread (pitch) size. 3. HANDLE WITH CARE AT ALL TIMES. Here you will enhance the quality of your ...as outlined in the installation instructions must be adhered to. Most projectors have either three or four mounting points and are M4 in serious personal injury and possible damage to the ceiling installation instruction. Mounting Points Inverted Projector Blanket, soft cloth etc Figure 1 Flat surface Installation Manual Page - 7 -...

Installation Guide - ELPMBUNI Universal Mount Assembly
Page 7
Next loosen the safety screw knurl knob far enough to allow the two parts to create free play between the bracket tri-lock assembly and the upper section tri-lock assembly points. 5. Installation Manual ELPMBUNI 4. Separate the upper assembly from the projector mounting bracket by slightly loosening the two tension knurl knobs to be rotated 180° apart and separate. Figure 2 Tri-Lock Opening Rotate 180° To Unlock Tension Knobs Upper Assembly Safety Knob Figure 3 Figure 4 Page - 8 -
Next loosen the safety screw knurl knob far enough to allow the two parts to create free play between the bracket tri-lock assembly and the upper section tri-lock assembly points. 5. Installation Manual ELPMBUNI 4. Separate the upper assembly from the projector mounting bracket by slightly loosening the two tension knurl knobs to be rotated 180° apart and separate. Figure 2 Tri-Lock Opening Rotate 180° To Unlock Tension Knobs Upper Assembly Safety Knob Figure 3 Figure 4 Page - 8 -

Installation Guide - ELPMBUNI Universal Mount Assembly
Page 8
... to allow routing of the legs around critical ventilation screens on the bottom of the projector and use the appropriate number of the mounting bracket. Use the M3 x 16 Phillips screws with the flat washers attached through the leveling barrel. ELPMBUNI Securing the Bracket to the... the projector (Figure A). NOTE: If your projector. Page - 9 - FIGURE 6 Two-Piece Leg FIGURE 7 One-Piece Leg Allen Wrench Mounting Hardware Inverted Projector Leveling Barrels FIGURE A Installation Manual Figure 5 Line up the leveling barrels to the projector. 1. You may also reduce the ...
... to allow routing of the legs around critical ventilation screens on the bottom of the projector and use the appropriate number of the mounting bracket. Use the M3 x 16 Phillips screws with the flat washers attached through the leveling barrel. ELPMBUNI Securing the Bracket to the... the projector (Figure A). NOTE: If your projector. Page - 9 - FIGURE 6 Two-Piece Leg FIGURE 7 One-Piece Leg Allen Wrench Mounting Hardware Inverted Projector Leveling Barrels FIGURE A Installation Manual Figure 5 Line up the leveling barrels to the projector. 1. You may also reduce the ...

Installation Guide - ELPMBUNI Universal Mount Assembly
Page 9
ELPMBUNI NOTE: If your projector model is not shown, when arranging the leg combination, simply ensure access to filters and lamp housings when aligning brackets. This mount works with all sub-25 pound projectors. PowerLite 830p, 835p Hardware: M4 x 12mm (Qty 4) Installation Manual PowerLite S3, S4, 62C, 76C, 82C, Hardware: M4 x 12mm (Qty 3) Page - 10 -
ELPMBUNI NOTE: If your projector model is not shown, when arranging the leg combination, simply ensure access to filters and lamp housings when aligning brackets. This mount works with all sub-25 pound projectors. PowerLite 830p, 835p Hardware: M4 x 12mm (Qty 4) Installation Manual PowerLite S3, S4, 62C, 76C, 82C, Hardware: M4 x 12mm (Qty 3) Page - 10 -

Installation Guide - ELPMBUNI Universal Mount Assembly
Page 13
Installation Manual Failure to do not over-tighten the mounting hardware. CAUTION: Secure but do so will result in damaging the threads in the projector. Rotate the leveling barrels to the projector then tighten the ...hex head leg screws with the Allen wrench (supplied) (Figure 8 and Figure 9). When the position desired is achieved tighten the mounting hardware to level the mounting bracket next, position the mounting bracket so that it avoids most, if not all, ventilation points (including lamp & filter access doors). 2. ELPMBUNI Leveling the...
Installation Manual Failure to do not over-tighten the mounting hardware. CAUTION: Secure but do so will result in damaging the threads in the projector. Rotate the leveling barrels to the projector then tighten the ...hex head leg screws with the Allen wrench (supplied) (Figure 8 and Figure 9). When the position desired is achieved tighten the mounting hardware to level the mounting bracket next, position the mounting bracket so that it avoids most, if not all, ventilation points (including lamp & filter access doors). 2. ELPMBUNI Leveling the...

Installation Guide - ELPMBUNI Universal Mount Assembly
Page 14
... screws (supplied) or with the top image edge of the wood stud. Page - 15 - It is recommended from the center of the mounting bracket to the front edge of the lens to the edge of the projector. Review your projector's distance calculation to determine what distance is normally... screen as well. 4. Ceiling Structure Ceiling Wood Stud Wood Screws Upper Assembly Installation Manual Knurl Knobs (3ea) Figure 9 Secure the ceiling mount to parallel with other (commercially available) hardware depending on the screen and no higher then the top image edge of the upper assembly....
... screws (supplied) or with the top image edge of the wood stud. Page - 15 - It is recommended from the center of the mounting bracket to the front edge of the lens to the edge of the projector. Review your projector's distance calculation to determine what distance is normally... screen as well. 4. Ceiling Structure Ceiling Wood Stud Wood Screws Upper Assembly Installation Manual Knurl Knobs (3ea) Figure 9 Secure the ceiling mount to parallel with other (commercially available) hardware depending on the screen and no higher then the top image edge of the upper assembly....
Installation Guide - ELPMBUNI Universal Mount Assembly
Page 15
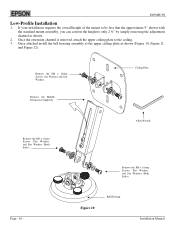
... 12). Figure 10 Bell Housing Installation Manual ELPMBUNI Low-Profile Installation 1. If your installation requires the overall height of the mount to be less that the approximate 9" shown with the standard mount assembly, you can convert the height to the ceiling. 3. Once attached install the bell housing assembly to the upper ceiling...
... 12). Figure 10 Bell Housing Installation Manual ELPMBUNI Low-Profile Installation 1. If your installation requires the overall height of the mount to be less that the approximate 9" shown with the standard mount assembly, you can convert the height to the ceiling. 3. Once attached install the bell housing assembly to the upper ceiling...

Installation Guide - ELPMBUNI Universal Mount Assembly
Page 17
... to the upper assembly. NOTE: Follow the number sequence prior to securing the projector to the "tri-lock" mounting plate in direct alignment with the alignment slot on the mounting bracket (Figure 13). The alignment slot must be in the base of the upper assembly. 2. ELPMBUNI Securing the... Projector to the tri-lock, then rotate the projector 180° Universal Mount Page - 18 - The safety knob should line up with the safety knob to lock the mounting bracket to the upper assembly Insert universal bracket to the Upper Assembly 1. Once inserted rotate the ...
... to the upper assembly. NOTE: Follow the number sequence prior to securing the projector to the "tri-lock" mounting plate in direct alignment with the alignment slot on the mounting bracket (Figure 13). The alignment slot must be in the base of the upper assembly. 2. ELPMBUNI Securing the... Projector to the tri-lock, then rotate the projector 180° Universal Mount Page - 18 - The safety knob should line up with the safety knob to lock the mounting bracket to the upper assembly Insert universal bracket to the Upper Assembly 1. Once inserted rotate the ...

Installation Guide - ELPMBUNI Universal Mount Assembly
Page 18
... loosen the side M8 screws and tilt to the desired angle to optimize the projected image. 2. ELPMBUNI Final Adjustments 1. With the projector secured in the mount and power on the screen, slightly loosen the front and rear M8 screws and adjust to the desired angle then firmly tighten the two M8...
... loosen the side M8 screws and tilt to the desired angle to optimize the projected image. 2. ELPMBUNI Final Adjustments 1. With the projector secured in the mount and power on the screen, slightly loosen the front and rear M8 screws and adjust to the desired angle then firmly tighten the two M8...
User Manual
Page 14
... document camera (ELPDC11) Epson DC-20 document camera (ELPDC20) Wireless IR mouse receiver for remote control (ELPST16) Passive 3D glasses (adult) (PL4855WU) Passive 3D glasses (children) (PL4855WU) Polarizer kit for 3D stacking (PL4855WU) Universal projector ceiling mount False ceiling plate kit... audio video cable 6 feet (1.8 m) length HDMI audio video cable 12 feet (3.6 m) length Active speakers (ELPSP02) PixiePlus control system for Epson projectors AP-60 projector sound solution Duet ultra portable projector screen 50" portable screen (4:3) 60" portable pop-up screen (4:3) 80" portable pop...
... document camera (ELPDC11) Epson DC-20 document camera (ELPDC20) Wireless IR mouse receiver for remote control (ELPST16) Passive 3D glasses (adult) (PL4855WU) Passive 3D glasses (children) (PL4855WU) Polarizer kit for 3D stacking (PL4855WU) Universal projector ceiling mount False ceiling plate kit... audio video cable 6 feet (1.8 m) length HDMI audio video cable 12 feet (3.6 m) length Active speakers (ELPSP02) PixiePlus control system for Epson projectors AP-60 projector sound solution Duet ultra portable projector screen 50" portable screen (4:3) 60" portable pop-up screen (4:3) 80" portable pop...
User Manual
Page 21
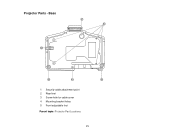
Base 1 Security cable attachment point 2 Rear feet 3 Screw hole for cable cover 4 Mounting bracket holes 5 Front adjustable foot Parent topic: Projector Part Locations 21 Projector Parts -
Base 1 Security cable attachment point 2 Rear feet 3 Screw hole for cable cover 4 Mounting bracket holes 5 Front adjustable foot Parent topic: Projector Part Locations 21 Projector Parts -
User Manual
Page 26
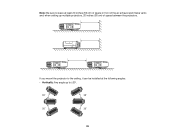
...the Projector Follow the instructions in a fixed location. You can place the projector on a sturdy, level surface or install it using a compatible mount. • Leave plenty of or next to project an image. Keep these sections to set up your projector in the Remote Control Projector Placement... You can also install the projector in a ceiling mount if you select a projector location: • Place the projector on almost any flat surface to anything that could block the vents. &#...
...the Projector Follow the instructions in a fixed location. You can place the projector on a sturdy, level surface or install it using a compatible mount. • Leave plenty of or next to project an image. Keep these sections to set up your projector in the Remote Control Projector Placement... You can also install the projector in a ceiling mount if you select a projector location: • Place the projector on almost any flat surface to anything that could block the vents. &#...
User Manual
Page 28
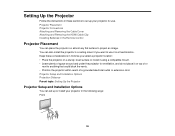
If you mount the projector to the ceiling, it can be installed at the following angles: • Vertically: Any angle up to leave at least 20 inches (50 cm) of space in front of the air exhaust and intake vents and, when setting up multiple projectors, 20 inches (50 cm) of space between the projectors. Note: Be sure to ±30°. 28
If you mount the projector to the ceiling, it can be installed at the following angles: • Vertically: Any angle up to leave at least 20 inches (50 cm) of space in front of the air exhaust and intake vents and, when setting up multiple projectors, 20 inches (50 cm) of space between the projectors. Note: Be sure to ±30°. 28
User Manual
Page 96
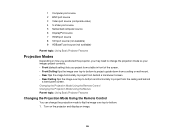
... top-to project from behind a translucent screen. • Rear/Ceiling flips the image over top-to-bottom to project upside-down from a ceiling or wall mount. • Rear flips the image horizontally to project from the ceiling and behind a translucent screen.
... top-to project from behind a translucent screen. • Rear/Ceiling flips the image over top-to-bottom to project upside-down from a ceiling or wall mount. • Rear flips the image horizontally to project from the ceiling and behind a translucent screen.
User Manual
Page 114
Note: Do not pass drop-prevention cables through the security cable attachment point when mounting the projector on the projector to attach a wire cable and secure it to a room fixture or heavy furniture. Parent topic: Projector Security Features Related references ...
Note: Do not pass drop-prevention cables through the security cable attachment point when mounting the projector on the projector to attach a wire cable and secure it to a room fixture or heavy furniture. Parent topic: Projector Security Features Related references ...

User Manual
Page 154
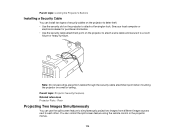
Replacing the Air Filter You need to replace the air filter in the following situations: • After cleaning the air filter, you see a message telling you to clean or replace it • The air filter is torn or damaged You can replace the air filter while the projector is mounted to the ceiling or placed on a table. 1. Slide the air filter cover latch and open the air filter cover. 154 Turn off the projector and unplug the power cord. 2.
Replacing the Air Filter You need to replace the air filter in the following situations: • After cleaning the air filter, you see a message telling you to clean or replace it • The air filter is torn or damaged You can replace the air filter while the projector is mounted to the ceiling or placed on a table. 1. Slide the air filter cover latch and open the air filter cover. 154 Turn off the projector and unplug the power cord. 2.

