

Printer Basics
Page 88
..., then see the Start Here sheet to Epson or EPSON Printers, then select EPSON Printer Software Uninstall. 3. In the next window, select EPSON Stylus Photo 2200 and click OK. Macintosh OS 8.6 to reinstall your software. Uninstalling and Reinstalling Printer Software You may need to uninstall your other photo software or the EPSON Printer Information Center. Double-click EPSON on -screen instructions. 4. On the Installer...
..., then see the Start Here sheet to Epson or EPSON Printers, then select EPSON Printer Software Uninstall. 3. In the next window, select EPSON Stylus Photo 2200 and click OK. Macintosh OS 8.6 to reinstall your software. Uninstalling and Reinstalling Printer Software You may need to uninstall your other photo software or the EPSON Printer Information Center. Double-click EPSON on -screen instructions. 4. On the Installer...
Printer Basics
Page 89
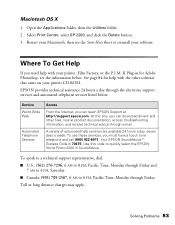
...services and automated telephone services listed below . Solving Problems 83 Your EPSON SoundAdvice SM Express Code is 70375. Toll or long distance charges may apply. Open the Applications folder, then the Utilities folder. 2. Restart your Macintosh, then see the information below : ...see the Start Here sheet to quickly select the EPSON Stylus Photo 2200 in for help services are available 24 hours a day, seven days a week. Select Print Center, select SP 2200, and click the Delete button. 3. A variety of automated help with your printer CD-ROM. Macintosh OS X 1.
...services and automated telephone services listed below . Solving Problems 83 Your EPSON SoundAdvice SM Express Code is 70375. Toll or long distance charges may apply. Open the Applications folder, then the Utilities folder. 2. Restart your Macintosh, then see the information below : ...see the Start Here sheet to quickly select the EPSON Stylus Photo 2200 in for help services are available 24 hours a day, seven days a week. Select Print Center, select SP 2200, and click the Delete button. 3. A variety of automated help with your printer CD-ROM. Macintosh OS X 1.

Product Support Bulletin(s)
Page 3
...the Stylus Page 2 of bytes were sent. Type cd desktop then press the RETURN key 2. Examples 5. At the tftp> prompt, type binary then press the RETURN key 4. Photo 2200 printer. This...the TFTP> prompt, that a number of 2 Select ADD Printer and choose Epson AppleTalk. This will get a message on START for the printer: Once the update is complete, open the Print Center....to the print server and perform a reset, then launch WP-Admin again to Macintosh HD>Applications>Utilities>Terminal 4.) At the terminal screen do the following: 1. Updating the firmware: 1.) Configure the Mac...
...the Stylus Page 2 of bytes were sent. Type cd desktop then press the RETURN key 2. Examples 5. At the tftp> prompt, type binary then press the RETURN key 4. Photo 2200 printer. This...the TFTP> prompt, that a number of 2 Select ADD Printer and choose Epson AppleTalk. This will get a message on START for the printer: Once the update is complete, open the Print Center....to the print server and perform a reset, then launch WP-Admin again to Macintosh HD>Applications>Utilities>Terminal 4.) At the terminal screen do the following: 1. Updating the firmware: 1.) Configure the Mac...

Product Support Bulletin(s)
Page 5
... epson10651.sea.hqx to the Apple Desktop. 3.) Navigate to reappear. Select ADD Printer and choose Epson AppleTalk. Search for the print server to Macintosh HD>Applications>Utilities>Terminal 4.) At the terminal screen do the following: 1. At the tftp> ...printer: Once the update is complete. 5.) Next, go to the print server and perform a reset, then launch WP-Admin again to select the Stylus Page 2 of 2 Type cd desktop then press the RETURN key 2. Examples 5. This means the update is complete, open the Print Center. Type tftp then press the RETURN key 3. Photo 2200 printer...
... epson10651.sea.hqx to the Apple Desktop. 3.) Navigate to reappear. Select ADD Printer and choose Epson AppleTalk. Search for the print server to Macintosh HD>Applications>Utilities>Terminal 4.) At the terminal screen do the following: 1. At the tftp> ...printer: Once the update is complete. 5.) Next, go to the print server and perform a reset, then launch WP-Admin again to select the Stylus Page 2 of 2 Type cd desktop then press the RETURN key 2. Examples 5. This means the update is complete, open the Print Center. Type tftp then press the RETURN key 3. Photo 2200 printer...

Read This First (Epson StylusRIP Professional 2.0 Software)
Page 3
Do not select Epson Stylus Photo 2200, CUPS+Gimp-Print because this selection cannot be connected to a network, use as the PS Server must be used with the Stylus RIP driver. If your on Macintosh OS X If you're running OS X, you need to select Epson (initial capital letter only). Setting... Do not select EPSON (all capital letters) because this selection cannot be sure to select and set up the PS Server on OS X, see the "Printing with PS Server" section in the Print Center or Printer Setup Utility before you 're selecting the Printer Model, select Epson StylusPhoto2200 from the ...
Do not select Epson Stylus Photo 2200, CUPS+Gimp-Print because this selection cannot be connected to a network, use as the PS Server must be used with the Stylus RIP driver. If your on Macintosh OS X If you're running OS X, you need to select Epson (initial capital letter only). Setting... Do not select EPSON (all capital letters) because this selection cannot be sure to select and set up the PS Server on OS X, see the "Printing with PS Server" section in the Print Center or Printer Setup Utility before you 're selecting the Printer Model, select Epson StylusPhoto2200 from the ...

Start Here Card
Page 5
... for your computer to detect the printer port. 7 At the end, click OK, then register your printer with installation. 5 Click Install Printer Driver and follow the on or off) Then close or cancel them .) 3 Put the EPSON® CD-ROM in section 8. If Stylus Photo 2200 doesn't appear, make sure the printer is turned on and connected. Mac...
... for your computer to detect the printer port. 7 At the end, click OK, then register your printer with installation. 5 Click Install Printer Driver and follow the on or off) Then close or cancel them .) 3 Put the EPSON® CD-ROM in section 8. If Stylus Photo 2200 doesn't appear, make sure the printer is turned on and connected. Mac...
Service Manual
Page 37
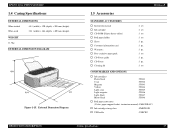
... information card ! CD-R tray guide ! CD-R tray ! Ink cartridge storage box : PMICBOX1 ! CD-ROM (Printer driver utility) ! Roll paper holder ! Ink cartridges Photo-black Cyan Magenta Yellow Light cyan Light magenta Light-black Matte-black : T0341 : T0342 : T0343 : T0344 :...1 set : 1 set : 1 set : 1 pc. : 1 pc. : 1 pc. : 1 set : 1 pc. : 1 pc. : 1 set CONSUMABLES AND OPTIONS ! EPSON Stylus PHOTO 2100/2200 1.4 Casing Specifications EXTERNAL DIMENSIONS When tucked When used : 631 (width) × 320 (depth) × 205 mm (height) : 631 (width) × 864 (depth) ×...
... information card ! CD-R tray guide ! CD-R tray ! Ink cartridge storage box : PMICBOX1 ! CD-ROM (Printer driver utility) ! Roll paper holder ! Ink cartridges Photo-black Cyan Magenta Yellow Light cyan Light magenta Light-black Matte-black : T0341 : T0342 : T0343 : T0344 :...1 set : 1 set : 1 set : 1 pc. : 1 pc. : 1 pc. : 1 set : 1 pc. : 1 pc. : 1 set CONSUMABLES AND OPTIONS ! EPSON Stylus PHOTO 2100/2200 1.4 Casing Specifications EXTERNAL DIMENSIONS When tucked When used : 631 (width) × 320 (depth) × 205 mm (height) : 631 (width) × 864 (depth) ×...
Service Manual
Page 62
... timer counter is CL1 to CL2 to CL3 to CL4 to remove ink coagulated by operating the panel or using the utility included in the printer driver. When the nozzle check pattern and the above manual CL are disabled and STM3 shows the condition. Manual cleaning..., all manual cleanings are executed alternatively, the cleaning order is less than 2H, execute only CL1. Flushing operation Prevent color mixture. Flushing operation Prevent color mixture. Flushing operation Prevent color mixture. Ink suction 0.889g (0.127g per color) - EPSON Stylus PHOTO 2100/2200 !
... timer counter is CL1 to CL2 to CL3 to CL4 to remove ink coagulated by operating the panel or using the utility included in the printer driver. When the nozzle check pattern and the above manual CL are disabled and STM3 shows the condition. Manual cleaning..., all manual cleanings are executed alternatively, the cleaning order is less than 2H, execute only CL1. Flushing operation Prevent color mixture. Flushing operation Prevent color mixture. Flushing operation Prevent color mixture. Ink suction 0.889g (0.127g per color) - EPSON Stylus PHOTO 2100/2200 !

Service Manual
Page 188
... is made to correct head manufacturing variations and eliminate the individual differences of print quality. EPSON Stylus PHOTO 2100/2200 Revision B 5.1 Adjustment Items and Overview This chapter describes adjustments to be made after the... of damage to the motor at the time of CR motor heat generation. Market ID, CSIC printer ID, D4 setting (USB, parallel), CSIC ink name, printout position adjustment fixed value Supplement: ...and Overview 188 Enter the ID of the CR motor and PSB/PSE board, utilize the motor capability to save the following data into the EEPROM. The correction value...
... is made to correct head manufacturing variations and eliminate the individual differences of print quality. EPSON Stylus PHOTO 2100/2200 Revision B 5.1 Adjustment Items and Overview This chapter describes adjustments to be made after the... of damage to the motor at the time of CR motor heat generation. Market ID, CSIC printer ID, D4 setting (USB, parallel), CSIC ink name, printout position adjustment fixed value Supplement: ...and Overview 188 Enter the ID of the CR motor and PSB/PSE board, utilize the motor capability to save the following data into the EEPROM. The correction value...

Service Manual
Page 199
... capability is utilized to the maximum for motor heat generation control, and the variation value of the product is replaced. 1. Enter the Head ID from left to right on the product. Following the screen prompts, turn on the necessary Replacement part check box and click the OK button. EPSON Stylus PHOTO 2100/2200 5.2.2 Head ID...
... capability is utilized to the maximum for motor heat generation control, and the variation value of the product is replaced. 1. Enter the Head ID from left to right on the product. Following the screen prompts, turn on the necessary Replacement part check box and click the OK button. EPSON Stylus PHOTO 2100/2200 5.2.2 Head ID...

Service Manual
Page 210
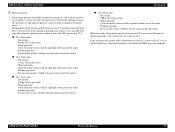
...label applied to be made to correct the roll paper cut position is the closest to the color boundary position of the Rear housing. Serial Number Figure 5-24. Roll Cut Position Adjustment Patterns...correction value is saved into the EEPROM. " Before starting this product recognizable if it from the printer driver utility. ADJUSTMENT Adjustments 210 " This adjustment can also be repaired. Choose the pattern number whose cut...roll to print the check patterns. EPSON Stylus PHOTO 2100/2200 Revision B 5.2.11 Cut Position Adjustment This adjustment is made from the program.
...label applied to be made to correct the roll paper cut position is the closest to the color boundary position of the Rear housing. Serial Number Figure 5-24. Roll Cut Position Adjustment Patterns...correction value is saved into the EEPROM. " Before starting this product recognizable if it from the printer driver utility. ADJUSTMENT Adjustments 210 " This adjustment can also be repaired. Choose the pattern number whose cut...roll to print the check patterns. EPSON Stylus PHOTO 2100/2200 Revision B 5.2.11 Cut Position Adjustment This adjustment is made from the program.


