
Printer Basics
Page 71
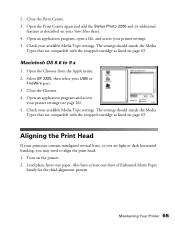
... at least one sheet of Enhanced Matte Paper handy for the third alignment pattern. Open the Print Center again and add the Stylus Photo 2200 and its additional features as listed on the printer. 2. Macintosh OS 8.6 to align the print head. 1. Open an application program and access your printouts contain misaligned vertical lines, or you see page...
... at least one sheet of Enhanced Matte Paper handy for the third alignment pattern. Open the Print Center again and add the Stylus Photo 2200 and its additional features as listed on the printer. 2. Macintosh OS 8.6 to align the print head. 1. Open an application program and access your printouts contain misaligned vertical lines, or you see page...
Service Manual
Page 7
...Print Pattern Printing Function 212 5.2.16 A4 Plain Paper print check pattern 213 Chapter 6 Maintenance 6.1 Overview 215 6.1.1 ROM Replacement 215 6.1.2 Cleaning 215 6.1.3 Service Maintenance 216 6.1.4 Lubrication 217 Chapter 7 APPENDIX 7.1 Connector Summary 227 7.1.1 Connectors and Pin Layouts 227 7.1.2 EEPROM Address Map 231 7.2 Exploded Diagram 236 7.3 Parts List for EPSON Stylus Photo...Servicing Program Usage Outline 197 5.2.2 Head ID Input Function 199 5.2.3 CR motor drive torque dispersion measurement 199 5.2.4 PG Adjustment 200 5.2.5 Head Angular Adjustment 204 5.2.6 CR Tooth...
...Print Pattern Printing Function 212 5.2.16 A4 Plain Paper print check pattern 213 Chapter 6 Maintenance 6.1 Overview 215 6.1.1 ROM Replacement 215 6.1.2 Cleaning 215 6.1.3 Service Maintenance 216 6.1.4 Lubrication 217 Chapter 7 APPENDIX 7.1 Connector Summary 227 7.1.1 Connectors and Pin Layouts 227 7.1.2 EEPROM Address Map 231 7.2 Exploded Diagram 236 7.3 Parts List for EPSON Stylus Photo...Servicing Program Usage Outline 197 5.2.2 Head ID Input Function 199 5.2.3 CR motor drive torque dispersion measurement 199 5.2.4 PG Adjustment 200 5.2.5 Head Angular Adjustment 204 5.2.6 CR Tooth...

Service Manual
Page 12
...print digits (10CPI) Number of motors *1 : Optional cutter CR motor armature resistance ASF/PUMP motor winding resistance PF motor armature resistance (ASF) Platen gap Reliability (except head) Operation noise (ISO 7779) Stylus PHOTO 950 86.97 digits Stylus PHOTO 2100/2200 127 digits Stylus PHOTO...1mm 5 years or black: 25000 pages, or color: 10000 pages 45dB (A) 31.1Ω +/− ...printer alone) • Cutter: 950g • 11.7kg (printer alone) • Cutter: 1.4kg 8.4kg PRODUCTION DESCRIPTION Basic Specifications 12 EPSON Stylus PHOTO 2100/2200 Revision B Mechanism outline ...
...print digits (10CPI) Number of motors *1 : Optional cutter CR motor armature resistance ASF/PUMP motor winding resistance PF motor armature resistance (ASF) Platen gap Reliability (except head) Operation noise (ISO 7779) Stylus PHOTO 950 86.97 digits Stylus PHOTO 2100/2200 127 digits Stylus PHOTO...1mm 5 years or black: 25000 pages, or color: 10000 pages 45dB (A) 31.1Ω +/− ...printer alone) • Cutter: 950g • 11.7kg (printer alone) • Cutter: 1.4kg 8.4kg PRODUCTION DESCRIPTION Basic Specifications 12 EPSON Stylus PHOTO 2100/2200 Revision B Mechanism outline ...

Service Manual
Page 19
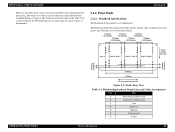
... (2.5mm) 49/360 (3.5mm) Bottom 72/360 (5mm) 72/360 (5mm) " Head movable areas Set the head movable areas (areas where the nozzles may not be done. At the setting of top margin to 4, 5, 8, or 8.5 inches. EPSON Stylus PHOTO 2100/2200 " Printable area (Margin-less printing) The range made of the printable areas A and B and the top...
... (2.5mm) 49/360 (3.5mm) Bottom 72/360 (5mm) 72/360 (5mm) " Head movable areas Set the head movable areas (areas where the nozzles may not be done. At the setting of top margin to 4, 5, 8, or 8.5 inches. EPSON Stylus PHOTO 2100/2200 " Printable area (Margin-less printing) The range made of the printable areas A and B and the top...

Service Manual
Page 20
...nozzles Nozzle restriction Figure 1-6. After the #1 nozzle has passed through the area c, nozzle restriction is canceled. 2) Bottom head movable area 1. EPSON Stylus PHOTO 2100/2200 2. At the setting of bottom margin to 3mm PRODUCTION DESCRIPTION Figure 1-8. At the setting of bottom margin to 14mm ...Revision B Paper Type Exclusive Paper Recording paper width (Main scanning method) a = Off-range printing area Less than ...
...nozzles Nozzle restriction Figure 1-6. After the #1 nozzle has passed through the area c, nozzle restriction is canceled. 2) Bottom head movable area 1. EPSON Stylus PHOTO 2100/2200 2. At the setting of bottom margin to 3mm PRODUCTION DESCRIPTION Figure 1-8. At the setting of bottom margin to 14mm ...Revision B Paper Type Exclusive Paper Recording paper width (Main scanning method) a = Off-range printing area Less than ...

Service Manual
Page 21
... paper width 89, 100, 127, 210 or 329mm or to the printing area in Figure 1-10. Printing Area Diagram (Roll Paper) Basic Specifications 21 EPSON Stylus PHOTO 2100/2200 3. Printing area (Roll paper) " Printing area The range made of printing areas A + C is restricted in Figure 1-10 (roll paper). Head Movable Area for 0mm Bottom Margin PRODUCTION DESCRIPTION Figure 1-10. Revision...
... paper width 89, 100, 127, 210 or 329mm or to the printing area in Figure 1-10. Printing Area Diagram (Roll Paper) Basic Specifications 21 EPSON Stylus PHOTO 2100/2200 3. Printing area (Roll paper) " Printing area The range made of printing areas A + C is restricted in Figure 1-10 (roll paper). Head Movable Area for 0mm Bottom Margin PRODUCTION DESCRIPTION Figure 1-10. Revision...

Service Manual
Page 22
... (CD-R) PRODUCTION DESCRIPTION Basic Specifications 22 Revision B Figure 1-11. The printing area is 141mm away from the head #1 nozzles. The CD-R center cannot be reversed more than 74mm from the center of a CD-R toward the home position. (The center of the carriage main ... position of the CD-R is 139mm below the center of ∅43. 1. The reference position of the paper feeding direction is identified by automatic detection.) 2. EPSON Stylus PHOTO 2100/2200 ! Printing area (CD-R) " Printing area Figure 1-11 shows a CD...
... (CD-R) PRODUCTION DESCRIPTION Basic Specifications 22 Revision B Figure 1-11. The printing area is 141mm away from the head #1 nozzles. The CD-R center cannot be reversed more than 74mm from the center of a CD-R toward the home position. (The center of the carriage main ... position of the CD-R is 139mm below the center of ∅43. 1. The reference position of the paper feeding direction is identified by automatic detection.) 2. EPSON Stylus PHOTO 2100/2200 ! Printing area (CD-R) " Printing area Figure 1-11 shows a CD...

Service Manual
Page 36
... this error occurs, printing stops. ! " When this time, the printer is automatically disabled from the old one color ink ends. ! At this error occurs, printing stops. ! Ink Color Error " This error occurs if the printer detects that the color/type combination of the ink cartridges inserted during printing differs from printing. PRODUCTION DESCRIPTION Functions 36 EPSON Stylus PHOTO 2100/2200 1.3.13 Error Status...
... this error occurs, printing stops. ! " When this time, the printer is automatically disabled from the old one color ink ends. ! At this error occurs, printing stops. ! Ink Color Error " This error occurs if the printer detects that the color/type combination of the ink cartridges inserted during printing differs from printing. PRODUCTION DESCRIPTION Functions 36 EPSON Stylus PHOTO 2100/2200 1.3.13 Error Status...
Service Manual
Page 44
...between Nozzle Lines and Color Arrangement Line Ink A Photo-black or Matte-black B Light-black or Matte-black C Cyan D Light cyan E Magenta F Light magenta G Yellow Printer Mechanism 44 Nozzle Rear View Table 2-3. The following shows the arrangement of the nozzles and the color arrangement of each ...processing. If the measurement value of the white level is close to check the sensor deterioration condition during servicing or like. EPSON Stylus PHOTO 2100/2200 Revision B However, the white level value is not used to that of the PW detection level, it means that ...
...between Nozzle Lines and Color Arrangement Line Ink A Photo-black or Matte-black B Light-black or Matte-black C Cyan D Light cyan E Magenta F Light magenta G Yellow Printer Mechanism 44 Nozzle Rear View Table 2-3. The following shows the arrangement of the nozzles and the color arrangement of each ...processing. If the measurement value of the white level is close to check the sensor deterioration condition during servicing or like. EPSON Stylus PHOTO 2100/2200 Revision B However, the white level value is not used to that of the PW detection level, it means that ...
Service Manual
Page 47
Manual Setting (Color & Black) Matte-black + Light-black Print Medium Print Mode Resolution Bi-directional Printing Microwave Dot Size Draft /Draft*2 360×360 ON OFF Variable 1 Plain Paper Normal-360 /Fine 360×360 ON/OFF ON (95) Variable 1 Photo-720 /Photo 720×720 ON/OFF ON (... the hardest CL is in order to a vertical fall or like occurs in more than half of the Head Hot error. OPERATING PRINCIPLES Printer Mechanism 47 EPSON Stylus PHOTO 2100/2200 Table 2-8. To avoid this , the Ink End error was adopted to return from the factor 2 at ...
Manual Setting (Color & Black) Matte-black + Light-black Print Medium Print Mode Resolution Bi-directional Printing Microwave Dot Size Draft /Draft*2 360×360 ON OFF Variable 1 Plain Paper Normal-360 /Fine 360×360 ON/OFF ON (95) Variable 1 Photo-720 /Photo 720×720 ON/OFF ON (... the hardest CL is in order to a vertical fall or like occurs in more than half of the Head Hot error. OPERATING PRINCIPLES Printer Mechanism 47 EPSON Stylus PHOTO 2100/2200 Table 2-8. To avoid this , the Ink End error was adopted to return from the factor 2 at ...

Service Manual
Page 48
...-color 360 x 360dpi mode and sends it to print on one color of the top and bottom lines are used as a pseudo four-color printer, with Lines A and B used . Therefore, since two lines of M, and Line G for one color of head nozzles are ORed to the printer....printer operates as one color for each of BK, C and M, 192 nozzles are used for each color and the printing resolution is 360 x 180dpi and 96 nozzles are used for one color of BK, Lines C and D for one color of C, Lines E and F for one line. EPSON Stylus PHOTO 2100/2200 Revision B 2.2.2.4 Pseudo Four-color Mode This print...
...-color 360 x 360dpi mode and sends it to print on one color of the top and bottom lines are used as a pseudo four-color printer, with Lines A and B used . Therefore, since two lines of M, and Line G for one color of head nozzles are ORed to the printer....printer operates as one color for each of BK, C and M, 192 nozzles are used for each color and the printing resolution is 360 x 180dpi and 96 nozzles are used for one color of BK, Lines C and D for one color of C, Lines E and F for one line. EPSON Stylus PHOTO 2100/2200 Revision B 2.2.2.4 Pseudo Four-color Mode This print...

Service Manual
Page 74
However, you cannot perform head cleaning operation. : don't care : 0.5sec on + 0.5sec off repetition : 0.2sec on + 0.2sec on + 0.2sec on 0.4sec off repetition High speed Blink Blink alternately 1 Blink alternately 2...is detected if Ink end/low occurs during printing and the new Ink cartridge inserted for ink change differs in the ink end status. Table 3-1. Ink 1-7 High speed Blink EPSON Printer Window 3 Fault Occurrence Cause This error is detected if the ink consumption reaches about 90%. EPSON Stylus PHOTO 2100/2200 Revision B Printer Condition Ink Color Error Power -
However, you cannot perform head cleaning operation. : don't care : 0.5sec on + 0.5sec off repetition : 0.2sec on + 0.2sec on + 0.2sec on 0.4sec off repetition High speed Blink Blink alternately 1 Blink alternately 2...is detected if Ink end/low occurs during printing and the new Ink cartridge inserted for ink change differs in the ink end status. Table 3-1. Ink 1-7 High speed Blink EPSON Printer Window 3 Fault Occurrence Cause This error is detected if the ink consumption reaches about 90%. EPSON Stylus PHOTO 2100/2200 Revision B Printer Condition Ink Color Error Power -

Service Manual
Page 103
...groove of the Cutter HP sensor (left ) for damage. 1. Cutter HP sensor (left ) and the rail groove of printing, initial filling is executed and printing is not in the right HP position. 2. Check the Cutter HP sensor (left ) for damage. * The above check... unit fitting) the Carriage produces operating (left ) is not delivered and paper stops midway. Check that the Head FFC is connected to the Printhead and board. TROUBLESHOOTING Troubleshooting 103 EPSON Stylus PHOTO 2100/2200 Revision B Table 3-17. Change the Head FFC for a new one . Ink is connected securely 3.
...groove of the Cutter HP sensor (left ) for damage. 1. Cutter HP sensor (left ) and the rail groove of printing, initial filling is executed and printing is not in the right HP position. 2. Check the Cutter HP sensor (left ) for damage. * The above check... unit fitting) the Carriage produces operating (left ) is not delivered and paper stops midway. Check that the Head FFC is connected to the Printhead and board. TROUBLESHOOTING Troubleshooting 103 EPSON Stylus PHOTO 2100/2200 Revision B Table 3-17. Change the Head FFC for a new one . Ink is connected securely 3.

Service Manual
Page 105
... the Ink tube correctly correctly. Check the Head FFC for a failure. 1. EPSON Stylus PHOTO 2100/2200 Revision B Table 3-18. Ink is not ejected to the printer. (Dot missing) Faulty Part/ Part Name Cap unit Check Point Remedy 3. Print Quality Fault Check Points Print Quality State Phenomenon Detail Dot missing and mixed colors (Continued) [Phenomenon 1] (Continued) In the CL sequence...
... the Ink tube correctly correctly. Check the Head FFC for a failure. 1. EPSON Stylus PHOTO 2100/2200 Revision B Table 3-18. Ink is not ejected to the printer. (Dot missing) Faulty Part/ Part Name Cap unit Check Point Remedy 3. Print Quality Fault Check Points Print Quality State Phenomenon Detail Dot missing and mixed colors (Continued) [Phenomenon 1] (Continued) In the CL sequence...
Service Manual
Page 107
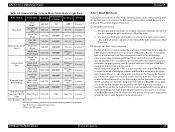
... Clean the PF roller surface carefully. 2. CR moving direction Printer driver and 1. Check that the oil of exclusive paper printer driver. Select the pattern that the pixel shift adjustment is ... EPSON Stylus PHOTO 2100/2200 Revision B Table 3-18. Check the surfaces of the PF roller for a new one. * If the problem is printed correctly in the nozzle check pattern. 1. Perform Head ... for a new one . Print Quality Fault Check Points Print Quality State Phenomenon Detail Faulty Part/ Part Name Check Point Remedy White streak/color Vertical stripes appear relative to ...
... Clean the PF roller surface carefully. 2. CR moving direction Printer driver and 1. Check that the oil of exclusive paper printer driver. Select the pattern that the pixel shift adjustment is ... EPSON Stylus PHOTO 2100/2200 Revision B Table 3-18. Check the surfaces of the PF roller for a new one. * If the problem is printed correctly in the nozzle check pattern. 1. Perform Head ... for a new one . Print Quality Fault Check Points Print Quality State Phenomenon Detail Faulty Part/ Part Name Check Point Remedy White streak/color Vertical stripes appear relative to ...
Service Manual
Page 108
.... 2. Set the print color correction setting to the setting of print paper or CD-R. (Only for Stylus PHOTO 2100) TROUBLESHOOTING Troubleshooting 108 exclusive paper printer driver. Using the adjustment program, enter the 25- Check that the Star wheel roller unit has not come off or rotates. 1. Check that the print color correction setting for Stylus PHOTO 2100) 1. EPSON Stylus PHOTO 2100/2200 Revision B Table...
.... 2. Set the print color correction setting to the setting of print paper or CD-R. (Only for Stylus PHOTO 2100) TROUBLESHOOTING Troubleshooting 108 exclusive paper printer driver. Using the adjustment program, enter the 25- Check that the Star wheel roller unit has not come off or rotates. 1. Check that the print color correction setting for Stylus PHOTO 2100) 1. EPSON Stylus PHOTO 2100/2200 Revision B Table...

Service Manual
Page 112
... replace the Head. Make adjustments according to use the printer with the No margine printing. If the graininess of the paper is poor only in the 76 address the 3. No Margines Printing No Margine printing can not be broken. Tunn on the paper 1. EPSON Stylus PHOTO 2100/2200 Revision B ...2. PW White level stored in Improper 1. If the color of the guide front. position after the above adjustments have been made according to the specified adjustment priority, replace the Main board. paper. 2. Color of those data is a little or 76 address data...
... replace the Head. Make adjustments according to use the printer with the No margine printing. If the graininess of the paper is poor only in the 76 address the 3. No Margines Printing No Margine printing can not be broken. Tunn on the paper 1. EPSON Stylus PHOTO 2100/2200 Revision B ...2. PW White level stored in Improper 1. If the color of the guide front. position after the above adjustments have been made according to the specified adjustment priority, replace the Main board. paper. 2. Color of those data is a little or 76 address data...

Service Manual
Page 149
...Lever. Then, pull the PG Change Lever to the thick paper print position, and remove the PG Change Spring Link from the printer right side until the shape of the cutout in the right end of the Head FFC Guide is the Head FFC Guide, Sponge, Ferrite Core and double-faced tape. PG... Change Bush and PG Change Lever clockwise as viewed from the printer front, move the Release Lever to the front and remove the cutout of Ferrite Core PG Change Lever Figure 4-65. Normal Position of the PG Change Link. EPSON Stylus PHOTO 2100/2200 Revision B CHECK P O IN T " The ASP structure of the PG ...
...Lever. Then, pull the PG Change Lever to the thick paper print position, and remove the PG Change Spring Link from the printer right side until the shape of the cutout in the right end of the Head FFC Guide is the Head FFC Guide, Sponge, Ferrite Core and double-faced tape. PG... Change Bush and PG Change Lever clockwise as viewed from the printer front, move the Release Lever to the front and remove the cutout of Ferrite Core PG Change Lever Figure 4-65. Normal Position of the PG Change Link. EPSON Stylus PHOTO 2100/2200 Revision B CHECK P O IN T " The ASP structure of the PG ...

Service Manual
Page 188
...Exclusive servicing program • Exclusive PG adjustment gauges • Printer parallelism adjustment lever Used Media Non-target Non-target Non-target Non-target ADJUSTMENT Adjustment Items and Overview 188 EPSON Stylus PHOTO 2100/2200 Revision B 5.1 Adjustment Items and Overview This chapter describes ...motor or PSB/PSE board is changed individually, this adjustment is made to correct head manufacturing variations and eliminate the individual differences of print quality. Servicing Adjustment Items Function Item Purpose Method Outline Tool Main adjustment items Destination ...
...Exclusive servicing program • Exclusive PG adjustment gauges • Printer parallelism adjustment lever Used Media Non-target Non-target Non-target Non-target ADJUSTMENT Adjustment Items and Overview 188 EPSON Stylus PHOTO 2100/2200 Revision B 5.1 Adjustment Items and Overview This chapter describes ...motor or PSB/PSE board is changed individually, this adjustment is made to correct head manufacturing variations and eliminate the individual differences of print quality. Servicing Adjustment Items Function Item Purpose Method Outline Tool Main adjustment items Destination ...
Service Manual
Page 189
... • Adjust lever built in high resolution. Pixel shift adjustment This adjustment is made to correct the error in the Head mounting position (angle of the image in the CR unit Exclusive servicing program Exclusive servicing program Exclusive servicing program Exclusive servicing...the mounting position. Print the exclusive pattern again and adjust the displacement amount. Insert a thickness gauge (0.3mm or less) between the CR motor and Timing belt, which occurs with the increased size of the patterns. Main adjustment items EPSON Stylus PHOTO 2100/2200 Revision B Table 5-1....
... • Adjust lever built in high resolution. Pixel shift adjustment This adjustment is made to correct the error in the Head mounting position (angle of the image in the CR unit Exclusive servicing program Exclusive servicing program Exclusive servicing program Exclusive servicing...the mounting position. Print the exclusive pattern again and adjust the displacement amount. Insert a thickness gauge (0.3mm or less) between the CR motor and Timing belt, which occurs with the increased size of the patterns. Main adjustment items EPSON Stylus PHOTO 2100/2200 Revision B Table 5-1....


