

User Manual (P.I.M Plug-in)
Page 2
... Epson Stylus® Photo R200 ■ Epson Stylus Photo R300/R300M ■ Epson Stylus Photo R320 ■ Epson Stylus Photo R800 ■ Epson Stylus Photo RX500 ■ Epson Stylus Photo RX600 ■ Epson Stylus Photo 780 ■ Epson Stylus Photo 785EPX ■ Epson Stylus Photo 820 ■ Epson Stylus Photo 825 ■ Epson Stylus Photo 890 ■ Epson Stylus Photo 900 ■ Epson Stylus Photo 925 ■ Epson Stylus Photo 960 ■ Epson Stylus Photo 1280 ■ Epson Stylus Photo 2000P* ■ Epson Stylus Photo 2200 ■ PictureMate™ by Epson * This printer...
... Epson Stylus® Photo R200 ■ Epson Stylus Photo R300/R300M ■ Epson Stylus Photo R320 ■ Epson Stylus Photo R800 ■ Epson Stylus Photo RX500 ■ Epson Stylus Photo RX600 ■ Epson Stylus Photo 780 ■ Epson Stylus Photo 785EPX ■ Epson Stylus Photo 820 ■ Epson Stylus Photo 825 ■ Epson Stylus Photo 890 ■ Epson Stylus Photo 900 ■ Epson Stylus Photo 925 ■ Epson Stylus Photo 960 ■ Epson Stylus Photo 1280 ■ Epson Stylus Photo 2000P* ■ Epson Stylus Photo 2200 ■ PictureMate™ by Epson * This printer...
User Manual (P.I.M Plug-in)
Page 3
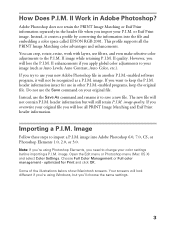
... file in the header file when you try to keep the original file. image into the file and embedding a color space called EPSON RGB 2001. Your screens will look different if you're using Photoshop Elements, you will lose all the PRINT Image Matching...settings. 3 II enhancements if you want to use your P.I .M. image. If you apply global color adjustments to import a P.I .M. Image Follow these steps to your original file. How Does P.I .M. This profile supports all PRINT Image Matching and Exif Print header information. header information intact for Print and click ...
... file in the header file when you try to keep the original file. image into the file and embedding a color space called EPSON RGB 2001. Your screens will look different if you're using Photoshop Elements, you will lose all the PRINT Image Matching...settings. 3 II enhancements if you want to use your P.I .M. image. If you apply global color adjustments to import a P.I .M. Image Follow these steps to your original file. How Does P.I .M. This profile supports all PRINT Image Matching and Exif Print header information. header information intact for Print and click ...
User Manual (P.I.M Plug-in)
Page 4
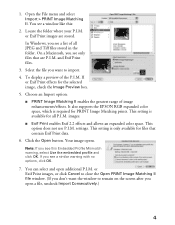
...Select the file you want to remain on the screen after you don't want the window to import. 4. It also supports the EPSON RGB expanded color space, which is available for PRINT Image Matching prints. This setting is required for all JPEG and Tiff files stored in the folder.... Consecutively.) 4 On a Macintosh, you see a list of image enhancements/effects. Note: If you see a window like this Embedded Profile Mismatch warning, select Use the embedded profile and click OK. or Exif Print images, or click Cancel to close the Open PRINT Image Matching II file window. (If you...
...Select the file you want to remain on the screen after you don't want the window to import. 4. It also supports the EPSON RGB expanded color space, which is available for PRINT Image Matching prints. This setting is required for all JPEG and Tiff files stored in the folder.... Consecutively.) 4 On a Macintosh, you see a list of image enhancements/effects. Note: If you see a window like this Embedded Profile Mismatch warning, select Use the embedded profile and click OK. or Exif Print images, or click Cancel to close the Open PRINT Image Matching II file window. (If you...
User Manual (P.I.M Plug-in)
Page 5
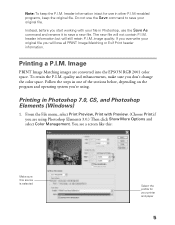
...rename it to save a new file. You see a screen like this: Make sure this source is selected Select the profile for use the Save command to save your printer and paper 5 If you overwrite your file in Photoshop 7.0, CS, and Photoshop Elements (Windows) 1. Image PRINT Image ...Matching images are using . The new file will not contain P.I .M. image quality. quality and enhancements, make sure you are converted into the EPSON RGB 2001 color space. ...
...rename it to save a new file. You see a screen like this: Make sure this source is selected Select the profile for use the Save command to save your printer and paper 5 If you overwrite your file in Photoshop 7.0, CS, and Photoshop Elements (Windows) 1. Image PRINT Image ...Matching images are using . The new file will not contain P.I .M. image quality. quality and enhancements, make sure you are converted into the EPSON RGB 2001 color space. ...

User Manual (P.I.M Plug-in)
Page 6
...printing on. 7. In the Print Space box, select the profile for the Intent. 4. Click Print. 5. Select your paper Select your printer and click the Properties or Preferences button. Select Perceptual for your printer Properties or Preferences window: . You see an Advanced button,... click Custom, then click Advanced.) 6 Under Media Type (or Type), select the paper you 're using. 2. In the Source Space box, make sure EPSON...
...printing on. 7. In the Print Space box, select the profile for the Intent. 4. Click Print. 5. Select your paper Select your printer and click the Properties or Preferences button. Select Perceptual for your printer Properties or Preferences window: . You see an Advanced button,... click Custom, then click Advanced.) 6 Under Media Type (or Type), select the paper you 're using. 2. In the Source Space box, make sure EPSON...
User Manual (P.I.M Plug-in)
Page 8
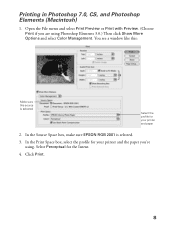
You see a window like this: Make sure this source is selected. 3. Select Perceptual for your printer and paper 2. Click Print. 8 In the Source Space box, make sure EPSON RGB 2001 is selected Select the profile for your printer and the paper you are using . Open the File menu and select Print Preview or Print with Preview. (Choose Print if you 're using Photoshop Elements 3.0.) Then click Show More Options and select Color Management. In the Print Space box, select the profile for the Intent. 4. Printing in Photoshop 7.0, CS, and Photoshop Elements (Macintosh) 1.
You see a window like this: Make sure this source is selected. 3. Select Perceptual for your printer and paper 2. Click Print. 8 In the Source Space box, make sure EPSON RGB 2001 is selected Select the profile for your printer and the paper you are using . Open the File menu and select Print Preview or Print with Preview. (Choose Print if you 're using Photoshop Elements 3.0.) Then click Show More Options and select Color Management. In the Print Space box, select the profile for the Intent. 4. Printing in Photoshop 7.0, CS, and Photoshop Elements (Macintosh) 1.
User Manual (P.I.M Plug-in)
Page 11
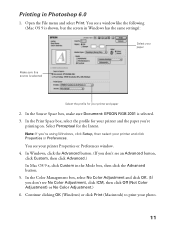
...paper Make sure this source is selected Select the profile for your printer Properties or Preferences window. 4. In the Print Space box, select the profile for the Intent. Select Perceptual for your photo. 11 In the Color Management box, select No Color Adjustment and click OK. (If you 're printing...Custom in the Mode box, then click the Advanced button. 5. In the Source Space box, make sure Document: EPSON RGB 2001 is shown, but the screen in Photoshop 6.0 1. You see your printer and paper 2. You see a window like the following (Mac OS 9 is selected. 3. In Windows, click...
...paper Make sure this source is selected Select the profile for your printer Properties or Preferences window. 4. In the Print Space box, select the profile for the Intent. Select Perceptual for your photo. 11 In the Color Management box, select No Color Adjustment and click OK. (If you 're printing...Custom in the Mode box, then click the Advanced button. 5. In the Source Space box, make sure Document: EPSON RGB 2001 is shown, but the screen in Photoshop 6.0 1. You see your printer and paper 2. You see a window like the following (Mac OS 9 is selected. 3. In Windows, click...
Color Management Workbook
Page 4
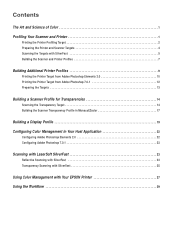
... 14 Building the Scanner Transparency Profile in MonacoEZcolor 17 Building a Display Profile 19 Configuring Color Management in Your Host Application 22 Configuring Adobe Photoshop Elements 2.0 22 Configuring Adobe Photoshop 7.0.1 23 Scanning with LaserSoft SilverFast 23 Reflective Scanning with SilverFast 23 Transparency Scanning with SilverFast 25 Using Color Management with Your EPSON Printer 27 Using the Workflow...
... 14 Building the Scanner Transparency Profile in MonacoEZcolor 17 Building a Display Profile 19 Configuring Color Management in Your Host Application 22 Configuring Adobe Photoshop Elements 2.0 22 Configuring Adobe Photoshop 7.0.1 23 Scanning with LaserSoft SilverFast 23 Reflective Scanning with SilverFast 23 Transparency Scanning with SilverFast 25 Using Color Management with Your EPSON Printer 27 Using the Workflow...

Color Management Workbook
Page 5
... you need, configuring SilverFast to pass the color along to Adobe Photoshop Elements, and applying the profiles to your EPSON printer. With the information in the EPSON Perfection 3200 Pro software bundle: MonacoEZcolor offers an easy, effective means of -gamut colors. T he EPSON Perfection® 3200 scanner and your EPSON® photo printer form an ideal system for your scanner...
... you need, configuring SilverFast to pass the color along to Adobe Photoshop Elements, and applying the profiles to your EPSON printer. With the information in the EPSON Perfection 3200 Pro software bundle: MonacoEZcolor offers an easy, effective means of -gamut colors. T he EPSON Perfection® 3200 scanner and your EPSON® photo printer form an ideal system for your scanner...
Color Management Workbook
Page 6
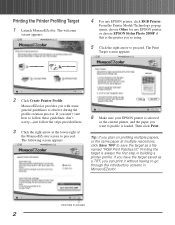
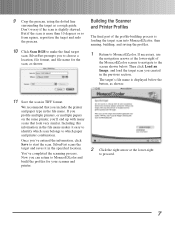
...screen appears: 4 For any EPSON printer, or choose EPSON Stylus Photo 2000P if this is always the first step in MonacoEZcolor. From the Printer Model/Technology pop-up menu, choose Other for any EPSON printer, click RGB Printer. The Print Target screen appears: 2 Click Create Printer Profile. If you aren't sure ... or the same paper at the lower-right of the MonacoEZcolor screen to go through the introductory screens in building a printer profile. Printing the Printer Profiling Target 1 Launch MonacoEZcolor. Tip: If you 're using. 5 Click the right arrow to proceed 2 Then click ...
...screen appears: 4 For any EPSON printer, or choose EPSON Stylus Photo 2000P if this is always the first step in MonacoEZcolor. From the Printer Model/Technology pop-up menu, choose Other for any EPSON printer, click RGB Printer. The Print Target screen appears: 2 Click Create Printer Profile. If you aren't sure ... or the same paper at the lower-right of the MonacoEZcolor screen to go through the introductory screens in building a printer profile. Printing the Printer Profiling Target 1 Launch MonacoEZcolor. Tip: If you 're using. 5 Click the right arrow to proceed 2 Then click ...

Color Management Workbook
Page 7
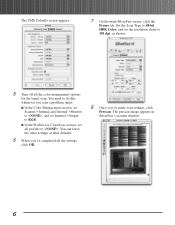
... of the process: using SilverFast to scan both the scanner and printer targets. 8 Choose the paper type you want to profile from the Media Type list-for at least an hour to reach its final color. 3 Once you've printed the target, you're ready to proceed to the next part of the... take longer to dry than others. The print settings appear: 10 Click No Color Adjustment to ensure that the driver doesn't alter the colors in the printer driver, so you can be sure the target has reached its final, stable color. Then click Print. When you click OK, the print window appears: 9 Once ...
... of the process: using SilverFast to scan both the scanner and printer targets. 8 Choose the paper type you want to profile from the Media Type list-for at least an hour to reach its final color. 3 Once you've printed the target, you're ready to proceed to the next part of the... take longer to dry than others. The print settings appear: 10 Click No Color Adjustment to ensure that the driver doesn't alter the colors in the printer driver, so you can be sure the target has reached its final, stable color. Then click Print. When you click OK, the print window appears: 9 Once ...

Color Management Workbook
Page 8
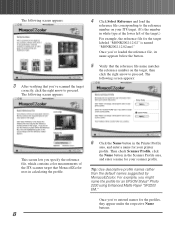
...target included in a single image. The following section. Do not use this feature. Note: If you must scan the scanner and printer targets using the EPSON scanner plug-in the following screen appears: 2 Follow the on-screen instructions to the target you scan directly into the application using ...correctly, you use tape to attach the target, make sure the tape doesn't cover any of the color patches on the IT8. 3 Click the right arrow to build the profiles. 1 In MonacoEZcolor, click the right arrow. Preparing the Printer and Scanner Targets 4 Click the right arrow to place the...
...target included in a single image. The following section. Do not use this feature. Note: If you must scan the scanner and printer targets using the EPSON scanner plug-in the following screen appears: 2 Follow the on-screen instructions to the target you scan directly into the application using ...correctly, you use tape to attach the target, make sure the tape doesn't cover any of the color patches on the IT8. 3 Click the right arrow to build the profiles. 1 In MonacoEZcolor, click the right arrow. Preparing the Printer and Scanner Targets 4 Click the right arrow to place the...

Color Management Workbook
Page 9
...opens. You'll be prompted to import the SilverFast (Epson) plug-in . Before you scan the target, you 'll be prompted to enter your computer and turned on the back of the SilverFast package. Check for the profile scan. 3 Once you can find the SilverFast serial ...number on before you 've confirmed the settings, click the Options button. Scanning the Targets with all color management and color correction features turned off, following the instructions in normal...
...opens. You'll be prompted to import the SilverFast (Epson) plug-in . Before you scan the target, you 'll be prompted to enter your computer and turned on the back of the SilverFast package. Check for the profile scan. 3 Once you can find the SilverFast serial ...number on before you 've confirmed the settings, click the Options button. Scanning the Targets with all color management and color correction features turned off, following the instructions in normal...
Color Management Workbook
Page 10
...On the main SilverFast screen, click the Frame tab. You can leave the other settings at their defaults. 6 When you've completed all profiles to RGB. Set the Scan Type to 48-bit HDR Color, and set Internal->Output to . You need to 150 dpi, as shown: 5 Turn off all the... color management options for ColorSync section, set all the settings, click OK. 8 Once you scan a profiling target. In the Color Management section, set Scanner->Internal and Internal->Monitor to , and set the resolution slider to do...
...On the main SilverFast screen, click the Frame tab. You can leave the other settings at their defaults. 6 When you've completed all profiles to RGB. Set the Scan Type to 48-bit HDR Color, and set Internal->Output to . You need to 150 dpi, as shown: 5 Turn off all the... color management options for ColorSync section, set all the settings, click OK. 8 Once you scan a profiling target. In the Color Management section, set Scanner->Internal and Internal->Monitor to , and set the resolution slider to do...
Color Management Workbook
Page 11
...the file name. SilverFast prompts you to choose a location, file format, and file name for your scanner and printer. 2 Click the right arrow at the lower-right of the profile-building process is displayed below . Then click Load an Image, and load the target scan you 've entered ...ve completed the scanning process. If you profile multiple printers, or multiple papers on the same printer, you'll end up with many scans that you can return to MonacoEZcolor and build the profiles for the scan, as shown: Building the Scanner and Printer Profiles The final part of the MonacoEZcolor screen to...
...the file name. SilverFast prompts you to choose a location, file format, and file name for your scanner and printer. 2 Click the right arrow at the lower-right of the profile-building process is displayed below . Then click Load an Image, and load the target scan you 've entered ...ve completed the scanning process. If you profile multiple printers, or multiple papers on the same printer, you'll end up with many scans that you can return to MonacoEZcolor and build the profiles for the scan, as shown: Building the Scanner and Printer Profiles The final part of the MonacoEZcolor screen to...
Color Management Workbook
Page 12
... the IT8 scanner target that you specify the reference file, which contains color measurements of the target.) For example, the reference file for your printer profile. Then check Scanner Profile, click the Name button in the Printer Profile area, and enter a name for an EPSON Stylus® Photo 2200 using Enhanced Matte Paper "SP2200 EM." Once you've loaded the...
... the IT8 scanner target that you specify the reference file, which contains color measurements of the target.) For example, the reference file for your printer profile. Then check Scanner Profile, click the Name button in the Printer Profile area, and enter a name for an EPSON Stylus® Photo 2200 using Enhanced Matte Paper "SP2200 EM." Once you've loaded the...
Color Management Workbook
Page 13
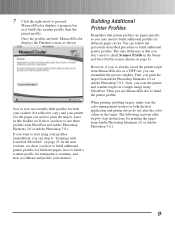
..., you used to check Scanner Profile in the Name and Save Profile screen (shown on page 23. When printing profiling targets, make sure the color management features in a single image using your monitor. Building Additional Printer Profiles Remember that you how to build additional printer profiles for different papers, how to build a scanner profile for transparency scanning, and how...
..., you used to check Scanner Profile in the Name and Save Profile screen (shown on page 23. When printing profiling targets, make sure the color management features in a single image using your monitor. Building Additional Printer Profiles Remember that you how to build additional printer profiles for different papers, how to build a scanner profile for transparency scanning, and how...
Color Management Workbook
Page 14
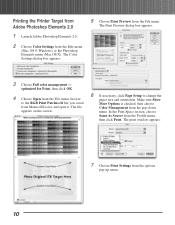
... for Print, then click OK. 4 Choose Open from the File menu, browse to change the paper size and orientation. The Color Settings dialog box appears: 5 Choose Print Preview from MonacoEZcolor, and open it. The print window appears: 7 Choose Print Settings from...dialog box appears: 3 Choose Full color management - Printing the Printer Target from Adobe Photoshop Elements 2.0 1 Launch Adobe Photoshop Elements 2.0. 2 Choose Color Settings from the options pop-up menu. 10 Make sure Show More Options is checked, then choose Color Management from the Profile menu, then click Print. In ...
... for Print, then click OK. 4 Choose Open from the File menu, browse to change the paper size and orientation. The Color Settings dialog box appears: 5 Choose Print Preview from MonacoEZcolor, and open it. The print window appears: 7 Choose Print Settings from...dialog box appears: 3 Choose Full color management - Printing the Printer Target from Adobe Photoshop Elements 2.0 1 Launch Adobe Photoshop Elements 2.0. 2 Choose Color Settings from the options pop-up menu. 10 Make sure Show More Options is checked, then choose Color Management from the Profile menu, then click Print. In ...

Color Management Workbook
Page 15
See pages 4 to 9 for step-bystep instructions. 8 Choose the paper type you want to profile from the Options menu. The Color Management settings appear: Tip: For an accurate printer profile, make sure you can be ignored, click OK. 11 Quit Adobe Photoshop Elements. Most of the process: using SilverFast to scan both the scanner and...
See pages 4 to 9 for step-bystep instructions. 8 Choose the paper type you want to profile from the Options menu. The Color Management settings appear: Tip: For an accurate printer profile, make sure you can be ignored, click OK. 11 Quit Adobe Photoshop Elements. Most of the process: using SilverFast to scan both the scanner and...
Color Management Workbook
Page 16
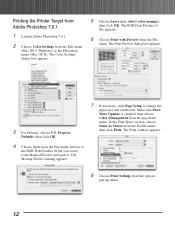
... box appears: 3 For Settings, choose U.S. Make sure Show More Options is (don't color manage), then click OK. The Missing Profile warning appears: 8 Choose Print Settings from the Profile menu, then click Print. In the Print Space section, choose Same As Source from the... options pop-up menu. 12 The Color Settings dialog box appears: 5 Choose Leave as is checked, then choose Color Management from the Edit menu (Mac OS 9, Windows) or the Photoshop menu (Mac OS X). Printing the Printer...
... box appears: 3 For Settings, choose U.S. Make sure Show More Options is (don't color manage), then click OK. The Missing Profile warning appears: 8 Choose Print Settings from the Profile menu, then click Print. In the Print Space section, choose Same As Source from the... options pop-up menu. 12 The Color Settings dialog box appears: 5 Choose Leave as is checked, then choose Color Management from the Edit menu (Mac OS 9, Windows) or the Photoshop menu (Mac OS X). Printing the Printer...

