

Printer Basics
Page 79
...Printer Parts Left edge guide Paper support and extension Sheet feeder Control panel Output tray and extensions Roll paper holder Roll paper edge guide Auto cutter connector (Automatic roll paper cutter and basket not pictured) Adjust lever Interface ports Manual feed slot 73 Download instructions are posted for free updates to your printer...Uninstalling and Reinstalling Printer Software" on page 82 ■ "Where To Get Help" on page 74 to help determine what the cause of your convenience. Visit http://support.epson.com. Solving Problems See "Diagnosing Printer Problems" on...
...Printer Parts Left edge guide Paper support and extension Sheet feeder Control panel Output tray and extensions Roll paper holder Roll paper edge guide Auto cutter connector (Automatic roll paper cutter and basket not pictured) Adjust lever Interface ports Manual feed slot 73 Download instructions are posted for free updates to your printer...Uninstalling and Reinstalling Printer Software" on page 82 ■ "Where To Get Help" on page 74 to help determine what the cause of your convenience. Visit http://support.epson.com. Solving Problems See "Diagnosing Printer Problems" on...

Service Manual
Page 2
...trademarks of this manual. All rights reserved. The contents of this manual. Copyright © 2002 SEIKO EPSON CORPORATION. All effort have been made to change without the prior written permission of this manual or the consequences thereof. EPSON is a ...EPSON would greatly appreciate being informed of SEIKO EPSON CORPORATION. General Notice:Other product names used herein are subject to ensure the accuracy of the contents of their respective owners. Notice ! No part of SEIKO EPSON CORPORATION. ! EPSON disclaims any errors be detected, SEIKO EPSON...
...trademarks of this manual. All rights reserved. The contents of this manual. Copyright © 2002 SEIKO EPSON CORPORATION. All effort have been made to change without the prior written permission of this manual or the consequences thereof. EPSON is a ...EPSON would greatly appreciate being informed of SEIKO EPSON CORPORATION. General Notice:Other product names used herein are subject to ensure the accuracy of the contents of their respective owners. Notice ! No part of SEIKO EPSON CORPORATION. ! EPSON disclaims any errors be detected, SEIKO EPSON...

Service Manual
Page 3
... TO WEAR GLOVES TO AVOID INJURIER FROM METAL PARTS WITH SHARP EDGES. WHEN PERFORMING TESTING AS DICTATED WITHIN THIS MANUAL, DO NOT CONNECT THE UNIT TO A POWER SOURCE UNTIL INSTRUCTED TO DO SO. REPAIRS ON EPSON PRODUCT SHOULD BE PERFORMED ONLY BY AN EPSON CERTIFIED REPAIR TECHNICIAN. 2. WHEN THE POWER SUPPLY... TO THE POWER SOURCE. 3. DANGER Signals a precaution which , if ignored, could result in serious or fatal personal injury. ALWAYS VERIFY THAT THE EPSON PRODUCT HAS BEEN DISCONNECTED FROM THE POWER SOURCE BEFORE REMOVING OR REPLACING PRINTED CIRCUIT BOARDS AND/OR INDIVIDUAL CHIPS. 4.
... TO WEAR GLOVES TO AVOID INJURIER FROM METAL PARTS WITH SHARP EDGES. WHEN PERFORMING TESTING AS DICTATED WITHIN THIS MANUAL, DO NOT CONNECT THE UNIT TO A POWER SOURCE UNTIL INSTRUCTED TO DO SO. REPAIRS ON EPSON PRODUCT SHOULD BE PERFORMED ONLY BY AN EPSON CERTIFIED REPAIR TECHNICIAN. 2. WHEN THE POWER SUPPLY... TO THE POWER SOURCE. 3. DANGER Signals a precaution which , if ignored, could result in serious or fatal personal injury. ALWAYS VERIFY THAT THE EPSON PRODUCT HAS BEEN DISCONNECTED FROM THE POWER SOURCE BEFORE REMOVING OR REPLACING PRINTED CIRCUIT BOARDS AND/OR INDIVIDUAL CHIPS. 4.

Service Manual
Page 4
...step procedures for servicing the product. ADJUSTMENT Provides Epson-approved methods for the troubleshooting. About This Manual This manual describes basic functions, theory of electrical and ... of the printer. A D J U S T M E N T Indicates an operating or maintenance procedure, practice or R E Q U I R E D condition that , if not strictly observed, could result in this manual either to ...diagram & Parts List • Electric circuit boards components layout • Electrical circuit boards schematics Various symbols are used throughout this Manual This manual consists of...
...step procedures for servicing the product. ADJUSTMENT Provides Epson-approved methods for the troubleshooting. About This Manual This manual describes basic functions, theory of electrical and ... of the printer. A D J U S T M E N T Indicates an operating or maintenance procedure, practice or R E Q U I R E D condition that , if not strictly observed, could result in this manual either to ...diagram & Parts List • Electric circuit boards components layout • Electrical circuit boards schematics Various symbols are used throughout this Manual This manual consists of...
Service Manual
Page 62
...CL1. Flushing operation Prevent color mixture. Wiper operation Clean the nozzle surface with the right-half rubber part of the wiper. - When the nozzle check pattern and the above manual CL are disabled and STM3 shows the condition. EPSON Stylus PHOTO 2100/2200 ! Independently of the monochrome or color I/C is short or...timer counter is CL1 to CL2 to CL3 to CL4 to CL4 in the printer driver. Flushing operation Prevent color mixture. Wiper operation Clean the nozzle surface with the right-half rubber part of the wiper. - If the remaining ink amount of the printing path ...
...CL1. Flushing operation Prevent color mixture. Wiper operation Clean the nozzle surface with the right-half rubber part of the wiper. - When the nozzle check pattern and the above manual CL are disabled and STM3 shows the condition. EPSON Stylus PHOTO 2100/2200 ! Independently of the monochrome or color I/C is short or...timer counter is CL1 to CL2 to CL3 to CL4 to CL4 in the printer driver. Flushing operation Prevent color mixture. Wiper operation Clean the nozzle surface with the right-half rubber part of the wiper. - If the remaining ink amount of the printing path ...

Service Manual
Page 82
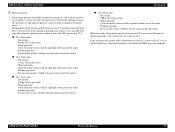
...Table 3-4. Phenomenon-Based Release Lever Error Check Points Faulty Part/ Part Name Check Point Remedy Release lever Release lever sensor 1....manually in the front position and the Paper guide is closed but Release lever error is displayed. Check that the Release lever sensor connector cable is connected 1. Release lever sensor 2. Change the Release lever sensor for Stylus PHOTO 2100) 1. EPSON Stylus PHOTO 2100/2200... Revision B Occurrence Timing Phenomenon Detail At power-on At power-on, the Paper guide of the Printer ...
...Table 3-4. Phenomenon-Based Release Lever Error Check Points Faulty Part/ Part Name Check Point Remedy Release lever Release lever sensor 1....manually in the front position and the Paper guide is closed but Release lever error is displayed. Check that the Release lever sensor connector cable is connected 1. Release lever sensor 2. Change the Release lever sensor for Stylus PHOTO 2100) 1. EPSON Stylus PHOTO 2100/2200... Revision B Occurrence Timing Phenomenon Detail At power-on At power-on, the Paper guide of the Printer ...

Service Manual
Page 101
...4V or more 2. If the voltage value is abnormal, change the ASF sensor for damage, and turn the ASF sensor wheel manually and check that the ASF sensor connector cable is as indicated below with the right or left or right end. Check that... and Main board securely. Phenomenon-Based Fatal Error Check Points Occurrence Timing Phenomenon Detail Faulty Part/Part Name Check Point At power-on At power-on , the ASF hopper produces operating noise. Remedy 1. EPSON Stylus PHOTO 2100/2200 Revision B Table 3-17. CR scale 1. TROUBLESHOOTING Troubleshooting 101
...4V or more 2. If the voltage value is abnormal, change the ASF sensor for damage, and turn the ASF sensor wheel manually and check that the ASF sensor connector cable is as indicated below with the right or left or right end. Check that... and Main board securely. Phenomenon-Based Fatal Error Check Points Occurrence Timing Phenomenon Detail Faulty Part/Part Name Check Point At power-on At power-on , the ASF hopper produces operating noise. Remedy 1. EPSON Stylus PHOTO 2100/2200 Revision B Table 3-17. CR scale 1. TROUBLESHOOTING Troubleshooting 101

Service Manual
Page 116
... " To prevent injury from sharp metal edges, always wear gloves for any units or parts that could result in injury or loss of life, if cautions are not taken, are ..., such as anti-static wrist straps, and handle them carefully when accessing the internal components. EPSON Stylus PHOTO 2100/2200 Revision B 4.1 Overview This chapter describes procedures for disassembling and assembling this product, always disconnect ... the procedures in your eyes, wash your eyes from the reverse procedure of this manual to do your skin, wash it has caused skin irritation, see the doctor. Unless...
... " To prevent injury from sharp metal edges, always wear gloves for any units or parts that could result in injury or loss of life, if cautions are not taken, are ..., such as anti-static wrist straps, and handle them carefully when accessing the internal components. EPSON Stylus PHOTO 2100/2200 Revision B 4.1 Overview This chapter describes procedures for disassembling and assembling this product, always disconnect ... the procedures in your eyes, wash your eyes from the reverse procedure of this manual to do your skin, wash it has caused skin irritation, see the doctor. Unless...

Service Manual
Page 249
...LEAF SPRING LEVER CLEANER 1050346 BUSHING PULLEY DRIVEN 1058063 BUSH PG CHANGE RIGHT APPENDIX Parts List for EPSON Stylus Photo 2100 Parts Code Parts Name 1103743 STOPPER HOLDER PUREY 1104240 PAPER GUIDE MANUAL;B 1090723 BELT PUMP 1048834 SPUR GEAR 15.2" 1092108 MINI CLAMP UMAS-02WL-0 ...557' '558' '559' '560' '561' '562' '563' '564' '565' '566' '567' '568' '569' '570' '571' '572' '573' '575' '576' Table 7- 17. EPSON Stylus PHOTO 2100/2200 No '517' '518' '519' '520' '521' '522' '523' '524' '525' '526' '527' '528' '529' '530' '531' '532' '533' '534' '535' '536' ...
...LEAF SPRING LEVER CLEANER 1050346 BUSHING PULLEY DRIVEN 1058063 BUSH PG CHANGE RIGHT APPENDIX Parts List for EPSON Stylus Photo 2100 Parts Code Parts Name 1103743 STOPPER HOLDER PUREY 1104240 PAPER GUIDE MANUAL;B 1090723 BELT PUMP 1048834 SPUR GEAR 15.2" 1092108 MINI CLAMP UMAS-02WL-0 ...557' '558' '559' '560' '561' '562' '563' '564' '565' '566' '567' '568' '569' '570' '571' '572' '573' '575' '576' Table 7- 17. EPSON Stylus PHOTO 2100/2200 No '517' '518' '519' '520' '521' '522' '523' '524' '525' '526' '527' '528' '529' '530' '531' '532' '533' '534' '535' '536' ...


