
Color Management Workbook
Page 29
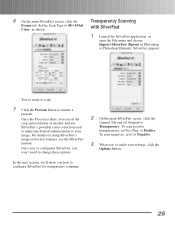
... and resolution as shown: Transparency Scanning with SilverFast 1 Launch the SilverFast application, or open the File menu and choose Import>SilverFast (Epson) in Photoshop or Photoshop Elements. Once the Prescan is done, you can set it to Negative. 3 When you've made your...powerful color-correction tools to make any desired enhancements to Transparency. To scan positive transparencies, set Original to your settings, click the Options button. 6 On the main SilverFast screen, click the Frame tab. For details on using SilverFast's image-correction features, see the SilverFast manual....
... and resolution as shown: Transparency Scanning with SilverFast 1 Launch the SilverFast application, or open the File menu and choose Import>SilverFast (Epson) in Photoshop or Photoshop Elements. Once the Prescan is done, you can set it to Negative. 3 When you've made your...powerful color-correction tools to make any desired enhancements to Transparency. To scan positive transparencies, set Original to your settings, click the Options button. 6 On the main SilverFast screen, click the Frame tab. For details on using SilverFast's image-correction features, see the SilverFast manual....
Color Management Workbook
Page 30
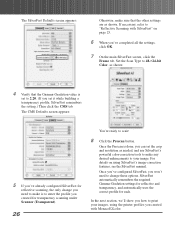
...you can set it while building a transparency profile, SilverFast remembers the setting.) Then click the CMS tab. For details on using the printer profiles you created with SilverFast" on page 23. 6 When you've completed all the settings, click OK. 7 On the main ... 4 Verify that the other settings are as needed, and use SilverFast's powerful color-correction tools to make any desired enhancements to your images, using SilverFast's image-correction features, see the SilverFast manual. If necessary, refer to "Reflective Scanning with MonacoEZcolor. Once you've configured SilverFast...
...you can set it while building a transparency profile, SilverFast remembers the setting.) Then click the CMS tab. For details on using the printer profiles you created with SilverFast" on page 23. 6 When you've completed all the settings, click OK. 7 On the main ... 4 Verify that the other settings are as needed, and use SilverFast's powerful color-correction tools to make any desired enhancements to your images, using SilverFast's image-correction features, see the SilverFast manual. If necessary, refer to "Reflective Scanning with MonacoEZcolor. Once you've configured SilverFast...

Printer Basics
Page 3
...! PRINT Image Matching and Exif Print About PRINT Image Matching About Exif Print About Your Software About Your Documentation Using the EPSON Printer Information Center Launching the Movies Launching the Manual Printer Buttons and Lights Loading Paper Loading Paper in the Sheet Feeder Loading Special Paper Loading Envelopes Loading Roll Paper Installing the Roll...
...! PRINT Image Matching and Exif Print About PRINT Image Matching About Exif Print About Your Software About Your Documentation Using the EPSON Printer Information Center Launching the Movies Launching the Manual Printer Buttons and Lights Loading Paper Loading Paper in the Sheet Feeder Loading Special Paper Loading Envelopes Loading Roll Paper Installing the Roll...
Printer Basics
Page 7
Your EPSON Stylus® Photo 2200 is the ultimate desktop printer for thick paper (up to 0.05-inch) gives you more media choices than ever before. ■ Roll paper feeder and automatic roll paper cutter enable ... let you print panoramics, portraits, and specialty prints up to 13 × 44 inches. ■ Straight-through, manual feed slot for professional and amateur photography. Your outstanding printouts result from these advanced features: ■ EPSON's 7-color inks let you print up to 2880 × 1440 dpi (dots per inch). ■ Large gamut, pigment...
Your EPSON Stylus® Photo 2200 is the ultimate desktop printer for thick paper (up to 0.05-inch) gives you more media choices than ever before. ■ Roll paper feeder and automatic roll paper cutter enable ... let you print panoramics, portraits, and specialty prints up to 13 × 44 inches. ■ Straight-through, manual feed slot for professional and amateur photography. Your outstanding printouts result from these advanced features: ■ EPSON's 7-color inks let you print up to 2880 × 1440 dpi (dots per inch). ■ Large gamut, pigment...

Printer Basics
Page 11
Follow the instructions on your equipment. Double-click the EPSON Printer Information Center icon on the Start Here sheet to install the EPSON Printer Information Center, if you haven't already. Click a movie title. Click Exit to view the manual. Welcome! 5 Cautions must be observed to avoid damage to ...® Internet Explorer 4.0 or later or Netscape® Navigator® 3.0 or later-to exit EPSON Print Show. Use the program tools to view printer movies and a manual that quickly tell you are using a different browser, the pages may not display correctly. Tips contain...
Follow the instructions on your equipment. Double-click the EPSON Printer Information Center icon on the Start Here sheet to install the EPSON Printer Information Center, if you haven't already. Click a movie title. Click Exit to view the manual. Welcome! 5 Cautions must be observed to avoid damage to ...® Internet Explorer 4.0 or later or Netscape® Navigator® 3.0 or later-to exit EPSON Print Show. Use the program tools to view printer movies and a manual that quickly tell you are using a different browser, the pages may not display correctly. Tips contain...

Printer Basics
Page 12
Launching the Manual 1. Click Reference Guide. Click a topic on a topic. ■ Click down arrows to expand the table of contents 3. Closed list, click to expand Click to go ... Note: If you want to view. ■ Click right arrows to view subtopics, then click on the left to close a subtopic list. Double-click the EPSON Printer Information Center icon on the topic you see this screen: Click a topic to load the graphic. 6 Welcome! You see an icon for a graphic when viewing...
Launching the Manual 1. Click Reference Guide. Click a topic on a topic. ■ Click down arrows to expand the table of contents 3. Closed list, click to expand Click to go ... Note: If you want to view. ■ Click right arrows to view subtopics, then click on the left to close a subtopic list. Double-click the EPSON Printer Information Center icon on the topic you see this screen: Click a topic to load the graphic. 6 Welcome! You see an icon for a graphic when viewing...

Printer Basics
Page 16
...size paper EPSON Premium Glossy Photo Paper 1 sheet at a time EPSON Velvet Fine Art Paper 1 sheet at a time EPSON Premium Luster Photo Paper 20 sheets of letter-size paper; 1 sheet of A3- Radiant White 1 sheet at a time; manual feed slot only EPSON Premium ...manual feed slot, following the instructions on page 17. ■ Check the paper package for additional handling instructions. ■ Set the adjust lever on the side of Super B-size paper EPSON Watercolor Paper - or Super B-size paper EPSON Premium Semigloss Photo Paper 20 sheets of letter-size paper; 1 sheet of the printer...
...size paper EPSON Premium Glossy Photo Paper 1 sheet at a time EPSON Velvet Fine Art Paper 1 sheet at a time EPSON Premium Luster Photo Paper 20 sheets of letter-size paper; 1 sheet of A3- Radiant White 1 sheet at a time; manual feed slot only EPSON Premium ...manual feed slot, following the instructions on page 17. ■ Check the paper package for additional handling instructions. ■ Set the adjust lever on the side of Super B-size paper EPSON Watercolor Paper - or Super B-size paper EPSON Premium Semigloss Photo Paper 20 sheets of letter-size paper; 1 sheet of the printer...

Printer Basics
Page 23
...the leading edge so it into the printer as EPSON Velvet Fine Art Paper, in the manual feed slot when you slide the paper into the manual feed slot. Note: You can load thick paper, such as you 're printing with no folded edges. Open the printer cover and look down into the ... lever to the ! Note: You must be on Thick Paper You can 't print on thick paper in the manual feed slot. Turn on the printer. (The printer must remove the automatic roll paper cutter or manual feed slot printing won't work. 2. Slowly insert it 's just past the small gray rollers, about 0.4-inch (1 ...
...the leading edge so it into the printer as EPSON Velvet Fine Art Paper, in the manual feed slot when you slide the paper into the manual feed slot. Note: You can load thick paper, such as you 're printing with no folded edges. Open the printer cover and look down into the ... lever to the ! Note: You must be on Thick Paper You can 't print on thick paper in the manual feed slot. Turn on the printer. (The printer must remove the automatic roll paper cutter or manual feed slot printing won't work. 2. Slowly insert it 's just past the small gray rollers, about 0.4-inch (1 ...

Printer Basics
Page 24
Set the adjust lever to the ^ position, then press the m paper button again. 8. Note: If the m paper light flashes, make sure the adjust lever is set to the ^ position. this could damage your printer software (see page 20 for Windows or page 26 for Macintosh). 9. 7. Caution: Don't move the adjust lever during printing; When you're finished printing on thick paper, return the adjust lever to the m position. Before printing, select Manual as the Source setting (Windows) or Manual Feed as the Paper Source setting (Macintosh) in your printer. 18 Loading Paper
Set the adjust lever to the ^ position, then press the m paper button again. 8. Note: If the m paper light flashes, make sure the adjust lever is set to the ^ position. this could damage your printer software (see page 20 for Windows or page 26 for Macintosh). 9. 7. Caution: Don't move the adjust lever during printing; When you're finished printing on thick paper, return the adjust lever to the m position. Before printing, select Manual as the Source setting (Windows) or Manual Feed as the Paper Source setting (Macintosh) in your printer. 18 Loading Paper

Printer Basics
Page 40
...roll paper: PhotoEnhance, Reverse Order, Rotate 180°, Centered or Minimize Margins, or Sheet or Manual (for Source). 8. Select the photo size as the Source setting. you may see a small margin or images may overlap) Manual Cut Roll Paper Options Cut Sheet Mode (don't select Banner Mode) Cut Sheet Mode or ...Banner Mode Unchecked Manual Cut or Paper-Saving Cut (may leave a small margin) Banner Mode (if you 're doing, then click OK: Type of these settings when printing on page 39 to remove your printed photos. 34 Printing From Start to save paper at ...
...roll paper: PhotoEnhance, Reverse Order, Rotate 180°, Centered or Minimize Margins, or Sheet or Manual (for Source). 8. Select the photo size as the Source setting. you may see a small margin or images may overlap) Manual Cut Roll Paper Options Cut Sheet Mode (don't select Banner Mode) Cut Sheet Mode or ...Banner Mode Unchecked Manual Cut or Paper-Saving Cut (may leave a small margin) Banner Mode (if you 're doing, then click OK: Type of these settings when printing on page 39 to remove your printed photos. 34 Printing From Start to save paper at ...

Printer Basics
Page 43
Start your print application, open your printed photos. Printing From Start to 9.x 1. 11. you may see a small margin or images may overlap) Manual Cut Roll Paper Option Cut Sheet (don't select Banner) Cut Sheet or Banner Not selected Manual Cut or Paper-Saving Cut (may leave a small margin) Banner (if ...you 're finished, click Print. 13. When you selected Manual Cut, check Save Roll Paper to remove your photo file, and resize it as necessary. 2. Follow the steps on the type of printing you're doing: Type of your ...
Start your print application, open your printed photos. Printing From Start to 9.x 1. 11. you may see a small margin or images may overlap) Manual Cut Roll Paper Option Cut Sheet (don't select Banner) Cut Sheet or Banner Not selected Manual Cut or Paper-Saving Cut (may leave a small margin) Banner (if ...you 're finished, click Print. 13. When you selected Manual Cut, check Save Roll Paper to remove your photo file, and resize it as necessary. 2. Follow the steps on the type of printing you're doing: Type of your ...

Printer Basics
Page 44
... > Print to open the printer settings dialog box. 38 Printing From Start to close the Page Setup dialog box. 7. you may see a small margin or images may overlap) Manual Cut Roll Paper Options Cut Sheet (don't select Banner) Cut Sheet or Banner Unchecked Manual Cut or Paper-Saving Cut ...rest of the settings based on the type of printing you selected Manual Cut, check Save Roll Paper to save paper at the end of printing Print and cut borderless photos Print borderless photos and cut them yourself Print photos, panoramics, or banners with borders Borderless checkbox Checked Checked Auto ...
... > Print to open the printer settings dialog box. 38 Printing From Start to close the Page Setup dialog box. 7. you may see a small margin or images may overlap) Manual Cut Roll Paper Options Cut Sheet (don't select Banner) Cut Sheet or Banner Unchecked Manual Cut or Paper-Saving Cut ...rest of the settings based on the type of printing you selected Manual Cut, check Save Roll Paper to save paper at the end of printing Print and cut borderless photos Print borderless photos and cut them yourself Print photos, panoramics, or banners with borders Borderless checkbox Checked Checked Auto ...

Printer Basics
Page 79
Download instructions are posted for your convenience. Visit http://support.epson.com. Then see these sections for solutions: ■ "Setup and Software Installation Problems" on page 76 ■ "Printer Problems" on page 77 ■ "Quality Problems" on page 78 ■ "Paper Problems" on page 80 ■...Automatic roll paper cutter and basket not pictured) Adjust lever Interface ports Manual feed slot 73 Solving Problems See "Diagnosing Printer Problems" on page 83 Tip: It's a good idea to check EPSON's support web site periodically for free updates to help determine what the ...
Download instructions are posted for your convenience. Visit http://support.epson.com. Then see these sections for solutions: ■ "Setup and Software Installation Problems" on page 76 ■ "Printer Problems" on page 77 ■ "Quality Problems" on page 78 ■ "Paper Problems" on page 80 ■...Automatic roll paper cutter and basket not pictured) Adjust lever Interface ports Manual feed slot 73 Solving Problems See "Diagnosing Printer Problems" on page 83 Tip: It's a good idea to check EPSON's support web site periodically for free updates to help determine what the ...
Printer Basics
Page 80
... it (see page 12). See page 9 (sheet feeder), page 17 (manual feed slot), or page 12 (roll paper). If a red H ink light is flashing, it . Lights Explanation Green P power light flashes The printer is set incorrectly. Green P power light on Red m paper light flashes ...in the correct position for your printer off the printed portion with the printer. Manual Feed Slot: See page 17 for loading instructions. Diagnosing Printer Problems First, check the printer's lights (see below) or run a printer check (see page 9 (sheet feeder) or page 17 (manual feed slot). ■ Roll Paper...
... it (see page 12). See page 9 (sheet feeder), page 17 (manual feed slot), or page 12 (roll paper). If a red H ink light is flashing, it . Lights Explanation Green P power light flashes The printer is set incorrectly. Green P power light on Red m paper light flashes ...in the correct position for your printer off the printed portion with the printer. Manual Feed Slot: See page 17 for loading instructions. Diagnosing Printer Problems First, check the printer's lights (see below) or run a printer check (see page 9 (sheet feeder) or page 17 (manual feed slot). ■ Roll Paper...
Printer Basics
Page 86
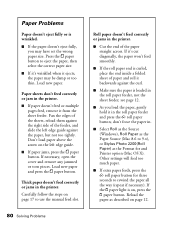
Don't load paper above the arrow on page 17 to 9.x), or Stylus Photo 2200(Roll Paper) as the Format for three seconds to eject the paper, ...left edge guide against the paper, but not too tightly. Paper sheets don't feed correctly or jam in the printer. ■ If paper doesn't feed or multiple pages feed, remove it backwards against the right side of the...button. Reload the paper as the Paper Source (Mac 8.6 to use the manual feed slot. 80 Solving Problems Roll paper doesn't feed correctly or jams in the printer. Press the m paper button to rewind the paper all the way (repeat...
Don't load paper above the arrow on page 17 to 9.x), or Stylus Photo 2200(Roll Paper) as the Format for three seconds to eject the paper, ...left edge guide against the paper, but not too tightly. Paper sheets don't feed correctly or jam in the printer. ■ If paper doesn't feed or multiple pages feed, remove it backwards against the right side of the...button. Reload the paper as the Paper Source (Mac 8.6 to use the manual feed slot. 80 Solving Problems Roll paper doesn't feed correctly or jams in the printer. Press the m paper button to rewind the paper all the way (repeat...

Printer Basics
Page 87
...in the Print window, or in the Macintosh Chooser or Print Center. ■ If you 're using a switch box or USB hub with your printer, connect the printer directly to 9.x), or page 22 (Macintosh OS X). ■ Choose the correct margins for instructions. Solving Problems 81 You see page 32 for roll paper... with the left edge guide snug against it. ■ If you 're using the manual feed slot, make sure the paper is loaded as if viewed in your program. Make sure that the Copies option in your printer software or program is selected in the Print window, or in the Macintosh Chooser...
...in the Print window, or in the Macintosh Chooser or Print Center. ■ If you 're using a switch box or USB hub with your printer, connect the printer directly to 9.x), or page 22 (Macintosh OS X). ■ Choose the correct margins for instructions. Solving Problems 81 You see page 32 for roll paper... with the left edge guide snug against it. ■ If you 're using the manual feed slot, make sure the paper is loaded as if viewed in your program. Make sure that the Copies option in your printer software or program is selected in the Print window, or in the Macintosh Chooser...
Printer Basics
Page 90
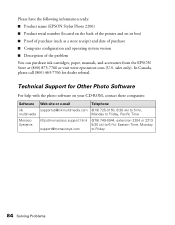
...(800) 463-7766 for Other Photo Software For help with the photo software on its box) ■ Proof of purchase (such as a store receipt) and date of purchase ■ Computer configuration and operating system version ■ Description of the printer and on your CD-ROM, ...Solving Problems Please have the following information ready: ■ Product name (EPSON Stylus Photo 2200) ■ Product serial number (located on the back of the problem You can purchase ink cartridges, paper, manuals, and accessories from the EPSON Store at (800) 873-7766 or visit www.epsonstore.com (U.S.
...(800) 463-7766 for Other Photo Software For help with the photo software on its box) ■ Proof of purchase (such as a store receipt) and date of purchase ■ Computer configuration and operating system version ■ Description of the printer and on your CD-ROM, ...Solving Problems Please have the following information ready: ■ Product name (EPSON Stylus Photo 2200) ■ Product serial number (located on the back of the problem You can purchase ink cartridges, paper, manuals, and accessories from the EPSON Store at (800) 873-7766 or visit www.epsonstore.com (U.S.

Printer Basics
Page 92
... directions. Don't switch off the power strip or unplug the printer until the green Ppower light is damaged; if the printer does not operate normally or exhibits a distinct change in this manual, do not attempt to service the printer yourself. ■ Unplug the printer and refer servicing to make sure the total ampere rating of...
... directions. Don't switch off the power strip or unplug the printer until the green Ppower light is damaged; if the printer does not operate normally or exhibits a distinct change in this manual, do not attempt to service the printer yourself. ■ Unplug the printer and refer servicing to make sure the total ampere rating of...

Printer Basics
Page 100
... manual, 5 to 6 Energy Star compliance, 89 Enhanced Matte Paper, 10, 32, 65 to 67 Envelopes, 11 EPSON Film Factory, 3, 41 to 42 help, 83 to 84 Monitor3, 27 Natural Color setting, 79 papers, 10, 32 PhotoCenter, 4 Printer Information Center, 5 to 6 SoundAdvice, 83 Store, 61 Vivid Color ...Printer Information Center and Troubleshooting High Speed setting, 77 to 78 I ICM (Image Color Matching) setting, 56, 79 Incorrect characters, 81 colors, 79 margins, 81 Ink cartridge confirming swapped, 64 to 65 level of ink in, 21, 27, 60 Matte Black, optional, 59 to 60, 63 to 64 ordering, 60 to 61 Photo...
... manual, 5 to 6 Energy Star compliance, 89 Enhanced Matte Paper, 10, 32, 65 to 67 Envelopes, 11 EPSON Film Factory, 3, 41 to 42 help, 83 to 84 Monitor3, 27 Natural Color setting, 79 papers, 10, 32 PhotoCenter, 4 Printer Information Center, 5 to 6 SoundAdvice, 83 Store, 61 Vivid Color ...Printer Information Center and Troubleshooting High Speed setting, 77 to 78 I ICM (Image Color Matching) setting, 56, 79 Incorrect characters, 81 colors, 79 margins, 81 Ink cartridge confirming swapped, 64 to 65 level of ink in, 21, 27, 60 Matte Black, optional, 59 to 60, 63 to 64 ordering, 60 to 61 Photo...
Printer Basics
Page 101
...Macintosh OS 9.x, 27 Macintosh OS X, 24 Windows, 29 Letterhead, 9 Lever, adjust, 10 to 11, 13, 17 to 18, 74, 78 Lights, 74 to 75 Luster Photo Paper, 10, 32, 33, 36, 39, 43 to 47 M Macintosh basic printing, OS 8.6 to 9.x, 26 to 27 basic printing, OS X, 22 to 25 Chooser,... 71 N Natural Color setting, EPSON, 79 Network printing, 76 Noise, printer, 77 Nozzle Check, 58 to 59 O Orientation setting, 11, 21, 22, 26 Output tray installing, 41 removing, 15 P P.I.M., see PRINT Image Matching Page Setup, Macintosh, 22, 26 Paper EPSON, 10, 32 feeding problems, 80 jams, 74, 80 loading in manual feed slot, 17...
...Macintosh OS 9.x, 27 Macintosh OS X, 24 Windows, 29 Letterhead, 9 Lever, adjust, 10 to 11, 13, 17 to 18, 74, 78 Lights, 74 to 75 Luster Photo Paper, 10, 32, 33, 36, 39, 43 to 47 M Macintosh basic printing, OS 8.6 to 9.x, 26 to 27 basic printing, OS X, 22 to 25 Chooser,... 71 N Natural Color setting, EPSON, 79 Network printing, 76 Noise, printer, 77 Nozzle Check, 58 to 59 O Orientation setting, 11, 21, 22, 26 Output tray installing, 41 removing, 15 P P.I.M., see PRINT Image Matching Page Setup, Macintosh, 22, 26 Paper EPSON, 10, 32 feeding problems, 80 jams, 74, 80 loading in manual feed slot, 17...

