
User Manual (P.I.M Plug-in)
Page 2
... Epson Stylus® Photo R200 ■ Epson Stylus Photo R300/R300M ■ Epson Stylus Photo R320 ■ Epson Stylus Photo R800 ■ Epson Stylus Photo RX500 ■ Epson Stylus Photo RX600 ■ Epson Stylus Photo 780 ■ Epson Stylus Photo 785EPX ■ Epson Stylus Photo 820 ■ Epson Stylus Photo 825 ■ Epson Stylus Photo 890 ■ Epson Stylus Photo 900 ■ Epson Stylus Photo 925 ■ Epson Stylus Photo 960 ■ Epson Stylus Photo 1280 ■ Epson Stylus Photo 2000P* ■ Epson Stylus Photo 2200 ■ PictureMate™ by Epson * This printer...
... Epson Stylus® Photo R200 ■ Epson Stylus Photo R300/R300M ■ Epson Stylus Photo R320 ■ Epson Stylus Photo R800 ■ Epson Stylus Photo RX500 ■ Epson Stylus Photo RX600 ■ Epson Stylus Photo 780 ■ Epson Stylus Photo 785EPX ■ Epson Stylus Photo 820 ■ Epson Stylus Photo 825 ■ Epson Stylus Photo 890 ■ Epson Stylus Photo 900 ■ Epson Stylus Photo 925 ■ Epson Stylus Photo 960 ■ Epson Stylus Photo 1280 ■ Epson Stylus Photo 2000P* ■ Epson Stylus Photo 2200 ■ PictureMate™ by Epson * This printer...
User Manual (P.I.M Plug-in)
Page 5
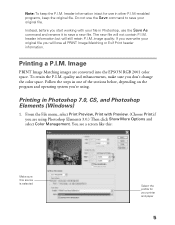
... screen like this: Make sure this source is selected Select the profile for use in one of the sections below, depending on the program and operating system you are converted into the EPSON RGB 2001 color space. The new file will still retain P.I.M. Printing a P.I .M.... header information intact for your original file. To retain the P.I .M. Follow the steps in other P.I.M.-enabled programs, keep the P.I .M. Printing in Photoshop, use the Save command to save your printer ...
... screen like this: Make sure this source is selected Select the profile for use in one of the sections below, depending on the program and operating system you are converted into the EPSON RGB 2001 color space. The new file will still retain P.I.M. Printing a P.I .M.... header information intact for your original file. To retain the P.I .M. Follow the steps in other P.I.M.-enabled programs, keep the P.I .M. Printing in Photoshop, use the Save command to save your printer ...

User Manual (P.I.M Plug-in)
Page 6
Click Print. 5. In the Source Space box, make sure EPSON RGB 2001 is selected. 3. In the Print Space box, select the profile for the Intent. 4. Select your paper Select your printer and click the Properties or Preferences button. Click Setup, then select your paper Click Advanced Click Custom, then Advanced 6. 2. Under Media Type (or...
Click Print. 5. In the Source Space box, make sure EPSON RGB 2001 is selected. 3. In the Print Space box, select the profile for the Intent. 4. Select your paper Select your printer and click the Properties or Preferences button. Click Setup, then select your paper Click Advanced Click Custom, then Advanced 6. 2. Under Media Type (or...
Color Management Workbook
Page 4
... 14 Building the Scanner Transparency Profile in MonacoEZcolor 17 Building a Display Profile 19 Configuring Color Management in Your Host Application 22 Configuring Adobe Photoshop Elements 2.0 22 Configuring Adobe Photoshop 7.0.1 23 Scanning with LaserSoft SilverFast 23 Reflective Scanning with SilverFast 23 Transparency Scanning with SilverFast 25 Using Color Management with Your EPSON Printer 27 Using the Workflow...
... 14 Building the Scanner Transparency Profile in MonacoEZcolor 17 Building a Display Profile 19 Configuring Color Management in Your Host Application 22 Configuring Adobe Photoshop Elements 2.0 22 Configuring Adobe Photoshop 7.0.1 23 Scanning with LaserSoft SilverFast 23 Reflective Scanning with SilverFast 23 Transparency Scanning with SilverFast 25 Using Color Management with Your EPSON Printer 27 Using the Workflow...

Color Management Workbook
Page 5
... great scans that the others can achieve effective color reproduction using your prints contain the color you used to print the printer profiling target from one can produce certain colors that need , configuring SilverFast to pass the color along to Adobe Photoshop Elements, and applying the profiles to your EPSON® photo printer form an ideal system for your computer...
... great scans that the others can achieve effective color reproduction using your prints contain the color you used to print the printer profiling target from one can produce certain colors that need , configuring SilverFast to pass the color along to Adobe Photoshop Elements, and applying the profiles to your EPSON® photo printer form an ideal system for your computer...
Color Management Workbook
Page 6
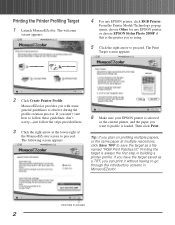
The welcome screen appears: 4 For any EPSON printer, or choose EPSON Stylus Photo 2000P if this is loaded. The Print Target screen appears: 2 Click Create Printer Profile. The following screen appears: 6 Make sure your EPSON printer is selected as the current printer, and the paper you want to profile is the printer you're using. 5 Click the right arrow to go through the introductory...
The welcome screen appears: 4 For any EPSON printer, or choose EPSON Stylus Photo 2000P if this is loaded. The Print Target screen appears: 2 Click Create Printer Profile. The following screen appears: 6 Make sure your EPSON printer is selected as the current printer, and the paper you want to profile is the printer you're using. 5 Click the right arrow to go through the introductory...

Color Management Workbook
Page 7
... sure you want to profile from the Media Type list-for at least an hour to reach its final color. 3 The color management settings appear: 7 Choose Print Settings from the Options menu. Then click Print. Tip: For an accurate printer profile, make in the profiling target. The print settings... appear: 10 Click No Color Adjustment to the next part of the time, the default settings work well. Once you've printed ...
... sure you want to profile from the Media Type list-for at least an hour to reach its final color. 3 The color management settings appear: 7 Choose Print Settings from the Options menu. Then click Print. Tip: For an accurate printer profile, make in the profiling target. The print settings... appear: 10 Click No Color Adjustment to the next part of the time, the default settings work well. Once you've printed ...
Color Management Workbook
Page 11
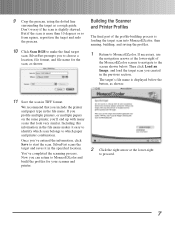
... . Then click Load an Image, and load the target scan you can return to MonacoEZcolor and build the profiles for the scan, as shown: Building the Scanner and Printer Profiles The final part of the MonacoEZcolor screen to navigate to make the final target scan. Including this information in ... a rough guide. We recommend that you 'll end up with many scans that look very similar. If you profile multiple printers, or multiple papers on the same printer, you include the printer and paper type in the file name. 9 Crop the prescan, using the dotted line surrounding the target as shown...
... . Then click Load an Image, and load the target scan you can return to MonacoEZcolor and build the profiles for the scan, as shown: Building the Scanner and Printer Profiles The final part of the MonacoEZcolor screen to navigate to make the final target scan. Including this information in ... a rough guide. We recommend that you 'll end up with many scans that look very similar. If you profile multiple printers, or multiple papers on the same printer, you include the printer and paper type in the file name. 9 Crop the prescan, using the dotted line surrounding the target as shown...
Color Management Workbook
Page 12
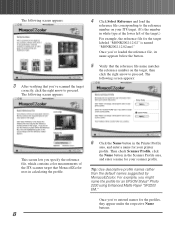
...an EPSON Stylus® Photo 2200 using Enhanced Matte Paper "SP2200 EM." Then check Scanner Profile, click the Name button in the Printer Profile area, and enter a name for your printer profile. Tip: Use descriptive profile names... rather than the default names suggested by MonacoEZcolor. The following screen appears: This screen lets you might name the profile for the profiles, they appear under the respective Name buttons. For example, you specify the reference file, which contains color...
...an EPSON Stylus® Photo 2200 using Enhanced Matte Paper "SP2200 EM." Then check Scanner Profile, click the Name button in the Printer Profile area, and enter a name for your printer profile. Tip: Use descriptive profile names... rather than the default names suggested by MonacoEZcolor. The following screen appears: This screen lets you might name the profile for the profiles, they appear under the respective Name buttons. For example, you specify the reference file, which contains color...
Color Management Workbook
Page 13
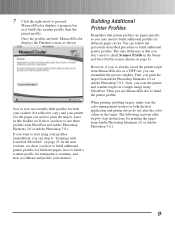
... the target). The only difference is that printer profiles are built, MonacoEZcolor displays the Finished screen, as shown: You've now successfully built profiles for both the host application and printer driver do not alter the color values in a single image using your profiles immediately, you used to build additional printer profiles. First, you print the target from...
... the target). The only difference is that printer profiles are built, MonacoEZcolor displays the Finished screen, as shown: You've now successfully built profiles for both the host application and printer driver do not alter the color values in a single image using your profiles immediately, you used to build additional printer profiles. First, you print the target from...

Color Management Workbook
Page 15
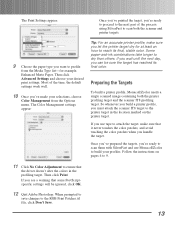
... settings work well. 9 Once you want to profile from the Options menu. Once you've printed the target, you can be ignored, click OK. 11 Quit Adobe Photoshop Elements. The Color Management settings appear: Tip: For an accurate printer profile, make sure you see a warning that the... driver doesn't alter the colors in the profiling target. Then click Print. If you let the printer target dry for step-bystep instructions. 8 Choose...
... settings work well. 9 Once you want to profile from the Options menu. Once you've printed the target, you can be ignored, click OK. 11 Quit Adobe Photoshop Elements. The Color Management settings appear: Tip: For an accurate printer profile, make sure you see a warning that the... driver doesn't alter the colors in the profiling target. Then click Print. If you let the printer target dry for step-bystep instructions. 8 Choose...
Color Management Workbook
Page 17
... to ensure that some PostScriptspecific settings will be sure the target has reached its final, stable color. So whenever you build a printer profile, you must attach the scanner IT8 target to the printer target in the profiling target. If you use MonacoEZcolor to build your desired print settings. Once you've prepared the targets, you...
... to ensure that some PostScriptspecific settings will be sure the target has reached its final, stable color. So whenever you build a printer profile, you must attach the scanner IT8 target to the printer target in the profiling target. If you use MonacoEZcolor to build your desired print settings. Once you've prepared the targets, you...
Color Management Workbook
Page 30
..., and use SilverFast's powerful color-correction tools to make is set to 2.20. (If you set the crop and resolution as shown. SilverFast automatically remembers the required Gamma-Gradation settings for reflective and transparency, and automatically uses the correct profile for reflective scanning, the only...for transparency scanning under Scanner (Transparent). 26 You're ready to scan! 8 Click the Prescan button. For details on using the printer profiles you created with SilverFast" on page 23. 6 When you need to make any desired enhancements to your images, using SilverFast's ...
..., and use SilverFast's powerful color-correction tools to make is set to 2.20. (If you set the crop and resolution as shown. SilverFast automatically remembers the required Gamma-Gradation settings for reflective and transparency, and automatically uses the correct profile for reflective scanning, the only...for transparency scanning under Scanner (Transparent). 26 You're ready to scan! 8 Click the Prescan button. For details on using the printer profiles you created with SilverFast" on page 23. 6 When you need to make any desired enhancements to your images, using SilverFast's ...
Color Management Workbook
Page 31
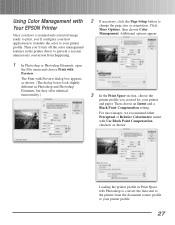
... to prevent a second, unnecessary conversion from the document source profile to your printer and paper. Using Color Management with Your EPSON Printer Once you have a scanned and corrected image ready to print, you created for your printer profile. 27 Then you'll turn off the color management features in Photoshop and Photoshop Elements, but they offer identical functionality...
... to prevent a second, unnecessary conversion from the document source profile to your printer and paper. Using Color Management with Your EPSON Printer Once you have a scanned and corrected image ready to print, you created for your printer profile. 27 Then you'll turn off the color management features in Photoshop and Photoshop Elements, but they offer identical functionality...

Color Management Workbook
Page 32
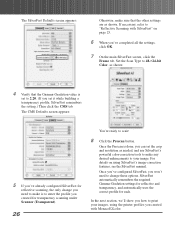
... to many different outputs by simply changing the profile in the print space. 4 Once you can easily print the same document to the image data, usually with disappointing results.) Then click Print. Your EPSON printer produces a colormanaged print that you 've made your settings, choose Color Management. The Print window appears: 6 Make sure the...
... to many different outputs by simply changing the profile in the print space. 4 Once you can easily print the same document to the image data, usually with disappointing results.) Then click Print. Your EPSON printer produces a colormanaged print that you 've made your settings, choose Color Management. The Print window appears: 6 Make sure the...
Color Management Workbook
Page 33
... at hand. You need to match the profile to the printer and paper setting you're using for every image you won't need to change that investment will automatically deliver the color in the workflow, you print. 29 The only profile setting you don't even need to change... most of time and effort. Building the workflow demands a significant initial investment of the settings. SilverFast will automatically use the same paper, you need to change regularly is the printer profile....
... at hand. You need to match the profile to the printer and paper setting you're using for every image you won't need to change that investment will automatically deliver the color in the workflow, you print. 29 The only profile setting you don't even need to change... most of time and effort. Building the workflow demands a significant initial investment of the settings. SilverFast will automatically use the same paper, you need to change regularly is the printer profile....
User Manual - Epson Stylus RIP Mac & PC
Page 34
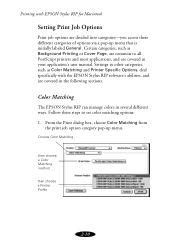
... via a pop-up menu. then choose a Color Matching method . . . then choose a Printer Profile 2-10 Certain categories, such as Color Matching and Printer Specific Options, deal specifically with EPSON Stylus RIP for Macintosh Setting Print Job Options Print job options are divided into categories-you access these steps to all PostScript printers and most applications, and are covered in...
... via a pop-up menu. then choose a Color Matching method . . . then choose a Printer Profile 2-10 Certain categories, such as Color Matching and Printer Specific Options, deal specifically with EPSON Stylus RIP for Macintosh Setting Print Job Options Print job options are divided into categories-you access these steps to all PostScript printers and most applications, and are covered in...
User Manual - Epson Stylus RIP Mac & PC
Page 35
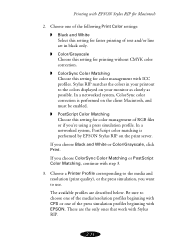
... or if you want to the colors displayed on the print server. The available profiles are the only ones that work with EPSON Stylus RIP for faster printing of the press simulation profiles beginning with EPSON. These are described below. If you choose ColorSync Color Matching or PostScript Color Matching, continue with ICC profiles. Choose one of text and...
... or if you want to the colors displayed on the print server. The available profiles are the only ones that work with EPSON Stylus RIP for faster printing of the press simulation profiles beginning with EPSON. These are described below. If you choose ColorSync Color Matching or PostScript Color Matching, continue with ICC profiles. Choose one of text and...
User Manual - Epson Stylus RIP Mac & PC
Page 37
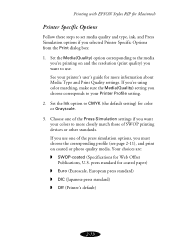
...DIC (Japanese press standard) Off (Printer's default) 2-13 If you use . press standard for color or Grayscale. 3. See your Printer Profile setting. 2. If you're using color matching, make sure the Media(Quality) setting you choose corresponds to your printer's user's guide for more closely match those...other standards. Set the Media(Quality) option corresponding to the media you're printing on coated or photo quality media. Printing with EPSON Stylus RIP for Macintosh Printer Specific Options Follow these steps to set media quality and type, ink, and Press Simulation options ...
...DIC (Japanese press standard) Off (Printer's default) 2-13 If you use . press standard for color or Grayscale. 3. See your Printer Profile setting. 2. If you're using color matching, make sure the Media(Quality) setting you choose corresponds to your printer's user's guide for more closely match those...other standards. Set the Media(Quality) option corresponding to the media you're printing on coated or photo quality media. Printing with EPSON Stylus RIP for Macintosh Printer Specific Options Follow these steps to set media quality and type, ink, and Press Simulation options ...
User Manual - Epson Stylus RIP Mac & PC
Page 79
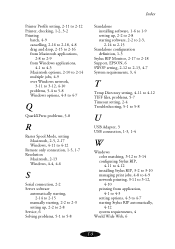
Printer Profile setting, 2-11 to 2-12 Printer, checking, 1-2, 3-2 Printing batch, 4-9 cancelling, 2-16 to 2-18, 4-8 drag and drop, 2-15 to 2-16 from Macintosh applications, 2-8 to 2-9 from Windows applications, 4-1 ... Monitor, 2-17 to 2-18 Support, EPSON, 6 SWOP setting, 2-12 to 2-13, 4-7 System requirements, 3, 4 T Temp Directory setting, 4-11 to 4-12 TIFF files, problems, 5-7 Timeout setting, 2-4 Troubleshooting, 5-1 to 5-8 U USB Adapter, 3 USB connection, 1-3, 1-4 W Windows color matching, 3-12 to 3-14 configuring Stylus RIP, 4-11 to 4-12 installing Stylus RIP, 3-2 to 3-10 managing print jobs...
Printer Profile setting, 2-11 to 2-12 Printer, checking, 1-2, 3-2 Printing batch, 4-9 cancelling, 2-16 to 2-18, 4-8 drag and drop, 2-15 to 2-16 from Macintosh applications, 2-8 to 2-9 from Windows applications, 4-1 ... Monitor, 2-17 to 2-18 Support, EPSON, 6 SWOP setting, 2-12 to 2-13, 4-7 System requirements, 3, 4 T Temp Directory setting, 4-11 to 4-12 TIFF files, problems, 5-7 Timeout setting, 2-4 Troubleshooting, 5-1 to 5-8 U USB Adapter, 3 USB connection, 1-3, 1-4 W Windows color matching, 3-12 to 3-14 configuring Stylus RIP, 4-11 to 4-12 installing Stylus RIP, 3-2 to 3-10 managing print jobs...


