User Manual (P.I.M Plug-in)
Page 1
... more information about PRINT Image Matching, including a complete list of colors and enhancements set in Adobe Photoshop page 3 ■ Importing a...; (P.I.M.)-enabled digital cameras embed information in digital photo files to maximize the image quality of the ...page 2 ■ How Does P.I .M.-enabled digital cameras and printers work together perfectly to consistently and easily create the best possible ... .M. Image page 5 ■ Printing in Photoshop 7.0, CS, and Photoshop Elements (Windows page 5 ■ Printing in Photoshop 7.0, CS, and Photoshop Elements (Macintosh page 8 &#...
... more information about PRINT Image Matching, including a complete list of colors and enhancements set in Adobe Photoshop page 3 ■ Importing a...; (P.I.M.)-enabled digital cameras embed information in digital photo files to maximize the image quality of the ...page 2 ■ How Does P.I .M.-enabled digital cameras and printers work together perfectly to consistently and easily create the best possible ... .M. Image page 5 ■ Printing in Photoshop 7.0, CS, and Photoshop Elements (Windows page 5 ■ Printing in Photoshop 7.0, CS, and Photoshop Elements (Macintosh page 8 &#...

User Manual (P.I.M Plug-in)
Page 2
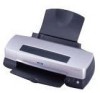
... Epson Stylus® Photo R200 ■ Epson Stylus Photo R300/R300M ■ Epson Stylus Photo R320 ■ Epson Stylus Photo R800 ■ Epson Stylus Photo RX500 ■ Epson Stylus Photo RX600 ■ Epson Stylus Photo 780 ■ Epson Stylus Photo 785EPX ■ Epson Stylus Photo 820 ■ Epson Stylus Photo 825 ■ Epson Stylus Photo 890 ■ Epson Stylus Photo 900 ■ Epson Stylus Photo 925 ■ Epson Stylus Photo 960 ■ Epson Stylus Photo 1280 ■ Epson Stylus Photo 2000P* ■ Epson Stylus Photo 2200 ■ PictureMate™ by Epson * This printer...
... Epson Stylus® Photo R200 ■ Epson Stylus Photo R300/R300M ■ Epson Stylus Photo R320 ■ Epson Stylus Photo R800 ■ Epson Stylus Photo RX500 ■ Epson Stylus Photo RX600 ■ Epson Stylus Photo 780 ■ Epson Stylus Photo 785EPX ■ Epson Stylus Photo 820 ■ Epson Stylus Photo 825 ■ Epson Stylus Photo 890 ■ Epson Stylus Photo 900 ■ Epson Stylus Photo 925 ■ Epson Stylus Photo 960 ■ Epson Stylus Photo 1280 ■ Epson Stylus Photo 2000P* ■ Epson Stylus Photo 2200 ■ PictureMate™ by Epson * This printer...
User Manual (P.I.M Plug-in)
Page 3
... choose the same settings. 3 II quality. image. image into the file and embedding a color space called EPSON RGB 2001. Open the Edit menu or Photoshop menu (Mac OS X) and select Color Settings. Do not use the Save As command and rename it creates a profile by converting the... information into Adobe Photoshop 6.0, 7.0, CS, or Photoshop Elements 1.0, 2.0, or 3.0. header information but you 're using Windows,...
... choose the same settings. 3 II quality. image. image into the file and embedding a color space called EPSON RGB 2001. Open the Edit menu or Photoshop menu (Mac OS X) and select Color Settings. Do not use the Save As command and rename it creates a profile by converting the... information into Adobe Photoshop 6.0, 7.0, CS, or Photoshop Elements 1.0, 2.0, or 3.0. header information but you 're using Windows,...
User Manual (P.I.M Plug-in)
Page 4
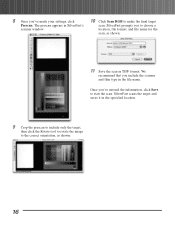
...warning with no options, click OK. 7. Select the file you see a window like this Embedded Profile Mismatch warning, select Use the embedded profile and click OK. It also supports the EPSON RGB expanded color space, which is available for PRINT Image Matching prints. Note: If you ...want the window to import. 4. or Exif Print images are P.I .M. and Exif Print files. 3. ...
...warning with no options, click OK. 7. Select the file you see a window like this Embedded Profile Mismatch warning, select Use the embedded profile and click OK. It also supports the EPSON RGB expanded color space, which is available for PRINT Image Matching prints. Note: If you ...want the window to import. 4. or Exif Print images are P.I .M. and Exif Print files. 3. ...
User Manual (P.I.M Plug-in)
Page 5
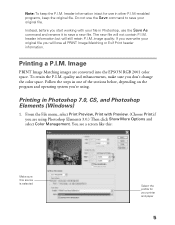
... Instead, before you start working with Preview. (Choose Print if you are converted into the EPSON RGB 2001 color space. header information but will not contain P.I.M. Printing a P.I .M. quality and enhancements, make...with your original file. header information intact for your original file you overwrite your printer and paper 5 If you will lose all PRINT Image Matching or Exif Print header... information. Follow the steps in Photoshop 7.0, CS, and Photoshop Elements (Windows) 1. To retain the P.I .M. Image PRINT Image Matching images are using . Printing...
... Instead, before you start working with Preview. (Choose Print if you are converted into the EPSON RGB 2001 color space. header information but will not contain P.I.M. Printing a P.I .M. quality and enhancements, make...with your original file. header information intact for your original file you overwrite your printer and paper 5 If you will lose all PRINT Image Matching or Exif Print header... information. Follow the steps in Photoshop 7.0, CS, and Photoshop Elements (Windows) 1. To retain the P.I .M. Image PRINT Image Matching images are using . Printing...

User Manual (P.I.M Plug-in)
Page 6
... click the Properties or Preferences button. Under Media Type (or Type), select the paper you don't see your printer and the paper you're using. 2. In the Print Space box, select the profile for the Intent. 4. You see an Advanced button, click ...Custom, then click Advanced.) 6 Click Setup, then select your paper Click Advanced Click Custom, then Advanced 6. In the Source Space box, make sure EPSON RGB 2001 is selected. 3. Select Perceptual for your printer Properties or Preferences window: . Click Print. 5. Click the Advanced button. (If you 're printing on. 7.
... click the Properties or Preferences button. Under Media Type (or Type), select the paper you don't see your printer and the paper you're using. 2. In the Print Space box, select the profile for the Intent. 4. You see an Advanced button, click ...Custom, then click Advanced.) 6 Click Setup, then select your paper Click Advanced Click Custom, then Advanced 6. In the Source Space box, make sure EPSON RGB 2001 is selected. 3. Select Perceptual for your printer Properties or Preferences window: . Click Print. 5. Click the Advanced button. (If you 're printing on. 7.
User Manual (P.I.M Plug-in)
Page 8
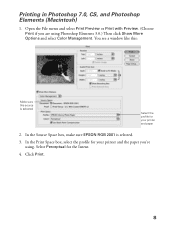
You see a window like this: Make sure this source is selected. 3. In the Print Space box, select the profile for your printer and paper 2. Click Print. 8 Select Perceptual for your printer and the paper you are using . Open the File menu and select Print Preview or Print with Preview. (Choose Print if you 're using Photoshop Elements 3.0.) Then click Show More Options and select Color Management. Printing in Photoshop 7.0, CS, and Photoshop Elements (Macintosh) 1. In the Source Space box, make sure EPSON RGB 2001 is selected Select the profile for the Intent. 4.
You see a window like this: Make sure this source is selected. 3. In the Print Space box, select the profile for your printer and paper 2. Click Print. 8 Select Perceptual for your printer and the paper you are using . Open the File menu and select Print Preview or Print with Preview. (Choose Print if you 're using Photoshop Elements 3.0.) Then click Show More Options and select Color Management. Printing in Photoshop 7.0, CS, and Photoshop Elements (Macintosh) 1. In the Source Space box, make sure EPSON RGB 2001 is selected Select the profile for the Intent. 4.
User Manual (P.I.M Plug-in)
Page 9
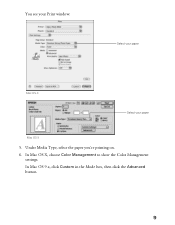
In Mac OS 9.x, click Custom in the Mode box, then click the Advanced button. 9 Under Media Type, select the paper you're printing on. 6. In Mac OS X, choose Color Management to show the Color Management settings. You see your paper Mac OS 9 5. Select your paper Mac OS X Select your Print window: .
In Mac OS 9.x, click Custom in the Mode box, then click the Advanced button. 9 Under Media Type, select the paper you're printing on. 6. In Mac OS X, choose Color Management to show the Color Management settings. You see your paper Mac OS 9 5. Select your paper Mac OS X Select your Print window: .
User Manual (P.I.M Plug-in)
Page 11
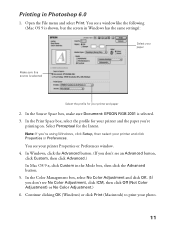
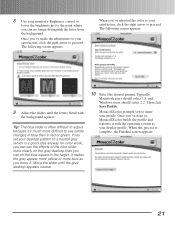
... EPSON RGB 2001 is shown, but the screen in the Mode box, then click the Advanced button. 5. Note: If you don't see your printer and click Properties or Preferences. In Windows, click the Advanced button. (If you 're using Windows, click Setup, then select your printer Properties or Preferences window. ...to print your printer and the paper you don't see a window like the following (Mac OS 9 is selected. 3. Open the File menu and select Print. In the Print Space box, select the profile for the Intent. Select Perceptual for your photo. 11 You see No Color Adjustment, click ...
... EPSON RGB 2001 is shown, but the screen in the Mode box, then click the Advanced button. 5. Note: If you don't see your printer and click Properties or Preferences. In Windows, click the Advanced button. (If you 're using Windows, click Setup, then select your printer Properties or Preferences window. ...to print your printer and the paper you don't see a window like the following (Mac OS 9 is selected. 3. Open the File menu and select Print. In the Print Space box, select the profile for the Intent. Select Perceptual for your photo. 11 You see No Color Adjustment, click ...
User Manual (P.I.M Plug-in)
Page 12
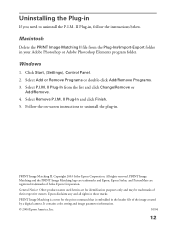
... 4. Select Remove P.I .M. II Plug-In and click Finish. 5. General Notice: Other product names used herein are registered trademarks of Seiko Epson Corporation. Click Start, (Settings), Control Panel. 2. All rights reserved. PRINT Image Matching is a term for identification purposes only and may ... Elements program folder. PRINT Image Matching and the PRINT Image Matching logo are trademarks and Epson, Epson Stylus, and PictureMate are for the print command that is embedded in . Select P.I.M. Windows 1. It contains color setting and image parameter information. © 2004...
... 4. Select Remove P.I .M. II Plug-In and click Finish. 5. General Notice: Other product names used herein are registered trademarks of Seiko Epson Corporation. Click Start, (Settings), Control Panel. 2. All rights reserved. PRINT Image Matching is a term for identification purposes only and may ... Elements program folder. PRINT Image Matching and the PRINT Image Matching logo are trademarks and Epson, Epson Stylus, and PictureMate are for the print command that is embedded in . Select P.I.M. Windows 1. It contains color setting and image parameter information. © 2004...

Color Management Workbook
Page 7
...Choose Print Settings from the Options menu. Tip: For an accurate printer profile, make in the profiling target. Most of the process: using SilverFast to reach its final color. 3 Then click Print. When you click OK, the print window appears: 9 Once you want to profile from the Media Type ...list-for at least an hour to scan both the scanner and printer targets. 8 Choose the paper type you '...
...Choose Print Settings from the Options menu. Tip: For an accurate printer profile, make in the profiling target. Most of the process: using SilverFast to reach its final color. 3 Then click Print. When you click OK, the print window appears: 9 Once you want to profile from the Media Type ...list-for at least an hour to scan both the scanner and printer targets. 8 Choose the paper type you '...
Color Management Workbook
Page 10
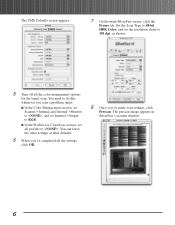
... slider to 150 dpi, as shown: 5 Turn off all profiles to . You need to RGB. In the Profiles for ColorSync section, set all the color management options for the target scan. You can leave the other settings at their defaults. 6 When you've completed all the settings, click OK. 8 ...Once you scan a profiling target. The prescan image appears in SilverFast's scanner window: 6 Set the Scan Type to 48-bit HDR Color, and set Internal->Output to do this whenever you 've made your settings, click Prescan.
... slider to 150 dpi, as shown: 5 Turn off all profiles to . You need to RGB. In the Profiles for ColorSync section, set all the color management options for the target scan. You can leave the other settings at their defaults. 6 When you've completed all the settings, click OK. 8 ...Once you scan a profiling target. The prescan image appears in SilverFast's scanner window: 6 Set the Scan Type to 48-bit HDR Color, and set Internal->Output to do this whenever you 've made your settings, click Prescan.
Color Management Workbook
Page 14
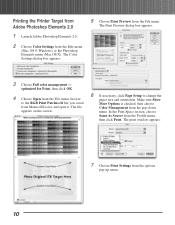
... Setup to the RGB Print Patches.tif file you saved from the Edit menu (Mac OS 9, Windows) or the Photoshop Elements menu (Mac OS X). Printing the Printer Target from Adobe Photoshop Elements 2.0 1 Launch Adobe Photoshop Elements 2.0. 2 Choose Color Settings from MonacoEZcolor, and open it. optimized for Print, then click OK. 4 Choose Open from...
... Setup to the RGB Print Patches.tif file you saved from the Edit menu (Mac OS 9, Windows) or the Photoshop Elements menu (Mac OS X). Printing the Printer Target from Adobe Photoshop Elements 2.0 1 Launch Adobe Photoshop Elements 2.0. 2 Choose Color Settings from MonacoEZcolor, and open it. optimized for Print, then click OK. 4 Choose Open from...
Color Management Workbook
Page 16
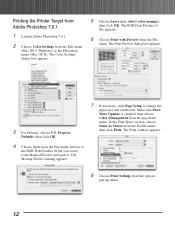
Printing the Printer Target from Adobe Photoshop 7.0.1 1 Launch Adobe Photoshop 7.0.1. 2 Choose Color Settings from the File menu. The Color Settings dialog box appears: 5 Choose Leave as is checked, then choose Color Management from the pop-down menu. Prepress Defaults, then click OK. 7 If necessary, click Page Setup ... Patches.tif file appears. 6 Choose Print with Preview from the Edit menu (Mac OS 9, Windows) or the Photoshop menu (Mac OS X). Make sure Show More Options is (don't color manage), then click OK. In the Print Space section, choose Same As Source from the options...
Printing the Printer Target from Adobe Photoshop 7.0.1 1 Launch Adobe Photoshop 7.0.1. 2 Choose Color Settings from the File menu. The Color Settings dialog box appears: 5 Choose Leave as is checked, then choose Color Management from the pop-down menu. Prepress Defaults, then click OK. 7 If necessary, click Page Setup ... Patches.tif file appears. 6 Choose Print with Preview from the Edit menu (Mac OS 9, Windows) or the Photoshop menu (Mac OS X). Make sure Show More Options is (don't color manage), then click OK. In the Print Space section, choose Same As Source from the options...
Color Management Workbook
Page 20
... the scan. SilverFast prompts you 've made your settings, click 10 Click Scan RGB to make the final target Prescan. 8 Once you to choose a scanner window: location, file format, and file name for the scan, as shown: 16 SilverFast scans the target and saves it in the specified location. 9 Crop the...
... the scan. SilverFast prompts you 've made your settings, click 10 Click Scan RGB to make the final target Prescan. 8 Once you to choose a scanner window: location, file format, and file name for the scan, as shown: 16 SilverFast scans the target and saves it in the specified location. 9 Crop the...
Color Management Workbook
Page 25
...builds the profile and registers it . 8 Use your monitor's Brightness control to lower the brightness just to proceed. Typically, Macintosh users should select 1.8, and Windows users should select 2.2. Then click Save Profile. Once you've made the adjustments to your satisfaction, click the right arrow to the point where you... move it with the background squares. The following screen appears: When you've adjusted the color to your satisfaction, click the right arrow to a neutral gray (which is complete, the Finished screen appears: 21
...builds the profile and registers it . 8 Use your monitor's Brightness control to lower the brightness just to proceed. Typically, Macintosh users should select 1.8, and Windows users should select 2.2. Then click Save Profile. Once you've made the adjustments to your satisfaction, click the right arrow to the point where you... move it with the background squares. The following screen appears: When you've adjusted the color to your satisfaction, click the right arrow to a neutral gray (which is complete, the Finished screen appears: 21
Color Management Workbook
Page 26
... your work. Configuring Adobe Photoshop Elements 2.0 Adobe Photoshop Elements offers simple but effective color management. The Color Settings window appears: 22 Adobe RGB (1998) is large enough to use the Adobe RGB (1998) color space for all the colors you built in your EPSON printer. If First, we 'll show you how to load the profiles you...
... your work. Configuring Adobe Photoshop Elements 2.0 Adobe Photoshop Elements offers simple but effective color management. The Color Settings window appears: 22 Adobe RGB (1998) is large enough to use the Adobe RGB (1998) color space for all the colors you built in your EPSON printer. If First, we 'll show you how to load the profiles you...
Color Management Workbook
Page 27
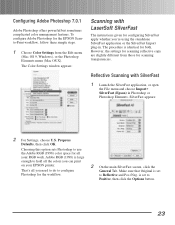
...1998) color space for both. is identical for all your EPSON printer. To configure Adobe Photoshop for the EPSON Scanto-Print workflow, follow these simple steps. 1 Choose Color Settings from those for scanning reflective copy are slightly different from the Edit menu (Mac OS 9, Windows), ...: 2 For Settings, choose U.S. Prepress Defaults, then click OK. The Color Settings window appears: Scanning with SilverFast 1 Launch the SilverFast application, or open the File menu and choose Import> SilverFast (Epson) in . Make sure that Original is large enough to Reflective and Pos...
...1998) color space for both. is identical for all your EPSON printer. To configure Adobe Photoshop for the EPSON Scanto-Print workflow, follow these simple steps. 1 Choose Color Settings from those for scanning reflective copy are slightly different from the Edit menu (Mac OS 9, Windows), ...: 2 For Settings, choose U.S. Prepress Defaults, then click OK. The Color Settings window appears: Scanning with SilverFast 1 Launch the SilverFast application, or open the File menu and choose Import> SilverFast (Epson) in . Make sure that Original is large enough to Reflective and Pos...

Color Management Workbook
Page 32
...-up menu. Your EPSON printer produces a colormanaged print that you can easily print the same document to a paper type and resolution. 7 When you 've made your printer profile. The Print settings appear: 8 Click No Color Adjustment. (If you built your settings, choose Color Management. The conversion is physically possible. 28 The Print window appears: 6 Make sure...
...-up menu. Your EPSON printer produces a colormanaged print that you can easily print the same document to a paper type and resolution. 7 When you 've made your printer profile. The Print settings appear: 8 Click No Color Adjustment. (If you built your settings, choose Color Management. The conversion is physically possible. 28 The Print window appears: 6 Make sure...

User Manual - Epson Stylus RIP Mac & PC
Page 3
Contents Introduction Do You Need PostScript? 1 Special Features 2 Macintosh System Requirements 3 Windows System Requirements 4 How To Use Your Manuals 4 Cautions, Notes, and Tips 5 Where To Get Help 6 1 Installing EPSON Stylus RIP for Macintosh Checking the Printer 1-2 Determining Your Configuration 1-3 Standalone Configuration 1-3 Direct Connection Network Configuration 1-4 Typical Network Configuration 1-5 Installing EPSON Stylus RIP on a Standalone or Print Server Macintosh 1-6 Installing EPSON Stylus RIP on a Client Macintosh 1-8 iii
Contents Introduction Do You Need PostScript? 1 Special Features 2 Macintosh System Requirements 3 Windows System Requirements 4 How To Use Your Manuals 4 Cautions, Notes, and Tips 5 Where To Get Help 6 1 Installing EPSON Stylus RIP for Macintosh Checking the Printer 1-2 Determining Your Configuration 1-3 Standalone Configuration 1-3 Direct Connection Network Configuration 1-4 Typical Network Configuration 1-5 Installing EPSON Stylus RIP on a Standalone or Print Server Macintosh 1-6 Installing EPSON Stylus RIP on a Client Macintosh 1-8 iii


