
Technical Brief (Scanners)
Page 7
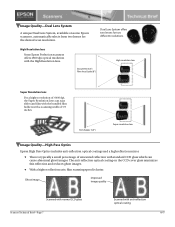
... and film with the bundled film holders with a scanning width of unwanted reflection with standard CCD glass which can cause abnormal ghost images. Film Holder (5.9") Super resolution lens Image Quality-High-Pass Optics Epson High Pass Optics includes anti-reflection optical coatings and a high reflection...
... and film with the bundled film holders with a scanning width of unwanted reflection with standard CCD glass which can cause abnormal ghost images. Film Holder (5.9") Super resolution lens Image Quality-High-Pass Optics Epson High Pass Optics includes anti-reflection optical coatings and a high reflection...
Product Brochure
Page 1
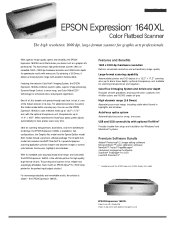
...); Featuring the exclusive ColorTrue® II Imaging System, the EPSON Expression 1640XL combines custom optics, superior image processing, Dynamic Range Control, a xenon lamp, and Color MatrixCCDTM technology for graphic arts professionals. For increased productivity and remarkable results, the solution is available in its custom film holders make batch scanning easy. Ideal for Windows® and Macintosh®...
...); Featuring the exclusive ColorTrue® II Imaging System, the EPSON Expression 1640XL combines custom optics, superior image processing, Dynamic Range Control, a xenon lamp, and Color MatrixCCDTM technology for graphic arts professionals. For increased productivity and remarkable results, the solution is available in its custom film holders make batch scanning easy. Ideal for Windows® and Macintosh®...
Product Information Guide
Page 5
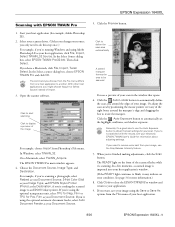
...driver. (Unless you change your source, you only need to your host application. 8/00 EPSON Expression 1640XL - 5 If you might choose Acquire or Select Source instead of your scan. Film as your Document Source. Open the scanner software. Choose the Document Source, Image Type, and...as your host application, click File, Import, Select TWAIN_32 Source. EPSON Expression 1640XL Scanning with the results, see a preview of your application. 9. Click the Auto Locate button to automatically define the scan area around the marquee's edge and dragging the box to automatically ...
...driver. (Unless you change your source, you only need to your host application. 8/00 EPSON Expression 1640XL - 5 If you might choose Acquire or Select Source instead of your scan. Film as your Document Source. Open the scanner software. Choose the Document Source, Image Type, and...as your host application, click File, Import, Select TWAIN_32 Source. EPSON Expression 1640XL Scanning with the results, see a preview of your application. 9. Click the Auto Locate button to automatically define the scan area around the marquee's edge and dragging the box to automatically ...
Product Information Guide
Page 6
... size of the resulting image file by scanning only part of the optional transparency unit's film guides). Click the Destination button in the... for most images except line art, use a scanning resolution of an image, see either the EPSON Scan Server dialog box, or the EPSON Scan Server icon on the client computer...scanned at a time can produce a 24MB file. t From the client computer, start EPSON Scan Server manually, click Start, Programs, EPSON Scan Server, and then select EPSON Scan Server. 6 - Close EPSON TWAIN Pro Network to end your final output device. EPSON Expression 1640XL...
... size of the resulting image file by scanning only part of the optional transparency unit's film guides). Click the Destination button in the... for most images except line art, use a scanning resolution of an image, see either the EPSON Scan Server dialog box, or the EPSON Scan Server icon on the client computer...scanned at a time can produce a 24MB file. t From the client computer, start EPSON Scan Server manually, click Start, Programs, EPSON Scan Server, and then select EPSON Scan Server. 6 - Close EPSON TWAIN Pro Network to end your final output device. EPSON Expression 1640XL...
Start Here Card
Page 7
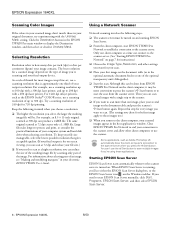
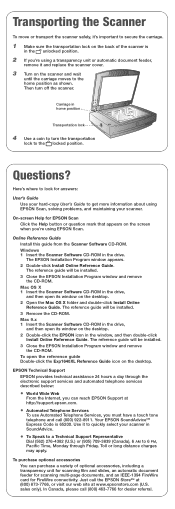
...until the carriage moves to the home position as shown. To purchase optional accessories You can reach EPSON Support at www.epsonstore.com (U.S. sales only). Your EPSON SoundAdviceSM Express Code is in home position Transportation lock 4 Use a coin to turn off the scanner. Just... using EPSON Scan. Transporting the Scanner To move or transport the scanner safely, it's important to secure the carriage. 1 Make sure the transportation lock on the back of optional accessories, including a transparency unit for scanning film and slides, an automatic document feeder for scanning multi-page...
...until the carriage moves to the home position as shown. To purchase optional accessories You can reach EPSON Support at www.epsonstore.com (U.S. sales only). Your EPSON SoundAdviceSM Express Code is in home position Transportation lock 4 Use a coin to turn off the scanner. Just... using EPSON Scan. Transporting the Scanner To move or transport the scanner safely, it's important to secure the carriage. 1 Make sure the transportation lock on the back of optional accessories, including a transparency unit for scanning film and slides, an automatic document feeder for scanning multi-page...
User Manual
Page 4
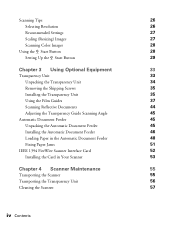
... 33 Transparency Unit 33 Unpacking the Transparency Unit 34 Removing the Shipping Screws 35 Installing the Transparency Unit 35 Using the Film Guides 37 Scanning Reflective Documents 44 Adjusting the Transparency Guide Scanning Angle 45 Automatic Document Feeder 45 Unpacking the Automatic Document Feeder 45 Installing the Automatic Document Feeder 46 Loading Paper...
... 33 Transparency Unit 33 Unpacking the Transparency Unit 34 Removing the Shipping Screws 35 Installing the Transparency Unit 35 Using the Film Guides 37 Scanning Reflective Documents 44 Adjusting the Transparency Guide Scanning Angle 45 Automatic Document Feeder 45 Unpacking the Automatic Document Feeder 45 Installing the Automatic Document Feeder 46 Loading Paper...
User Manual
Page 20
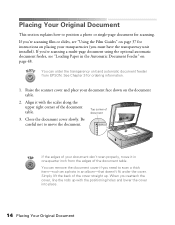
...scan properly, move the document. Placing Your Original Document This section explains how to move it with the positioning holes and lower the cover into place. 14 Placing Your Original Document If you're scanning film or slides, see "Using the Film... Guides" on page 37 for instructions on placing your transparencies (you 're scanning a multi-page document ... along the upper right corner of the document table. See Chapter 3 for scanning. Be careful not to position a photo or single-page document for ordering ...
...scan properly, move the document. Placing Your Original Document This section explains how to move it with the positioning holes and lower the cover into place. 14 Placing Your Original Document If you're scanning film or slides, see "Using the Film... Guides" on page 37 for instructions on placing your transparencies (you 're scanning a multi-page document ... along the upper right corner of the document table. See Chapter 3 for scanning. Be careful not to position a photo or single-page document for ordering ...
User Manual
Page 21
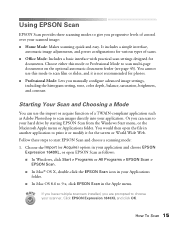
... as follows: ■ In Windows, click Start > Programs or All Programs > EPSON Scan > EPSON Scan. ■ In Mac® OS X, double-click the EPSON Scan icon in your application and choose EPSON Expression 1640XL, or open the file in the Apple menu. Or you can use this mode ...to start EPSON Scan and choose a scanning mode: 1. You would then open EPSON Scan as Adobe Photoshop to scan images directly into your application. Choose the Import (or Acquire) option in your Applications folder. ■ In Mac OS 8.6 to 9.x, click EPSON Scan in another application to scan film or ...
... as follows: ■ In Windows, click Start > Programs or All Programs > EPSON Scan > EPSON Scan. ■ In Mac® OS X, double-click the EPSON Scan icon in your application and choose EPSON Expression 1640XL, or open the file in the Apple menu. Or you can use this mode ...to start EPSON Scan and choose a scanning mode: 1. You would then open EPSON Scan as Adobe Photoshop to scan images directly into your application. Choose the Import (or Acquire) option in your Applications folder. ■ In Mac OS 8.6 to 9.x, click EPSON Scan in another application to scan film or ...
User Manual
Page 23
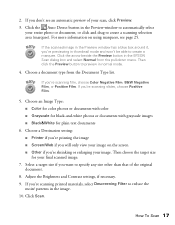
...arrow beside the Preview button in normal mode. 4. If you 're scanning film, choose Color Negative Film, B&W Negative Film, or Positive Film. If the scanned image in the image. 10. If you 're scanning slides, choose Positive Film. 5. For more information on the screen ■ Other if you '... and drag to automatically select your final scanned image. 7. Select a target size if you don't see page 25. Click Scan. 2. Adjust the Brightness and Contrast settings, if necessary. 9. If you want to preview in the EPSON Scan dialog box and select Normal from the Document...
...arrow beside the Preview button in normal mode. 4. If you 're scanning film, choose Color Negative Film, B&W Negative Film, or Positive Film. If the scanned image in the image. 10. If you 're scanning slides, choose Positive Film. 5. For more information on the screen ■ Other if you '... and drag to automatically select your final scanned image. 7. Select a target size if you don't see page 25. Click Scan. 2. Adjust the Brightness and Contrast settings, if necessary. 9. If you want to preview in the EPSON Scan dialog box and select Normal from the Document...

User Manual
Page 28
...window to optimize exposure for slides and some film), Color Negative Film, or B&W Negative Film. 7. If you choose this option; Either click Scan to complete your entire document, or click and drag in the next section to fine-tune it. 22 Using EPSON Scan For more information on using marquees, see... a preview of your scan. 3. see page 33.) If you chose Reflective as the Document Type, choose the Film Type: Positive Film (for printed material. 6. Click Preview to step 6. If...
...window to optimize exposure for slides and some film), Color Negative Film, or B&W Negative Film. 7. If you choose this option; Either click Scan to complete your entire document, or click and drag in the next section to fine-tune it. 22 Using EPSON Scan For more information on using marquees, see... a preview of your scan. 3. see page 33.) If you chose Reflective as the Document Type, choose the Film Type: Positive Film (for printed material. 6. Click Preview to step 6. If...

User Manual
Page 33
... For information about selecting part of an image, see "Selecting the Scanning Area in this table for selecting a resolution: Type of scan Photograph Text with images Film or slides Line art Image for web Image to be sent by e-mail Text for on page 25. system and hard disk drive when selecting a resolution. Recommended...
... For information about selecting part of an image, see "Selecting the Scanning Area in this table for selecting a resolution: Type of scan Photograph Text with images Film or slides Line art Image for web Image to be sent by e-mail Text for on page 25. system and hard disk drive when selecting a resolution. Recommended...
User Manual
Page 39
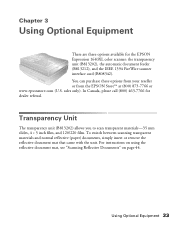
...the EPSON Expression 1640XL color scanner: the transparency unit (B813202), the automatic document feeder (B813212), and the IEEE 1394 FireWire scanner interface card (B808342). Transparency Unit The transparency unit (B813202) allows you to scan transparent materials-35 mm slides, 4 × 5 inch film, and 120/220 film.... Using Optional Equipment 33 You can purchase these options from your reseller or from the EPSON StoreSM at (800) 873-7766 or www.epsonstore....
...the EPSON Expression 1640XL color scanner: the transparency unit (B813202), the automatic document feeder (B813212), and the IEEE 1394 FireWire scanner interface card (B808342). Transparency Unit The transparency unit (B813202) allows you to scan transparent materials-35 mm slides, 4 × 5 inch film, and 120/220 film.... Using Optional Equipment 33 You can purchase these options from your reseller or from the EPSON StoreSM at (800) 873-7766 or www.epsonstore....

User Manual
Page 40
Keep all of the following items are included in Canada). If any items are not scanning transparencies. Film holders Transparency unit Reflective document mat Transparency guide Guide pins and adjust pins 34 Transparency Unit Unpacking the Transparency Unit Make sure that all the packing materials so you can use them for storage when you are missing or damaged, contact your EPSON dealer, or contact EPSON at (562) 276-4382 (in the United States) or (905) 709-3839 (in the transparency unit box.
Keep all of the following items are included in Canada). If any items are not scanning transparencies. Film holders Transparency unit Reflective document mat Transparency guide Guide pins and adjust pins 34 Transparency Unit Unpacking the Transparency Unit Make sure that all the packing materials so you can use them for storage when you are missing or damaged, contact your EPSON dealer, or contact EPSON at (562) 276-4382 (in the United States) or (905) 709-3839 (in the transparency unit box.

User Manual
Page 43
Tighten the attached screws to scan 35 mm slides, strips of the scanner. Using the Film Guides You can use . Then plug the scanner in use the four film guides that came with the scanner to secure the connector. Store the reflective document mat in the transparency unit pocket when...completely closed and the calibration area (next to the notch on . See Chapter 2 for instructions. Connect the transparency unit's connector to scan. When using the film guides, be sure the transparency unit is uncovered or an error will be unable to the option (ADF/TPU) connector at the back...
Tighten the attached screws to scan 35 mm slides, strips of the scanner. Using the Film Guides You can use . Then plug the scanner in use the four film guides that came with the scanner to secure the connector. Store the reflective document mat in the transparency unit pocket when...completely closed and the calibration area (next to the notch on . See Chapter 2 for instructions. Connect the transparency unit's connector to scan. When using the film guides, be sure the transparency unit is uncovered or an error will be unable to the option (ADF/TPU) connector at the back...

User Manual
Page 44
Place the 35 mm filmstrip guide on a flat surface and remove the cover from one of the strip holders. 2. Replace the strip holder you scan. 38 Transparency Unit Insert a filmstrip in step 1. 4. Repeat steps 1 through 3 for all the film strips you removed in the holder face down. 3. L400 16 Loading 35 mm film Follow these steps to load 35 mm positive or negative film: 1.
Place the 35 mm filmstrip guide on a flat surface and remove the cover from one of the strip holders. 2. Replace the strip holder you scan. 38 Transparency Unit Insert a filmstrip in step 1. 4. Repeat steps 1 through 3 for all the film strips you removed in the holder face down. 3. L400 16 Loading 35 mm film Follow these steps to load 35 mm positive or negative film: 1.

User Manual
Page 45
Using Optional Equipment 39 If you're using EPSON Scan, set the following options: ■ If you're using Home Mode, select one of the following for the Document Type option: Positive Film, Color Negative Film, or B&W Negative Film. ■ If you're using Professional Mode, set the Document Type option to Transparency, and then set the Film Type option to Positive Film, Color Negative Film, or B&W Negative Film. Close the TPU and begin scanning. Place the 35 mm filmstrip guide on the document table, and align it with the notch on the transparency guide as shown. 6. 5.
Using Optional Equipment 39 If you're using EPSON Scan, set the following options: ■ If you're using Home Mode, select one of the following for the Document Type option: Positive Film, Color Negative Film, or B&W Negative Film. ■ If you're using Professional Mode, set the Document Type option to Transparency, and then set the Film Type option to Positive Film, Color Negative Film, or B&W Negative Film. Close the TPU and begin scanning. Place the 35 mm filmstrip guide on the document table, and align it with the notch on the transparency guide as shown. 6. 5.

User Manual
Page 46
Loading 35 mm slides Follow these steps to Positive Film. 40 Transparency Unit If you're using EPSON Scan to scan, set the following options: ■ If you're using Home Mode, set Positive Film as shown. 3. Make sure the glossy side of each slide faces down, and the film emulsion layer faces up. 2. Align the slide...
Loading 35 mm slides Follow these steps to Positive Film. 40 Transparency Unit If you're using EPSON Scan to scan, set the following options: ■ If you're using Home Mode, set Positive Film as shown. 3. Make sure the glossy side of each slide faces down, and the film emulsion layer faces up. 2. Align the slide...

User Manual
Page 47
... and then set the following for all the film you scan. 4. Align it with the notch on the document table. Close the TPU and begin your scan. If you 're using EPSON Scan, set the Film Type option to load 4 × 5-inch film: 1. Then close the cover. 3. Using ...Optional Equipment 41 Insert the film in the film holder, making sure the glossy (smooth) side of the film holders. 2. Place the 4 × 5-inch film guide on ...
... and then set the following for all the film you scan. 4. Align it with the notch on the document table. Close the TPU and begin your scan. If you 're using EPSON Scan, set the Film Type option to load 4 × 5-inch film: 1. Then close the cover. 3. Using ...Optional Equipment 41 Insert the film in the film holder, making sure the glossy (smooth) side of the film holders. 2. Place the 4 × 5-inch film guide on ...

User Manual
Page 48
...following for all the film you 're using Home Mode, select one of the film holders. 2. Repeat steps 1 and 2 for the Document Type option: Positive Film, Color Negative Film, or B&W Negative Film. ■ If you scan. 4. If you're using EPSON Scan, set the Film Type option to load... 120-size or 220-size format film: 1. Close the TPU and begin your scan. Insert the film in the film holder, making sure the ...
...following for all the film you 're using Home Mode, select one of the film holders. 2. Repeat steps 1 and 2 for the Document Type option: Positive Film, Color Negative Film, or B&W Negative Film. ■ If you scan. 4. If you're using EPSON Scan, set the Film Type option to load... 120-size or 220-size format film: 1. Close the TPU and begin your scan. Insert the film in the film holder, making sure the ...

User Manual
Page 93
Scanning color images, 28 film, 37 to 43 into an application, 15, 18, 21, 24 photographs, 27 previewing scans, 16, 17, 19, 22, 25 to 26, 64 slides, 40 to your hard drive, 15, 18, 21, 24 transparencies, 27, 37 to 43 Scanning Quality setting, 23 SCSI cable length, 10...71 to 72 Terminator switch, SCSI, 11 Text, scanning, 27 Tone correction, 23 Transparency unit adjusting scanning angle, 45 color problems with transparencies, 69 installing, 35 to 37 scan settings, 27 scanning film, 17, 22 specifications, 76 unpacking, 34 to 35 using film guides, 37 to 42 Transportation lock, 64 Transporting scanner...
Scanning color images, 28 film, 37 to 43 into an application, 15, 18, 21, 24 photographs, 27 previewing scans, 16, 17, 19, 22, 25 to 26, 64 slides, 40 to your hard drive, 15, 18, 21, 24 transparencies, 27, 37 to 43 Scanning Quality setting, 23 SCSI cable length, 10...71 to 72 Terminator switch, SCSI, 11 Text, scanning, 27 Tone correction, 23 Transparency unit adjusting scanning angle, 45 color problems with transparencies, 69 installing, 35 to 37 scan settings, 27 scanning film, 17, 22 specifications, 76 unpacking, 34 to 35 using film guides, 37 to 42 Transportation lock, 64 Transporting scanner...


