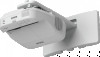
User Manual
Page 5
... Keystone Buttons 117 Correcting Image Shape with Quick Corner 120 Resizing the Image with the Wide and Tele Buttons 121 Adjusting the Image Position ...122 Focusing the Image...123 Remote Control Operation ...124 Using the Remote Control as a Wireless Mouse 126 Using the Remote Control as a Pointer 127 Selecting an Image...
... Keystone Buttons 117 Correcting Image Shape with Quick Corner 120 Resizing the Image with the Wide and Tele Buttons 121 Adjusting the Image Position ...122 Focusing the Image...123 Remote Control Operation ...124 Using the Remote Control as a Wireless Mouse 126 Using the Remote Control as a Pointer 127 Selecting an Image...
User Manual
Page 23
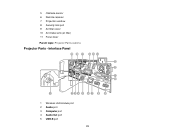
Interface Panel 1 Wireless LAN module port 2 Audio port 3 Computer port 4 Audio Out port 5 USB-B port 23 5 Obstacle sensor 6 Remote receiver 7 Projection window 8 Security lock port 9 Air filter cover 10 Air intake vent (air filter) 11 Focus lever Parent topic: Projector Part Locations Projector Parts -
Interface Panel 1 Wireless LAN module port 2 Audio port 3 Computer port 4 Audio Out port 5 USB-B port 23 5 Obstacle sensor 6 Remote receiver 7 Projection window 8 Security lock port 9 Air filter cover 10 Air intake vent (air filter) 11 Focus lever Parent topic: Projector Part Locations Projector Parts -
User Manual
Page 111
... Language for the Projector Menus Setting the Date and Time Image Shape Resizing the Image with the Wide and Tele Buttons Adjusting the Image Position Focusing the Image Remote Control Operation Selecting an Image Source Projection Modes Image Aspect Ratio Color Mode Controlling the Volume with the Volume Buttons Projecting a PC...
... Language for the Projector Menus Setting the Date and Time Image Shape Resizing the Image with the Wide and Tele Buttons Adjusting the Image Position Focusing the Image Remote Control Operation Selecting an Image Source Projection Modes Image Aspect Ratio Color Mode Controlling the Volume with the Volume Buttons Projecting a PC...
User Manual
Page 123
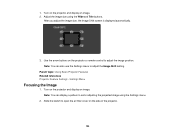
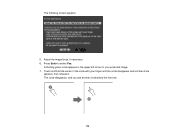
...: You can also use the Settings menu to adjust the image position. Parent topic: Using Basic Projector Features Related references Projector Feature Settings - Settings Menu Focusing the Image 1. 1. Turn on the side of the projector. 123 Slide the switch to aid in adjusting the projected image using the Wide and Tele...
...: You can also use the Settings menu to adjust the image position. Parent topic: Using Basic Projector Features Related references Projector Feature Settings - Settings Menu Focusing the Image 1. 1. Turn on the side of the projector. 123 Slide the switch to aid in adjusting the projected image using the Wide and Tele...
User Manual
Page 124
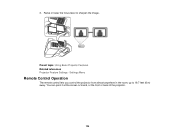
Raise or lower the focus lever to 19.7 feet (6 m) away. You can point it at the screen or board, or the front or back of the projector. 124 Parent topic: Using Basic Projector Features Related references Projector Feature Settings - Settings Menu Remote Control Operation The remote control lets you control the projector from almost anywhere in the room, up to sharpen the image. 3.
Raise or lower the focus lever to 19.7 feet (6 m) away. You can point it at the screen or board, or the front or back of the projector. 124 Parent topic: Using Basic Projector Features Related references Projector Feature Settings - Settings Menu Remote Control Operation The remote control lets you control the projector from almost anywhere in the room, up to sharpen the image. 3.
User Manual
Page 165
If you see a message that calibration failed, you need to select Yes. Select Auto Calibration and press Enter. 4. A pattern appears then disappears, and the system is calibrated. 2. Press Enter to calibrate manually. 165 Adjust the image focus, if necessary. 5. Select the Easy Interactive Function setting and press Enter. 3.
If you see a message that calibration failed, you need to select Yes. Select Auto Calibration and press Enter. 4. A pattern appears then disappears, and the system is calibrated. 2. Press Enter to calibrate manually. 165 Adjust the image focus, if necessary. 5. Select the Easy Interactive Function setting and press Enter. 3.
User Manual
Page 167
Touch the center of the circle with the tip of your projected image. 6. 3. A flashing green circle appears in the upper left corner of the pen. Select Manual Calibration and press Enter. 4. Adjust the image focus, if necessary. 5. The circle disappears, and you see another circle below the first one. 167 Press Enter to select Yes.
Touch the center of the circle with the tip of your projected image. 6. 3. A flashing green circle appears in the upper left corner of the pen. Select Manual Calibration and press Enter. 4. Adjust the image focus, if necessary. 5. The circle disappears, and you see another circle below the first one. 167 Press Enter to select Yes.
User Manual
Page 173
Adjust the image focus, if necessary. 6. Touch and hold the center of your finger until the circle disappears and another circle below the first one. 173 Press Enter to select Yes. A flashing green circle appears in the upper left corner of the circle with your projected image. 7. The circle disappears, and you see another circle appears, then release it. The following screen appears: 5.
Adjust the image focus, if necessary. 6. Touch and hold the center of your finger until the circle disappears and another circle below the first one. 173 Press Enter to select Yes. A flashing green circle appears in the upper left corner of the circle with your projected image. 7. The circle disappears, and you see another circle appears, then release it. The following screen appears: 5.
User Manual
Page 241
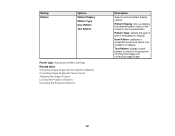
... or line pattern to display User Pattern: captures a projected screen and saves it as a pattern for display Test Pattern: displays a test pattern to assist in focusing and zooming the image and correcting image shape 241
... or line pattern to display User Pattern: captures a projected screen and saves it as a pattern for display Test Pattern: displays a test pattern to assist in focusing and zooming the image and correcting image shape 241
User Manual
Page 285
Note: Adjusting Quick Corner and Keystone settings may affect focus and pen calibration. Parent topic: Solving Image or Sound Problems Related tasks Correcting Image Shape with the Keystone Buttons Correcting Image Shape with Quick Corner ...
Note: Adjusting Quick Corner and Keystone settings may affect focus and pen calibration. Parent topic: Solving Image or Sound Problems Related tasks Correcting Image Shape with the Keystone Buttons Correcting Image Shape with Quick Corner ...
User Manual
Page 286
.... • Position the projector so the keystone adjustment angle is fuzzy or blurry, try the following solutions: • Adjust the image focus. • Check the projector lens cover glass for condensation. Note: To avoid condensation on the remote control to automatically adjust the tracking... and sync. Parent topic: Solving Image or Sound Problems Related references Image Quality Settings - Signal Menu Related tasks Focusing the Image 286 If any bands or overall blurriness remain, display a uniformly patterned image on the screen and manually adjust the ...
.... • Position the projector so the keystone adjustment angle is fuzzy or blurry, try the following solutions: • Adjust the image focus. • Check the projector lens cover glass for condensation. Note: To avoid condensation on the remote control to automatically adjust the tracking... and sync. Parent topic: Solving Image or Sound Problems Related references Image Quality Settings - Signal Menu Related tasks Focusing the Image 286 If any bands or overall blurriness remain, display a uniformly patterned image on the screen and manually adjust the ...
User Manual
Page 300
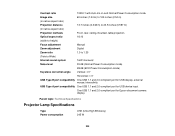
... (0.597 m) (in native aspect ratio) Projection methods Front, rear, ceiling-mounted, table projection Optical aspect ratio 16:10 (width-to-height) Focus adjustment Manual Zoom adjustment Digital Zoom ratio 1.0 to 1.35 (Tele-to-Wide) Internal sound system 16 W monaural Noise level 35 dB (Normal ...Type A port compatibility One USB 1.1 and 2.0 compliant port for USB device input One USB 1.1 and 2.0 compliant port for Epson document camera display Parent topic: Technical Specifications Projector Lamp Specifications Type Power consumption UHE (Ultra High Efficiency) 245 W 300
... (0.597 m) (in native aspect ratio) Projection methods Front, rear, ceiling-mounted, table projection Optical aspect ratio 16:10 (width-to-height) Focus adjustment Manual Zoom adjustment Digital Zoom ratio 1.0 to 1.35 (Tele-to-Wide) Internal sound system 16 W monaural Noise level 35 dB (Normal ...Type A port compatibility One USB 1.1 and 2.0 compliant port for USB device input One USB 1.1 and 2.0 compliant port for Epson document camera display Parent topic: Technical Specifications Projector Lamp Specifications Type Power consumption UHE (Ultra High Efficiency) 245 W 300

Installation Guide - Ultra-Short Throw Wall Mount (ELPMB28)
Page 4
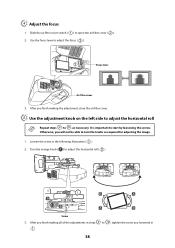
... the adjustment knob on the left side to the wall mount 9. Adjust the horizontal slide 9. Attach the wall plate covers and end cap 2. Adjust the focus 5. Display the mount adjustment test pattern, as described below 3. Adjust the forward/backward slide 10. Disassemble the parts 2. Attach the mount arm to adjust the...
... the adjustment knob on the left side to the wall mount 9. Adjust the horizontal slide 9. Attach the wall plate covers and end cap 2. Adjust the focus 5. Display the mount adjustment test pattern, as described below 3. Adjust the forward/backward slide 10. Disassemble the parts 2. Attach the mount arm to adjust the...
Installation Guide - Ultra-Short Throw Wall Mount (ELPMB28)
Page 38
... making the adjustment, close the air filter cover. Slide the air filter cover switch ( ) to adjust the focus ( ). Use the focus lever to open the air filter cover ( ). 2. D Adjust the focus 1. E Use the adjustment knob on the left side to adjust the horizontal roll E J Repeat steps to ...start by loosening the screws. It is important to as required for adjusting the image. 1. Turn the orange knob ( ) to adjust the horizontal roll ( ). Focus lever Air filter cover 3....
... making the adjustment, close the air filter cover. Slide the air filter cover switch ( ) to adjust the focus ( ). Use the focus lever to open the air filter cover ( ). 2. D Adjust the focus 1. E Use the adjustment knob on the left side to adjust the horizontal roll E J Repeat steps to ...start by loosening the screws. It is important to as required for adjusting the image. 1. Turn the orange knob ( ) to adjust the horizontal roll ( ). Focus lever Air filter cover 3....
Installation Guide - Ultra-Short Throw Wall Mount (ELPMB43)
Page 7
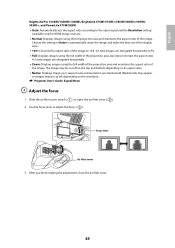
... 1. Change the aspect ratio if necessary 4. Connect the cable 7. English 6 Adjusting the Image 1. Adjust the forward/backward slide 10. Attaching a Security Cable s 66 7 Adjust the focus 5. Install the Touch Unit 6. Adjust the angle 8. Use the adjustment knob on the projector 2. Turn on the left side to adjust the horizontal rotation 7. Attach...
... 1. Change the aspect ratio if necessary 4. Connect the cable 7. English 6 Adjusting the Image 1. Adjust the forward/backward slide 10. Attaching a Security Cable s 66 7 Adjust the focus 5. Install the Touch Unit 6. Adjust the angle 8. Use the adjustment knob on the projector 2. Turn on the left side to adjust the horizontal rotation 7. Attach...
Installation Guide - Ultra-Short Throw Wall Mount (ELPMB43)
Page 43
... area, but does not retain the aspect ratio. 4:3 ratio images are maintained). Slide the air filter cover switch ( ) to adjust the focus ( ). Use the focus lever to open the air filter cover ( ). 2. Black bands may appear or images may be cut off , depending on its aspect ratio.... • Zoom: Displays images using the full projection area and maintains the aspect ratio of the image. English BrightLink Pro 1410Wi/1420Wi/1430Wi, BrightLink 575Wi/575Wi+/585Wi/585Wi+/595Wi/ 595Wi+, and PowerLite 575W/585W • Auto: Automatically sets the aspect ratio according to the input...
... area, but does not retain the aspect ratio. 4:3 ratio images are maintained). Slide the air filter cover switch ( ) to adjust the focus ( ). Use the focus lever to open the air filter cover ( ). 2. Black bands may appear or images may be cut off , depending on its aspect ratio.... • Zoom: Displays images using the full projection area and maintains the aspect ratio of the image. English BrightLink Pro 1410Wi/1420Wi/1430Wi, BrightLink 575Wi/575Wi+/585Wi/585Wi+/595Wi/ 595Wi+, and PowerLite 575W/585W • Auto: Automatically sets the aspect ratio according to the input...
Operation Guide - Easy Interactive Tools V4.x
Page 19
...of the red tint in .avi format for Windows or .mov format for the recorded image on the Camera Settings tab on the image. F Auto Focus to the window display. Move the slider to the right to increase the contrast and to the left to the right. To increase the strength... in the image, move the position of the camera image. You cannot record or save location for OS X. Click back to switch Adjusts the image focus automatically. G Freeze Pauses the image temporarily. While recording, the recording time is enlarged). You can set the audio input device on the Camera Settings...
...of the red tint in .avi format for Windows or .mov format for the recorded image on the Camera Settings tab on the image. F Auto Focus to the window display. Move the slider to the right to increase the contrast and to the left to the right. To increase the strength... in the image, move the position of the camera image. You cannot record or save location for OS X. Click back to switch Adjusts the image focus automatically. G Freeze Pauses the image temporarily. While recording, the recording time is enlarged). You can set the audio input device on the Camera Settings...