User Manual
Page 7
Using the Interactive Features ...159 Interactive Modes...159 Using the Interactive Pens ...160 Using the Pens ...160 Pen Calibration ...163 Calibrating Automatically ...164 Calibrating Manually ...166 Using Finger Touch Interactivity ...169 Touch Unit Safety Instructions...169 Calibrating for Finger Touch Interactivity 171 Using Finger Touch Operations 175 Using BrightLink With a Computer 177 PC Interactive Mode...
Using the Interactive Features ...159 Interactive Modes...159 Using the Interactive Pens ...160 Using the Pens ...160 Pen Calibration ...163 Calibrating Automatically ...164 Calibrating Manually ...166 Using Finger Touch Interactivity ...169 Touch Unit Safety Instructions...169 Calibrating for Finger Touch Interactivity 171 Using Finger Touch Operations 175 Using BrightLink With a Computer 177 PC Interactive Mode...

User Manual
Page 10
..." Message Appears 291 Solutions When the Interactive Pens Do Not Work 291 Solutions When the Interactive Pen Position Is Not Accurate 292 Solutions When Manual Calibration Does Not Work 293 Solutions When the Interactive Pens Are Slow or Difficult to Use 293 Solutions When the Interactive Pens Cause Interference or Unwanted...
..." Message Appears 291 Solutions When the Interactive Pens Do Not Work 291 Solutions When the Interactive Pen Position Is Not Accurate 292 Solutions When Manual Calibration Does Not Work 293 Solutions When the Interactive Pens Are Slow or Difficult to Use 293 Solutions When the Interactive Pens Cause Interference or Unwanted...

User Manual
Page 56
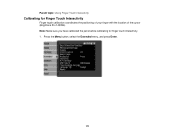
23. Select Touch Calibration and follow the instructions. 56 Perform touch calibration by pressing the Menu button on the remote control. On the Extended menu, select Easy Interactive Function, then select Touch Unit Setup.
23. Select Touch Calibration and follow the instructions. 56 Perform touch calibration by pressing the Menu button on the remote control. On the Extended menu, select Easy Interactive Function, then select Touch Unit Setup.

User Manual
Page 57
After you have finished touch calibration, store the markers inside the Touch Unit. 57 24.
After you have finished touch calibration, store the markers inside the Touch Unit. 57 24.
User Manual
Page 59
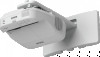
You can then use the projector on a table or cart, you first need to install the feet (BrightLink Pro 1420Wi). Turn the projector upside down. 59 Parent topic: Setting Up the Projector Related references Touch Unit Safety Instructions Related tasks Calibrating for Finger Touch Interactivity Using Finger Touch Operations Installing the Projector Feet To use the feet to tighten the screw at the bottom of the cover. Attach the dial cover. Make sure to adjust the image position. 1. 26.
You can then use the projector on a table or cart, you first need to install the feet (BrightLink Pro 1420Wi). Turn the projector upside down. 59 Parent topic: Setting Up the Projector Related references Touch Unit Safety Instructions Related tasks Calibrating for Finger Touch Interactivity Using Finger Touch Operations Installing the Projector Feet To use the feet to tighten the screw at the bottom of the cover. Attach the dial cover. Make sure to adjust the image position. 1. 26.
User Manual
Page 160
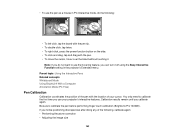
.... • With a computer, you can annotate at the same time (one of the pen. Two people can use Easy Interactive Tools. Using the Pens Pen Calibration Parent topic: Using the Interactive Features Related concepts Easy Interactive Tools Related tasks Selecting a Networked Device Source Using the Pens Your projector came with a blue...
.... • With a computer, you can annotate at the same time (one of the pen. Two people can use Easy Interactive Tools. Using the Pens Pen Calibration Parent topic: Using the Interactive Features Related concepts Easy Interactive Tools Related tasks Selecting a Networked Device Source Using the Pens Your projector came with a blue...
User Manual
Page 163
... touching it off using the Easy Interactive Function setting in PC Interactive mode, do not want to calibrate the pen before performing finger touch calibration (BrightLink Pro 1430Wi). If you calibrate again. You only need to calibrate the first time you can turn it . Be sure to use the hovering feature, you use ... • To use your cursor. Parent topic: Using the Interactive Pens Related concepts Whiteboard Mode Using BrightLink With a Computer Annotation Mode (PC Free) Pen Calibration Calibration coordinates the position of your projector's interactive features.
... touching it off using the Easy Interactive Function setting in PC Interactive mode, do not want to calibrate the pen before performing finger touch calibration (BrightLink Pro 1430Wi). If you calibrate again. You only need to calibrate the first time you can turn it . Be sure to use the hovering feature, you use ... • To use your cursor. Parent topic: Using the Interactive Pens Related concepts Whiteboard Mode Using BrightLink With a Computer Annotation Mode (PC Free) Pen Calibration Calibration coordinates the position of your projector's interactive features.

User Manual
Page 164
... Image Shape with the Keystone Buttons Resizing the Image with the Wide and Tele Buttons Adjusting the Image Position Calibrating Automatically You do not need the pens or a computer for Auto Calibration. • Using the Image Shift feature • Moving the projector Note: Move any pen you are ...not using away from the projection screen while calibrating. Note: You can start Auto Calibration by pressing the User button on the remote control or by pressing the Menu button on the remote control as described here. ...
... Image Shape with the Keystone Buttons Resizing the Image with the Wide and Tele Buttons Adjusting the Image Position Calibrating Automatically You do not need the pens or a computer for Auto Calibration. • Using the Image Shift feature • Moving the projector Note: Move any pen you are ...not using away from the projection screen while calibrating. Note: You can start Auto Calibration by pressing the User button on the remote control or by pressing the Menu button on the remote control as described here. ...
User Manual
Page 165
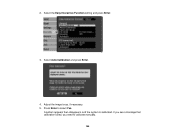
A pattern appears then disappears, and the system is calibrated. If you see a message that calibration failed, you need to select Yes. 2. Adjust the image focus, if necessary. 5. Select the Easy Interactive Function setting and press Enter. 3. Press Enter to calibrate manually. 165 Select Auto Calibration and press Enter. 4.
A pattern appears then disappears, and the system is calibrated. If you see a message that calibration failed, you need to select Yes. 2. Adjust the image focus, if necessary. 5. Select the Easy Interactive Function setting and press Enter. 3. Press Enter to calibrate manually. 165 Select Auto Calibration and press Enter. 4.

User Manual
Page 166
The cursor location and pen position should match after auto calibration, you may need to calibrate manually. Select the Easy Interactive Function setting and press Enter. 166 Press the Menu button, select the Extended menu, and press Enter. 2. If not, you can calibrate manually. 1. Parent topic: Pen Calibration Calibrating Manually If the cursor location and pen position do not match after calibration.
The cursor location and pen position should match after auto calibration, you may need to calibrate manually. Select the Easy Interactive Function setting and press Enter. 166 Press the Menu button, select the Extended menu, and press Enter. 2. If not, you can calibrate manually. 1. Parent topic: Pen Calibration Calibrating Manually If the cursor location and pen position do not match after calibration.
User Manual
Page 167
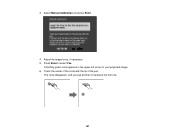
Select Manual Calibration and press Enter. 4. Press Enter to select Yes. The circle disappears, and you see another circle below the first one. 167 A flashing green circle appears in the upper left corner of the pen. Adjust the image focus, if necessary. 5. Touch the center of the circle with the tip of your projected image. 6. 3.
Select Manual Calibration and press Enter. 4. Press Enter to select Yes. The circle disappears, and you see another circle below the first one. 167 A flashing green circle appears in the upper left corner of the pen. Adjust the image focus, if necessary. 5. Touch the center of the circle with the tip of your projected image. 6. 3.

User Manual
Page 168
...to the projection window on the remote control to go back to the previous circle. To restart the calibration process, press and hold the Esc button for 2 seconds. 8. Note: For the most accurate calibration, make a mistake, press the Esc button on the projector). Note: Make sure you get to the... bottom of the column, the next circle appears at the top of the circle. 7. Continue until all of the next circle, then repeat. Parent topic: Pen Calibration 168 Touch the...
...to the projection window on the remote control to go back to the previous circle. To restart the calibration process, press and hold the Esc button for 2 seconds. 8. Note: For the most accurate calibration, make a mistake, press the Esc button on the projector). Note: Make sure you get to the... bottom of the column, the next circle appears at the top of the circle. 7. Continue until all of the next circle, then repeat. Parent topic: Pen Calibration 168 Touch the...
User Manual
Page 169
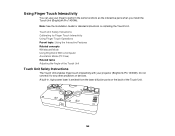
... is emitted from the laser diffusion ports on installing the Touch Unit. Using Finger Touch Interactivity You can use your projector (BrightLink Pro 1430Wi). Touch Unit Safety Instructions Calibrating for detailed instructions on the back of the Touch Unit Touch Unit Safety Instructions The Touch Unit enables finger touch interactivity with your...
... is emitted from the laser diffusion ports on installing the Touch Unit. Using Finger Touch Interactivity You can use your projector (BrightLink Pro 1430Wi). Touch Unit Safety Instructions Calibrating for detailed instructions on the back of the Touch Unit Touch Unit Safety Instructions The Touch Unit enables finger touch interactivity with your...
User Manual
Page 171
Press the Menu button, select the Extended menu, and press Enter. 171 Note: Make sure you have calibrated the pens before calibrating for Finger Touch Interactivity Finger touch calibration coordinates the positioning of your finger with the location of the cursor (BrightLink Pro 1430Wi). Parent topic: Using Finger Touch Interactivity Calibrating for finger touch interactivity. 1.
Press the Menu button, select the Extended menu, and press Enter. 171 Note: Make sure you have calibrated the pens before calibrating for Finger Touch Interactivity Finger touch calibration coordinates the positioning of your finger with the location of the cursor (BrightLink Pro 1430Wi). Parent topic: Using Finger Touch Interactivity Calibrating for finger touch interactivity. 1.

User Manual
Page 172
Select Touch Unit Setup and press Enter. 4. Select the Easy Interactive Function setting and press Enter. 3. Select Touch Calibration and press Enter. 172 2.
Select Touch Unit Setup and press Enter. 4. Select the Easy Interactive Function setting and press Enter. 3. Select Touch Calibration and press Enter. 172 2.

User Manual
Page 174
Note: If you make sure you touch the center of the circle with your finger. To restart the calibration process, press and hold the Esc button for 2 seconds. 9. Note: For the most accurate calibration, make a mistake, press the Esc button on the projector). 8. If the cursor location and your finger and the interactive..., repeat these steps to the bottom of a column, the next circle appears at the top of the circles disappear. Note: Make sure you get to calibrate again. 174
Note: If you make sure you touch the center of the circle with your finger. To restart the calibration process, press and hold the Esc button for 2 seconds. 9. Note: For the most accurate calibration, make a mistake, press the Esc button on the projector). 8. If the cursor location and your finger and the interactive..., repeat these steps to the bottom of a column, the next circle appears at the top of the circles disappear. Note: Make sure you get to calibrate again. 174

User Manual
Page 175
Install the Touch Unit as you can use two fingers in your finger, you would use an interactive pen (BrightLink Pro 1430Wi). Turn on the Touch Unit remains lit. 175 The blue light on your finger, or use both at the same time. This ...can use either a pen or your projector. When performing touch operations with the projected screen, just as described in annotation and whiteboard modes. 1. Calibrate for finger touch interactivity. 5. Parent topic: Using Finger Touch Interactivity Related tasks Adjusting the Angle of the Touch Unit if it was not adjusted during...
Install the Touch Unit as you can use two fingers in your finger, you would use an interactive pen (BrightLink Pro 1430Wi). Turn on the Touch Unit remains lit. 175 The blue light on your finger, or use both at the same time. This ...can use either a pen or your projector. When performing touch operations with the projected screen, just as described in annotation and whiteboard modes. 1. Calibrate for finger touch interactivity. 5. Parent topic: Using Finger Touch Interactivity Related tasks Adjusting the Angle of the Touch Unit if it was not adjusted during...
User Manual
Page 177
... the system requirements here to the projector and install the software from the CD labeled "Epson Projector Software for Easy Interactive Function." Parent topic: Using Finger Touch Interactivity Related tasks Calibrating for Finger Touch Interactivity Using BrightLink With a Computer You can then do the following:...bandages. Note: Finger touch operations may not work correctly with both pens or a combination of pen and finger touch (BrightLink Pro 1430Wi) at the same time Note: See the online Easy Interactive Tools Operation Guide for annotation in a browser window, use PC Interactive ...
... the system requirements here to the projector and install the software from the CD labeled "Epson Projector Software for Easy Interactive Function." Parent topic: Using Finger Touch Interactivity Related tasks Calibrating for Finger Touch Interactivity Using BrightLink With a Computer You can then do the following:...bandages. Note: Finger touch operations may not work correctly with both pens or a combination of pen and finger touch (BrightLink Pro 1430Wi) at the same time Note: See the online Easy Interactive Tools Operation Guide for annotation in a browser window, use PC Interactive ...

User Manual
Page 240
... Lock Off Three shapes available Varying levels available Front/Rear Front Rear Off Power Consumption Info Progressive Closed Caption Test Pattern Resolution Pattern Display Auto Calibration Description Controls projector button locking to secure the projector Full Lock: locks all buttons Partial Lock: locks all receivers Assigns a menu option to the User...
... Lock Off Three shapes available Varying levels available Front/Rear Front Rear Off Power Consumption Info Progressive Closed Caption Test Pattern Resolution Pattern Display Auto Calibration Description Controls projector button locking to secure the projector Full Lock: locks all buttons Partial Lock: locks all receivers Assigns a menu option to the User...

User Manual
Page 242
Easy Interactive Function Settings Setting Options General Easy Interactive Function settings Auto Calibration - Manual Calibration Description Start calibration for the interactive pens 242 Extended Menu Settings on the Extended menu let you customize various projector setup features that control its operation. Projector Setup Settings -
Easy Interactive Function Settings Setting Options General Easy Interactive Function settings Auto Calibration - Manual Calibration Description Start calibration for the interactive pens 242 Extended Menu Settings on the Extended menu let you customize various projector setup features that control its operation. Projector Setup Settings -

