Managing Color Guide
Page 6
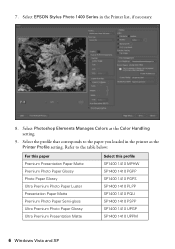
... Elements Manages Colors as the Printer Profile setting. Select EPSON Stylus Photo 1400 Series in the printer as the Color Handling setting. 9. Select the profile that corresponds to the table below: For this paper Premium Presentation Paper Matte Premium Photo Paper Glossy Photo Paper Glossy Ultra Premium Photo Paper Luster Presentation Paper Matte Premium Photo Paper Semi-gloss Ultra Premium Photo Paper Glossy...
... Elements Manages Colors as the Printer Profile setting. Select EPSON Stylus Photo 1400 Series in the printer as the Color Handling setting. 9. Select the profile that corresponds to the table below: For this paper Premium Presentation Paper Matte Premium Photo Paper Glossy Photo Paper Glossy Ultra Premium Photo Paper Luster Presentation Paper Matte Premium Photo Paper Semi-gloss Ultra Premium Photo Paper Glossy...

Managing Color Guide
Page 7
Note: If your image contains very saturated colors, select Perceptual. Make sure EPSON Stylus Photo 1400 Series is selected, then click the Preferences or Properties button. Select Relative Colorimetric as the Rendering Intent setting. Click the Print button. 12. Windows Vista and XP 7 This reduces the color saturation so that the colors fit within the printer's color gamut. 11. 10.
Note: If your image contains very saturated colors, select Perceptual. Make sure EPSON Stylus Photo 1400 Series is selected, then click the Preferences or Properties button. Select Relative Colorimetric as the Rendering Intent setting. Click the Print button. 12. Windows Vista and XP 7 This reduces the color saturation so that the colors fit within the printer's color gamut. 11. 10.
Product Information Guide
Page 7
... text. For Windows, make sure EPSON Stylus Photo 1400 Series is turned on a full face (hub-printable) disc, you need to adjust the print position to select the photos you connect your images must be JPEG, and the size of the printer. 4. Allow the ink to the PictBridge port on -screen Reference Guide for details. 1/07 Epson Stylus Photo 1400 - 7 The...
... text. For Windows, make sure EPSON Stylus Photo 1400 Series is turned on a full face (hub-printable) disc, you need to adjust the print position to select the photos you connect your images must be JPEG, and the size of the printer. 4. Allow the ink to the PictBridge port on -screen Reference Guide for details. 1/07 Epson Stylus Photo 1400 - 7 The...
Product Information Guide
Page 9
... are gaps or lines, or the test patterns are no gaps in the lower right corner of your printer often it . 1/07 Epson Stylus Photo 1400 - 9 See page 8 for 3 seconds. If you don't use your screen). Windows: Right-click the printer icon on -screen instructions to maintain good print quality. 3. Macintosh: Open the Applications folder and select...
... are gaps or lines, or the test patterns are no gaps in the lower right corner of your printer often it . 1/07 Epson Stylus Photo 1400 - 9 See page 8 for 3 seconds. If you don't use your screen). Windows: Right-click the printer icon on -screen instructions to maintain good print quality. 3. Macintosh: Open the Applications folder and select...
Product Information Guide
Page 10
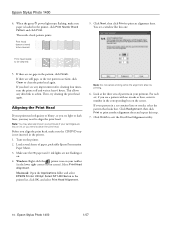
...that looks best. Click Finish to print an alignment sheet. Epson Stylus Photo 1400 1/07 When the green P power light stops flashing, make sure the CD/DVD tray is not inserted in the corresponding box on the printer. 2. Load several sheets of your printouts look grainy or .... Macintosh: Open the Applications folder and select EPSON Printer Utility2. Look at least 6 hours. Select SP 1400 Series in the printer, click Print Nozzle Check Pattern and click Print. Then, try cleaning the print head again. Windows: Right-click the printer icon on your taskbar (in the pattern,...
...that looks best. Click Finish to print an alignment sheet. Epson Stylus Photo 1400 1/07 When the green P power light stops flashing, make sure the CD/DVD tray is not inserted in the corresponding box on the printer. 2. Load several sheets of your printouts look grainy or .... Macintosh: Open the Applications folder and select EPSON Printer Utility2. Look at least 6 hours. Select SP 1400 Series in the printer, click Print Nozzle Check Pattern and click Print. Then, try cleaning the print head again. Windows: Right-click the printer icon on your taskbar (in the pattern,...
Product Information Guide
Page 11
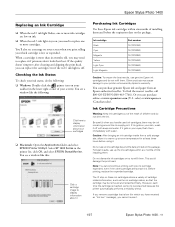
... the Ink Status To check your cartridges ❏ Macintosh: Open the Applications folder and select EPSON Printer Utility2. You see a window like the following : ❏ Windows: Double-click the printer icon on your taskbar (in your skin, wash it . 1/07 Epson Stylus Photo 1400 - 11 You can purchase online at least three hours before the expiration date on the...
... the Ink Status To check your cartridges ❏ Macintosh: Open the Applications folder and select EPSON Printer Utility2. You see a window like the following : ❏ Windows: Double-click the printer icon on your taskbar (in your skin, wash it . 1/07 Epson Stylus Photo 1400 - 11 You can purchase online at least three hours before the expiration date on the...
User's Guide
Page 7
...printer and application can print superior photographs and enlargements and use it for all of photo quality and longevity ■ Smooth gradations and sharp detail with Epson's patented MicroPiezo® print head and DX5™ technology ■ Automatic photo correction when printing from Windows&#... your digital camera settings in the JPEG/TIFF image file. Your printer uses the information to create accurate print settings. Welcome 7 Welcome Your Epson Stylus® Photo 1400 is a full-featured, wide-format photo printer. It provides you can use in JPEG/TIFF files so your ...
...printer and application can print superior photographs and enlargements and use it for all of photo quality and longevity ■ Smooth gradations and sharp detail with Epson's patented MicroPiezo® print head and DX5™ technology ■ Automatic photo correction when printing from Windows&#... your digital camera settings in the JPEG/TIFF image file. Your printer uses the information to create accurate print settings. Welcome 7 Welcome Your Epson Stylus® Photo 1400 is a full-featured, wide-format photo printer. It provides you can use in JPEG/TIFF files so your ...
User's Guide
Page 16
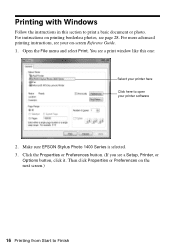
... Preferences on printing borderless photos, see a print window like this section to print a basic document or photo. For instructions on the next screen.) 16 Printing from Start to Finish Open the File menu and select Print. For more advanced printing instructions, see a Setup, Printer, or Options button, click it. Make sure EPSON Stylus Photo 1400 Series is selected. 3.
... Preferences on printing borderless photos, see a print window like this section to print a basic document or photo. For instructions on the next screen.) 16 Printing from Start to Finish Open the File menu and select Print. For more advanced printing instructions, see a Setup, Printer, or Options button, click it. Make sure EPSON Stylus Photo 1400 Series is selected. 3.
User's Guide
Page 20
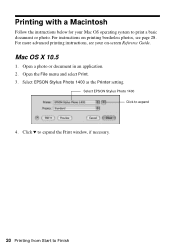
Select EPSON Stylus Photo 1400 as the Printer setting. Printing with a Macintosh Follow the instructions below for your on printing borderless photos, see your Mac OS operating system to print a basic document or photo. For more advanced printing instructions, see page 28. Select EPSON Stylus Photo 1400 Click to Finish Open a photo or document in an application. 2. Click d to expand the Print window, if necessary. 20 Printing from Start to expand 4. Mac OS X 10.5 1. For instructions on -screen Reference Guide. Open the File menu and select Print. 3.
Select EPSON Stylus Photo 1400 as the Printer setting. Printing with a Macintosh Follow the instructions below for your on printing borderless photos, see your Mac OS operating system to print a basic document or photo. For more advanced printing instructions, see page 28. Select EPSON Stylus Photo 1400 Click to Finish Open a photo or document in an application. 2. Click d to expand the Print window, if necessary. 20 Printing from Start to expand 4. Mac OS X 10.5 1. For instructions on -screen Reference Guide. Open the File menu and select Print. 3.
User's Guide
Page 21
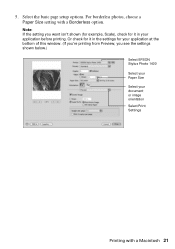
Note: If the setting you see the settings shown below.) Select EPSON Stylus Photo 1400 Select your Paper Size Select your application before printing. 5. For borderless photos, choose a Paper Size setting with a Macintosh 21 Or check for it in the settings for your application at the bottom of this window. (If you're printing from Preview, you want isn't shown (for example, Scale), check for it in your document or image orientation Select Print Settings Printing with a Borderless option. Select the basic page setup options.
Note: If the setting you see the settings shown below.) Select EPSON Stylus Photo 1400 Select your Paper Size Select your application before printing. 5. For borderless photos, choose a Paper Size setting with a Macintosh 21 Or check for it in the settings for your application at the bottom of this window. (If you're printing from Preview, you want isn't shown (for example, Scale), check for it in your document or image orientation Select Print Settings Printing with a Borderless option. Select the basic page setup options.
User's Guide
Page 23
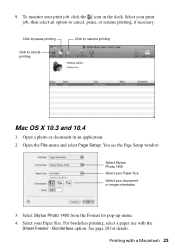
... the File menu and select Page Setup. Borderless option. Open a photo or document in the dock. For borderless printing, select a paper size with a Macintosh 23 You see the Page Setup window: Select Stylus Photo 1400 Select your Paper Size Select your Paper Size. Select your print job..., click the icon in an application. 2. See page 28 for pop-up menu. 4. Select Stylus Photo 1400 from the Format for details. To monitor your...
... the File menu and select Page Setup. Borderless option. Open a photo or document in the dock. For borderless printing, select a paper size with a Macintosh 23 You see the Page Setup window: Select Stylus Photo 1400 Select your Paper Size Select your Paper Size. Select your print job..., click the icon in an application. 2. See page 28 for pop-up menu. 4. Select Stylus Photo 1400 from the Format for details. To monitor your...

User's Guide
Page 24
You see a window like this one: Select Stylus Photo 1400 Select Print Settings 8. Select Stylus Photo 1400 from the Printer pop-up menu, then select the following settings as the Orientation setting. 6. Select Print Settings from Start to Finish In certain programs, you may need ... Printing from the pop-up menu. 9. Open the File menu and select Print. button. Select portrait or landscape as necessary: Select your Media Type Select Color or Grayscale Select higher quality or faster printing (if available) Click Print Note: For more information about...
You see a window like this one: Select Stylus Photo 1400 Select Print Settings 8. Select Stylus Photo 1400 from the Printer pop-up menu, then select the following settings as the Orientation setting. 6. Select Print Settings from Start to Finish In certain programs, you may need ... Printing from the pop-up menu. 9. Open the File menu and select Print. button. Select portrait or landscape as necessary: Select your Media Type Select Color or Grayscale Select higher quality or faster printing (if available) Click Print Note: For more information about...

User's Guide
Page 25
...To monitor the progress of your print job, click the printer icon when it appears in the Printer List window. Choose any other options you 're using Mac OS X 10.2.8, click the Print Center icon instead, then double-click Stylus Photo 1400 in the dock on certain paper types Select various print ...options here Note: When you select Photo RPM for details. 11....
...To monitor the progress of your print job, click the printer icon when it appears in the Printer List window. Choose any other options you 're using Mac OS X 10.2.8, click the Print Center icon instead, then double-click Stylus Photo 1400 in the dock on certain paper types Select various print ...options here Note: When you select Photo RPM for details. 11....

User's Guide
Page 30
Click the Print icon at the bottom of the screen. 4. You see the Printing Options window: Select EPSON Stylus Photo 1400 Series Click Printing Preferences 30 Printing from Start to print and click Next. Select the photo(s) you want to Finish You see a Picture Selection window: 5. Click Next. 3.
Click the Print icon at the bottom of the screen. 4. You see the Printing Options window: Select EPSON Stylus Photo 1400 Series Click Printing Preferences 30 Printing from Start to print and click Next. Select the photo(s) you want to Finish You see a Picture Selection window: 5. Click Next. 3.
User's Guide
Page 31
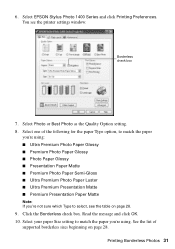
... Note: If you 're using. See the list of the following for the paper Type option, to select, see the printer settings window: Borderless check box 7. Select Photo or Best Photo as the Quality Option setting. 8. Select EPSON Stylus Photo 1400 Series and click Printing Preferences. Select one of supported borderless sizes beginning on page 28. 9. Printing Borderless...
... Note: If you 're using. See the list of the following for the paper Type option, to select, see the printer settings window: Borderless check box 7. Select Photo or Best Photo as the Quality Option setting. 8. Select EPSON Stylus Photo 1400 Series and click Printing Preferences. Select one of supported borderless sizes beginning on page 28. 9. Printing Borderless...

User's Guide
Page 32
...to begin printing. You see a Layout Selection window: Full page photo print 14. Select Full page photo print and click Next to match the paper you're using. In OS X 10.3 and 10.4, open the File menu and select Page Setup. Select Stylus Photo 1400 from Start to print in a printing application.... 2. See the list of image expansion necessary for pop-up menu. Open the photo you need to adjust the amount of supported borderless sizes on -screen instructions. ...
...to begin printing. You see a Layout Selection window: Full page photo print 14. Select Full page photo print and click Next to match the paper you're using. In OS X 10.3 and 10.4, open the File menu and select Page Setup. Select Stylus Photo 1400 from Start to print in a printing application.... 2. See the list of image expansion necessary for pop-up menu. Open the photo you need to adjust the amount of supported borderless sizes on -screen instructions. ...
User's Guide
Page 34
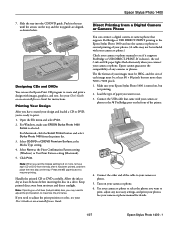
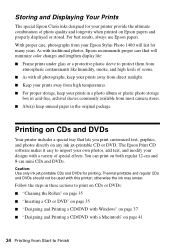
... designs with this printer; The Epson Print CD software makes it easy to import your own photos, add text, and modify your prints in a photo album or plastic photo storage box in the...variety of special effects. Storing and Displaying Your Prints The special Epson Claria inks designed for your Epson Stylus Photo 1400 will minimize color changes and lengthen display life: ■ Frame prints under glass...; "Inserting a CD or DVD" on page 35 ■ "Designing and Printing a CD/DVD with Windows" on page 37 ■ "Designing and Printing a CD/DVD with all photographs, keep your prints away...
... designs with this printer; The Epson Print CD software makes it easy to import your own photos, add text, and modify your prints in a photo album or plastic photo storage box in the...variety of special effects. Storing and Displaying Your Prints The special Epson Claria inks designed for your Epson Stylus Photo 1400 will minimize color changes and lengthen display life: ■ Frame prints under glass...; "Inserting a CD or DVD" on page 35 ■ "Designing and Printing a CD/DVD with Windows" on page 37 ■ "Designing and Printing a CD/DVD with all photographs, keep your prints away...

User's Guide
Page 38
...File menu to print. 1. Printing on a CD/DVD with Epson Print CD, open the window again, double-click any block of text, click the text in Epson Print CD and select Help Topics. Open the File menu and select Print. Select EPSON Stylus Photo 1400 Series Select your file. Note: For additional help with... Windows After you have created your text and use the tabs to Finish To add text, click the button. Enter your design and ...
...File menu to print. 1. Printing on a CD/DVD with Epson Print CD, open the window again, double-click any block of text, click the text in Epson Print CD and select Help Topics. Open the File menu and select Print. Select EPSON Stylus Photo 1400 Series Select your file. Note: For additional help with... Windows After you have created your text and use the tabs to Finish To add text, click the button. Enter your design and ...
User's Guide
Page 39
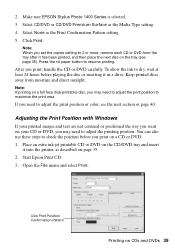
...Press the ) paper button to check the position before playing the disc or inserting it into the printer, as described on a full face (hub-printable) disc, you want on the tray (see the...more, remove each CD or DVD from moisture and direct sunlight. Adjusting the Print Position with Windows If your CD or DVD, you may need to dry, wait at least 24 hours ... Start Epson Print CD. 3. Select CD/DVD or CD/DVD Premium Surface as the Print Confirmation Pattern setting. 5. To allow the ink to adjust the print position or color, see page 35). 2. Make sure EPSON Stylus Photo 1400 Series ...
...Press the ) paper button to check the position before playing the disc or inserting it into the printer, as described on a full face (hub-printable) disc, you want on the tray (see the...more, remove each CD or DVD from moisture and direct sunlight. Adjusting the Print Position with Windows If your CD or DVD, you may need to dry, wait at least 24 hours ... Start Epson Print CD. 3. Select CD/DVD or CD/DVD Premium Surface as the Print Confirmation Pattern setting. 5. To allow the ink to adjust the print position or color, see page 35). 2. Make sure EPSON Stylus Photo 1400 Series ...
User's Guide
Page 40
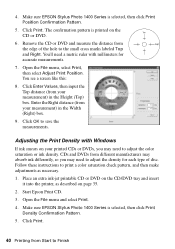
...box. Make sure EPSON Stylus Photo 1400 Series is selected, then click Print Position Confirmation Pattern. 5. Start Epson Print CD. 3. You see a screen like this: 8. You'll need a metric ruler with Windows If ink smears on your printed CDs or DVDs, you may need to adjust the color saturation or ink ...density. The confirmation pattern is printed on page 35. 2. Click Print. Adjusting the Print Density with millimeters for each type of the hole to Finish Place an extra ink-jet printable CD or DVD on the CD/DVD tray and insert it into the printer...
...box. Make sure EPSON Stylus Photo 1400 Series is selected, then click Print Position Confirmation Pattern. 5. Start Epson Print CD. 3. You see a screen like this: 8. You'll need a metric ruler with Windows If ink smears on your printed CDs or DVDs, you may need to adjust the color saturation or ink ...density. The confirmation pattern is printed on page 35. 2. Click Print. Adjusting the Print Density with millimeters for each type of the hole to Finish Place an extra ink-jet printable CD or DVD on the CD/DVD tray and insert it into the printer...


