
Users Guide
Page 10
... into the extension cord does not exceed the cord's ampere rating. The AC power cord should be followed carefully to repair the AC adapter, scanner, or scanner option by the cable. Use only the type of this product. Inserting a connector in the plug, make sure you use it was included.... personnel under the following : Warnings must be stepped on top of the connectors. Use only the AC adapter that regularly switch on the scanner. Place the scanner and the AC adapter near excessive dirt or dust, water, heat sources, or in locations subject to the plug, replace the cord set...
... into the extension cord does not exceed the cord's ampere rating. The AC power cord should be followed carefully to repair the AC adapter, scanner, or scanner option by the cable. Use only the type of this product. Inserting a connector in the plug, make sure you use it was included.... personnel under the following : Warnings must be stepped on top of the connectors. Use only the AC adapter that regularly switch on the scanner. Place the scanner and the AC adapter near excessive dirt or dust, water, heat sources, or in locations subject to the plug, replace the cord set...

Users Guide
Page 11
... to ensure responsible and legal use of copyrighted materials Epson encourages each user to be sure to use liquid or aerosol cleaners. While some countries' laws permit limited copying or reuse of children. Clean with this scanner contain small parts. Passports, driver's licenses, warrants ...or exhibits a distinct change in certain circumstances, those circumstances may also be as broad as some people assume. Do not use the scanner for any Epson product. Warning The film holders included with a damp cloth only. Top (NPD4827 - 00 EN) Restrictions on Copying Observe the ...
... to ensure responsible and legal use of copyrighted materials Epson encourages each user to be sure to use liquid or aerosol cleaners. While some countries' laws permit limited copying or reuse of children. Clean with this scanner contain small parts. Passports, driver's licenses, warrants ...or exhibits a distinct change in certain circumstances, those circumstances may also be as broad as some people assume. Do not use the scanner for any Epson product. Warning The film holders included with a damp cloth only. Top (NPD4827 - 00 EN) Restrictions on Copying Observe the ...
Users Guide
Page 19
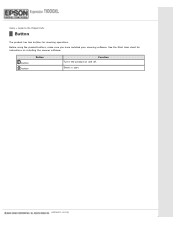
button button Button Function Turns the product on installing the scanner software. Starts a scan. (NPD4827 - 00 EN) See the Start Here sheet for scanning operations. Home > Guide to the Product Parts Button The product has two buttons for instructions on and off. Before using the product buttons, make sure you have installed your scanning software.
button button Button Function Turns the product on installing the scanner software. Starts a scan. (NPD4827 - 00 EN) See the Start Here sheet for scanning operations. Home > Guide to the Product Parts Button The product has two buttons for instructions on and off. Before using the product buttons, make sure you have installed your scanning software.

Users Guide
Page 20
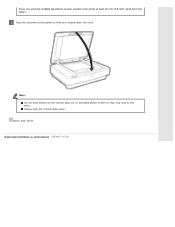
Open the document cover. Note: Place your document facedown on the scanner glass and do not press the glass with the mark. Home > Placing Originals on the Product Placing Documents Important: Do not place heavy objects on the scanner glass. Make sure the top corner of the document is aligned with too much force.
Open the document cover. Note: Place your document facedown on the scanner glass and do not press the glass with the mark. Home > Placing Originals on the Product Placing Documents Important: Do not place heavy objects on the scanner glass. Make sure the top corner of the document is aligned with too much force.
Users Guide
Page 21
Close the document cover gently so that your original does not move. Epson Scan Driver (NPD4827 - 00 EN) Always keep the scanner glass clean. If you are scanning multiple documents at once, position each photo at least 20 mm (0.8 inch) apart from the others. Note: Do not leave photos on the scanner glass for an extended period of time as they may stick to the glass.
Close the document cover gently so that your original does not move. Epson Scan Driver (NPD4827 - 00 EN) Always keep the scanner glass clean. If you are scanning multiple documents at once, position each photo at least 20 mm (0.8 inch) apart from the others. Note: Do not leave photos on the scanner glass for an extended period of time as they may stick to the glass.
Users Guide
Page 22
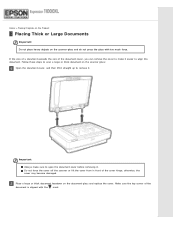
... exceeds the size of the document cover, you can remove the cover to make sure to remove it . Do not force the cover off the scanner or lift the cover from in front of the document is aligned with too much force. Make sure the top corner of the cover hinge...; Follow these steps to scan a large or thick document on the scanner glass: Open the document cover, and then lift it straight up to open the document cover before removing it . Home > Placing Originals on the Product...
... exceeds the size of the document cover, you can remove the cover to make sure to remove it . Do not force the cover off the scanner or lift the cover from in front of the document is aligned with too much force. Make sure the top corner of the cover hinge...; Follow these steps to scan a large or thick document on the scanner glass: Open the document cover, and then lift it straight up to open the document cover before removing it . Home > Placing Originals on the Product...
Users Guide
Page 24
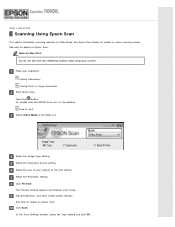
.... Select the size of your original(s). Adjust brightness, and other scanning modes. See help for details on Epson Scan. Place your original as the Size setting. See Epson Scan Modes for details on the desktop. Select the Resolution setting. Placing Documents Placing Thick or Large Documents ...OS X: Do not use the Fast User Switching function while using your image. Or, double-click the EPSON Scan icon on Epson Scan. The Preview window appears and displays your scanner. Select the Image Type setting. Home > How to start Select Office Mode in Office Mode. In File...
.... Select the size of your original(s). Adjust brightness, and other scanning modes. See help for details on Epson Scan. Place your original as the Size setting. See Epson Scan Modes for details on the desktop. Select the Resolution setting. Placing Documents Placing Thick or Large Documents ...OS X: Do not use the Fast User Switching function while using your image. Or, double-click the EPSON Scan icon on Epson Scan. The Preview window appears and displays your scanner. Select the Image Type setting. Home > How to start Select Office Mode in Office Mode. In File...

Users Guide
Page 27
... the Image Type, Document Source, Size, and Resolution settings. Place your scan area. Make File Save and PDF settings as necessary. See Epson Scan Modes for details on the scanner glass. Click Scan. Home > How to Scan Text Enhancement When you scan documents, you use Text Enhancement, it is recommended that you...
... the Image Type, Document Source, Size, and Resolution settings. Place your scan area. Make File Save and PDF settings as necessary. See Epson Scan Modes for details on the scanner glass. Click Scan. Home > How to Scan Text Enhancement When you scan documents, you use Text Enhancement, it is recommended that you...
Users Guide
Page 31
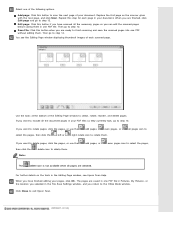
... to include all the necessary pages so you have finished editing your PDF files as they currently look, go to exit Epson Scan. (NPD4827 - 00 EN) For further details on the scanner glass with the next page, and click Scan. Select one PDF file. Use the tools at the bottom of each... when all pages icon to If you are finished, click Edit page and go to scan the next page of the following options. You see Epson Scan Help. The pages are selected. Add page: Click this step for each scanned page.
... to include all the necessary pages so you have finished editing your PDF files as they currently look, go to exit Epson Scan. (NPD4827 - 00 EN) For further details on the scanner glass with the next page, and click Scan. Select one PDF file. Use the tools at the bottom of each... when all pages icon to If you are finished, click Edit page and go to scan the next page of the following options. You see Epson Scan Help. The pages are selected. Add page: Click this step for each scanned page.
Users Guide
Page 36
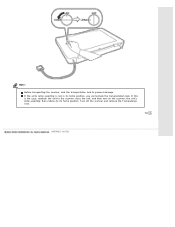
Turn off the scanner and remove the Transparency Unit. If the unit's lamp assembly is the case, reattach the unit to prevent damage. Top (NPD4827 - 00 EN) If this is not in its home position. Note: Before transporting the scanner, lock the transportation lock to the scanner, close the unit, and then turn on the scanner; the unit's lamp assembly then returns to its home position, you cannot lock the transportation lock.
Turn off the scanner and remove the Transparency Unit. If the unit's lamp assembly is the case, reattach the unit to prevent damage. Top (NPD4827 - 00 EN) If this is not in its home position. Note: Before transporting the scanner, lock the transportation lock to the scanner, close the unit, and then turn on the scanner; the unit's lamp assembly then returns to its home position, you cannot lock the transportation lock.
Users Guide
Page 37
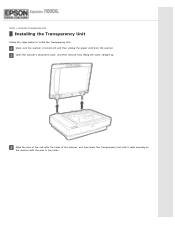
Home > Using the Transparency Unit Installing the Transparency Unit Follow the steps below to install the Transparency Unit. Open the scanner's document cover, and then remove it rests securely on the scanner with the pins in the holes. Align the pins of the unit with the holes of the scanner, and then lower the Transparency Unit until it by lifting the cover straight up. Make sure the scanner is turned off, and then unplug the power cord from the scanner.
Home > Using the Transparency Unit Installing the Transparency Unit Follow the steps below to install the Transparency Unit. Open the scanner's document cover, and then remove it rests securely on the scanner with the pins in the holes. Align the pins of the unit with the holes of the scanner, and then lower the Transparency Unit until it by lifting the cover straight up. Make sure the scanner is turned off, and then unplug the power cord from the scanner.

Users Guide
Page 38
Remove the reflective document mat from the Transparency Unit as shown below . Place the transparency guide on the scanner glass as shown below .
Remove the reflective document mat from the Transparency Unit as shown below . Place the transparency guide on the scanner glass as shown below .
Users Guide
Page 39
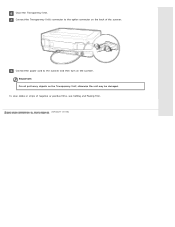
Connect the power cord to the option connector on the back of negative or positive films, see Setting and Placing Film. (NPD4827 - 00 EN) Important: Do not put heavy objects on the scanner. Close the Transparency Unit. otherwise the unit may be damaged. To scan slides or strips of the scanner. Connect the Transparency Unit's connector to the scanner and then turn on the Transparency Unit;
Connect the power cord to the option connector on the back of negative or positive films, see Setting and Placing Film. (NPD4827 - 00 EN) Important: Do not put heavy objects on the scanner. Close the Transparency Unit. otherwise the unit may be damaged. To scan slides or strips of the scanner. Connect the Transparency Unit's connector to the scanner and then turn on the Transparency Unit;
Users Guide
Page 40
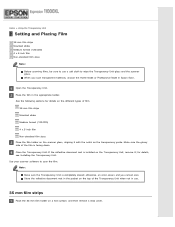
... you cannot scan. Use your scanner software to wipe the Transparency Unit glass and the scanner glass. Note: Make sure the Transparency Unit is installed on the Transparency Unit, remove it with the notch on a flat surface, and then remove a strip cover. Place the film in Epson Scan. Make sure the glossy ...Before scanning films, be sure to use . 35 mm film strips Place the 35 mm film holder on the transparency guide. for details on the scanner glass, aligning it ; Store the reflective document mat in the pocket on the top of the Transparency Unit when not in use a soft cloth to...
... you cannot scan. Use your scanner software to wipe the Transparency Unit glass and the scanner glass. Note: Make sure the Transparency Unit is installed on the Transparency Unit, remove it with the notch on a flat surface, and then remove a strip cover. Place the film in Epson Scan. Make sure the glossy ...Before scanning films, be sure to use . 35 mm film strips Place the 35 mm film holder on the transparency guide. for details on the scanner glass, aligning it ; Store the reflective document mat in the pocket on the top of the Transparency Unit when not in use a soft cloth to...

Users Guide
Page 42
Top Mounted slides Load slides facedown in the Mounted slide holder, as shown below . Repeat this step for all the slides you want to scan. Align the slide holder with the notch on the transparency guide as shown below . Place the film holder on the scanner glass and align it with the notch on the transparency guide, as shown Place the slide holder on the scanner glass.
Top Mounted slides Load slides facedown in the Mounted slide holder, as shown below . Repeat this step for all the slides you want to scan. Align the slide holder with the notch on the transparency guide as shown below . Place the film holder on the scanner glass and align it with the notch on the transparency guide, as shown Place the slide holder on the scanner glass.

Users Guide
Page 44
Close the cover. Repeat steps 1 through 3 for all the film you want to scan. Place the film holder on the scanner glass and align it with the notch on the transparency guide, as shown below.
Close the cover. Repeat steps 1 through 3 for all the film you want to scan. Place the film holder on the scanner glass and align it with the notch on the transparency guide, as shown below.

Users Guide
Page 46
Close the cover. Place the holder on the scanner glass and align it with the notch on the transparency guide, as shown below. Repeat steps 1 through 3 for all the film you want to scan.
Close the cover. Place the holder on the scanner glass and align it with the notch on the transparency guide, as shown below. Repeat steps 1 through 3 for all the film you want to scan.

Users Guide
Page 47
Close the Transparency Unit. Note: An area approximately 17.0 mm (0.7 in) from the horizontal edges and 2.0 mm (0.1 in) from the vertical edges of the film is installed in Epson Scan. If the reflective document mat is facing down. Top (NPD4827 - 00 EN) When you place the film directly on the scanner glass, making sure the glossy (smooth) side of the scanner glass cannot be scanned. Top Non-standard film sizes Place the film directly on the scanner glass, make sure to set the focus position to 0.0 in the Transparency Unit, remove it.
Close the Transparency Unit. Note: An area approximately 17.0 mm (0.7 in) from the horizontal edges and 2.0 mm (0.1 in) from the vertical edges of the film is installed in Epson Scan. If the reflective document mat is facing down. Top (NPD4827 - 00 EN) When you place the film directly on the scanner glass, making sure the glossy (smooth) side of the scanner glass cannot be scanned. Top Non-standard film sizes Place the film directly on the scanner glass, make sure to set the focus position to 0.0 in the Transparency Unit, remove it.
Users Guide
Page 48
...that match your film. Select any Adjustments settings, if necessary. (You may need to scroll to create. Setting and Placing Film Start Epson Scan and then select the Professional Mode. Select the Original settings that match the file you want to create. See Adjusting the Scanned Image for... a high resolution, the number of the screen.) Note: You can improve the scanned image quality by changing the Adjustments settings. Make sure the scanner is turned on the document table. However, increasing the resolution will also cause the file size to your films on . Click the Preview button...
...that match your film. Select any Adjustments settings, if necessary. (You may need to scroll to create. Setting and Placing Film Start Epson Scan and then select the Professional Mode. Select the Original settings that match the file you want to create. See Adjusting the Scanned Image for... a high resolution, the number of the screen.) Note: You can improve the scanned image quality by changing the Adjustments settings. Make sure the scanner is turned on the document table. However, increasing the resolution will also cause the file size to your films on . Click the Preview button...
Users Guide
Page 49
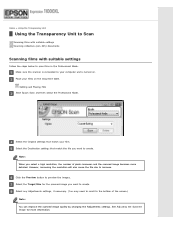
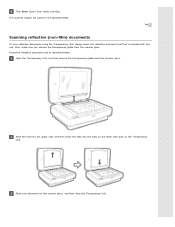
.... Slide the mat into the upper side, and then insert the tabs into the slots on the lower side slots on the scanner glass, and then close the Transparency Unit. Place your document on the Transparency Unit. Top Scanning reflective (non-film) documents To scan reflective documents using ... Unit, always insert the reflective document mat that is included with this unit. Open the Transparency Unit, and then remove the transparency guide from the scanner glass. The scanned images are saved in the specified folder. Insert the reflective document mat as described below...
.... Slide the mat into the upper side, and then insert the tabs into the slots on the lower side slots on the scanner glass, and then close the Transparency Unit. Place your document on the Transparency Unit. Top Scanning reflective (non-film) documents To scan reflective documents using ... Unit, always insert the reflective document mat that is included with this unit. Open the Transparency Unit, and then remove the transparency guide from the scanner glass. The scanned images are saved in the specified folder. Insert the reflective document mat as described below...

