
Owners Manual
Page 2
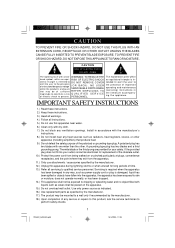
..., DO NOT USE THIS PLUG WITH AN EXTENSION CORD, RECEPTACLE OR OTHER OUTLET UNLESS THE BLADES CAN BE FULLY INSERTED TO PREVENT BLADE EXPOSURE. CAUTION RISK OF ELECTRIC SHOCK DO NOT OPEN ! Use only power source as indicated. 16.) Use replacement parts as radiators, heat registers, stoves, or other . WARNING: TO REDUCE THE head symbol, within the product's enclosure SERVICEABLE PARTS INSIDE that...
..., DO NOT USE THIS PLUG WITH AN EXTENSION CORD, RECEPTACLE OR OTHER OUTLET UNLESS THE BLADES CAN BE FULLY INSERTED TO PREVENT BLADE EXPOSURE. CAUTION RISK OF ELECTRIC SHOCK DO NOT OPEN ! Use only power source as indicated. 16.) Use replacement parts as radiators, heat registers, stoves, or other . WARNING: TO REDUCE THE head symbol, within the product's enclosure SERVICEABLE PARTS INSIDE that...
Owners Manual
Page 3
... the final consumer. Model No: PD5802 Serial No: PD5802_ib031803.p65 2 2 18/3/2003, 11:06 It was manufactured using the highest quality components and standards of workmanship. BEFORE WE BEGIN Thank you experience any problems with the operation of this product, please refer to the instructions for obtaining service at the end of this Manual. Please be in perfect working order before it...
... the final consumer. Model No: PD5802 Serial No: PD5802_ib031803.p65 2 2 18/3/2003, 11:06 It was manufactured using the highest quality components and standards of workmanship. BEFORE WE BEGIN Thank you experience any problems with the operation of this product, please refer to the instructions for obtaining service at the end of this Manual. Please be in perfect working order before it...
Owners Manual
Page 4
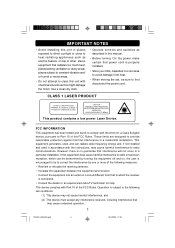
... cloth. • Operate controls and switches as described in the manual. • Before turning 'On' the power, make certain that may cause harmful interference to radio communications. This device complies with the limits for help. AVOID EXPOSURE TO BEAM This product contains a low power Laser Device. This equipment generates, uses, and can radiate radio frequency energy and, if not installed and used in a cool area to avoid...
... cloth. • Operate controls and switches as described in the manual. • Before turning 'On' the power, make certain that may cause harmful interference to radio communications. This device complies with the limits for help. AVOID EXPOSURE TO BEAM This product contains a low power Laser Device. This equipment generates, uses, and can radiate radio frequency energy and, if not installed and used in a cool area to avoid...
Owners Manual
Page 5
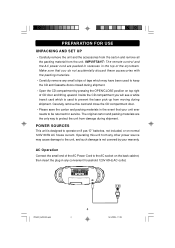
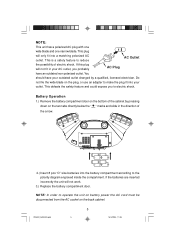
... remote control and the AC power cord are the only way to the AC socket on the back cabinet, then insert the plug in any convenient household 120V 60Hz AC outlet. Carefully remove this unit from any small strips of tape which is used to operate on 8 pcs "D" batteries, not included, or on top right of CD door and lifting upward. Operating...
... remote control and the AC power cord are the only way to the AC socket on the back cabinet, then insert the plug in any convenient household 120V 60Hz AC outlet. Carefully remove this unit from any small strips of tape which is used to operate on 8 pcs "D" batteries, not included, or on top right of CD door and lifting upward. Operating...
Owners Manual
Page 6
... the " "marks and slide in your outdated outlet changed by pressing down on the back cabinet. OPEN OPEN 2.) Insert 8 pcs "D" size batteries into a matching polarized AC outlet. NOTE: In order to electric shock. If this plug will not fit in the direction of OPEN the arrow. Battery Operation 1.) Remove the battery compartment door on the bottom of electric shock. This defeats...
... the " "marks and slide in your outdated outlet changed by pressing down on the back cabinet. OPEN OPEN 2.) Insert 8 pcs "D" size batteries into a matching polarized AC outlet. NOTE: In order to electric shock. If this plug will not fit in the direction of OPEN the arrow. Battery Operation 1.) Remove the battery compartment door on the bottom of electric shock. This defeats...
Owners Manual
Page 7
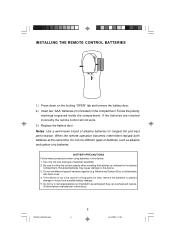
... types of time, remove the batteries to prevent damage or injury from possible battery leakage. 5. If the device is not to be used for longest life and best performance. BATTERY PRECAUTIONS Follow these precautions when using batteries in the compartment. If the batteries are inserted incorrectly the remote control will not work. 3.) Replace the battery door. When the remote operation becomes intermittent replace both batteries at the same time. they can...
... types of time, remove the batteries to prevent damage or injury from possible battery leakage. 5. If the device is not to be used for longest life and best performance. BATTERY PRECAUTIONS Follow these precautions when using batteries in the compartment. If the batteries are inserted incorrectly the remote control will not work. 3.) Replace the battery door. When the remote operation becomes intermittent replace both batteries at the same time. they can...
Owners Manual
Page 10
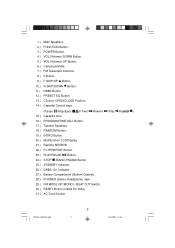
....) PRESET EQ Button. 13.) CD door OPEN/CLOSE Position. 14.) Cassette Control keys. (Pause /Stop/Eject /F.Fwd /Rewind 15.) Cassette door. 16.) PROGRAM/TIME ADJ. Button. 17.) Tweeter Speakers. 18.) RANDOM Button. 19.) INTRO Button. 20.) Multifunction LCD Display. 21.) Remote SENSOR. 22.) P-UP/REPEAT Button. 23.) PLAY/PAUSE Button. 24.) STOP /BAND (FM/AM) Button. 25.) STANDBY Indicator. 26.) DBBS 'On'Indicator. 27.) Battery Compartment (Bottom Cabinet). 28.) PHONES (Stereo...
....) PRESET EQ Button. 13.) CD door OPEN/CLOSE Position. 14.) Cassette Control keys. (Pause /Stop/Eject /F.Fwd /Rewind 15.) Cassette door. 16.) PROGRAM/TIME ADJ. Button. 17.) Tweeter Speakers. 18.) RANDOM Button. 19.) INTRO Button. 20.) Multifunction LCD Display. 21.) Remote SENSOR. 22.) P-UP/REPEAT Button. 23.) PLAY/PAUSE Button. 24.) STOP /BAND (FM/AM) Button. 25.) STANDBY Indicator. 26.) DBBS 'On'Indicator. 27.) Battery Compartment (Bottom Cabinet). 28.) PHONES (Stereo...

Owners Manual
Page 12
... have installed batteries in the remote control. • Make sure that the AC power cord is connected to an outlet that is controlled by a wall switch. Note: Do not turn the main unit power 'On'. Do not connect to the correct minutes. 6.) Press the PROGRAM/TIME ADJ button once more. The clock can only be set the display to an outlet that is always "live". "24H" flashes on the front panel...
... have installed batteries in the remote control. • Make sure that the AC power cord is connected to an outlet that is controlled by a wall switch. Note: Do not turn the main unit power 'On'. Do not connect to the correct minutes. 6.) Press the PROGRAM/TIME ADJ button once more. The clock can only be set the display to an outlet that is always "live". "24H" flashes on the front panel...
Owners Manual
Page 13
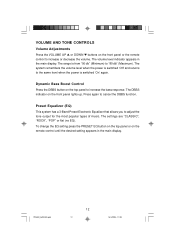
... panel or the remote control to "80 db" (Maximum). VOLUME AND TONE CONTROLS Volume Adjustments Press the VOLUME UP or DOWN buttons on the front panel lights up. Press again to adjust the tone output for the most popular types of music. Preset Equalizer (EQ) This system has a 3-Band Preset Electronic Equalizer that allows you to cancel the DBBS function. The volume level indicator appears in the main display...
... panel or the remote control to "80 db" (Maximum). VOLUME AND TONE CONTROLS Volume Adjustments Press the VOLUME UP or DOWN buttons on the front panel lights up. Press again to adjust the tone output for the most popular types of music. Preset Equalizer (EQ) This system has a 3-Band Preset Electronic Equalizer that allows you to cancel the DBBS function. The volume level indicator appears in the main display...

Owners Manual
Page 14
... back panel to the Standby (Power Off) mode. The ST indicator will show an AM or FM station frequency. The main display turns on and the STANDBY indicator goes "Off". 2.) If necessary, press the FUNCTION button on the top panel of the main unit or / buttons on the remote control until the tuner stops on your desired station. 4.) Adjust the VOLUME, EQ and DBBS controls as follows: • Manual Tuning...
... back panel to the Standby (Power Off) mode. The ST indicator will show an AM or FM station frequency. The main display turns on and the STANDBY indicator goes "Off". 2.) If necessary, press the FUNCTION button on the top panel of the main unit or / buttons on the remote control until the tuner stops on your desired station. 4.) Adjust the VOLUME, EQ and DBBS controls as follows: • Manual Tuning...
Owners Manual
Page 16
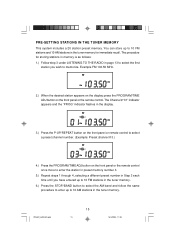
... step 3 under LISTENING TO THE RADIO in page 13 to select the first station you wish to 10 AM stations in the display. 3.) Press the P-UP/REPEAT button on the front panel or remote control to select a preset channel number. (Example: Preset channel # 3.) 4.) Press the PROGRAM/TIME ADJ button on the front panel or the remote control. PRE-SETTING STATIONS IN THE TUNER MEMORY This system includes a 20 station preset memory. The procedure for immediate...
... step 3 under LISTENING TO THE RADIO in page 13 to select the first station you wish to 10 AM stations in the display. 3.) Press the P-UP/REPEAT button on the front panel or remote control to select a preset channel number. (Example: Preset channel # 3.) 4.) Press the PROGRAM/TIME ADJ button on the front panel or the remote control. PRE-SETTING STATIONS IN THE TUNER MEMORY This system includes a 20 station preset memory. The procedure for immediate...
Owners Manual
Page 18
... display will show the elapsed playing time of each track as it plays. 7.) Adjust the VOLUME, EQ and DBBS controls as the player reads the table of the main unit or the remote controls to select the CD function. 3.) Press the OPEN/CLOSE position on the disc. If you use for recording. 100% compatibility cannot be affected by the quality and condition of the blank media...
... display will show the elapsed playing time of each track as it plays. 7.) Adjust the VOLUME, EQ and DBBS controls as the player reads the table of the main unit or the remote controls to select the CD function. 3.) Press the OPEN/CLOSE position on the disc. If you use for recording. 100% compatibility cannot be affected by the quality and condition of the blank media...

Owners Manual
Page 19
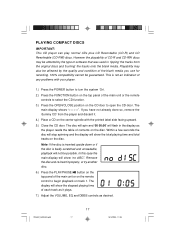
... to open the CD door and remove the disc. 10.)Press the POWER button to return the system to locate a specific musical passage depress and hold the F.SKIP/R.SKIP buttons on the top panel of the main unit or the SKIP / buttons on the remote control until the desired track number appears in the display, then press the PLAY/PAUSE button to higher or lower numbered tracks during CD playback...
... to open the CD door and remove the disc. 10.)Press the POWER button to return the system to locate a specific musical passage depress and hold the F.SKIP/R.SKIP buttons on the top panel of the main unit or the SKIP / buttons on the remote control until the desired track number appears in the display, then press the PLAY/PAUSE button to higher or lower numbered tracks during CD playback...
Owners Manual
Page 25
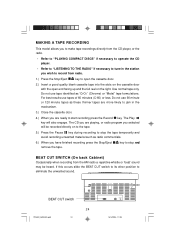
... CD player, or the radio. • Refer to "PLAYING COMPACT DISCS" if necessary to operate the CD player. • Refer to "LISTENING TO THE RADIO" if necessary to tune in the mechanism. 3.) Close the cassette door. 4.) When you are playing, or radio program you selected will also engage. BEAT CUT switch PD5802_ib031803.p65 24 24 RESET 18/3/2003, 11:06 MAKING A TAPE RECORDING This model allows you to make tape recordings directly...
... CD player, or the radio. • Refer to "PLAYING COMPACT DISCS" if necessary to operate the CD player. • Refer to "LISTENING TO THE RADIO" if necessary to tune in the mechanism. 3.) Close the cassette door. 4.) When you are playing, or radio program you selected will also engage. BEAT CUT switch PD5802_ib031803.p65 24 24 RESET 18/3/2003, 11:06 MAKING A TAPE RECORDING This model allows you to make tape recordings directly...
Owners Manual
Page 26
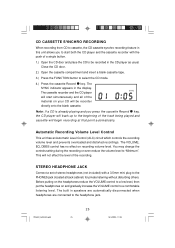
... Control (ALC) circuit which controls the recording volume level and prevents overloaded and distorted recordings. The SYNC indicator appears in speakers are automatically disconnected when headphones are connected to the PHONES jack (located at that point automatically. The built in the display. Close the CD door. 2.) Open the cassette compartment and insert a blank cassette tape. 3.) Press the FUNCTION button to select the CD mode...
... Control (ALC) circuit which controls the recording volume level and prevents overloaded and distorted recordings. The SYNC indicator appears in speakers are automatically disconnected when headphones are connected to the PHONES jack (located at that point automatically. The built in the display. Close the CD door. 2.) Open the cassette compartment and insert a blank cassette tape. 3.) Press the FUNCTION button to select the CD mode...
Owners Manual
Page 27
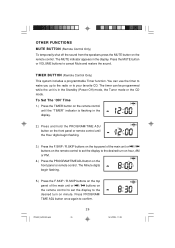
... the CD mode. Press PROGRAM/ TIME ADJ button once again to cancel Mute and restore the sound. OTHER FUNCTIONS MUTE BUTTON (Remote Control Only) To temporarily shut off the sound from the speakers press the MUTE button on minute. To Set The 'ON' Time 1.) Press the TIMER button on the front panel or remote control. TIMER BUTTON (Remote Control Only) This system includes a programmable Timer function. You can be programmed while the unit is flashing in the display...
... the CD mode. Press PROGRAM/ TIME ADJ button once again to cancel Mute and restore the sound. OTHER FUNCTIONS MUTE BUTTON (Remote Control Only) To temporarily shut off the sound from the speakers press the MUTE button on minute. To Set The 'ON' Time 1.) Press the TIMER button on the front panel or remote control. TIMER BUTTON (Remote Control Only) This system includes a programmable Timer function. You can be programmed while the unit is flashing in the display...
Owners Manual
Page 28
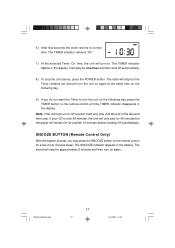
... another 15 minutes before shutting Off automatically. It will play until the TIMER indicator disappears in the display. The radio will stop but the power will stop the unit sooner, press the POWER button. SNOOZE BUTTON (Remote Control Only) After the system sounds, you do not want the Timer to correct time. Note: If the unit turns on again. PD5802_ib031803.p65 27 27 18/3/2003...
... another 15 minutes before shutting Off automatically. It will play until the TIMER indicator disappears in the display. The radio will stop but the power will stop the unit sooner, press the POWER button. SNOOZE BUTTON (Remote Control Only) After the system sounds, you do not want the Timer to correct time. Note: If the unit turns on again. PD5802_ib031803.p65 27 27 18/3/2003...
Owners Manual
Page 29
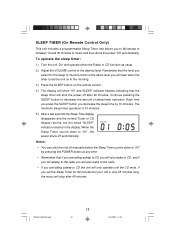
... to between 10 and 90 minutes of sleep timer operation. To operate the sleep timer: 1.) Turn the unit 'On'and operate either the Radio or CD function as usual. 2.) Adjust the VOLUME control to CD the unit will only operate until the CD ends. Remember that the level you decrease the sleep time by pressing the POWER button at any time. • Remember that allows you to fall...
... to between 10 and 90 minutes of sleep timer operation. To operate the sleep timer: 1.) Turn the unit 'On'and operate either the Radio or CD function as usual. 2.) Adjust the VOLUME control to CD the unit will only operate until the CD ends. Remember that the level you decrease the sleep time by pressing the POWER button at any time. • Remember that allows you to fall...
Owners Manual
Page 31
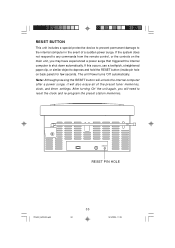
...:06 If the system does not respond to shut down automatically. Note: Although pressing the RESET button will unlock the internal computer after a power surge, it will need to the internal computer in the event of the preset tuner memories, clock, and timer settings. RESET BUTTON This unit includes a special protective device to prevent permanent damage to reset the clock and re-program the preset station memories.
...:06 If the system does not respond to shut down automatically. Note: Although pressing the RESET button will unlock the internal computer after a power surge, it will need to the internal computer in the event of the preset tuner memories, clock, and timer settings. RESET BUTTON This unit includes a special protective device to prevent permanent damage to reset the clock and re-program the preset station memories.

Owners Manual
Page 35
... use , rental, repairs by California residents) to follow operating instructions, commercial use and conditions, for labor and parts at an authorized Depot Repair Facility, or replace the product in the U.S. AU898M SERVICE TO FIND THE LOCATION AND PHONE R NUMBER OF YOUR NEAREST SERVICE CENTER PERMITTED TO PERFORM WARRANTY... Send your check or money order payable to : Emerson Radio Corp. 1901 Diplomat Drive. THIS WARRANTY GIVES YOU SPECIFIC...
... use , rental, repairs by California residents) to follow operating instructions, commercial use and conditions, for labor and parts at an authorized Depot Repair Facility, or replace the product in the U.S. AU898M SERVICE TO FIND THE LOCATION AND PHONE R NUMBER OF YOUR NEAREST SERVICE CENTER PERMITTED TO PERFORM WARRANTY... Send your check or money order payable to : Emerson Radio Corp. 1901 Diplomat Drive. THIS WARRANTY GIVES YOU SPECIFIC...

