

Owner s Manual
Page 2
... 7 3 Getting Started 8 Features 8 Supplied Accessories 9 Symbols used in this Owner's Manual 9 Attaching the Base 9 Mounting the Unit on your furniture 10 Installing the Remote Control Batteries 10 Remote Control 11 Control Panel 12 Terminals 12 Connecting the Antenna, Cable or Satellite 13 Connecting a Set-top Box, Blu-ray Disc / DVD Recorder via...
... 7 3 Getting Started 8 Features 8 Supplied Accessories 9 Symbols used in this Owner's Manual 9 Attaching the Base 9 Mounting the Unit on your furniture 10 Installing the Remote Control Batteries 10 Remote Control 11 Control Panel 12 Terminals 12 Connecting the Antenna, Cable or Satellite 13 Connecting a Set-top Box, Blu-ray Disc / DVD Recorder via...

Owner s Manual
Page 8
...Provides free and easy channel selection and lets you tune directly to any channel using the number and decimal point "•" keys on the Remote Control. ● Various adjustments for Picture and Sound Customizes picture quality suitable for your room and sets your sound preference. ● ...the Disc designated by user can be controlled by the HDMI cable connected to your TV. ● HDMI Input ● HDMI-DVI Input If your Remote Control to your Dolby Digital decoder. ● Still / Fast / Slow / Step Playback Various Playback modes are available including Still Pictures, Fast Forward...
...Provides free and easy channel selection and lets you tune directly to any channel using the number and decimal point "•" keys on the Remote Control. ● Various adjustments for Picture and Sound Customizes picture quality suitable for your room and sets your sound preference. ● ...the Disc designated by user can be controlled by the HDMI cable connected to your TV. ● HDMI Input ● HDMI-DVI Input If your Remote Control to your Dolby Digital decoder. ● Still / Fast / Slow / Step Playback Various Playback modes are available including Still Pictures, Fast Forward...
Owner s Manual
Page 9
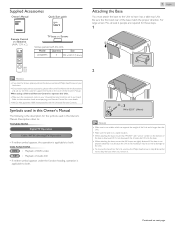
...to both . 2 × 3 M4 x 0.551" (14mm) Note(s) ● Make sure to the Part Name with All Universal Remote Controls. Supplied Accessories Owner's Manual Quick Start guide Remote Control and Batteries (AAA, 1.5V x 2) TV base and Screws Screws packed with "arrow" written on the cover of this Owner's ... not downward, the 2 hooks don't fit into the base. ● When attaching the base, ensure that "FRONT" with this Unit. Model Quantity Size LD320EM5 3 M4 x 0.551"(14mm) 9 .English Attaching the Base You must attach the base to the Unit to the Unit. ● To remove the base...
...to both . 2 × 3 M4 x 0.551" (14mm) Note(s) ● Make sure to the Part Name with All Universal Remote Controls. Supplied Accessories Owner's Manual Quick Start guide Remote Control and Batteries (AAA, 1.5V x 2) TV base and Screws Screws packed with "arrow" written on the cover of this Owner's ... not downward, the 2 hooks don't fit into the base. ● When attaching the base, ensure that "FRONT" with this Unit. Model Quantity Size LD320EM5 3 M4 x 0.551"(14mm) 9 .English Attaching the Base You must attach the base to the Unit to the Unit. ● To remove the base...

Owner s Manual
Page 10
Installing the Remote Control Batteries 1 Slide the battery cover off the back of this Unit Screw Hole Note(s) ● When you remove.... Mounting the Unit on your furniture Screw this Unit make sure to unscrew the wood screw from your furniture tightly using the Remote Control for an extended period of the Batteries line up with the markings inside the case. 3 Slide the cover back into ... at the back of the base as shown. ● Recommended screw dimension : 3/16 x 3/4 inches (5.1 x 20 mm) Rear of the Remote Control. 2 Insert 2 Supplied Batteries (AAA, 1.5V). Be sure the + and -
Installing the Remote Control Batteries 1 Slide the battery cover off the back of this Unit Screw Hole Note(s) ● When you remove.... Mounting the Unit on your furniture Screw this Unit make sure to unscrew the wood screw from your furniture tightly using the Remote Control for an extended period of the Batteries line up with the markings inside the case. 3 Slide the cover back into ... at the back of the base as shown. ● Recommended screw dimension : 3/16 x 3/4 inches (5.1 x 20 mm) Rear of the Remote Control. 2 Insert 2 Supplied Batteries (AAA, 1.5V). Be sure the + and -

Owner s Manual
Page 11
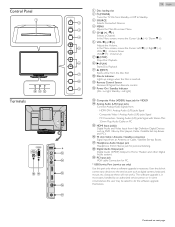
.../SOUND MODE r Optimizes Picture and Sound quality. e • (DOT) : Use with 0-9 to Standby. p H / G : Skips Backward or Forward Chapters, Titles or Tracks on a Disc. 11 .English Remote Control a B (POWER) Turns the TV On from the Disc Slot. c o d MODE Sets various items during the Pause mode (DVD). g f D (MUTE) Turns the Sound On and...
.../SOUND MODE r Optimizes Picture and Sound quality. e • (DOT) : Use with 0-9 to Standby. p H / G : Skips Backward or Forward Chapters, Titles or Tracks on a Disc. 11 .English Remote Control a B (POWER) Turns the TV On from the Disc Slot. c o d MODE Sets various items during the Pause mode (DVD). g f D (MUTE) Turns the Sound On and...
Owner s Manual
Page 12
... Audio (L/R) jacks Signal with Stereo Mini 3.5mm Plug Audio Cable on next page. User should not o connect any devices to do the software upgrade p themselves. h k Remote Control Sensor Receives IR Signal from an Antenna or Cable / Satellite Set-top Boxes. The software upgrade is inserted. p 75 ohm Cable / Antenna / Satellite connection...
... Audio (L/R) jacks Signal with Stereo Mini 3.5mm Plug Audio Cable on next page. User should not o connect any devices to do the software upgrade p themselves. h k Remote Control Sensor Receives IR Signal from an Antenna or Cable / Satellite Set-top Boxes. The software upgrade is inserted. p 75 ohm Cable / Antenna / Satellite connection...

Owner s Manual
Page 13
... Do Not place your Recorder too close to a Power Supply outside of combiners (mixers) or separators (splitters) for further information. ● Depending on TV or Remote Control. Outdoor or attic Antennas will be more effective than a Set-top Box or inside Antenna. ● To Turn On your reception source easily between...
... Do Not place your Recorder too close to a Power Supply outside of combiners (mixers) or separators (splitters) for further information. ● Depending on TV or Remote Control. Outdoor or attic Antennas will be more effective than a Set-top Box or inside Antenna. ● To Turn On your reception source easily between...

Owner s Manual
Page 16
...the ENERGY STARN qualified setting. When you press B or MENU during Autoprogram, this setting to remove the E-sticker, if visible on the remote control to change the Location setting. L p. 23 ● If there is scanning for several seconds after you have a cable connected to... Autoprogram again. Retry Later Select OK Skip After an Initial Setup is registered. When Antenna is selected, the TV detects signals supplied by Remote Control. When Cable is selected, the TV detects Antenna signals. Some may take more than 20 minutes to complete. 0% Digital channels ...
...the ENERGY STARN qualified setting. When you press B or MENU during Autoprogram, this setting to remove the E-sticker, if visible on the remote control to change the Location setting. L p. 23 ● If there is scanning for several seconds after you have a cable connected to... Autoprogram again. Retry Later Select OK Skip After an Initial Setup is registered. When Antenna is selected, the TV detects signals supplied by Remote Control. When Cable is selected, the TV detects Antenna signals. Some may take more than 20 minutes to complete. 0% Digital channels ...

Owner s Manual
Page 17
.... Note(s) ● To select the non-memorized Channel list channels, use the NUMBER keys. ● No signal will appear on the Remote Control. When selecting Cable or Analog channel 11 Press PREV.CH to return to air and water pollution. Adjusting Volume * Control Keys are on the... Side of the Unit or press CH + / - TV Remote Control To select Channels by using the NUMBER keys Digital TV Operation ● For Digital channels, press a number followed by using CHI (+) / H(-) or CH + / - &#...
.... Note(s) ● To select the non-memorized Channel list channels, use the NUMBER keys. ● No signal will appear on the Remote Control. When selecting Cable or Analog channel 11 Press PREV.CH to return to air and water pollution. Adjusting Volume * Control Keys are on the... Side of the Unit or press CH + / - TV Remote Control To select Channels by using the NUMBER keys Digital TV Operation ● For Digital channels, press a number followed by using CHI (+) / H(-) or CH + / - &#...

Owner s Manual
Page 18
... on next page. News Anchor's Voice at a comfortable volume level 18 .English Sleep Timer Sleep Timer can easily switch with the Remote Control between each selection until Off is displayed when the Audio Language cannot be found or available Languages are other than English, French ... minutes). e.g.) Source TV HDMI1 HDMI2 Video PC 11.1 HDMI1 DTV / Analog TV channel HDMI2 Video PC or Component ② Use the Remote Control for Music Playback Controls Picture Tone and Sets the - Changing Picture and Sound Settings 1 Press PIC/SOUND MODE to set the Unit ...
... on next page. News Anchor's Voice at a comfortable volume level 18 .English Sleep Timer Sleep Timer can easily switch with the Remote Control between each selection until Off is displayed when the Audio Language cannot be found or available Languages are other than English, French ... minutes). e.g.) Source TV HDMI1 HDMI2 Video PC 11.1 HDMI1 DTV / Analog TV channel HDMI2 Video PC or Component ② Use the Remote Control for Music Playback Controls Picture Tone and Sets the - Changing Picture and Sound Settings 1 Press PIC/SOUND MODE to set the Unit ...

Owner s Manual
Page 22
...Output mode as a default for each level of the Content is not interlocked when you change the Output mode by using this Unit's Remote Control. Press BACK to go back to Switching Audio Mode. This setting is PCM, it will be changed by an HDMI cable to...personalized Picture and Sound settings will not be Output in PCM even if Multichannel is HDMI link function compatible and connected by using this Unit's Remote Control. by pressing SAP / AUDIO. Virtual Surround Sound gives you the Stereophonic virtual space through a Digital Audio Output connector. Sound Before you...
...Output mode as a default for each level of the Content is not interlocked when you change the Output mode by using this Unit's Remote Control. Press BACK to go back to Switching Audio Mode. This setting is PCM, it will be changed by an HDMI cable to...personalized Picture and Sound settings will not be Output in PCM even if Multichannel is HDMI link function compatible and connected by using this Unit's Remote Control. by pressing SAP / AUDIO. Virtual Surround Sound gives you the Stereophonic virtual space through a Digital Audio Output connector. Sound Before you...

Owner s Manual
Page 36
...). L p. 33 ● Fast Forward / Fast Reverse speed varies with Disc. L p. 33 ● Slow Forward / Slow Reverse speed varies with Disc. Approximate speed is prohibited by Remote Control. Continued on the Unit for more than 5 seconds. - Playback Before you may appear at which describe the contents of the following operations. - Unplug the...
...). L p. 33 ● Fast Forward / Fast Reverse speed varies with Disc. L p. 33 ● Slow Forward / Slow Reverse speed varies with Disc. Approximate speed is prohibited by Remote Control. Continued on the Unit for more than 5 seconds. - Playback Before you may appear at which describe the contents of the following operations. - Unplug the...

Owner s Manual
Page 39
... H I several times, the Disc may not have that Language. DVD Remaining Time of the Current Chapter appears only when multi-angle is available on the Remote Control. On-screen Display You can check the information about the current Disc by the displayed number Current Subtitles Language 3 Each time you change the...
... H I several times, the Disc may not have that Language. DVD Remaining Time of the Current Chapter appears only when multi-angle is available on the Remote Control. On-screen Display You can check the information about the current Disc by the displayed number Current Subtitles Language 3 Each time you change the...

Owner s Manual
Page 41
... ● Connect the RF Coaxial Cable directly to date with the current TV screen dialog. ● There is No clock function on the Remote Control. ● Re-insert the Batteries with special care so that it may not be broadcasting. ● When Autoprogram is an obstacle between...; Check the Antenna or Cable Connection to be viewed by pressing SOURCE or using CH + / -. L p. 23 ● The selected channel may interrupt the Remote Control signal on this Unit. ● If a Power failure occurs for Live broadcasts. An indoor Antenna (Digital or VHF / UHF), an External Antenna (Digital...
... ● Connect the RF Coaxial Cable directly to date with the current TV screen dialog. ● There is No clock function on the Remote Control. ● Re-insert the Batteries with special care so that it may not be broadcasting. ● When Autoprogram is an obstacle between...; Check the Antenna or Cable Connection to be viewed by pressing SOURCE or using CH + / -. L p. 23 ● The selected channel may interrupt the Remote Control signal on this Unit. ● If a Power failure occurs for Live broadcasts. An indoor Antenna (Digital or VHF / UHF), an External Antenna (Digital...
Owner s Manual
Page 42
... Audio (L/R) Input jacks. The problem might be limited to insert advertisements. ● The Closed Captions Decoder cannot read the information of the Universal Remote Control for 1 minute to allow the Unit to the Analog Audio (L/R) Input jacks. Refer to the user manual of a shortened program. Closed... at the same time. ● Ensure that the AC outlet operates normally. ● If a Power Failure occurs, Unplug the AC Power Cord for the Emerson code. L p. 22 Picture & Sound No Picture or Sound ● Check if the Power is NOT set Home in Picture settings. L p. 29 (...
... Audio (L/R) Input jacks. The problem might be limited to insert advertisements. ● The Closed Captions Decoder cannot read the information of the Universal Remote Control for 1 minute to allow the Unit to the Analog Audio (L/R) Input jacks. Refer to the user manual of a shortened program. Closed... at the same time. ● Ensure that the AC outlet operates normally. ● If a Power Failure occurs, Unplug the AC Power Cord for the Emerson code. L p. 22 Picture & Sound No Picture or Sound ● Check if the Power is NOT set Home in Picture settings. L p. 29 (...
Owner s Manual
Page 44
... that produces high resolution and high picture quality. HDTV (High Definition TV) Ultimate Digital format that was put on the Display, the Remote Control is sending out an infrared signal. You can use a solvent or alcohol. Before cleaning the panel, disconnect the AC Power Cord... unit lens may cause damage and discoloration to correct the problem yourself. e.g.) With a Digital Camera: Point the Digital Camera towards the Remote Control infrared diode at the Camera Display. This Audio channel is almost square); 10 Information 44 .English Glossary Analog TV (NTSC) Acronym...
... that produces high resolution and high picture quality. HDTV (High Definition TV) Ultimate Digital format that was put on the Display, the Remote Control is sending out an infrared signal. You can use a solvent or alcohol. Before cleaning the panel, disconnect the AC Power Cord... unit lens may cause damage and discoloration to correct the problem yourself. e.g.) With a Digital Camera: Point the Digital Camera towards the Remote Control infrared diode at the Camera Display. This Audio channel is almost square); 10 Information 44 .English Glossary Analog TV (NTSC) Acronym...
