
Owners Manual
Page 1
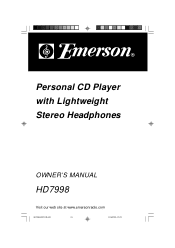
Personal CD Player with Lightweight Stereo Headphones OWNER'S MANUAL HD7998 Visit our web site at www.emersonradio.com HD7998_B081105.p65 19 11/8/2005, 15:05
Personal CD Player with Lightweight Stereo Headphones OWNER'S MANUAL HD7998 Visit our web site at www.emersonradio.com HD7998_B081105.p65 19 11/8/2005, 15:05
Owners Manual
Page 2
... use the Shuffle playback feature and let the player select the playback order for purchasing this Emerson Personal CD Player. Please read this instruction manual completely and carefully to the songs on your favorite CD's in any order you . HD7998_B081105.p65 1 1 11/8/2005, 15:05 Use the 3-way Repeat feature to repeat a single track, the entire disc, or a programmed sequence of -the-art CD player. Or you can listen to make...
... use the Shuffle playback feature and let the player select the playback order for purchasing this Emerson Personal CD Player. Please read this instruction manual completely and carefully to the songs on your favorite CD's in any order you . HD7998_B081105.p65 1 1 11/8/2005, 15:05 Use the 3-way Repeat feature to repeat a single track, the entire disc, or a programmed sequence of -the-art CD player. Or you can listen to make...
Owners Manual
Page 3
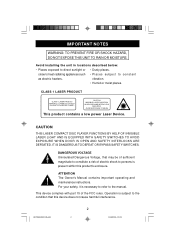
... appliances such • P l ac e s s u b j ec t t o c o n s t an t as electric heaters. close to the manual. AVOID EXPOSURE TO BEAM This product contains a low power Laser Device. This device complies with part 15 of electric shock to persons is subject to direct sunlight or • Dusty places. Avoid installing the unit in locations described below: • Places exposed to the condition...
... appliances such • P l ac e s s u b j ec t t o c o n s t an t as electric heaters. close to the manual. AVOID EXPOSURE TO BEAM This product contains a low power Laser Device. This device complies with part 15 of electric shock to persons is subject to direct sunlight or • Dusty places. Avoid installing the unit in locations described below: • Places exposed to the condition...
Owners Manual
Page 4
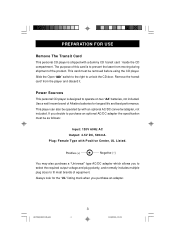
...laser from the player and discard it. This player can also be as follows: Input: 120V 60Hz AC Output: 4.5V DC, 500mA. Plug: Female Type with a dummy CD 'transit card 'inside the CD compartment. PREPARATION FOR USE Remove The Transit Card This personal CD player is shipped with Positive Center, UL Listed. Power Sources This personal CD player is to fit most brands of the product... purchase a "Universal" type AC/DC adapter which allows you purchase an adapter. Slide the Open " "switch to the right to operate on two "AA"batteries, not included. This card must be operated by with an...
...laser from the player and discard it. This player can also be as follows: Input: 120V 60Hz AC Output: 4.5V DC, 500mA. Plug: Female Type with a dummy CD 'transit card 'inside the CD compartment. PREPARATION FOR USE Remove The Transit Card This personal CD player is shipped with Positive Center, UL Listed. Power Sources This personal CD player is to fit most brands of the product... purchase a "Universal" type AC/DC adapter which allows you purchase an adapter. Slide the Open " "switch to the right to operate on two "AA"batteries, not included. This card must be operated by with an...

Owners Manual
Page 5
DC 4.5V Input Jack. 20 TRACK PROGRAMMABLE CD PLAYER To 120V/60Hz AC Outlet. Connecting The Optional AC/DC Adapter (Not Included) 1.) Connect the small female plug of the optional AC adapter to the "DC 4.5V" jack on the right side of the CD player. 2.) Connect the adapter housing to operate the player on batteries. Optional AC/DC Adapter NOTES: • Never connect or disconnect the adapter from the CD player in order to...
DC 4.5V Input Jack. 20 TRACK PROGRAMMABLE CD PLAYER To 120V/60Hz AC Outlet. Connecting The Optional AC/DC Adapter (Not Included) 1.) Connect the small female plug of the optional AC adapter to the "DC 4.5V" jack on the right side of the CD player. 2.) Connect the adapter housing to operate the player on batteries. Optional AC/DC Adapter NOTES: • Never connect or disconnect the adapter from the CD player in order to...
Owners Manual
Page 6
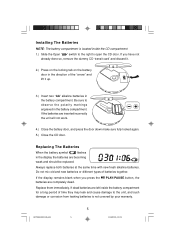
... locking tab on the battery door in the direction of batteries together. If dead batteries are inserted incorrectly the unit will not work. 4.) Close the battery door, and press the door down make sure fully locked again. 5.) Close the CD door. PLAY/PAUSE button, the Replace them immediately. Be sure to open the CD door. Do not mix old and new batteries or different types...
... locking tab on the battery door in the direction of batteries together. If dead batteries are inserted incorrectly the unit will not work. 4.) Close the battery door, and press the door down make sure fully locked again. 5.) Close the CD door. PLAY/PAUSE button, the Replace them immediately. Be sure to open the CD door. Do not mix old and new batteries or different types...
Owners Manual
Page 7
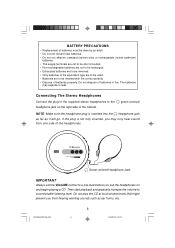
Connecting The Stereo Headphones Connect the plug of the supplied stereo headphones to the headphone jack on and begin playing a CD. Do not dispose of the cabinet. Then start playback and gradually increase the volume to a comfortable listening level. BATTERY PRECAUTIONS • Replacement of batteries must be done by an adult. • Do not mix old and new batteries. • Do not mix alkaline, standard (carbon-zinc...
Connecting The Stereo Headphones Connect the plug of the supplied stereo headphones to the headphone jack on and begin playing a CD. Do not dispose of the cabinet. Then start playback and gradually increase the volume to a comfortable listening level. BATTERY PRECAUTIONS • Replacement of batteries must be done by an adult. • Do not mix old and new batteries. • Do not mix alkaline, standard (carbon-zinc...

Owners Manual
Page 8
LOCATION OF CONTROLS AND INDICATORS 2 3 4 5 6 20 TRACK PROGRAMMABLE CD PLAYER 7 1 8 9 10 11 12 13 15 14 HD7998_B081105.p65 7 7 11/8/2005, 15:05
LOCATION OF CONTROLS AND INDICATORS 2 3 4 5 6 20 TRACK PROGRAMMABLE CD PLAYER 7 1 8 9 10 11 12 13 15 14 HD7998_B081105.p65 7 7 11/8/2005, 15:05

Owners Manual
Page 9
....) STOP Button. 14.) PLAY/PAUSE Button. 15.) LCD Display - Press repeatedly to unlock and open the CD door. 7.) VOLUME + / - Connect an AC adapter (not included) to this jack. 9.) MODE Button - Raises or lowers the volume. 8.) Headphone Jack - HD7998_B081105.p65 8 8 11/8/2005, 15:05 Slide to the right to use 120V 60Hz AC house current. 4.) HOLD (On/Off) Switch - Buttons - Connect stereo headphones, included, to this jack to lock the function of the control buttons. 5.) EQ Button - 1.) CD Door. 2.) Battery...
....) STOP Button. 14.) PLAY/PAUSE Button. 15.) LCD Display - Press repeatedly to unlock and open the CD door. 7.) VOLUME + / - Connect an AC adapter (not included) to this jack. 9.) MODE Button - Raises or lowers the volume. 8.) Headphone Jack - HD7998_B081105.p65 8 8 11/8/2005, 15:05 Slide to the right to use 120V 60Hz AC house current. 4.) HOLD (On/Off) Switch - Buttons - Connect stereo headphones, included, to this jack to lock the function of the control buttons. 5.) EQ Button - 1.) CD Door. 2.) Battery...
Owners Manual
Page 10
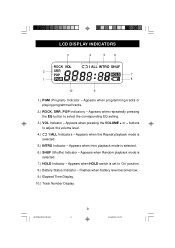
... corresponding EQ setting. 3.) VOL Indicator - Appears when HOLD switch is selected. 6.) SHUF (Shuffle) Indicator - Flashes when battery level becomes low. 9.) Elapsed Time Display. 10.) Track Number Display. Appears when repeatedly pressing the EQ button to adjust the volume level. 4.) 1/ALL Indicators - Appears when the Repeat playback mode is selected. 7.) HOLD Indicator - Appears when Random playback mode is selected. 5.) INTRO Indicator - Appears when pressing the VOLUME + or - Appears when programming tracks or playing programmed tracks. 2.) ROCK, SRR...
... corresponding EQ setting. 3.) VOL Indicator - Appears when HOLD switch is selected. 6.) SHUF (Shuffle) Indicator - Flashes when battery level becomes low. 9.) Elapsed Time Display. 10.) Track Number Display. Appears when repeatedly pressing the EQ button to adjust the volume level. 4.) 1/ALL Indicators - Appears when the Repeat playback mode is selected. 7.) HOLD Indicator - Appears when Random playback mode is selected. 5.) INTRO Indicator - Appears when pressing the VOLUME + or - Appears when programming tracks or playing programmed tracks. 2.) ROCK, SRR...
Owners Manual
Page 11
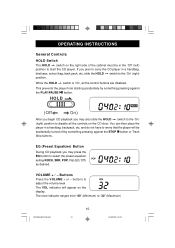
... to worry that the player will appear on the display. OPERATING INSTRUCTIONS General Controls HOLD Switch The HOLD switch on the right side of the cabinet must be accidentally turned off by something pressing against the PLAY/PAUSE button. VOLUME + / - EQ (Preset Equalizer) Button During CD playback you plan to carry the CD player in a handbag, briefcase, school bag, back pack, etc, slide the HOLD switch to select the preset equalizer setting ROCK, SRR, POP...
... to worry that the player will appear on the display. OPERATING INSTRUCTIONS General Controls HOLD Switch The HOLD switch on the right side of the cabinet must be accidentally turned off by something pressing against the PLAY/PAUSE button. VOLUME + / - EQ (Preset Equalizer) Button During CD playback you plan to carry the CD player in a handbag, briefcase, school bag, back pack, etc, slide the HOLD switch to select the preset equalizer setting ROCK, SRR, POP...
Owners Manual
Page 12
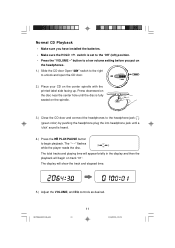
... playback will show the track and elapsed time. 5.) Adjust the VOLUME, and EQ controls as desired. Press downward on the disc near the center hole until a 'click'sound is set to the 'Off'(left) position. • Press the "VOLUME -" button to a low volume setting before you have installed the batteries. • Make sure the HOLD switch is heard. 4.) Press the PLAY/PAUSE button to begin on the spindle. 3.) Close the CD...
... playback will show the track and elapsed time. 5.) Adjust the VOLUME, and EQ controls as desired. Press downward on the disc near the center hole until a 'click'sound is set to the 'Off'(left) position. • Press the "VOLUME -" button to a low volume setting before you have installed the batteries. • Make sure the HOLD switch is heard. 4.) Press the PLAY/PAUSE button to begin on the spindle. 3.) Close the CD...
Owners Manual
Page 13
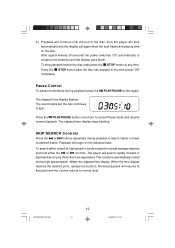
... search. The sound stops but the disc continues to conserve the batteries and the display goes blank. To search within a track at high speed to cancel Pause mode and resume normal playback. The volume is automatically muted during playback press the PLAY/PAUSE button again. The elapsed time display flashes. Press the PLAY/PAUSE button once more to locate a specific musical passage depress and hold either the or controls. HD7998_B081105...
... search. The sound stops but the disc continues to conserve the batteries and the display goes blank. To search within a track at high speed to cancel Pause mode and resume normal playback. The volume is automatically muted during playback press the PLAY/PAUSE button again. The elapsed time display flashes. Press the PLAY/PAUSE button once more to locate a specific musical passage depress and hold either the or controls. HD7998_B081105...

Owners Manual
Page 14
... the display and the entire disc will be programmed to begin playback, then press the MODE button twice. ALL (Repeat All) INTRO SHUF Repeat Playback The player can be repeated continuously. All Tracks Repeat Press the PLAY/PAUSE button to continuously repeat a single track or the entire disc automatically. HD7998_B081105.p65 13 13 11/8/2005, 15:05 MODE Button Pressing the MODE button during CD playback cycles the player through the following four special playback modes: 1(Repeat 1) (Shuffle) Playback. The...
... the display and the entire disc will be programmed to begin playback, then press the MODE button twice. ALL (Repeat All) INTRO SHUF Repeat Playback The player can be repeated continuously. All Tracks Repeat Press the PLAY/PAUSE button to continuously repeat a single track or the entire disc automatically. HD7998_B081105.p65 13 13 11/8/2005, 15:05 MODE Button Pressing the MODE button during CD playback cycles the player through the following four special playback modes: 1(Repeat 1) (Shuffle) Playback. The...

Owners Manual
Page 15
... your disc in the player as usual and press the PLAY/PAUSE button to begin playback. 2.) When playback begins press the MODE button three times. To cancel Shuffle playback press the STOP button. To cancel Intro Scan playback press the STOP button. After each track has played once the player stops. The SHUF indicator stops flashing and remains 'On'. The player backs up to begin playback. 2.) When playback begins press the MODE button four times. The INTRO...
... your disc in the player as usual and press the PLAY/PAUSE button to begin playback. 2.) When playback begins press the MODE button three times. To cancel Shuffle playback press the STOP button. To cancel Intro Scan playback press the STOP button. After each track has played once the player stops. The SHUF indicator stops flashing and remains 'On'. The player backs up to begin playback. 2.) When playback begins press the MODE button four times. The INTRO...

Owners Manual
Page 16
... play again. Programmed Playback You can program a disc either during playback or in Stop mode. 1.) Press the PROG button once. The PGM indicator stops flashing. • Playback begins with the first track you programmed and continues until all programmed tracks have been played, and then the player stops. • The programmed sequence will remain in the memory until the power shuts off (approximately 30 seconds) or until the CD door is opened...
... play again. Programmed Playback You can program a disc either during playback or in Stop mode. 1.) Press the PROG button once. The PGM indicator stops flashing. • Playback begins with the first track you programmed and continues until all programmed tracks have been played, and then the player stops. • The programmed sequence will remain in the memory until the power shuts off (approximately 30 seconds) or until the CD door is opened...
Owners Manual
Page 17
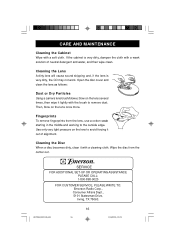
... out. Wipe the disc from the lens, use a cotton swab starting in the middle and working to the outside edge. SERVICE FOR ADDITIONAL SET-UP OR OPERATING ASSISTANCE PLEASE CALL: 1-800-898-9020 FOR CUSTOMER SERVICE, PLEASE WRITE TO: Emerson Radio Corp., Consumer Affairs Dept., 5101 Statesman Drive, Irving, TX 75063. Cleaning the Lens A dirty lens will cause sound skipping and, if...
... out. Wipe the disc from the lens, use a cotton swab starting in the middle and working to the outside edge. SERVICE FOR ADDITIONAL SET-UP OR OPERATING ASSISTANCE PLEASE CALL: 1-800-898-9020 FOR CUSTOMER SERVICE, PLEASE WRITE TO: Emerson Radio Corp., Consumer Affairs Dept., 5101 Statesman Drive, Irving, TX 75063. Cleaning the Lens A dirty lens will cause sound skipping and, if...
Owners Manual
Page 18
... of purchase, we will provide repair service at an authorized Depot Repair Facility, or replace the product in original material, including original parts and workmanship, under normal use and conditions, for labor and parts at no charge for a period of ninety (90) days from negligence, misuse, abuse, accident, failure to follow operating instructions, commercial use, rental, repairs by California residents) to Emerson Radio Corp.
... of purchase, we will provide repair service at an authorized Depot Repair Facility, or replace the product in original material, including original parts and workmanship, under normal use and conditions, for labor and parts at no charge for a period of ninety (90) days from negligence, misuse, abuse, accident, failure to follow operating instructions, commercial use, rental, repairs by California residents) to Emerson Radio Corp.
Owners Manual
Page 19
EMERSON Part No. 16-2987B 508-01 HD7998_B081105.p65 18 Printed in China 11/8/2005, 15:05
EMERSON Part No. 16-2987B 508-01 HD7998_B081105.p65 18 Printed in China 11/8/2005, 15:05