
Owners Manual
Page 1
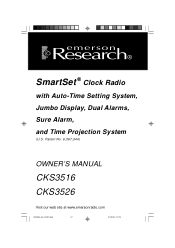
R SmartSet ® Clock Radio with Auto-Time Setting System, Jumbo Display, Dual Alarms, Sure Alarm, and Time Projection System (U.S. Patent No. 6,567,344) OWNER'S MANUAL CKS3516 CKS3526 Visit our web site at www.emersonradio.com CKS3516-26_070307.p65 27 3/7/2007, 17:09
R SmartSet ® Clock Radio with Auto-Time Setting System, Jumbo Display, Dual Alarms, Sure Alarm, and Time Projection System (U.S. Patent No. 6,567,344) OWNER'S MANUAL CKS3516 CKS3526 Visit our web site at www.emersonradio.com CKS3516-26_070307.p65 27 3/7/2007, 17:09

Owners Manual
Page 2
... the product's enclosure (OR BACK), NO USER SERVICEABLE PARTS INSIDE that produce heat. 6.) Do not defeat the safety purpose of important operating and maintenance (servicing) instructions in accordance with arrow- The exclamation point within an equilateral triangle is provided for replacement of the obsolete outlet. 7.) Protect the power cord from tip-over. 13.) Do not overload wall outlet. A polarized plug has...
... the product's enclosure (OR BACK), NO USER SERVICEABLE PARTS INSIDE that produce heat. 6.) Do not defeat the safety purpose of important operating and maintenance (servicing) instructions in accordance with arrow- The exclamation point within an equilateral triangle is provided for replacement of the obsolete outlet. 7.) Protect the power cord from tip-over. 13.) Do not overload wall outlet. A polarized plug has...
Owners Manual
Page 3
... year, month, date, day, and time. And both of a dark room. Once again, thank you for purchasing this Emerson SmartSet® Dual Alarm Clock Radio with normal battery back up or operation of this item, please call the Emerson Consumer Products Corp., Customer Service Hotline, toll free, at the clock itself to your AC outlet, and after every power interruption, within seconds the clock will automatically set and used independently, which...
... year, month, date, day, and time. And both of a dark room. Once again, thank you for purchasing this Emerson SmartSet® Dual Alarm Clock Radio with normal battery back up or operation of this item, please call the Emerson Consumer Products Corp., Customer Service Hotline, toll free, at the clock itself to your AC outlet, and after every power interruption, within seconds the clock will automatically set and used independently, which...

Owners Manual
Page 4
... receiving antenna. • Increase the separation between the equipment and receiver. • Connect the equipment into an outlet on a circuit different from that the AC power cord is properly installed. • When moving the set, be determined by turning the equipment off and on the power, make certain that to which can radiate radio frequency energy and, if not installed and used...
... receiving antenna. • Increase the separation between the equipment and receiver. • Connect the equipment into an outlet on a circuit different from that the AC power cord is properly installed. • When moving the set, be determined by turning the equipment off and on the power, make certain that to which can radiate radio frequency energy and, if not installed and used...
Owners Manual
Page 5
... page of your radio ever needs to be fully extended to provide the best FM reception. We suggest that you operate the controls. The FM antenna is built in the unlikely event that you purchase small self-adhesive felt pads, available at hardware stores and home improvement centers everywhere,... for service. However certain types of excess heat, dirt, dust, moisture, humidity, or vibration. • Unwind the AC power cord and extend it from moving when you save the packing material, if possible, in to an AC outlet, out of direct sunlight, and away from the radio. Do...
... page of your radio ever needs to be fully extended to provide the best FM reception. We suggest that you operate the controls. The FM antenna is built in the unlikely event that you purchase small self-adhesive felt pads, available at hardware stores and home improvement centers everywhere,... for service. However certain types of excess heat, dirt, dust, moisture, humidity, or vibration. • Unwind the AC power cord and extend it from moving when you save the packing material, if possible, in to an AC outlet, out of direct sunlight, and away from the radio. Do...

Owners Manual
Page 6
... selected wake up time the clock display will be connected to an AC outlet that is designed to operate on any other . You should be off automatically. If your power is equipped with a polarized AC power plug having one blade wider than a few hours. The Sure Alarm will not fit into your warranty. To stop the Sure Alarm buzzer immediately, press the RADIO ON/OFF button. This radio...
... selected wake up time the clock display will be connected to an AC outlet that is designed to operate on any other . You should be off automatically. If your power is equipped with a polarized AC power plug having one blade wider than a few hours. The Sure Alarm will not fit into your warranty. To stop the Sure Alarm buzzer immediately, press the RADIO ON/OFF button. This radio...
Owners Manual
Page 8
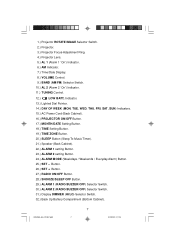
... Indicator. 7.) Time/Date Display. 8.) VOLUME Control. 9.) BAND (AM/FM) Selector Switch. 10.) AL 2 (Alarm 2 'On') Indicator. 11.) TUNING Control. 12.) LOW BATT. Indicator. 13.) Lighted Dial Pointer. 14.) DAY OF WEEK (MON, TUE, WED, THU, FRI, SAT, SUN) Indicators. 15.) AC Power Cord (Back Cabinet). 16.) PROJECTOR ON/OFF Button. 17.) MONTH/DATE Setting Button. 18.) TIME Setting Button. 19.) TIME ZONE Button. 20.) SLEEP Button (Sleep To Music Timer). 21.) Speaker (Back Cabinet). 22.) ALARM 1 setting Button. 23.) ALARM 2 setting Button. 24.) ALARM MODE (Weekdays...
... Indicator. 7.) Time/Date Display. 8.) VOLUME Control. 9.) BAND (AM/FM) Selector Switch. 10.) AL 2 (Alarm 2 'On') Indicator. 11.) TUNING Control. 12.) LOW BATT. Indicator. 13.) Lighted Dial Pointer. 14.) DAY OF WEEK (MON, TUE, WED, THU, FRI, SAT, SUN) Indicators. 15.) AC Power Cord (Back Cabinet). 16.) PROJECTOR ON/OFF Button. 17.) MONTH/DATE Setting Button. 18.) TIME Setting Button. 19.) TIME ZONE Button. 20.) SLEEP Button (Sleep To Music Timer). 21.) Speaker (Back Cabinet). 22.) ALARM 1 setting Button. 23.) ALARM 2 setting Button. 24.) ALARM MODE (Weekdays...

Owners Manual
Page 9
... and then show the correct Day and Time in the zone you selected after a power interruption. Eastern Time (Default Setting) ZONE 3 - Hold the TIME ZONE button and then press either the SET + or - If you move to a different time zone, simply change the default time zone display, depress the TIME ZONE button. Mountain Time ZONE 5 - O P E R AT I N G I N S T R U C T I O N S Setting The Time, The First Time IMPORTANT: The first time you connect your new SmartSet® clock radio to the AC outlet the...
... and then show the correct Day and Time in the zone you selected after a power interruption. Eastern Time (Default Setting) ZONE 3 - Hold the TIME ZONE button and then press either the SET + or - If you move to a different time zone, simply change the default time zone display, depress the TIME ZONE button. Mountain Time ZONE 5 - O P E R AT I N G I N S T R U C T I O N S Setting The Time, The First Time IMPORTANT: The first time you connect your new SmartSet® clock radio to the AC outlet the...
Owners Manual
Page 11
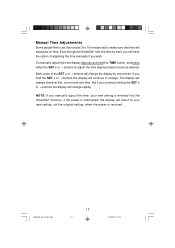
... you continue holding the SET + or - If the power is interrupted, the display will always be on time. Manual Time Adjustments Some people like to set their clocks 5 to 10 minutes fast to make sure that they will return to your new setting is entered into the SmartSet® memory. buttons to change rapidly. If you wish. The display will change slowly at first, one...
... you continue holding the SET + or - If the power is interrupted, the display will always be on time. Manual Time Adjustments Some people like to set their clocks 5 to 10 minutes fast to make sure that they will return to your new setting is entered into the SmartSet® memory. buttons to change rapidly. If you wish. The display will change slowly at first, one...

Owners Manual
Page 12
...; clock radio has two separate alarms that you may use the alarms to the Alarm 1 or Alarm 2 wake up time (AM or PM) appears on the display, release the SET + or - NOTE: Be sure that can be set the wake up times. You may use one alarm for weekdays and the other for both Alarm 1 and Alarm 2. 1.) Depress and hold either the SET + or - buttons. The procedure for adjusting the wake up time...
...; clock radio has two separate alarms that you may use the alarms to the Alarm 1 or Alarm 2 wake up time (AM or PM) appears on the display, release the SET + or - NOTE: Be sure that can be set the wake up times. You may use one alarm for weekdays and the other for both Alarm 1 and Alarm 2. 1.) Depress and hold either the SET + or - buttons. The procedure for adjusting the wake up time...

Owners Manual
Page 13
... operation. Release the ALARM 1 or ALARM 2 setting buttons to return to correct time. To change from among three different alarm operation modes for Alarm 1, hold the ALARM 1 setting button and press the ALARM MODE button until the DAY OF WEEK indicators show you the alarm mode which is currently selected. Selecting The Alarm Mode Your SmartSet® clock radio allows you to select from correct time to the correct time. The alarm modes are 'On', the Weekends only mode...
... operation. Release the ALARM 1 or ALARM 2 setting buttons to return to correct time. To change from among three different alarm operation modes for Alarm 1, hold the ALARM 1 setting button and press the ALARM MODE button until the DAY OF WEEK indicators show you the alarm mode which is currently selected. Selecting The Alarm Mode Your SmartSet® clock radio allows you to select from correct time to the correct time. The alarm modes are 'On', the Weekends only mode...
Owners Manual
Page 14
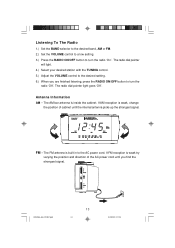
... until you are finished listening, press the RADIO ON/OFF button to turn the radio 'On'. The radio dial pointer will light. 4.) Select your desired station with the TUNING control. 5.) Adjust the VOLUME control to the desired setting. 6.) When you find the strongest signal. If FM reception is weak, change the position of the AC power cord until the internal antenna picks up the strongest signal. FM...
... until you are finished listening, press the RADIO ON/OFF button to turn the radio 'On'. The radio dial pointer will light. 4.) Select your desired station with the TUNING control. 5.) Adjust the VOLUME control to the desired setting. 6.) When you find the strongest signal. If FM reception is weak, change the position of the AC power cord until the internal antenna picks up the strongest signal. FM...
Owners Manual
Page 15
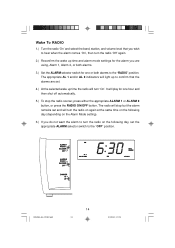
... time and alarm mode settings for the alarm you do not want the alarm to turn the radio on the following day, set and will turn 'On'. Wake To RADIO 1.) Turn the radio 'On'and select the band, station, and volume level that the alarms are using, Alarm 1, Alarm 2, or both alarms. 3.) Set the ALARM selector switch for one or both alarms to the "RADIO"position. It will play for one hour and then shut off automatically. 5.) To stop but the alarm remains set...
... time and alarm mode settings for the alarm you do not want the alarm to turn the radio on the following day, set and will turn 'On'. Wake To RADIO 1.) Turn the radio 'On'and select the band, station, and volume level that the alarms are using, Alarm 1, Alarm 2, or both alarms. 3.) Set the ALARM selector switch for one or both alarms to the "RADIO"position. It will play for one hour and then shut off automatically. 5.) To stop but the alarm remains set...
Owners Manual
Page 16
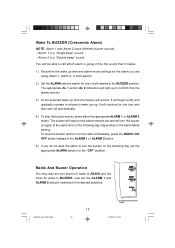
... ALARM 1 or ALARM 2 button. Radio And Buzzer Operation You may also set one hour and then shut off by the sound that the alarms are set the appropriate ALARM selector to the "OFF" position. The appropriate AL 1 and/or AL 2 indicators will sound. Just set and will turn the buzzer on again at the same time on the following day, set . 3.) At the selected wake up time and alarm mode settings for the alarm you are using, Alarm 1, Alarm...
... ALARM 1 or ALARM 2 button. Radio And Buzzer Operation You may also set one hour and then shut off by the sound that the alarms are set the appropriate ALARM selector to the "OFF" position. The appropriate AL 1 and/or AL 2 indicators will sound. Just set and will turn the buzzer on again at the same time on the following day, set . 3.) At the selected wake up time and alarm mode settings for the alarm you are using, Alarm 1, Alarm...
Owners Manual
Page 18
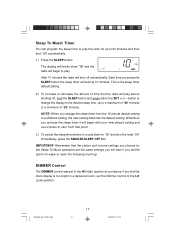
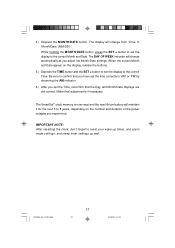
... - DIMMER Control The DIMMER control was set the alarm for the Sleep To Music operation are the same settings you change the display to the desired sleep time, up to 90 minutes and then shut 'Off'automatically. 1.) Press the SLEEP button. After 10 minutes the radio will play the radio for up to a maximum of "90"minutes or a minimum of time that point. 3.) To cancel the sleep timer before shutting off automatically. IMPORTANT: Remember that the station...
... - DIMMER Control The DIMMER control was set the alarm for the Sleep To Music operation are the same settings you change the display to the desired sleep time, up to 90 minutes and then shut 'Off'automatically. 1.) Press the SLEEP button. After 10 minutes the radio will play the radio for up to a maximum of "90"minutes or a minimum of time that point. 3.) To cancel the sleep timer before shutting off automatically. IMPORTANT: Remember that the station...

Owners Manual
Page 21
... indicator, you should change the battery proceed as , the length of time before replacement. IMPORTANT: Leave the radio AC power cord connected to your battery may last for at least 3 years even if it in for you plug the radio in lithium battery will 'Flash'. Changing The Lithium Battery Like all batteries, eventually the built in , your household outlet supplies the power, and the battery is supplying power to do so...
... indicator, you should change the battery proceed as , the length of time before replacement. IMPORTANT: Leave the radio AC power cord connected to your battery may last for at least 3 years even if it in for you plug the radio in lithium battery will 'Flash'. Changing The Lithium Battery Like all batteries, eventually the built in , your household outlet supplies the power, and the battery is supplying power to do so...
Owners Manual
Page 23
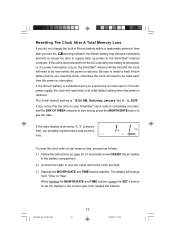
... able to supply back up power to its initial default setting when the power is restored. To reset the clock after a total memory loss, proceed as follows: 1.) Follow the instructions on your SmartSet® clock radio is completely incorrect, and the DAY OF WEEK indicator is also wrong, press the MONTH/DATE button to your AC outlet and let the clock set the display to...
... able to supply back up power to its initial default setting when the power is restored. To reset the clock after a total memory loss, proceed as follows: 1.) Follow the instructions on your SmartSet® clock radio is completely incorrect, and the DAY OF WEEK indicator is also wrong, press the MONTH/DATE button to your AC outlet and let the clock set the display to...
Owners Manual
Page 24
... buttons. 5.) Depress the TIME button and the SET + button to set the display to the correct Month and Date. Make final adjustments if necessary. While holding the MONTH/DATE button, press the SET + button to set the Time, reconfirm that you have set the time correctly to reset your wake up times, and alarm mode settings, and sleep timer settings as you set the display to the correct Time. The SmartSet® clock memory is now reset and the new lithium battery will change automatically...
... buttons. 5.) Depress the TIME button and the SET + button to set the display to the correct Month and Date. Make final adjustments if necessary. While holding the MONTH/DATE button, press the SET + button to set the Time, reconfirm that you have set the time correctly to reset your wake up times, and alarm mode settings, and sleep timer settings as you set the display to the correct Time. The SmartSet® clock memory is now reset and the new lithium battery will change automatically...
Owners Manual
Page 25
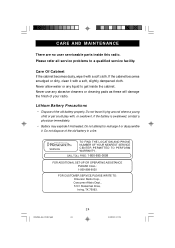
...user serviceable parts inside the cabinet. Lithium Battery Precautions • Dispose of the old battery in a fire. If the battery is swallowed, contact a physician immediately. • Battery may explode if mistreated. CALL TOLL FREE: 1-800-695-0098 FOR ADDITIONAL SET-UP OR OPERATING ASSISTANCE PLEASE CALL: 1-800-898-9020 FOR CUSTOMER SERVICE,PLEASE WRITE TO: Emerson Radio...where a young child or pet could play with, or swallow it with a soft cloth. SERVICE TO FIND THE LOCATION AND PHONE R NUMBER OF YOUR NEAREST SERVICE CENTER PERMITTED TO PERFORM WARRANTY... Never allow...
...user serviceable parts inside the cabinet. Lithium Battery Precautions • Dispose of the old battery in a fire. If the battery is swallowed, contact a physician immediately. • Battery may explode if mistreated. CALL TOLL FREE: 1-800-695-0098 FOR ADDITIONAL SET-UP OR OPERATING ASSISTANCE PLEASE CALL: 1-800-898-9020 FOR CUSTOMER SERVICE,PLEASE WRITE TO: Emerson Radio...where a young child or pet could play with, or swallow it with a soft cloth. SERVICE TO FIND THE LOCATION AND PHONE R NUMBER OF YOUR NEAREST SERVICE CENTER PERMITTED TO PERFORM WARRANTY... Never allow...
Owners Manual
Page 26
... Serial Number of this unit is located on a label on the bottom of original purchase in original material, including original parts and workmanship, under normal use and conditions, for labor and parts at no charge for a period of ninety (90) days from negligence, misuse, abuse, accident, failure to follow operating instructions, commercial use, rental, repairs by California residents) to : Emerson Radio Corp...
... Serial Number of this unit is located on a label on the bottom of original purchase in original material, including original parts and workmanship, under normal use and conditions, for labor and parts at no charge for a period of ninety (90) days from negligence, misuse, abuse, accident, failure to follow operating instructions, commercial use, rental, repairs by California residents) to : Emerson Radio Corp...


