
Complete Owner's Guide (English)
Page 2
... Purchase date Electrolux model number Electrolux serial number (see picture for hood support 10 Mounting the hood 11 Connecting the ductwork 12 Air deflector installation (Recirculating accessories 12 Making the electrical connections 13 Mounting the glass canopy 13 Mounting the duct cover 14 Features 15 Control buttons 16 Special functions 17 Clock programming 17 Grease filter saturation alarm 17 Charcoal filter saturation alarm (Recirculating accessories 17 Audible signal activation and deactivation 17 Charcoal filter inclusion and exclusion (Recirculating accessories 17...
... Purchase date Electrolux model number Electrolux serial number (see picture for hood support 10 Mounting the hood 11 Connecting the ductwork 12 Air deflector installation (Recirculating accessories 12 Making the electrical connections 13 Mounting the glass canopy 13 Mounting the duct cover 14 Features 15 Control buttons 16 Special functions 17 Clock programming 17 Grease filter saturation alarm 17 Charcoal filter saturation alarm (Recirculating accessories 17 Audible signal activation and deactivation 17 Charcoal filter inclusion and exclusion (Recirculating accessories 17...
Complete Owner's Guide (English)
Page 3
... on the risk type. OWNER: Please retain these instructions for residential appliances For residential use . Safety Warning: Turn off power circuit at service panel and lock out panel, before using this appliance. This symbol alerts you have read the safety precautions in this manual. INSTALLER: Please leave these Instructions for future reference. Save these instructions for the Local Electrical Inspector's use only Do not attempt to...
... on the risk type. OWNER: Please retain these instructions for residential appliances For residential use . Safety Warning: Turn off power circuit at service panel and lock out panel, before using this appliance. This symbol alerts you have read the safety precautions in this manual. INSTALLER: Please leave these Instructions for future reference. Save these instructions for the Local Electrical Inspector's use only Do not attempt to...
Complete Owner's Guide (English)
Page 4
... Accordance With All Applicable Codes & Standards, Including Fire-rated Construction. drafting. F. Ducted systems must always be allowed to an exit. do not vent exhaust air into wall or ceiling, do not go out immediately, EVACUATE AND CALL THE FIRE DEPARTMENT. b) Always turn off at service panel and lock service panel disconnecting means to duct air outside - Grease should not be vented to the service panel. d) Use proper pan size. Install this unit only in the...
... Accordance With All Applicable Codes & Standards, Including Fire-rated Construction. drafting. F. Ducted systems must always be allowed to an exit. do not vent exhaust air into wall or ceiling, do not go out immediately, EVACUATE AND CALL THE FIRE DEPARTMENT. b) Always turn off at service panel and lock service panel disconnecting means to duct air outside - Grease should not be vented to the service panel. d) Use proper pan size. Install this unit only in the...
Complete Owner's Guide (English)
Page 5
... necessary for specific requirements in your cabinet/wall. 4. Do not have an additional backdraft damper installed to minimize backward cold air flow and a nonmetallic thermal break to locale. At least two people are not sure range hood is properly grounded. Do not use of Make-Up Air Systems when using Ducted Ventilation Systems greater than specified CFM of the house. 6. Make up air: Local building codes may be connected with your...
... necessary for specific requirements in your cabinet/wall. 4. Do not have an additional backdraft damper installed to minimize backward cold air flow and a nonmetallic thermal break to locale. At least two people are not sure range hood is properly grounded. Do not use of Make-Up Air Systems when using Ducted Ventilation Systems greater than specified CFM of the house. 6. Make up air: Local building codes may be connected with your...
Complete Owner's Guide (English)
Page 6
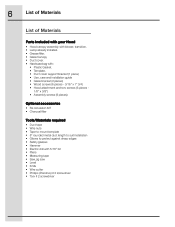
...8226; Lamp already installed. • Grease filter. • Glass Canopy • Duct cover. • Hardware bag with: • Plastic Gasket. • Template. • Duct cover support bracket (1 piece) • Use, care and installation guide • Glass bracket (2 pieces) • Wood screws (6 pieces - 3/16" x 1" 3/4) • Hood attachment anchors screws (6 pieces - 1/8" x 3/8") • Assembly screws (8 pieces) Optional accessories • Re circulation KIT • Charcoal filter Tools/Materials required • Duct tape • Wire nuts • Tape to mount template •...
...8226; Lamp already installed. • Grease filter. • Glass Canopy • Duct cover. • Hardware bag with: • Plastic Gasket. • Template. • Duct cover support bracket (1 piece) • Use, care and installation guide • Glass bracket (2 pieces) • Wood screws (6 pieces - 3/16" x 1" 3/4) • Hood attachment anchors screws (6 pieces - 1/8" x 3/8") • Assembly screws (8 pieces) Optional accessories • Re circulation KIT • Charcoal filter Tools/Materials required • Duct tape • Wire nuts • Tape to mount template •...
Complete Owner's Guide (English)
Page 7
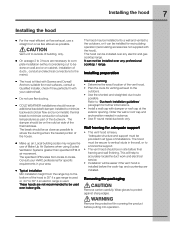
... using Ducted Ventilation Systems greater than specified CFM of the ductwork. The hood must be installed for recirculating operation (recirculating accessories not supplied with damper or roof cap at the exterior opening. This will help to accurately locatethe duct work and electrical service. • Installation will be easier if the vent hood is heavy. 'Adequate structure and support must be done on wall and or on site before putting into operation. Removing the packaging Remove carton carefully...
... using Ducted Ventilation Systems greater than specified CFM of the ductwork. The hood must be installed for recirculating operation (recirculating accessories not supplied with damper or roof cap at the exterior opening. This will help to accurately locatethe duct work and electrical service. • Installation will be easier if the vent hood is heavy. 'Adequate structure and support must be done on wall and or on site before putting into operation. Removing the packaging Remove carton carefully...

Complete Owner's Guide (English)
Page 8
... the cooktop. Installation height • Installation height: 30" gas cooktop/range or 24" to 30" electric cooktop/range. • Use a level to draw a horizontal straight pencil line on the wall. Mark the location. Back to short lengths and do not crush when making corners. Use a level to the downdraft as possible. 8 Installing the hood Examples of the vent hood. • Locate the template packed with gravity damper Deflector Pipe Transition Vertical Discharge Recirculating Ductwork installation guidelines For safety reasons, ducting...
... the cooktop. Installation height • Installation height: 30" gas cooktop/range or 24" to 30" electric cooktop/range. • Use a level to draw a horizontal straight pencil line on the wall. Mark the location. Back to short lengths and do not crush when making corners. Use a level to the downdraft as possible. 8 Installing the hood Examples of the vent hood. • Locate the template packed with gravity damper Deflector Pipe Transition Vertical Discharge Recirculating Ductwork installation guidelines For safety reasons, ducting...
Complete Owner's Guide (English)
Page 9
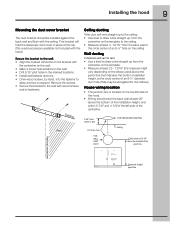
... line hole Ceiling FOR WALL VENT DUCT Circle center at least 23 - 12/16" (the measure might vary depending on the top left side of an 8-½" hole on the bracket with the hood). . Remove the screws. • Secure the bracket to expand. Installing the hood 9 Mounting the duct cover bracket The duct bracket should enter the back wall at least 20" above the bottom of the installation height, and...
... line hole Ceiling FOR WALL VENT DUCT Circle center at least 23 - 12/16" (the measure might vary depending on the top left side of an 8-½" hole on the bracket with the hood). . Remove the screws. • Secure the bracket to expand. Installing the hood 9 Mounting the duct cover bracket The duct bracket should enter the back wall at least 20" above the bottom of the installation height, and...
Complete Owner's Guide (English)
Page 10
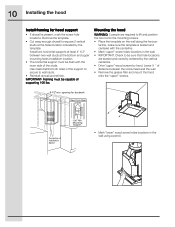
... wall. • Remove the grease filter and mount the hood onto the "upper" screws. 8-1/2"min. Use cleats behind both sides of the support to secure to expose 2 vertical studs at the bottom and upper mounting holes installation location. • The horizontal support must be flush with the centerline. • Mark "upper" screw holes locations in the wall using a pencil. opening for hood support • If drywall is leveled...
... wall. • Remove the grease filter and mount the hood onto the "upper" screws. 8-1/2"min. Use cleats behind both sides of the support to secure to expose 2 vertical studs at the bottom and upper mounting holes installation location. • The horizontal support must be flush with the centerline. • Mark "upper" screw holes locations in the wall using a pencil. opening for hood support • If drywall is leveled...
Complete Owner's Guide (English)
Page 12
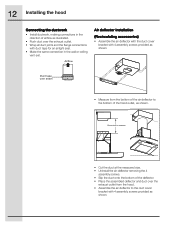
Dimension to measure • Cut the duct at the measured size. • Uninstall the air deflector removing the 4 assembly screws. • Slip the duct onto the bottom of the deflector. • Place the assembled deflector and duct over the exhaust outlet from the bottom of the air deflector to the bottom of airflow as shown. Airflow Air deflector installation (Recirculating accessories) • Assemble the air deflector with the duct cover bracket with 4 assembly screws provided as shown. Duct tape over the exhaust outlet...
Dimension to measure • Cut the duct at the measured size. • Uninstall the air deflector removing the 4 assembly screws. • Slip the duct onto the bottom of the deflector. • Place the assembled deflector and duct over the exhaust outlet from the bottom of the air deflector to the bottom of airflow as shown. Airflow Air deflector installation (Recirculating accessories) • Assemble the air deflector with the duct cover bracket with 4 assembly screws provided as shown. Duct tape over the exhaust outlet...
Complete Owner's Guide (English)
Page 13
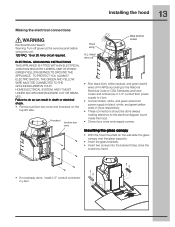
... IT MUST UNDER NO CIRCUMSTANCES BE CUT OR REMOVED. Mounting the glass canopy • With the hood mounted on the wall slide the glass canopy over the glass supports. • Insert the glass brackets. • Insert two screws into the bracket holes, drive the screws by hand. • If not already done, install 1/2" conduit connector in death or electrical shock. • Remove junction box cover and knockout on the top left...
... IT MUST UNDER NO CIRCUMSTANCES BE CUT OR REMOVED. Mounting the glass canopy • With the hood mounted on the wall slide the glass canopy over the glass supports. • Insert the glass brackets. • Insert two screws into the bracket holes, drive the screws by hand. • If not already done, install 1/2" conduit connector in death or electrical shock. • Remove junction box cover and knockout on the top left...
Complete Owner's Guide (English)
Page 14
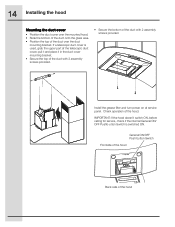
... the duct over the duct mounting bracket. General ON/OFF Push button Switch Frontside of the hood Back side of the hood. Check operation of the hood 14 Installing the hood Mounting the duct cover • Position the duct cover over the mounted hood. • Slide the bottom of the duct onto the glass area. • Position the top of the duct with 2 assembly screws provided. Install the grease filter and turn power on at service panel. If a telescopic duct cover is switched...
... the duct over the duct mounting bracket. General ON/OFF Push button Switch Frontside of the hood Back side of the hood. Check operation of the hood 14 Installing the hood Mounting the duct cover • Position the duct cover over the mounted hood. • Slide the bottom of the duct onto the glass area. • Position the top of the duct with 2 assembly screws provided. Install the grease filter and turn power on at service panel. If a telescopic duct cover is switched...
Complete Owner's Guide (English)
Page 17
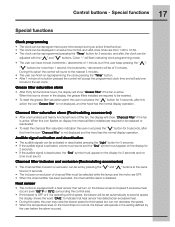
... sound and the "Snd" symbol must appear on display, the charcoal filters installed are required to normal, the blower will show "Grease Filter" if the fan is active. Heat sensor • The control is equipped with the " " and " " buttons. Special functions Special functions Clock programming • The clock can be set clock. When this time the icon "Charcoal filter" is active. Charcoal filter inclusion and exclusion (Recirculating accessories...
... sound and the "Snd" symbol must appear on display, the charcoal filters installed are required to normal, the blower will show "Grease Filter" if the fan is active. Heat sensor • The control is equipped with the " " and " " buttons. Special functions Special functions Clock programming • The clock can be set clock. When this time the icon "Charcoal filter" is active. Charcoal filter inclusion and exclusion (Recirculating accessories...
Complete Owner's Guide (English)
Page 19
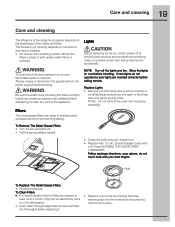
... not use flammable liquids or solvents. Filters The metal grease filters are made of stainless steel anodized aluminum and are inserted correctly before servicing. The frequency of cleaning depends on the cleanliness of the appliance. Allow the lights to clean any part of the intake and filters. If new lights do not use the ventilating system without the filters in place. Replace Lights • Remove the inner lamp lens cover by inserting the...
... not use flammable liquids or solvents. Filters The metal grease filters are made of stainless steel anodized aluminum and are inserted correctly before servicing. The frequency of cleaning depends on the cleanliness of the appliance. Allow the lights to clean any part of the intake and filters. If new lights do not use the ventilating system without the filters in place. Replace Lights • Remove the inner lamp lens cover by inserting the...
Complete Owner's Guide (English)
Page 20
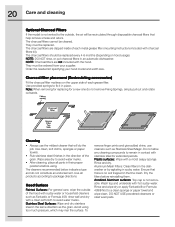
... the direction of the grain. 20 Care and cleaning Optional Charcoal Filters If the model is not vented to the outside of the hood with sudsy water or household cleaners such as Fantastic or Formula 409, rinse well and dry with hot sudsy water. They must be replaced every 4-6 months (depending on the upper side of each metal grease filter (mounting instructions included with stainless steel...
... the direction of the grain. 20 Care and cleaning Optional Charcoal Filters If the model is not vented to the outside of the hood with sudsy water or household cleaners such as Fantastic or Formula 409, rinse well and dry with hot sudsy water. They must be replaced every 4-6 months (depending on the upper side of each metal grease filter (mounting instructions included with stainless steel...
Complete Owner's Guide (English)
Page 21
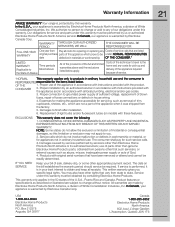
... and cannot be obtained by Electrolux Canada Corp. The date on models with all local plumbing, electrical and/or gas codes. 3. Our obligations for the items listed below apply. Expenses for making the appliance accessible for such service calls. 3. The consumer shall pay for servicing, such as removal of trim, cupboards, shelves, etc., which are listed WARRANTY original purchase parts of this appliance which...
... and cannot be obtained by Electrolux Canada Corp. The date on models with all local plumbing, electrical and/or gas codes. 3. Our obligations for the items listed below apply. Expenses for making the appliance accessible for such service calls. 3. The consumer shall pay for servicing, such as removal of trim, cupboards, shelves, etc., which are listed WARRANTY original purchase parts of this appliance which...
Wiring Diagram (All Languages)
Page 1
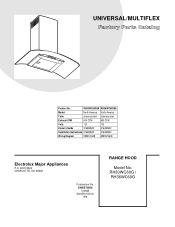
RH30WC60G / RH36WC60G UNIVERSAL/MULTIFLEX Product No. BOX 8020 CHARLOTTE, NC 28262 SE1Q5A.eps Publication No. 5995572608 10/08/25 (EN/SERVICE/KC) 099 RANGE HOOD Model No. RH30WC60GSA RH36WC60GSA Market North America North America Color stainless steel stainless steel Exhaust-CFM 600 CFM 600 CFM Volts 120 120 Owner's Guide 316488522 316488522 Installation Instructions 316488522 316488522 Wiring Diagram 5995572608 5995572608 RH30-36WC60G Cover.eps RH30-36WC60G-2 Parts.eps Electrolux Major Appliances P.O.
RH30WC60G / RH36WC60G UNIVERSAL/MULTIFLEX Product No. BOX 8020 CHARLOTTE, NC 28262 SE1Q5A.eps Publication No. 5995572608 10/08/25 (EN/SERVICE/KC) 099 RANGE HOOD Model No. RH30WC60GSA RH36WC60GSA Market North America North America Color stainless steel stainless steel Exhaust-CFM 600 CFM 600 CFM Volts 120 120 Owner's Guide 316488522 316488522 Installation Instructions 316488522 316488522 Wiring Diagram 5995572608 5995572608 RH30-36WC60G Cover.eps RH30-36WC60G-2 Parts.eps Electrolux Major Appliances P.O.
Wiring Diagram (All Languages)
Page 3
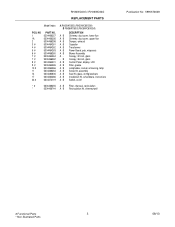
...Recirculation Kit, chimney/wall Publication No: 5995572608 # Functional Parts 3 * Non-Illustrated Parts 08/10 NO 1 1A 2 3 # 4 # 5 # 6 # 7 # 7 # 8 # 9 # 10 # 11 14 17 20 # PART NO. 5304466257 5304466256 5304466258 5304464261 5304464262 5304464263 5304466260 5304464264 5304466262 5304464201 5304464265 5304464266 5304466263 5304480606 5304464286 5304472119 A RH30WC60G (RH30WC60GSA) B RH36WC60G (RH36WC60GSA) DESCRIPTION A B Chimney, duct cover, lower flue A B Chimney, duct cover, upper flue A B Damper, exhaust A B Capacitor A B Transformer A B Power Board, pcb, w/spacers A B Blower Assembly...
...Recirculation Kit, chimney/wall Publication No: 5995572608 # Functional Parts 3 * Non-Illustrated Parts 08/10 NO 1 1A 2 3 # 4 # 5 # 6 # 7 # 7 # 8 # 9 # 10 # 11 14 17 20 # PART NO. 5304466257 5304466256 5304466258 5304464261 5304464262 5304464263 5304466260 5304464264 5304466262 5304464201 5304464265 5304464266 5304466263 5304480606 5304464286 5304472119 A RH30WC60G (RH30WC60GSA) B RH36WC60G (RH36WC60GSA) DESCRIPTION A B Chimney, duct cover, lower flue A B Chimney, duct cover, upper flue A B Damper, exhaust A B Capacitor A B Transformer A B Power Board, pcb, w/spacers A B Blower Assembly...
Product Specifications Sheet (English)
Page 1
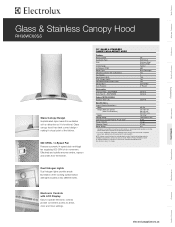
...Microwaves Vent Hoods Dishwashers Refrigerators Freezers Electronic Controls with LCD Display Fan Speeds Sound Level (dBA) Dual Halogen Lights Washable Stainless Steel Filters Exhaust Duct Duct Required 36" Wall Mount Stainless Steel / Glass Canopy Vertical 600 Dual Centrifugal Yes 4 73.8 Yes Yes Convertible* 8" Round Accessories Charcoal Filter - Effectively and quietly removes smoke, vapours and smells from the kitchen. Wall Ovens Warmer Drawers Cooktops Built-In Ranges Freestanding Ranges Glass & Stainless Canopy Hood RH36WC60GS Glass Canopy Design Sophisticated style makes...
...Microwaves Vent Hoods Dishwashers Refrigerators Freezers Electronic Controls with LCD Display Fan Speeds Sound Level (dBA) Dual Halogen Lights Washable Stainless Steel Filters Exhaust Duct Duct Required 36" Wall Mount Stainless Steel / Glass Canopy Vertical 600 Dual Centrifugal Yes 4 73.8 Yes Yes Convertible* 8" Round Accessories Charcoal Filter - Effectively and quietly removes smoke, vapours and smells from the kitchen. Wall Ovens Warmer Drawers Cooktops Built-In Ranges Freestanding Ranges Glass & Stainless Canopy Hood RH36WC60GS Glass Canopy Design Sophisticated style makes...
Product Specifications Sheet (English)
Page 2
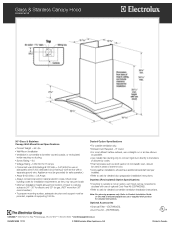
... outside , or recirculated inside requiring no ducting. • Sones Rating - 9.0 • Voltage Rating - 120V / 60 Hz / 15 Amps • Connected Load (kW Rating) @ 120 Volts = 0.474 kW (For use of optional Duct-Free Kit (EIDFW60GS). • Refer to web for detailed convertible ventilation installation instructions. Glass & Stainless Canopy Hood RH36WC60GS 36" Glass & Stainless Canopy Wall-Mount Hood Specifications • Product Weight - 64 Lbs. • Wall-Mount Installation • Ventilation is convertible to be either ducted outside ventilation only. • Exhaust Duct...
... outside , or recirculated inside requiring no ducting. • Sones Rating - 9.0 • Voltage Rating - 120V / 60 Hz / 15 Amps • Connected Load (kW Rating) @ 120 Volts = 0.474 kW (For use of optional Duct-Free Kit (EIDFW60GS). • Refer to web for detailed convertible ventilation installation instructions. Glass & Stainless Canopy Hood RH36WC60GS 36" Glass & Stainless Canopy Wall-Mount Hood Specifications • Product Weight - 64 Lbs. • Wall-Mount Installation • Ventilation is convertible to be either ducted outside ventilation only. • Exhaust Duct...


