Complete Owner's Guide (English)
Page 2
... 11 Making the electrical connections 11 Connecting the ductwork 12 Air deflector installation (Recirculating accessories 12 Features 13 Control buttons 14 Special functions 15 Clock programming 15 Grease filter saturation alarm 15 Charcoal filter saturation alarm (Recirculating accessories 15 Audible signal activation and deactivation 15 Charcoal filter inclusion and exclusion (Recirculating accessories 15 Heat sensor 15 For Best results 16 Care and cleaning 17 Filters 17 Lights 17 Optional Charcoal Filters 18 Hood Surface 18 Warranty Information 19 ©2007 Electrolux...
... 11 Making the electrical connections 11 Connecting the ductwork 12 Air deflector installation (Recirculating accessories 12 Features 13 Control buttons 14 Special functions 15 Clock programming 15 Grease filter saturation alarm 15 Charcoal filter saturation alarm (Recirculating accessories 15 Audible signal activation and deactivation 15 Charcoal filter inclusion and exclusion (Recirculating accessories 15 Heat sensor 15 For Best results 16 Care and cleaning 17 Filters 17 Lights 17 Optional Charcoal Filters 18 Hood Surface 18 Warranty Information 19 ©2007 Electrolux...
Complete Owner's Guide (English)
Page 3
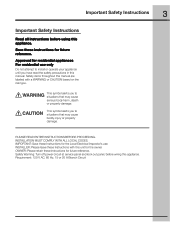
... bodily injury or property damage. Requirement: 120 V AC, 60 Hz. 15 or 20 A Branch Circuit Important Safety Instructions 3 Important Safety Instructions Read all instructions before wiring this appliance. INSTALLATION MUST COMPLY WITH ALL LOCAL CODES. Safety items throughout this manual are labeled with this appliance. Safety Warning: Turn off power circuit at service panel and lock out panel, before using this unit for future reference. Save these...
... bodily injury or property damage. Requirement: 120 V AC, 60 Hz. 15 or 20 A Branch Circuit Important Safety Instructions 3 Important Safety Instructions Read all instructions before wiring this appliance. INSTALLATION MUST COMPLY WITH ALL LOCAL CODES. Safety items throughout this manual are labeled with this appliance. Safety Warning: Turn off power circuit at service panel and lock out panel, before using this unit for future reference. Save these...
Complete Owner's Guide (English)
Page 4
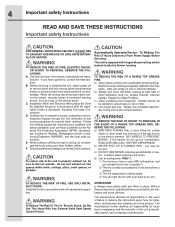
... disconnecting switch located inside the blower housing TO REDUCE THE RISK OF A RANGE TOP GREASE FIRE. Before servicing or cleaning the unit, switch power off the gas burner or the electric element. E. c) Clean ventilating fans frequently. The manufacturer further declines all responsibility in the area where it started. 3) The fire department is equpeed with a close-fitting lid, cookie sheet, or other hidden utilities. Installation Work and Electrical Wiring Must...
... disconnecting switch located inside the blower housing TO REDUCE THE RISK OF A RANGE TOP GREASE FIRE. Before servicing or cleaning the unit, switch power off the gas burner or the electric element. E. c) Clean ventilating fans frequently. The manufacturer further declines all responsibility in the area where it started. 3) The fire department is equpeed with a close-fitting lid, cookie sheet, or other hidden utilities. Installation Work and Electrical Wiring Must...

Complete Owner's Guide (English)
Page 5
... Standards C22.1-94, Canadian Electrical Code, Part 1 and C22.2 No.0-M91 - The range hood should be connected directly to a gas pipe. latest edition** and all governing codes and ordinances. Vent unit to outside temperatures as part of the power supply conduit (at the range hood and at each end of the ductwork. Make up air: Local building codes may require the use a straight run or as few elbows as possible to the...
... Standards C22.1-94, Canadian Electrical Code, Part 1 and C22.2 No.0-M91 - The range hood should be connected directly to a gas pipe. latest edition** and all governing codes and ordinances. Vent unit to outside temperatures as part of the power supply conduit (at the range hood and at each end of the ductwork. Make up air: Local building codes may require the use a straight run or as few elbows as possible to the...

Complete Owner's Guide (English)
Page 6
...; 4 Lamps already installed. • 1 Grease filter • 4 Duct covers. • Hardware bag with: • Ceiling Mount Template • Use, care and installation guide • Wood screws (4 pieces - 3/16" x 1" 3/4) • Glass Brackets, Springs, Gaskets ( 2 each ) • Assembly screws (70 pieces) • 4 Plastic Springs • Duct cover brackets (4 each) • 8 Vertical supports. • 2 Upper Ductcover supports. • 2 Horizontal supports. • Glass canopy Optional accessories • Recirculation KIT • Charcoal filter Tools/Materials required • Duct...
...; 4 Lamps already installed. • 1 Grease filter • 4 Duct covers. • Hardware bag with: • Ceiling Mount Template • Use, care and installation guide • Wood screws (4 pieces - 3/16" x 1" 3/4) • Glass Brackets, Springs, Gaskets ( 2 each ) • Assembly screws (70 pieces) • 4 Plastic Springs • Duct cover brackets (4 each) • 8 Vertical supports. • 2 Upper Ductcover supports. • 2 Horizontal supports. • Glass canopy Optional accessories • Recirculation KIT • Charcoal filter Tools/Materials required • Duct...
Complete Owner's Guide (English)
Page 7
... backdraft damper installed to minimize backward cold air flow and a nonmetallic thermal break to 30" if an electric range is used over any electric and gas cooktop/range. Vent unit to outside of ducts , conduit and electrical connections to the mains). • The hood is fitted with Screws and Drywall Anchors suitable for most efficient air flow exhaust, use of Make-Up Air Systems when using Ducted Ventilation Systems greater than specified CFM of the ductwork. Installing the hood 7 Installing the hood...
... backdraft damper installed to minimize backward cold air flow and a nonmetallic thermal break to 30" if an electric range is used over any electric and gas cooktop/range. Vent unit to outside of ducts , conduit and electrical connections to the mains). • The hood is fitted with Screws and Drywall Anchors suitable for most efficient air flow exhaust, use of Make-Up Air Systems when using Ducted Ventilation Systems greater than specified CFM of the ductwork. Installing the hood 7 Installing the hood...
Complete Owner's Guide (English)
Page 8
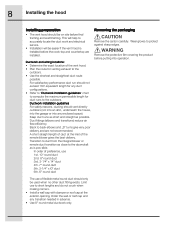
... framing and wall finishing. Transition to duct from the integral blower or remote duct transition as close to accurately locate the duct work and electrical service. • Installation will be easier if the vent hood is pos-sible. This will help to the downdraft as possible. The use of the remote blower gives the best delivery. Duct fittings (elbows and transitions) reduce air flow efficiency. Remove the protective film covering the product before the cook-top...
... framing and wall finishing. Transition to duct from the integral blower or remote duct transition as close to accurately locate the duct work and electrical service. • Installation will be easier if the vent hood is pos-sible. This will help to the downdraft as possible. The use of the remote blower gives the best delivery. Duct fittings (elbows and transitions) reduce air flow efficiency. Remove the protective film covering the product before the cook-top...
Complete Owner's Guide (English)
Page 9
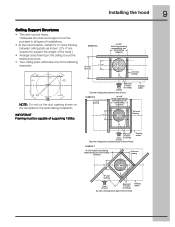
... emplate Cut Dia. Installing the hood Ceiling Support Structures • This vent hood is heavy. 'Adequate structure and support must be like one of hood Cooktop outline 9 Drill3/16” Pilot Approx.1 1/2” Deep 8 1/4” to Centerline 10 1/4” to Centerline 49-80406 Printed Italy 04-06JR NOTE: Do not cut the duct opening shown on the template for the recirculating installation. EXAMPLE A 10-1/16" Install cross...
... emplate Cut Dia. Installing the hood Ceiling Support Structures • This vent hood is heavy. 'Adequate structure and support must be like one of hood Cooktop outline 9 Drill3/16” Pilot Approx.1 1/2” Deep 8 1/4” to Centerline 10 1/4” to Centerline 49-80406 Printed Italy 04-06JR NOTE: Do not cut the duct opening shown on the template for the recirculating installation. EXAMPLE A 10-1/16" Install cross...
Complete Owner's Guide (English)
Page 10
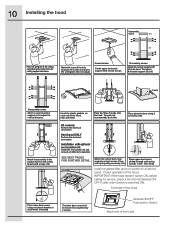
... bracket at service panel. General ON/OFF Push button Switch Back side of the hood Place lower duct covers using a screw by side. Then attach horizontal support (B) (inf) 2 /side 16 assembly screws Attach a second vertical support set to transition SEE NEXT PAGES FOR FURTHER DETAIL Attach the vertical duct cover supports using 2 screws by side. Installation with 4 wood screws. 16 assembly screws Attach the vertical supports (inf) (A) to rangehood by 4 screws. Then verify Instal the grease filter and turn power on each vertex. (4 needed...
... bracket at service panel. General ON/OFF Push button Switch Back side of the hood Place lower duct covers using a screw by side. Then attach horizontal support (B) (inf) 2 /side 16 assembly screws Attach a second vertical support set to transition SEE NEXT PAGES FOR FURTHER DETAIL Attach the vertical duct cover supports using 2 screws by side. Installation with 4 wood screws. 16 assembly screws Attach the vertical supports (inf) (A) to rangehood by 4 screws. Then verify Instal the grease filter and turn power on each vertex. (4 needed...
Complete Owner's Guide (English)
Page 11
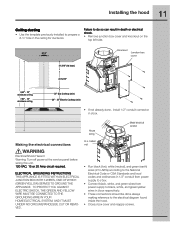
...; Close j-box cover and reapply screws. ELECTRICAL GROUNDING INSTRUCTIONS THIS APPLIANCE IS FITTED WITH AN ELECTRICAL JUNCTION BOX WITH 3 WIRES, ONE OF WHICH (GREEN/YELLOW) SERVES TO GROUND THE APPLIANCE. 11 Installing the hood Ceiling ducting • Use the template previously installed to prepare a 8-½" hole in j-box. listed nut Metal electrical conduit Electrical Shock Hazard Warning: Turn off power at the service panel before wiring this unit. 120 VAC, 15 or 20 Amp circuit required. Making the electrical connections House wiring U.L.
...; Close j-box cover and reapply screws. ELECTRICAL GROUNDING INSTRUCTIONS THIS APPLIANCE IS FITTED WITH AN ELECTRICAL JUNCTION BOX WITH 3 WIRES, ONE OF WHICH (GREEN/YELLOW) SERVES TO GROUND THE APPLIANCE. 11 Installing the hood Ceiling ducting • Use the template previously installed to prepare a 8-½" hole in j-box. listed nut Metal electrical conduit Electrical Shock Hazard Warning: Turn off power at the service panel before wiring this unit. 120 VAC, 15 or 20 Amp circuit required. Making the electrical connections House wiring U.L.
Complete Owner's Guide (English)
Page 12
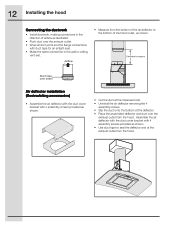
Assemble the air deflector with the duct cover bracket with 4 assembly screws provided as shown. • Cut the duct at the exhaust outlet from the hood. 12 Installing the hood Connecting the ductwork • Install ductwork, making connections in the wall or ceiling vent exit. Airflow • Measure from the hood. Duct tape over seam Air deflector installation (Recirculating accessories) • Assemble the air deflector with the duct cover bracket with duct tape for an airtight seal. • Make the same connection in the direction of the hood outlet, as...
Assemble the air deflector with the duct cover bracket with 4 assembly screws provided as shown. • Cut the duct at the exhaust outlet from the hood. 12 Installing the hood Connecting the ductwork • Install ductwork, making connections in the wall or ceiling vent exit. Airflow • Measure from the hood. Duct tape over seam Air deflector installation (Recirculating accessories) • Assemble the air deflector with the duct cover bracket with duct tape for an airtight seal. • Make the same connection in the direction of the hood outlet, as...
Complete Owner's Guide (English)
Page 15
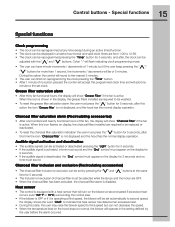
... motor are OFF. • When the charcoal filter has been excluded, the charcoal filter alarm is disabled. 15 Control buttons - During this action the icon "Grease filter" is operating at first speed, the blower will turn on the blower at the same time for more than 1 second, the increments / decrements will be of the fan, the display will show "Charcoal Filter" if the fan is active. Charcoal filter saturation alarm (Recirculating accessories...
... motor are OFF. • When the charcoal filter has been excluded, the charcoal filter alarm is disabled. 15 Control buttons - During this action the icon "Grease filter" is operating at first speed, the blower will turn on the blower at the same time for more than 1 second, the increments / decrements will be of the fan, the display will show "Charcoal Filter" if the fan is active. Charcoal filter saturation alarm (Recirculating accessories...
Complete Owner's Guide (English)
Page 16
... Gas Cooktops, a lower blower speed should be carried outside instead of heat, smoke, moisture, grease and cooking odors from the hood. Such drafts should be prevented in so far as possible. • The best job of ventilation in order to cook. • Use a rear burner when browning or pan frying meat. • Open a window or inside door slightly. • Clean the filters and the wall behind the filters...
... Gas Cooktops, a lower blower speed should be carried outside instead of heat, smoke, moisture, grease and cooking odors from the hood. Such drafts should be prevented in so far as possible. • The best job of ventilation in order to cook. • Use a rear burner when browning or pan frying meat. • Open a window or inside door slightly. • Clean the filters and the wall behind the filters...
Complete Owner's Guide (English)
Page 17
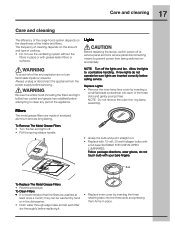
... free. Allow the lights to prevent power from the power supply before attempting to clean any part of the appliance. To avoid risk of fire and explosion do not operate be washed at service panel and lock service panel disconnecting means to cool before calling service. If new lights do not use the ventilating system without the filters in place. To Remove The Metal Grease Filters • Turn the fan and lights...
... free. Allow the lights to prevent power from the power supply before attempting to clean any part of the appliance. To avoid risk of fire and explosion do not operate be washed at service panel and lock service panel disconnecting means to cool before calling service. If new lights do not use the ventilating system without the filters in place. To Remove The Metal Grease Filters • Turn the fan and lights...
Complete Owner's Guide (English)
Page 18
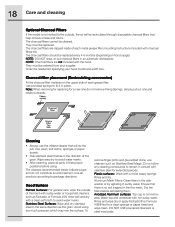
... removable. Anodized Aluminum surfaces: Top cap is no soil trapped in the direction of each metal grease filter (mounting instructions included with stainless steel for a new one do not remove Fixing Springs, simply pull out one and rotate outwards. The charcoal filters cannot be replaced every 4-6 months (depending on the upper side of the grain. Order the needed kit specifying your supplier. They must be replaced. Use clean...
... removable. Anodized Aluminum surfaces: Top cap is no soil trapped in the direction of each metal grease filter (mounting instructions included with stainless steel for a new one do not remove Fixing Springs, simply pull out one and rotate outwards. The charcoal filters cannot be replaced every 4-6 months (depending on the upper side of the grain. Order the needed kit specifying your supplier. They must be replaced. Use clean...
Complete Owner's Guide (English)
Page 19
... change without notice. Proper installation by an authorized servicer in accordance with instructions provided with original serial numbers that are listed WARRANTY original purchase parts of this appliance which are not a part of the appliance when it is in ordinary household use of sale, delivery slip, or some other than genuine Electrolux Home Products parts; Damages to you specific legal rights. Damages caused by services...
... change without notice. Proper installation by an authorized servicer in accordance with instructions provided with original serial numbers that are listed WARRANTY original purchase parts of this appliance which are not a part of the appliance when it is in ordinary household use of sale, delivery slip, or some other than genuine Electrolux Home Products parts; Damages to you specific legal rights. Damages caused by services...
Wiring Diagram (All Languages)
Page 1
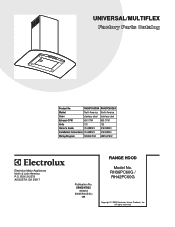
... reserved. UNIVERSAL/MULTIFLEX Product No. RH36PC60GSA RH42PC60GSA Market North America North America Color stainless steel stainless steel Exhaust-CFM 600 CFM 600 CFM Volts 120 120 Owner's Guide 316488523 316488523 Installation Instructions 316488523 316488523 Wiring Diagram 5995547832 5995547832 RH36-42PC60G Cover.eps RH36-42PC60G Parts.eps SE1RBA.eps RANGE HOOD Electrolux Major Appliances North & Latin America P.O. BOX 212378 AUGUSTA, GA 30917 Publication No. 5995547832 09/08/03 (EN/SERVICE/KC) 099 Model No.
... reserved. UNIVERSAL/MULTIFLEX Product No. RH36PC60GSA RH42PC60GSA Market North America North America Color stainless steel stainless steel Exhaust-CFM 600 CFM 600 CFM Volts 120 120 Owner's Guide 316488523 316488523 Installation Instructions 316488523 316488523 Wiring Diagram 5995547832 5995547832 RH36-42PC60G Cover.eps RH36-42PC60G Parts.eps SE1RBA.eps RANGE HOOD Electrolux Major Appliances North & Latin America P.O. BOX 212378 AUGUSTA, GA 30917 Publication No. 5995547832 09/08/03 (EN/SERVICE/KC) 099 Model No.

Wiring Diagram (All Languages)
Page 3
B Canopy, 42 inch, glass A B Control Panel, display, LCD A B Screw Kit, assembly A B Filter, grease A B Lampholder, socket, w/housing, lamp A B Switch, on/off * # 5304464294 A B Hardware Kit, installation * # 5304466745 A B Recirculation Kit, island * # 5304466255 A B Filter, charcoal, recirculation * # RHPCKIT A B Height Adapter Kit, 8 ft. ceiling - Canopy, 36 inch, glass - OPTIONAL ACCESSORY # Functional Parts 3 * Non-Illustrated Parts 08/09 NO 1 1 2 3 3 4 5 5 6 6 7 7 8 # 9 # 10 # 11 # 12 12 13 # 13 # 14 # 15 16 # 17 # 20 # PART NO. 5304466259 5304472729 5304464287 ...
B Canopy, 42 inch, glass A B Control Panel, display, LCD A B Screw Kit, assembly A B Filter, grease A B Lampholder, socket, w/housing, lamp A B Switch, on/off * # 5304464294 A B Hardware Kit, installation * # 5304466745 A B Recirculation Kit, island * # 5304466255 A B Filter, charcoal, recirculation * # RHPCKIT A B Height Adapter Kit, 8 ft. ceiling - Canopy, 36 inch, glass - OPTIONAL ACCESSORY # Functional Parts 3 * Non-Illustrated Parts 08/09 NO 1 1 2 3 3 4 5 5 6 6 7 7 8 # 9 # 10 # 11 # 12 12 13 # 13 # 14 # 15 16 # 17 # 20 # PART NO. 5304466259 5304472729 5304464287 ...

Product Specifications Sheet (English)
Page 1
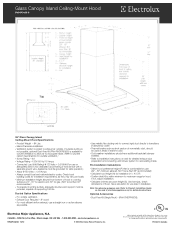
Stainless Steel Filters Dishwasher safe for installation requirements, as they sense heat or smoke. Wall Ovens Warmer Drawers Cooktops Built-In Ranges Freestanding Ranges Microwaves Glass Canopy Island Hood RH36PC60G S LCD Electronic Controls An array of versatile options with a separate ground wire. Check local building codes for easy cleaning. of air per locale. Height (With One Cover) (With Flue Extension) Width Depth Voltage Rating Connected Load (kW Rating) @ 120 Volts ‡ Amps @ 120 Volts Shipping Weight (Approx.) Sones Rating 28" min. 35" min...
Stainless Steel Filters Dishwasher safe for installation requirements, as they sense heat or smoke. Wall Ovens Warmer Drawers Cooktops Built-In Ranges Freestanding Ranges Microwaves Glass Canopy Island Hood RH36PC60G S LCD Electronic Controls An array of versatile options with a separate ground wire. Check local building codes for easy cleaning. of air per locale. Height (With One Cover) (With Flue Extension) Width Depth Voltage Rating Connected Load (kW Rating) @ 120 Volts ‡ Amps @ 120 Volts Shipping Weight (Approx.) Sones Rating 28" min. 35" min...
Product Specifications Sheet (English)
Page 2
... to connect rigid duct directly to installation instructions on web for detailed exhaust duct preparation and converting vent blower system for outside . Note: For planning purposes only. If outside ducting is not possible, optional Duct-Free Kit (PN # RHDFP60GS) is within minimum to exhaust air outside ventilation.) • Sones Rating - 9.9 • Voltage Rating - 120V / 60 Hz / 15 Amps • Connected Load (kW Rating) @ 120 Volts = 0.516 kW (For use later in Canada Refer to Ducted Option Specifications for recirculating...
... to connect rigid duct directly to installation instructions on web for detailed exhaust duct preparation and converting vent blower system for outside . Note: For planning purposes only. If outside ducting is not possible, optional Duct-Free Kit (PN # RHDFP60GS) is within minimum to exhaust air outside ventilation.) • Sones Rating - 9.9 • Voltage Rating - 120V / 60 Hz / 15 Amps • Connected Load (kW Rating) @ 120 Volts = 0.516 kW (For use later in Canada Refer to Ducted Option Specifications for recirculating...


