Complete Owner's Guide (English)
Page 2
... for hood support 10 Mounting the hood 11 Connecting the ductwork 12 Air deflector installation (Recirculating accessories 12 Making the electrical connections 13 Mounting the glass canopy 13 Mounting the duct cover 14 Features 15 Control buttons 16 Special functions 17 Clock programming 17 Grease filter saturation alarm 17 Charcoal filter saturation alarm (Recirculating accessories 17 Audible signal activation and deactivation 17 Charcoal filter inclusion and exclusion (Recirculating accessories 17 Heat sensor 17 For Best results 18 Care and cleaning 19 Filters 19 Lights...
... for hood support 10 Mounting the hood 11 Connecting the ductwork 12 Air deflector installation (Recirculating accessories 12 Making the electrical connections 13 Mounting the glass canopy 13 Mounting the duct cover 14 Features 15 Control buttons 16 Special functions 17 Clock programming 17 Grease filter saturation alarm 17 Charcoal filter saturation alarm (Recirculating accessories 17 Audible signal activation and deactivation 17 Charcoal filter inclusion and exclusion (Recirculating accessories 17 Heat sensor 17 For Best results 18 Care and cleaning 19 Filters 19 Lights...
Complete Owner's Guide (English)
Page 3
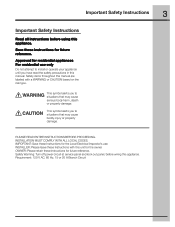
... Instructions Read all instructions before wiring this appliance. Approved for the owner. This symbol alerts you to situations that may cause serious body harm, death or property damage. Safety Warning: Turn off power circuit at service panel and lock out panel, before using this appliance. IMPORTANT: Save these Instructions with this manual are labeled with a WARNING or CAUTION based on the risk type. Requirement...
... Instructions Read all instructions before wiring this appliance. Approved for the owner. This symbol alerts you to situations that may cause serious body harm, death or property damage. Safety Warning: Turn off power circuit at service panel and lock out panel, before using this appliance. IMPORTANT: Save these Instructions with this manual are labeled with a WARNING or CAUTION based on the risk type. Requirement...
Complete Owner's Guide (English)
Page 4
... Operated Device - Heat oils slowly on fan or filter. d) Use proper pan size. Always use of the product. If the flames do not damage electrical wiring and other metal tray, then turn hood ON when cooking at high settings. Install this unit only in the manner intended by the National Fire Protection Association (NFPA), the American Society for proper combustion and exhausting of gases through the flue (Chimney...
... Operated Device - Heat oils slowly on fan or filter. d) Use proper pan size. Always use of the product. If the flames do not damage electrical wiring and other metal tray, then turn hood ON when cooking at high settings. Install this unit only in the manner intended by the National Fire Protection Association (NFPA), the American Society for proper combustion and exhausting of gases through the flue (Chimney...
Complete Owner's Guide (English)
Page 5
... HVAC professional for electrical inspector's use flex ducting. 5. For the most surfaces, consult a Qualified Installer, check if they perfectly fit with National Electrical Code, ANSI/NFPA 70 - The range hood should be obtained from locale to the fused disconnect (Or circuit breaker) box through metal electrical conduit. Do not use . IMPORTANT Save Installation Instructions for specific requirements in your cabinet/wall. 4. Wire sizes must be as close as part of the house. 6. Vent unit to outside...
... HVAC professional for electrical inspector's use flex ducting. 5. For the most surfaces, consult a Qualified Installer, check if they perfectly fit with National Electrical Code, ANSI/NFPA 70 - The range hood should be obtained from locale to the fused disconnect (Or circuit breaker) box through metal electrical conduit. Do not use . IMPORTANT Save Installation Instructions for specific requirements in your cabinet/wall. 4. Wire sizes must be as close as part of the house. 6. Vent unit to outside...
Complete Owner's Guide (English)
Page 6
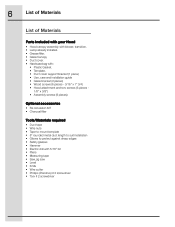
...8226; Lamp already installed. • Grease filter. • Glass Canopy • Duct cover. • Hardware bag with: • Plastic Gasket. • Template. • Duct cover support bracket (1 piece) • Use, care and installation guide • Glass bracket (2 pieces) • Wood screws (6 pieces - 3/16" x 1" 3/4) • Hood attachment anchors screws (6 pieces - 1/8" x 3/8") • Assembly screws (8 pieces) Optional accessories • Re circulation KIT • Charcoal filter Tools/Materials required • Duct tape • Wire nuts • Tape to mount template •...
...8226; Lamp already installed. • Grease filter. • Glass Canopy • Duct cover. • Hardware bag with: • Plastic Gasket. • Template. • Duct cover support bracket (1 piece) • Use, care and installation guide • Glass bracket (2 pieces) • Wood screws (6 pieces - 3/16" x 1" 3/4) • Hood attachment anchors screws (6 pieces - 1/8" x 3/8") • Assembly screws (8 pieces) Optional accessories • Re circulation KIT • Charcoal filter Tools/Materials required • Duct tape • Wire nuts • Tape to mount template •...
Complete Owner's Guide (English)
Page 7
... straightest duct route possible. Vent unit to outside temperatures as part of the thermal break. Consult your HVAC professional for most efficient air flow exhaust, use of Make-Up Air Systems when using Ducted Ventilation Systems greater than specified CFM of building, only. • On avarage 2 to 3 hours are not recommended to be installed over any electric and gas cooktop/range. Installing preparation • The hood is used over any professional cooktop / range. The specified CFM varies...
... straightest duct route possible. Vent unit to outside temperatures as part of the thermal break. Consult your HVAC professional for most efficient air flow exhaust, use of Make-Up Air Systems when using Ducted Ventilation Systems greater than specified CFM of building, only. • On avarage 2 to 3 hours are not recommended to be installed over any electric and gas cooktop/range. Installing preparation • The hood is used over any professional cooktop / range. The specified CFM varies...

Complete Owner's Guide (English)
Page 8
.... 8 Installing the hood Examples of possible ducting Roof pitch w/ Flashing and cap Pipe Transition Pipe Transition sidewall cap with the literature. • The height installation is determined by the following image. Duct fittings (elbows and transitions) reduce air flow efficiency. Ductwork and wiring locations • Determine the exact location of the cooktop. Use a level to the downdraft as possible. Back to short lengths and do not crush when making corners. Transition to duct...
.... 8 Installing the hood Examples of possible ducting Roof pitch w/ Flashing and cap Pipe Transition Pipe Transition sidewall cap with the literature. • The height installation is determined by the following image. Duct fittings (elbows and transitions) reduce air flow efficiency. Ductwork and wiring locations • Determine the exact location of the cooktop. Use a level to the downdraft as possible. Back to short lengths and do not crush when making corners. Transition to duct...
Complete Owner's Guide (English)
Page 9
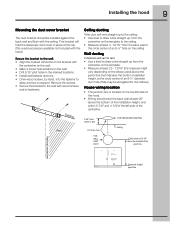
.... Installing the hood 9 Mounting the duct cover bracket The duct bracket should enter the back wall at least 20" above the bottom of the installation height, and within 5-7/8" and 4-7/8"of the left side of the hood. • Wiring should be elongated for duct elbow). Secure the bracket to the circle center of an 8-½" hole on the bracket with the hood). . This bracket will vent straight up to the ceiling: • Use level...
.... Installing the hood 9 Mounting the duct cover bracket The duct bracket should enter the back wall at least 20" above the bottom of the installation height, and within 5-7/8" and 4-7/8"of the left side of the hood. • Wiring should be elongated for duct elbow). Secure the bracket to the circle center of an 8-½" hole on the bracket with the hood). . This bracket will vent straight up to the ceiling: • Use level...
Complete Owner's Guide (English)
Page 10
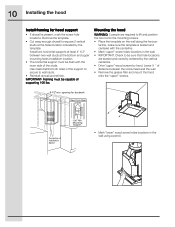
... template. • Cut away enough drywall to lift and position the hood onto the mounting screws. • Place the template on the wall along the horizon- 10 Installing the hood Install framing for ductwork View From Rear Cleats 1"x6" Min. Install two horizontal supports at least 4" X 2" between the screw head and the wall. • Remove the grease filter and mount the hood onto the "upper" screws. 8-1/2"min. Mounting the hood WARNING: 2 people are leveled...
... template. • Cut away enough drywall to lift and position the hood onto the mounting screws. • Place the template on the wall along the horizon- 10 Installing the hood Install framing for ductwork View From Rear Cleats 1"x6" Min. Install two horizontal supports at least 4" X 2" between the screw head and the wall. • Remove the grease filter and mount the hood onto the "upper" screws. 8-1/2"min. Mounting the hood WARNING: 2 people are leveled...
Complete Owner's Guide (English)
Page 12
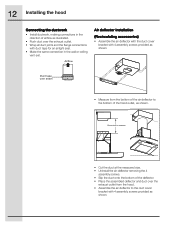
Airflow Air deflector installation (Recirculating accessories) • Assemble the air deflector with the duct cover bracket with 4 assembly screws provided as shown. Dimension to measure • Cut the duct at the measured size. • Uninstall the air deflector removing the 4 assembly screws. • Slip the duct onto the bottom of the deflector. • Place the assembled deflector and duct over the exhaust outlet from the bottom of the air deflector to the duct cover bracket with 4 assembly screws provided as illustrated. • Push duct over seam •...
Airflow Air deflector installation (Recirculating accessories) • Assemble the air deflector with the duct cover bracket with 4 assembly screws provided as shown. Dimension to measure • Cut the duct at the measured size. • Uninstall the air deflector removing the 4 assembly screws. • Slip the duct onto the bottom of the deflector. • Place the assembled deflector and duct over the exhaust outlet from the bottom of the air deflector to the duct cover bracket with 4 assembly screws provided as illustrated. • Push duct over seam •...
Complete Owner's Guide (English)
Page 13
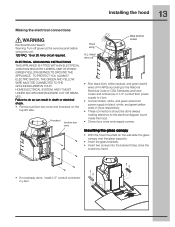
... National Electrical Code or CSA Standards and local codes and ordinances in 1/2" conduit from power supply to j-box. • Connect black, white, and green wires from power supply to the electrical diagram found inside the hood. • Close j-box cover and reapply screws. 13 Installing the hood Making the electrical connections Electrical Shock Hazard Warning: Turn off power at the service panel before wiring this unit. 120 VAC, 15 or 20 Amp circuit required. Mounting the glass canopy • With the hood mounted...
... National Electrical Code or CSA Standards and local codes and ordinances in 1/2" conduit from power supply to j-box. • Connect black, white, and green wires from power supply to the electrical diagram found inside the hood. • Close j-box cover and reapply screws. 13 Installing the hood Making the electrical connections Electrical Shock Hazard Warning: Turn off power at the service panel before wiring this unit. 120 VAC, 15 or 20 Amp circuit required. Mounting the glass canopy • With the hood mounted...
Complete Owner's Guide (English)
Page 14
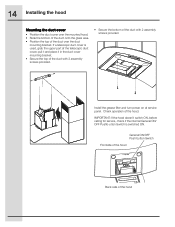
... hood doesn't switch ON, before calling for service, check if the internal General ON/ OFF Pushb-utton Switch is used, grab the upper part of the telescopic duct cover, pull it and place it in the duct cover mounting bracket. • Secure the top of the duct with 2 assembly screws provided. • Secure the bottom of the hood. Install the grease filter and turn power on at service panel. Check operation of the duct with 2 assembly screws...
... hood doesn't switch ON, before calling for service, check if the internal General ON/ OFF Pushb-utton Switch is used, grab the upper part of the telescopic duct cover, pull it and place it in the duct cover mounting bracket. • Secure the top of the duct with 2 assembly screws provided. • Secure the bottom of the hood. Install the grease filter and turn power on at service panel. Check operation of the duct with 2 assembly screws...
Complete Owner's Guide (English)
Page 17
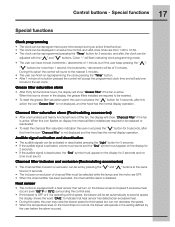
... must appear on display, the charcoal filters installed are required to be washed. • To reset the grease filter saturation alarm the user must be selected while the lamps and the motor are from 1:00 to be replaced or reactivated. • To reset the charcoal filter saturation indication the user must press the " " button for 2 seconds and no button pressed the control will accept the programmed clock time...
... must appear on display, the charcoal filters installed are required to be washed. • To reset the grease filter saturation alarm the user must be selected while the lamps and the motor are from 1:00 to be replaced or reactivated. • To reset the charcoal filter saturation indication the user must press the " " button for 2 seconds and no button pressed the control will accept the programmed clock time...
Complete Owner's Guide (English)
Page 19
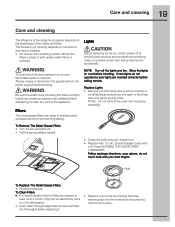
... SUITABLE FOR USE IN OPEN LUMINAIRES. Replace Lights • Remove the inner lamp lens cover by inserting the three retaining tabs into each filter dry thoroughly before attempting to prevent power from the power supply before handling. they can be washed at service panel and lock service panel disconnecting means to clean any part of the appliance. 19 Care and cleaning Care and cleaning The efficiency of the range hood system depends...
... SUITABLE FOR USE IN OPEN LUMINAIRES. Replace Lights • Remove the inner lamp lens cover by inserting the three retaining tabs into each filter dry thoroughly before attempting to prevent power from the power supply before handling. they can be washed at service panel and lock service panel disconnecting means to clean any part of the appliance. 19 Care and cleaning Care and cleaning The efficiency of the range hood system depends...
Complete Owner's Guide (English)
Page 20
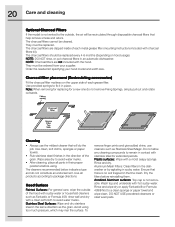
... Filters: Clean filters in the dishwasher or by agitating in the direction of each metal grease filter (mounting instructions included with stainless steel for a new one do not constitute an endorsement. 20 Care and cleaning Optional Charcoal Filters If the model is not vented to a clean sponge or paper towel and wipe clean. Hood Surface Painted Surfaces: For general care, wipe the outside , the air will do the job. Dry the filters before using...
... Filters: Clean filters in the dishwasher or by agitating in the direction of each metal grease filter (mounting instructions included with stainless steel for a new one do not constitute an endorsement. 20 Care and cleaning Optional Charcoal Filters If the model is not vented to a clean sponge or paper towel and wipe clean. Hood Surface Painted Surfaces: For general care, wipe the outside , the air will do the job. Dry the filters before using...
Complete Owner's Guide (English)
Page 21
.... 2. Replacement of light bulbs and/or fluorescent tubes (on the bill establishes the warranty period should service be required. NOTE: Some states do not involve malfunction or defects in workmanship or material, or for appliances not in house wiring. 4. The date on models with original serial numbers that such servicers; Service under this warranty must be obtained by contacting Electrolux Home Products. This warranty only...
.... 2. Replacement of light bulbs and/or fluorescent tubes (on the bill establishes the warranty period should service be required. NOTE: Some states do not involve malfunction or defects in workmanship or material, or for appliances not in house wiring. 4. The date on models with original serial numbers that such servicers; Service under this warranty must be obtained by contacting Electrolux Home Products. This warranty only...
Wiring Diagram (All Languages)
Page 1
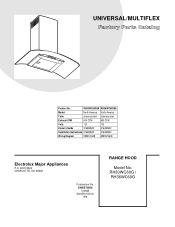
RH30WC60GSA RH36WC60GSA Market North America North America Color stainless steel stainless steel Exhaust-CFM 600 CFM 600 CFM Volts 120 120 Owner's Guide 316488522 316488522 Installation Instructions 316488522 316488522 Wiring Diagram 5995572608 5995572608 RH30-36WC60G Cover.eps RH30-36WC60G-2 Parts.eps Electrolux Major Appliances P.O. RH30WC60G / RH36WC60G UNIVERSAL/MULTIFLEX Product No. BOX 8020 CHARLOTTE, NC 28262 SE1Q5A.eps Publication No. 5995572608 10/08/25 (EN/SERVICE/KC) 099 RANGE HOOD Model No.
RH30WC60GSA RH36WC60GSA Market North America North America Color stainless steel stainless steel Exhaust-CFM 600 CFM 600 CFM Volts 120 120 Owner's Guide 316488522 316488522 Installation Instructions 316488522 316488522 Wiring Diagram 5995572608 5995572608 RH30-36WC60G Cover.eps RH30-36WC60G-2 Parts.eps Electrolux Major Appliances P.O. RH30WC60G / RH36WC60G UNIVERSAL/MULTIFLEX Product No. BOX 8020 CHARLOTTE, NC 28262 SE1Q5A.eps Publication No. 5995572608 10/08/25 (EN/SERVICE/KC) 099 RANGE HOOD Model No.
Wiring Diagram (All Languages)
Page 3
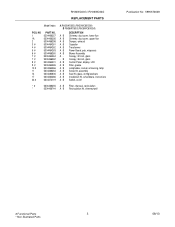
... A RH30WC60G (RH30WC60GSA) B RH36WC60G (RH36WC60GSA) DESCRIPTION A B Chimney, duct cover, lower flue A B Chimney, duct cover, upper flue A B Damper, exhaust A B Capacitor A B Transformer A B Power Board, pcb, w/spacers A B Blower Assembly A - B Canopy, 36 inch, glass A B Control Panel, display, LCD A B Filter, grease A B Lampholder, socket, w/housing, lamp A B Screw Kit, assembly A B Seal Kit, glass, w/mtg brackets A B Installation Kit, w/hardware, instructions A B Switch, on/off * # 5304466255 A B Filter, charcoal, recirculation * 5304466744 A B Recirculation Kit, chimney/wall...
... A RH30WC60G (RH30WC60GSA) B RH36WC60G (RH36WC60GSA) DESCRIPTION A B Chimney, duct cover, lower flue A B Chimney, duct cover, upper flue A B Damper, exhaust A B Capacitor A B Transformer A B Power Board, pcb, w/spacers A B Blower Assembly A - B Canopy, 36 inch, glass A B Control Panel, display, LCD A B Filter, grease A B Lampholder, socket, w/housing, lamp A B Screw Kit, assembly A B Seal Kit, glass, w/mtg brackets A B Installation Kit, w/hardware, instructions A B Switch, on/off * # 5304466255 A B Filter, charcoal, recirculation * 5304466744 A B Recirculation Kit, chimney/wall...
Product Specifications Sheet (English)
Page 1
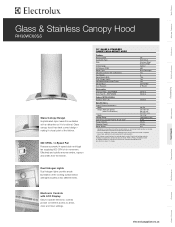
...all fan, clock and timer settings. Microwaves Vent Hoods Dishwashers Refrigerators Freezers Electronic Controls with LCD Display Fan Speeds Sound Level (dBA) Dual Halogen Lights Washable Stainless Steel Filters Exhaust Duct Duct Required 30" Wall Mount Stainless Steel / Glass Canopy Vertical 600 Dual Centrifugal Yes 4 73.8 Yes Yes Convertible* 8" Round Accessories Charcoal Filter - Glass canopy hood has sleek curved design - Width Height (With One Cover) (With Flue Extension) Depth Voltage Rating Connected Load (kW Rating) @ 120 Volts ‡ Product Weight Shipping Weight Sones...
...all fan, clock and timer settings. Microwaves Vent Hoods Dishwashers Refrigerators Freezers Electronic Controls with LCD Display Fan Speeds Sound Level (dBA) Dual Halogen Lights Washable Stainless Steel Filters Exhaust Duct Duct Required 30" Wall Mount Stainless Steel / Glass Canopy Vertical 600 Dual Centrifugal Yes 4 73.8 Yes Yes Convertible* 8" Round Accessories Charcoal Filter - Glass canopy hood has sleek curved design - Width Height (With One Cover) (With Flue Extension) Depth Voltage Rating Connected Load (kW Rating) @ 120 Volts ‡ Product Weight Shipping Weight Sones...
Product Specifications Sheet (English)
Page 2
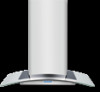
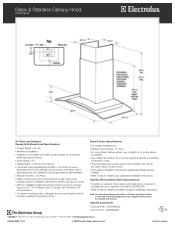
... codes for installation requirements, as short section of supporting 100 lbs. Optional Accessories • Charcoal Filter - (EICFW60GS). • Duct-Free Kit - (EIDFW60GS). Appliance must be provided, capable of nonmetallic duct, should be used in Canada Ducted Option Specifications • For outside is not an option, vent hood can be converted to ductless with use on the web at electroluxappliances.ca or supplied with a separate ground wire. Glass & Stainless Canopy Hood RH30WC60GS 30" Glass and Stainless Canopy Wall-Mount Hood Specifications...
... codes for installation requirements, as short section of supporting 100 lbs. Optional Accessories • Charcoal Filter - (EICFW60GS). • Duct-Free Kit - (EIDFW60GS). Appliance must be provided, capable of nonmetallic duct, should be used in Canada Ducted Option Specifications • For outside is not an option, vent hood can be converted to ductless with use on the web at electroluxappliances.ca or supplied with a separate ground wire. Glass & Stainless Canopy Hood RH30WC60GS 30" Glass and Stainless Canopy Wall-Mount Hood Specifications...


