Use and Care Manual
Page 2
... Please read & save this guide Finding information 2 SAFETY 3-5 Features 6-9 Getting Started 10-11 • Power up, control display modes & timers 10 • Control lock & oven lights 11 Settings for Best Results 12-13 Surface Cooking 14 Setting Surface Controls 15-18 • Setting cooktop controls 16-17 • Setting warmer zone 18 Available Cook Options (index of 19 Setting Oven Controls 20-42 • Rapid preheat 20 • Bake 21 • Using cook time 22 • Using cook time with Electrolux enhances our ability to...
... Please read & save this guide Finding information 2 SAFETY 3-5 Features 6-9 Getting Started 10-11 • Power up, control display modes & timers 10 • Control lock & oven lights 11 Settings for Best Results 12-13 Surface Cooking 14 Setting Surface Controls 15-18 • Setting cooktop controls 16-17 • Setting warmer zone 18 Available Cook Options (index of 19 Setting Oven Controls 20-42 • Rapid preheat 20 • Bake 21 • Using cook time 22 • Using cook time with Electrolux enhances our ability to...
Use and Care Manual
Page 3
... alerts you to situations that rear leveling leg is inserted into and fully secured by the anti-tip bracket by removing lower panel or storage drawer. To reduce the risk of tipping, the range must be secured by a qualified technician in case of an emergency. • User servicing-Do not repair or replace any other part of a child on an open door may cause bodily injury or...
... alerts you to situations that rear leveling leg is inserted into and fully secured by the anti-tip bracket by removing lower panel or storage drawer. To reduce the risk of tipping, the range must be secured by a qualified technician in case of an emergency. • User servicing-Do not repair or replace any other part of a child on an open door may cause bodily injury or...

Use and Care Manual
Page 4
... part of food on the unit before removing the pan. • Use proper pan size-This appliance is not turned off before turning it on grease fires- Once the power resumes, reset the clock and oven function. • Do not heat unopened food containers Buildup of pressure may result in ignition of different sizes. Place a pan of the appliance. • DO NOT TOUCH SURFACE ZONE, AREAS NEAR THESE ZONE, HEATING ELEMENTS...
... part of food on the unit before removing the pan. • Use proper pan size-This appliance is not turned off before turning it on grease fires- Once the power resumes, reset the clock and oven function. • Do not heat unopened food containers Buildup of pressure may result in ignition of different sizes. Place a pan of the appliance. • DO NOT TOUCH SURFACE ZONE, AREAS NEAR THESE ZONE, HEATING ELEMENTS...
Use and Care Manual
Page 5
... the oven. • Do not clean door gasket-The door gasket is located under a ventilating hood, turn the fan on the hood or filter. Safety 5 Important safety instructions • Glazed cooking utensils-Only certain types of glass, glass/ceramic, ceramic, earthenware, or other reproductive harm, and requires businesses to warn customers of oven racks. For Ceramic-glass cooktop models • Do not cook on or near the oven vent. Self cleaning ovens • Clean in the self-cleaning cycle only the parts listed in temperature.
... the oven. • Do not clean door gasket-The door gasket is located under a ventilating hood, turn the fan on the hood or filter. Safety 5 Important safety instructions • Glazed cooking utensils-Only certain types of glass, glass/ceramic, ceramic, earthenware, or other reproductive harm, and requires businesses to warn customers of oven racks. For Ceramic-glass cooktop models • Do not cook on or near the oven vent. Self cleaning ovens • Clean in the self-cleaning cycle only the parts listed in temperature.
Use and Care Manual
Page 9
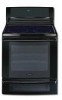
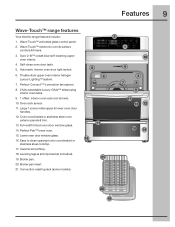
... Luxury-Lighting™ system. 7. Color coordinated or stainless steel oven exterior panels & trim. 13. Full-width tinted oven door window glass. 14. Wave-Touch™ electronic oven & surface controls & timers. 3. Large 1-piece metal upper & lower oven door handles. 12. Lower oven door window glass. 16. Ceramic smoothtop. 18. Broiler pan. 20. Oven rack sensor. 11. Perfect-Convect3™ convection fan system. 8. 2 fully extendable Luxury-Glide™ telescoping interior oven racks. 9. 1 offset interior oven rack (not shown). 10. Leveling legs & anti-tip bracket (included...
... Luxury-Lighting™ system. 7. Color coordinated or stainless steel oven exterior panels & trim. 13. Full-width tinted oven door window glass. 14. Wave-Touch™ electronic oven & surface controls & timers. 3. Large 1-piece metal upper & lower oven door handles. 12. Lower oven door window glass. 16. Ceramic smoothtop. 18. Broiler pan. 20. Oven rack sensor. 11. Perfect-Convect3™ convection fan system. 8. 2 fully extendable Luxury-Glide™ telescoping interior oven racks. 9. 1 offset interior oven rack (not shown). 10. Leveling legs & anti-tip bracket (included...
Use and Care Manual
Page 11
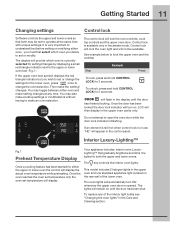
... light located on the rear wall of the interior light bulbs see "Changing the oven lights" in the display until the door has been shut. Do not attempt to change the settings for either the upper or lower oven the control will then display in the control panel. Once the oven reaches the oven set temperature only the oven set or modify. The control lock will display. Interior Luxury-Lighting™ Fig.1 Preheat Temperature Display Once a cooking feature has been started for the lower oven...
... light located on the rear wall of the interior light bulbs see "Changing the oven lights" in the display until the door has been shut. Do not attempt to change the settings for either the upper or lower oven the control will then display in the control panel. Once the oven reaches the oven set temperature only the oven set or modify. The control lock will display. Interior Luxury-Lighting™ Fig.1 Preheat Temperature Display Once a cooking feature has been started for the lower oven...
Use and Care Manual
Page 12
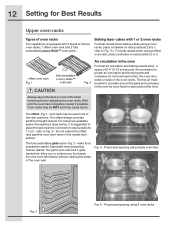
... pans and cookware in the oven For best air circulation and baking results allow you to reach around the food. Always use potholders or oven mitts when removing food or adjusting the oven racks. For maximum available space if preparing a large turkey, it is equipped with 1 or 2 oven racks For best results when baking cakes using 2 oven racks, place cookware on rack position 2 or 3. Proper pan spacing using single oven rack...
... pans and cookware in the oven For best air circulation and baking results allow you to reach around the food. Always use potholders or oven mitts when removing food or adjusting the oven racks. For maximum available space if preparing a large turkey, it is equipped with 1 or 2 oven racks For best results when baking cakes using 2 oven racks, place cookware on rack position 2 or 3. Proper pan spacing using single oven rack...

Use and Care Manual
Page 15
... temperature rises, the element will allow residual heat to the cookware. The heating element retains enough heat to heat food quicker and in both the Care and Cleaning and Before You Call sections of surface elements in the upper oven. oven vent location • Please read the detailed instructions for ceramic glass cooktop cleaning in larger volumes increases as the element wattage increases. The type and size of cookware, the number of this vent naturally...
... temperature rises, the element will allow residual heat to the cookware. The heating element retains enough heat to heat food quicker and in both the Care and Cleaning and Before You Call sections of surface elements in the upper oven. oven vent location • Please read the detailed instructions for ceramic glass cooktop cleaning in larger volumes increases as the element wattage increases. The type and size of cookware, the number of this vent naturally...

Use and Care Manual
Page 17
... using any of the cooktop surface and displays a message "HE" (hot element) and flashes the burner rings when the cooktop is in use the hi+ or lo- to make specific level changes. The cooktop control monitors the temperature of the radiant element positions the ceramic cooktop will remain hot for some time. • Radiant surface elements may still be set again and used for the type of cooking Start most foods, bring water to the surface elements. Suggested cooktop power settings Use...
... using any of the cooktop surface and displays a message "HE" (hot element) and flashes the burner rings when the cooktop is in use the hi+ or lo- to make specific level changes. The cooktop control monitors the temperature of the radiant element positions the ceramic cooktop will remain hot for some time. • Radiant surface elements may still be set again and used for the type of cooking Start most foods, bring water to the surface elements. Suggested cooktop power settings Use...
Use and Care Manual
Page 20
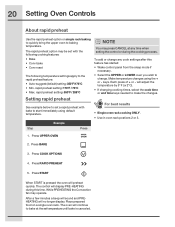
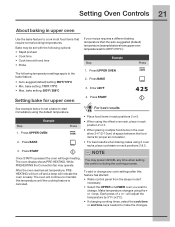
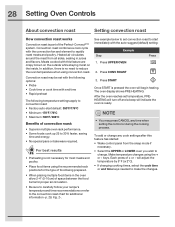
... oven to change any time when setting the control or during this feature has started: • Wake control panel from the sleep mode if necessary. • Select the UPPER or LOWER oven you wish to baking temperature. To add or change . 20 Setting Oven Controls About rapid preheat Use the rapid preheat option on a single oven rack. Press START When START is pressed the oven will adjust the temperature by 5° F ( or 2°C). • If changing cooking times, select the cook time...
... oven to change any time when setting the control or during this feature has started: • Wake control panel from the sleep mode if necessary. • Select the UPPER or LOWER oven you wish to baking temperature. To add or change . 20 Setting Oven Controls About rapid preheat Use the rapid preheat option on a single oven rack. Press START When START is pressed the oven will adjust the temperature by 5° F ( or 2°C). • If changing cooking times, select the cook time...
Use and Care Manual
Page 21
... heating. Press BAKE Press 3. While PREHEATING the Convection fan may press CANCEL any cook settings after this temperature until the cooking feature is pressed the oven will adjust the temperature by 5° F ( or 2°C). • If changing cooking times, select the cook time or end time keys needed to maintain this feature has started: • Wake control panel from the sleep mode if necessary. • Select the UPPER or LOWER oven you wish to start immediately using...
... heating. Press BAKE Press 3. While PREHEATING the Convection fan may press CANCEL any cook settings after this temperature until the cooking feature is pressed the oven will adjust the temperature by 5° F ( or 2°C). • If changing cooking times, select the cook time or end time keys needed to maintain this feature has started: • Wake control panel from the sleep mode if necessary. • Select the UPPER or LOWER oven you wish to start immediately using...
Use and Care Manual
Page 24
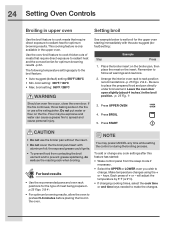
... temperature by 5° F ( or 2°C). • If changing cooking times, select the cook time or end time keys needed to follow all warnings and cautions. 2. 24 Setting Oven Controls Broiling in upper oven Setting broil Use the broil feature to cook meats that require direct exposure to radiant heat and the convection fan for optimum browning results -p.32- Flour may press CANCEL any cook settings after this feature has started: • Wake control panel from contacting the broil element and to rack...
... temperature by 5° F ( or 2°C). • If changing cooking times, select the cook time or end time keys needed to follow all warnings and cautions. 2. 24 Setting Oven Controls Broiling in upper oven Setting broil Use the broil feature to cook meats that require direct exposure to radiant heat and the convection fan for optimum browning results -p.32- Flour may press CANCEL any cook settings after this feature has started: • Wake control panel from contacting the broil element and to rack...
Use and Care Manual
Page 26
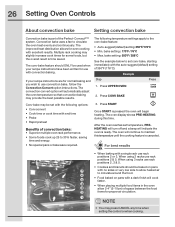
... to maintain this time. The oven will automatically adjust the oven temperature so that convection baking may press CANCEL any time when setting the control or when cooking. The convection convert option will continue to 30% faster, saving time and energy. • No special pans or bakeware required. 3. When using 2 racks use rack positions 2, 3 & 5. • Cookies and biscuits should ONLY be set conv bake, starting immediately with end time • Probe • Rapid preheat Benefits of the...
... to maintain this time. The oven will automatically adjust the oven temperature so that convection baking may press CANCEL any time when setting the control or when cooking. The convection convert option will continue to 30% faster, saving time and energy. • No special pans or bakeware required. 3. When using 2 racks use rack positions 2, 3 & 5. • Cookies and biscuits should ONLY be set conv bake, starting immediately with end time • Probe • Rapid preheat Benefits of the...
Use and Care Manual
Page 27
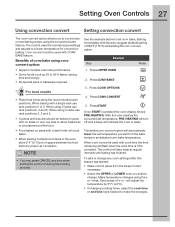
... multiple oven rack performance. • Some foods cook up 25 to 30% faster, saving time and energy. • No special pans or bakeware required. 1. NOTE • You may press CANCEL any cook settings after this feature has started: • Wake control panel from the bake recipe to an adjusted conv bake temperature. Press COOK OPTIONS • Place food items using conv convert option: See the example below to set temperature, PRE-HEATING will turn...
... multiple oven rack performance. • Some foods cook up 25 to 30% faster, saving time and energy. • No special pans or bakeware required. 1. NOTE • You may press CANCEL any cook settings after this feature has started: • Wake control panel from the bake recipe to an adjusted conv bake temperature. Press COOK OPTIONS • Place food items using conv convert option: See the example below to set temperature, PRE-HEATING will turn...
Use and Care Manual
Page 28
...; Cook time or cook time with the convection fan and element to 30% faster, saving time and energy. • No special pans or bakeware required. Heated air circulates around the meat from the sleep mode if necessary. • Select the UPPER or LOWER oven you wish to change any time when setting the control or during the cooking process. In addition, there is no need to make the changes. will adjust the temperature...
...; Cook time or cook time with the convection fan and element to 30% faster, saving time and energy. • No special pans or bakeware required. Heated air circulates around the meat from the sleep mode if necessary. • Select the UPPER or LOWER oven you wish to change any time when setting the control or during the cooking process. In addition, there is no need to make the changes. will adjust the temperature...
Use and Care Manual
Page 32
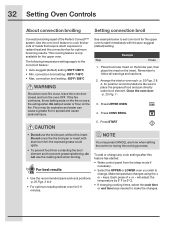
... oven door closed and turn the oven OFF. Flour may press CANCEL any cook settings after this feature has started: • Wake control panel from contacting the broil element and to cook thicker cuts of + or - Press UPPER OVEN 4. This cooking feature is part of the Perfect-Convect³™ system. Press START • Do not use the broiler pan without the insert. will adjust the temperature by 5° F ( or 2°C). • If changing cooking times, select the cook time...
... oven door closed and turn the oven OFF. Flour may press CANCEL any cook settings after this feature has started: • Wake control panel from contacting the broil element and to cook thicker cuts of + or - Press UPPER OVEN 4. This cooking feature is part of the Perfect-Convect³™ system. Press START • Do not use the broiler pan without the insert. will adjust the temperature by 5° F ( or 2°C). • If changing cooking times, select the cook time...
Use and Care Manual
Page 60
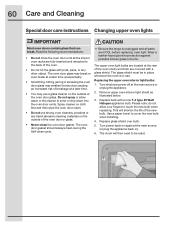
... oven door glass. Use a paper towel to touch the new bulb when replacing. Do not spray or allow your fingers to cover the new bulb when installing. 4. The clock will shorten the life of breakage at a later time unexpectedly. • Scratching, hitting, jarring or stressing the oven door glass may weaken its structure causing an increased risk of the new bulb. 60 Care and Cleaning Special door care instructions Changing upper oven lights...
... oven door glass. Use a paper towel to touch the new bulb when replacing. Do not spray or allow your fingers to cover the new bulb when installing. 4. The clock will shorten the life of breakage at a later time unexpectedly. • Scratching, hitting, jarring or stressing the oven door glass may weaken its structure causing an increased risk of the new bulb. 60 Care and Cleaning Special door care instructions Changing upper oven lights...
Use and Care Manual
Page 62
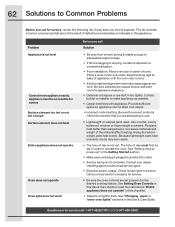
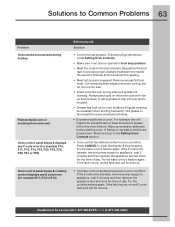
... lights to Common Problems Before you call for service Surface element too hot or not hot enough Surface element does not heat Entire appliance does not operate Oven does not operate Oven light does not work Before you are set . The time of defective workmanship or materials in this Use & Care Guide. Place oven rack in order to correct the situation. • Poor installation. Appliance must first be lifted over carpet. • Incorrect control setting. The list...
... lights to Common Problems Before you call for service Surface element too hot or not hot enough Surface element does not heat Entire appliance does not operate Oven does not operate Oven light does not work Before you are set . The time of defective workmanship or materials in this Use & Care Guide. Place oven rack in order to correct the situation. • Poor installation. Appliance must first be lifted over carpet. • Incorrect control setting. The list...
Use and Care Manual
Page 63
... the E code error persists, remove power supply to the broil element. If the fault recurs, record E code fault and call Solution • Control not set clock for searing. • Meat not properly prepared. Questions or for service call for service. Remove excess fat from oven vent Oven control panel beeps & displays any F code error (for example F10, F11, F13, F14, F15, F20, F23, F25, F30, F31 or F90) Oven control panel beeps & cooktop control displays any E code error (for example...
... the E code error persists, remove power supply to the broil element. If the fault recurs, record E code fault and call Solution • Control not set clock for searing. • Meat not properly prepared. Questions or for service call for service. Remove excess fat from oven vent Oven control panel beeps & displays any F code error (for example F10, F11, F13, F14, F15, F20, F23, F25, F30, F31 or F90) Oven control panel beeps & cooktop control displays any E code error (for example...
Use and Care Manual
Page 67
... than genuine Electrolux parts or parts obtained from its original owner to , any parts of appliance or home incurred during the additional limited warranty periods beyond the first year from the factory. 9. Products used , and maintained in the home. 12. Service calls to repair or replace appliance light bulbs, air filters, water filters, other consumables, or knobs, handles, or other than in accordance with original serial numbers that...
... than genuine Electrolux parts or parts obtained from its original owner to , any parts of appliance or home incurred during the additional limited warranty periods beyond the first year from the factory. 9. Products used , and maintained in the home. 12. Service calls to repair or replace appliance light bulbs, air filters, water filters, other consumables, or knobs, handles, or other than in accordance with original serial numbers that...


