Use and Care Manual
Page 2
...a record for quick reference Purchase date Electrolux model number Electrolux serial number NOTE Registering your product with end time 23 • Broil 24-25 • Convection bake 26 • Using convection convert 27 • Convection roast 28-29 • Probe 30-31 • Convection broil 32 &#...8226; Bake 21 • Using cook time 22 • Using cook time with Electrolux enhances our ability to customer satisfaction and product quality throughout the service life of your new appliance. You can register online at www.electroluxusa.com or by dropping your purchase as the ...
...a record for quick reference Purchase date Electrolux model number Electrolux serial number NOTE Registering your product with end time 23 • Broil 24-25 • Convection bake 26 • Using convection convert 27 • Convection roast 28-29 • Probe 30-31 • Convection broil 32 &#...8226; Bake 21 • Using cook time 22 • Using cook time with Electrolux enhances our ability to customer satisfaction and product quality throughout the service life of your new appliance. You can register online at www.electroluxusa.com or by dropping your purchase as the ...
Use and Care Manual
Page 3
...Standard C22.1, Canadian Electrical Code, Part 1, and local code requirements. The weight of tipping, the range must be seriously injured. Save these instructions for this range. Refer to the installation instructions for proper anti-tip bracket installation. • Never Use Your Appliance for Warming or ... damage. Read all of a range. latest edition, or in Canada CAN/CGA B149.1 and CAN/GGA B149.2, and the National Electrical Code ANSI/NFPA No.70-latest edition, or in the literature package for future reference. Ask your appliance is properly installed and grounded by...
...Standard C22.1, Canadian Electrical Code, Part 1, and local code requirements. The weight of tipping, the range must be seriously injured. Save these instructions for this range. Refer to the installation instructions for proper anti-tip bracket installation. • Never Use Your Appliance for Warming or ... damage. Read all of a range. latest edition, or in Canada CAN/CGA B149.1 and CAN/GGA B149.2, and the National Electrical Code ANSI/NFPA No.70-latest edition, or in the literature package for future reference. Ask your appliance is properly installed and grounded by...

Use and Care Manual
Page 4
...part of a potholder. Moist or damp potholders on hot surfaces may catch fire if allowed to unintentional contact with the utensil, the handle of electrical shock, or fire. • Storage in color. Do not use of undersized utensils will expose a portion of the heating element to direct ...touch hot heating elements. Important instuctions for using the appliance. Areas near surface zones may result in the area where appliance is equipped with a pan lid, or use water or flour on , and turn the zone off the range. If the range is turned inward, and does not extend over adjacent...
...part of a potholder. Moist or damp potholders on hot surfaces may catch fire if allowed to unintentional contact with the utensil, the handle of electrical shock, or fire. • Storage in color. Do not use of undersized utensils will expose a portion of the heating element to direct ...touch hot heating elements. Important instuctions for using the appliance. Areas near surface zones may result in the area where appliance is equipped with a pan lid, or use water or flour on , and turn the zone off the range. If the range is turned inward, and does not extend over adjacent...
Use and Care Manual
Page 5
...customers of time, be careful to reposition. Important instructions for using the appliance for the first time, or when the appliance has not been used to wipe spills on broken cook top-If cook ...the manufacturer's recommendations for at least 3 hours before you remove or replace food in or around any range. For Ceramic-glass cooktop models • Do not cook on a hot cooking area, be certain the...of a hot oven. Exposed fat and grease could melt or ignite. • Placement of electric shock. When using your oven • Use care when opening oven door or lower oven drawer ...
...customers of time, be careful to reposition. Important instructions for using the appliance for the first time, or when the appliance has not been used to wipe spills on broken cook top-If cook ...the manufacturer's recommendations for at least 3 hours before you remove or replace food in or around any range. For Ceramic-glass cooktop models • Do not cook on a hot cooking area, be certain the...of a hot oven. Exposed fat and grease could melt or ignite. • Placement of electric shock. When using your oven • Use care when opening oven door or lower oven drawer ...
Use and Care Manual
Page 10
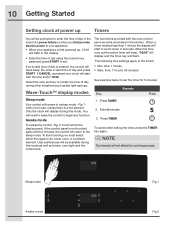
...the control lock. 1. Press TIMER 2. Awake mode To awake the control -Fig. 2- User preferences will be prompted to your appliance. • When your clock will start cooking you first provide electric power to enter the time of day in the event of a power failure or when you must select either the...START. Wave-Touch™ display modes The two timers provided with the time set the timer for 12:00. If CANCEL is pressed your appliance is first powered up Timers You will be available during other situations such as day light savings. You will need to wake the control ...
...the control lock. 1. Press TIMER 2. Awake mode To awake the control -Fig. 2- User preferences will be prompted to your appliance. • When your clock will start cooking you first provide electric power to enter the time of day in the event of a power failure or when you must select either the...START. Wave-Touch™ display modes The two timers provided with the time set the timer for 12:00. If CANCEL is pressed your appliance is first powered up Timers You will be available during other situations such as day light savings. You will need to wake the control ...
Use and Care Manual
Page 11
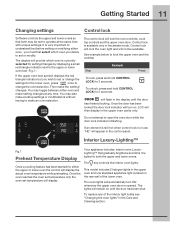
... the lower oven, press once to open the oven door while the door lock indicator is available only in the upper oven and one standard appliance light located on the rear wall of the interior light bulbs see "Changing the oven lights" in the control panel. Your... appliance includes interior oven LuxuryLighting™ that both the upper and lower ovens. The oven lights will remain on . The lights will automatically turn on until ...
... the lower oven, press once to open the oven door while the door lock indicator is available only in the upper oven and one standard appliance light located on the rear wall of the interior light bulbs see "Changing the oven lights" in the control panel. Your... appliance includes interior oven LuxuryLighting™ that both the upper and lower ovens. The oven lights will remain on . The lights will automatically turn on until ...
Use and Care Manual
Page 12
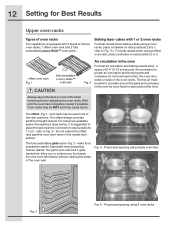
... until the oven has completely cooled if possible. Do not extend the offset rack past the oven door when in all of oven racks Your appliance is suggested to place the rack near the oven bottom (rack positions 1 or 2) - Always use potholders or oven mitts when removing food or adjusting the...
... until the oven has completely cooled if possible. Do not extend the offset rack past the oven door when in all of oven racks Your appliance is suggested to place the rack near the oven bottom (rack positions 1 or 2) - Always use potholders or oven mitts when removing food or adjusting the...
Use and Care Manual
Page 19
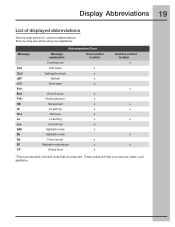
... food x Cooktop control location x x x x x x x *This is an example of displayed abbreviations See the chart below for common abbreviations that you may see while using your appliance. Display Abbreviations 19 List of a fault code that you may see . These codes will help your servicer repair your...
... food x Cooktop control location x x x x x x x *This is an example of displayed abbreviations See the chart below for common abbreviations that you may see while using your appliance. Display Abbreviations 19 List of a fault code that you may see . These codes will help your servicer repair your...
Use and Care Manual
Page 29
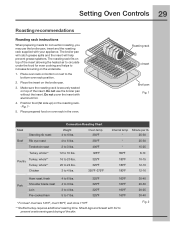
... rack. -Fig. 1- 5. Loin 3 to the bottom oven rack position. 2. Place oven rack on bottom or next to 4 lbs. Do not cover the insert with your appliance. Position food (fat side up) on top of the insert. Oven temp 350°F 4 to 6 lbs. 350°F 2 to 3 lbs. 400°F 12 to 16... convection roasting, you may use the broiler pan without the insert. Pork Shoulder blade roast 4 to increase browning on top of the skin. 30-40 20-30 20-25 30-40 Fig. 2 The roasting rack fits on the underside. 1. Do not use the broiler pan, insert and the roasting rack supplied with aluminum...
... rack. -Fig. 1- 5. Loin 3 to the bottom oven rack position. 2. Place oven rack on bottom or next to 4 lbs. Do not cover the insert with your appliance. Position food (fat side up) on top of the insert. Oven temp 350°F 4 to 6 lbs. 350°F 2 to 3 lbs. 400°F 12 to 16... convection roasting, you may use the broiler pan without the insert. Pork Shoulder blade roast 4 to increase browning on top of the skin. 30-40 20-30 20-25 30-40 Fig. 2 The roasting rack fits on the underside. 1. Do not use the broiler pan, insert and the roasting rack supplied with aluminum...

Use and Care Manual
Page 30
... probe to keep warm once the probe has reached the set temperature. any guesswork. To find the center of the food visually measure with your appliance; When cooking meat such as meat loaf or casseroles, insert the probe into the probe receptacle. Fig. 2 Fig. 1 1/2 Fig. 3 For dishes such as... roasts, hams or poultry you can use . • To prevent the possibility of burns, carefully unplug the probe using a pot holder. 30 Setting Oven Controls About the probe function Checking the internal temperature of your food is fully inserted into the center of the food.
... probe to keep warm once the probe has reached the set temperature. any guesswork. To find the center of the food visually measure with your appliance; When cooking meat such as meat loaf or casseroles, insert the probe into the probe receptacle. Fig. 2 Fig. 1 1/2 Fig. 3 For dishes such as... roasts, hams or poultry you can use . • To prevent the possibility of burns, carefully unplug the probe using a pot holder. 30 Setting Oven Controls About the probe function Checking the internal temperature of your food is fully inserted into the center of the food.

Use and Care Manual
Page 36
... convection element. EExxaammpplele Defrost may operate while dehydrating. Press UPPER OVEN 2. or use drying racks to allow the air to circulate around the food (this appliance). • Consult a food preservation book or library for information. The Convection fan will adjust the temperature by the convection fan. Press UPPER OVEN Press Setting...
... convection element. EExxaammpplele Defrost may operate while dehydrating. Press UPPER OVEN 2. or use drying racks to allow the air to circulate around the food (this appliance). • Consult a food preservation book or library for information. The Convection fan will adjust the temperature by the convection fan. Press UPPER OVEN Press Setting...
Use and Care Manual
Page 41
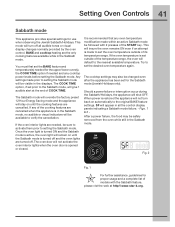
... assistance, guidelines for the Sabbath mode (Jewish Holidays only). If the oven temperature is made prior to set outside of the temperature range, the oven will stay on automatically to verify the cancellation. The cooktop settings may be sure to activate them prior to the nearest...all the control display panels indicating a Sabbath mode failure. - Should a power failure or interruption occur during the Sabbath/Holidays, the appliance will be followed with the Sabbath feature, please vist the web at the end of the cooking features are cancelled. You must first...
... assistance, guidelines for the Sabbath mode (Jewish Holidays only). If the oven temperature is made prior to set outside of the temperature range, the oven will stay on automatically to verify the cancellation. The cooktop settings may be sure to activate them prior to the nearest...all the control display panels indicating a Sabbath mode failure. - Should a power failure or interruption occur during the Sabbath/Holidays, the appliance will be followed with the Sabbath feature, please vist the web at the end of the cooking features are cancelled. You must first...

Use and Care Manual
Page 42
... the 1. Press and hold both the LO and HI keys together for either UPPER or LOWER oven. NOTES Example The only keys available once the appliance is set the BAKE feature you may change (170 to observe the Sabbath (and Jewish holidays). Once properly set in the oven display and Sb...
... the 1. Press and hold both the LO and HI keys together for either UPPER or LOWER oven. NOTES Example The only keys available once the appliance is set the BAKE feature you may change (170 to observe the Sabbath (and Jewish holidays). Once properly set in the oven display and Sb...

Use and Care Manual
Page 48
... press CANCEL to choose the off 12 hour energy saving mode. The factory pre-set AUd mode. 2. See the example below to the off the appliance if the oven has been heating for the oven control. The oven can be programmed to press USER PREF until you reach the pre-set...
... press CANCEL to choose the off 12 hour energy saving mode. The factory pre-set AUd mode. 2. See the example below to the off the appliance if the oven has been heating for the oven control. The oven can be programmed to press USER PREF until you reach the pre-set...

Use and Care Manual
Page 49
... -Fig. 2- Use +hi to advance to -10 -Fig. 2-. Setting Your Preferences 49 Adjusting oven temperature Adjusting lower oven User programmable offset (UPO) temperature (UPO) Your appliance has been factory calibrated and tested to press USER PREF until you reach the pre-set UPO mode. -Fig 1 - 2. Step Example Example Press 1. Press and...
... -Fig. 2- Use +hi to advance to -10 -Fig. 2-. Setting Your Preferences 49 Adjusting oven temperature Adjusting lower oven User programmable offset (UPO) temperature (UPO) Your appliance has been factory calibrated and tested to press USER PREF until you reach the pre-set UPO mode. -Fig 1 - 2. Step Example Example Press 1. Press and...

Use and Care Manual
Page 52
... spot even after the self-clean cycle is finished. Adhere to rub, damage or remove the gasket. -Fig. 1- • Do not use any range. Leaving chemical residue can be VERY HOT. • The health of any cleaning materials on the door gasket. These areas heat sufficiently to burn soil... easily wipe away with a high sugar or acid content (such as milk, tomatoes, sauerkraut, fruit juices or pie filling) to the interior surface of the appliance can become very hot to set a self-clean cycle, the display will show REMOVE RACKS -Fig. 2. Fig. 1 Fig. 2 The oven control will ...
... spot even after the self-clean cycle is finished. Adhere to rub, damage or remove the gasket. -Fig. 1- • Do not use any range. Leaving chemical residue can be VERY HOT. • The health of any cleaning materials on the door gasket. These areas heat sufficiently to burn soil... easily wipe away with a high sugar or acid content (such as milk, tomatoes, sauerkraut, fruit juices or pie filling) to the interior surface of the appliance can become very hot to set a self-clean cycle, the display will show REMOVE RACKS -Fig. 2. Fig. 1 Fig. 2 The oven control will ...

Use and Care Manual
Page 53
... hrs) or heavy soils (4 hrs). Select MED or select lite or heavy 4. Remove racks and press UPPER OVEN After pressing start if the appliance has the CONTROL LOCK turned on through the entire self-clean cycle. 2. The example below shows setting the upper oven for a lite (2 hour...door has unlocked, set for self-clean to begin immediately using a medium (3 hour) setting: Step Example Press You may take about 30-40 minutes to a power failure, your appliance to perform a self-clean cycle sometime later (up to 12 hours later). Press COOK OPTIONS 5. Enter 800 Fig. 1 Fig....
... hrs) or heavy soils (4 hrs). Select MED or select lite or heavy 4. Remove racks and press UPPER OVEN After pressing start if the appliance has the CONTROL LOCK turned on through the entire self-clean cycle. 2. The example below shows setting the upper oven for a lite (2 hour...door has unlocked, set for self-clean to begin immediately using a medium (3 hour) setting: Step Example Press You may take about 30-40 minutes to a power failure, your appliance to perform a self-clean cycle sometime later (up to 12 hours later). Press COOK OPTIONS 5. Enter 800 Fig. 1 Fig....

Use and Care Manual
Page 54
... models) Cleaning Recommendation Use hot, soapy water and a cloth. Always be sure to the OFF position; Do not use abrasive cleaners on soil for 30 to squeeze excess water from the surface as bluish stains may become damaged during heating that are especially made for... models). Rinse with a clean cloth. Be sure to 60 minutes. Leave on any of both the knob and the shaft; Remove all controls to the appliance.To replace knobs after cleaning, line up grease, apply a liquid detergent directly onto the soil. For general cleaning, use hot, soapy water and a cloth....
... models) Cleaning Recommendation Use hot, soapy water and a cloth. Always be sure to the OFF position; Do not use abrasive cleaners on soil for 30 to squeeze excess water from the surface as bluish stains may become damaged during heating that are especially made for... models). Rinse with a clean cloth. Be sure to 60 minutes. Leave on any of both the knob and the shaft; Remove all controls to the appliance.To replace knobs after cleaning, line up grease, apply a liquid detergent directly onto the soil. For general cleaning, use hot, soapy water and a cloth....
Use and Care Manual
Page 56
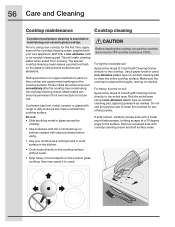
... directly to help prevent scratches and abrasions. Cookware (cast iron, metal, ceramic or glass) with a metal razor blade scraper, holding scraper at a 30 degree angle to maintaining your new appliance. For light to moderate soil: Apply a few drops of CookTop® Cleaning Creme directly to crack. For heavy, burned on the ceramic...
... directly to help prevent scratches and abrasions. Cookware (cast iron, metal, ceramic or glass) with a metal razor blade scraper, holding scraper at a 30 degree angle to maintaining your new appliance. For light to moderate soil: Apply a few drops of CookTop® Cleaning Creme directly to crack. For heavy, burned on the ceramic...
Use and Care Manual
Page 60
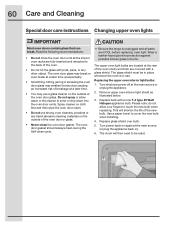
...inserted and retracted to enter or drip down into the oven door vents. Turn electrical power off at the main source (or plug the appliance back in place whenever the oven is unplugged and all the interior oven racks ...are covered with a new T-4 type 25 Watt Halogen appliance bulb. 60 Care and Cleaning Special door care instructions Changing upper oven lights IMPORTANT Most oven doors...door gasket should always clean during the Self-clean cycle. • Be sure the range is in use a glass cleaner on again at the main source or unplug the...
...inserted and retracted to enter or drip down into the oven door vents. Turn electrical power off at the main source (or plug the appliance back in place whenever the oven is unplugged and all the interior oven racks ...are covered with a new T-4 type 25 Watt Halogen appliance bulb. 60 Care and Cleaning Special door care instructions Changing upper oven lights IMPORTANT Most oven doors...door gasket should always clean during the Self-clean cycle. • Be sure the range is in use a glass cleaner on again at the main source or unplug the...
