
Use and Care Manual
Page 3
... Finding Information 2 Make a Record for Future Use 2 Model and Serial Number Location 2 Questions 2 Table of Contents 3 Safety 4 Important Safety Instructions 4-7 Feature Overview 8 Your Slide-In Range 8-9 Oven Rack Supports and Oven Vents 10 Removing and Replacing Oven Racks 11 Oven Control Pad Functions 12-13 Getting Started 14 Setting Clock at...
... Finding Information 2 Make a Record for Future Use 2 Model and Serial Number Location 2 Questions 2 Table of Contents 3 Safety 4 Important Safety Instructions 4-7 Feature Overview 8 Your Slide-In Range 8-9 Oven Rack Supports and Oven Vents 10 Removing and Replacing Oven Racks 11 Oven Control Pad Functions 12-13 Getting Started 14 Setting Clock at...
Use and Care Manual
Page 4
... Do not store or use any other flammable vapors and liquids in the vicinity of fire, electrical shock, or injury when using your new Electrolux range. ! Follow the gas supplier's instructions. • If you cannot reach your gas supplier from a neighbor's phone. Refer to the appliance.... • Never modify or alter the construction of a range by removing leveling legs, panels, wire covers, anti-tip brackets/screws, or any other servicing should be performed by a qualified technician in accordance...
... Do not store or use any other flammable vapors and liquids in the vicinity of fire, electrical shock, or injury when using your new Electrolux range. ! Follow the gas supplier's instructions. • If you cannot reach your gas supplier from a neighbor's phone. Refer to the appliance.... • Never modify or alter the construction of a range by removing leveling legs, panels, wire covers, anti-tip brackets/screws, or any other servicing should be performed by a qualified technician in accordance...
Use and Care Manual
Page 5
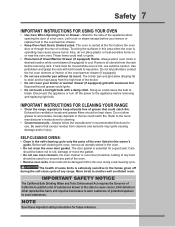
... cool. Doing so may begin to turn the oven off the main gas shutoff • Use Only Dry Potholders-Moist or damp potholders on the range to climb or play around the appliance. They should not be stored in an oven, near these areas until they have had sufficient time to...
... cool. Doing so may begin to turn the oven off the main gas shutoff • Use Only Dry Potholders-Moist or damp potholders on the range to climb or play around the appliance. They should not be stored in an oven, near these areas until they have had sufficient time to...
Use and Care Manual
Page 6
... may result in a risk of electric shock or fire or a short circuit. • Air curtain or other than when the hood and range have been designed, tested and listed by blowing a downward air flow on to cover the surface burner. 6 Safety Electronic controllers can be hazardous...your health. • Know which operate by an independent test laboratory for use of sealed gas burners. The use in conjunction with gas ranges other overhead range hoods, which knob controls each other. • Glazed Cooking Utensils-Only certain types of glass, glass/ceramic, ceramic, earthenware, or ...
... may result in a risk of electric shock or fire or a short circuit. • Air curtain or other than when the hood and range have been designed, tested and listed by blowing a downward air flow on to cover the surface burner. 6 Safety Electronic controllers can be hazardous...your health. • Know which operate by an independent test laboratory for use of sealed gas burners. The use in conjunction with gas ranges other overhead range hoods, which knob controls each other. • Glazed Cooking Utensils-Only certain types of glass, glass/ceramic, ceramic, earthenware, or ...
Use and Care Manual
Page 7
... of the broiler. • Do not cover your broiler or warmer drawer (if equipped) grid with a damp cloth. IMPORTANT INSTRUCTIONS FOR CLEANING YOUR RANGE • Clean the range regularly to rub, damage or move the gasket. • Do not use a broiler pan without its insert. Greasy deposits in the oven during the... self-clean cycle of any part of any kind should be taken not to keep all utensils stored in or around any range. No oven cleaner or oven liner protective coating of the oven. • Remove oven racks.
... of the broiler. • Do not cover your broiler or warmer drawer (if equipped) grid with a damp cloth. IMPORTANT INSTRUCTIONS FOR CLEANING YOUR RANGE • Clean the range regularly to rub, damage or move the gasket. • Do not use a broiler pan without its insert. Greasy deposits in the oven during the... self-clean cycle of any part of any kind should be taken not to keep all utensils stored in or around any range. No oven cleaner or oven liner protective coating of the oven. • Remove oven racks.

Use and Care Manual
Page 9
Feature Overview 9 Your Slide-in Range Oven Door Latch Oven vent Broiling Element Oven Rack Support slideable Oven racks Convection Fan Oven Light Oven Rack support brackets lower oven rack BROILER PAN BROILER PAN Grid Convection Roasting rack
Feature Overview 9 Your Slide-in Range Oven Door Latch Oven vent Broiling Element Oven Rack Support slideable Oven racks Convection Fan Oven Light Oven Rack support brackets lower oven rack BROILER PAN BROILER PAN Grid Convection Roasting rack

Use and Care Manual
Page 14
Press 1 3 0 + - To start with "12:00". When the unit has reached its target temperature, a chime will sound to remind you to the range has been interrupted, the timer in the display will flash with a time of 12:00. bake, convection bake, convection roast and perfect turkey. temperature visual ...
Press 1 3 0 + - To start with "12:00". When the unit has reached its target temperature, a chime will sound to remind you to the range has been interrupted, the timer in the display will flash with a time of 12:00. bake, convection bake, convection roast and perfect turkey. temperature visual ...

Use and Care Manual
Page 36
...; 12 hour Energy Saving on display to raise or lower the actual time displayed. 3. Adjusting oven temperature. • F-C F; When the range is not being used . Press USER + -PREF again to the range has been interrupted, the display will show "CLO 12:00". Fahrenheit / Celsius display. • AUd; To set the time of...
...; 12 hour Energy Saving on display to raise or lower the actual time displayed. 3. Adjusting oven temperature. • F-C F; When the range is not being used . Press USER + -PREF again to the range has been interrupted, the display will show "CLO 12:00". Fahrenheit / Celsius display. • AUd; To set the time of...
Use and Care Manual
Page 44
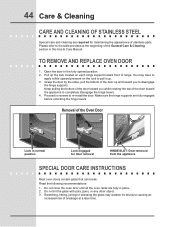
.... Pull up the lock located on the lock to pull it up and toward you while rotating the top of the door toward front of range. Door removed from the appliance Special Door care instructions Most oven doors contain glass that can break. Do not hit the glass with pots, pans...
.... Pull up the lock located on the lock to pull it up and toward you while rotating the top of the door toward front of range. Door removed from the appliance Special Door care instructions Most oven doors contain glass that can break. Do not hit the glass with pots, pans...

Use and Care Manual
Page 48
... to oven wall or rack overcrowded. • Pan warped. Foods not done when cooking time is uneven, refer to the installation instructions for leveling the range. • Be sure to allow 5.1cm to 10.2cm (2" to 4") of clearance on all sides of each pan in the oven. • Use a medium... dark on the oven before placing food in oven. • Set oven temperature 25°F/12°C lower than recommended. Cakes not level. • Range not level. • Pan too close to preheat the oven for the recommended time. • Be sure to remove all sides of pan. There is...
... to oven wall or rack overcrowded. • Pan warped. Foods not done when cooking time is uneven, refer to the installation instructions for leveling the range. • Be sure to allow 5.1cm to 10.2cm (2" to 4") of clearance on all sides of each pan in the oven. • Use a medium... dark on the oven before placing food in oven. • Set oven temperature 25°F/12°C lower than recommended. Cakes not level. • Range not level. • Pan too close to preheat the oven for the recommended time. • Be sure to remove all sides of pan. There is...
Use and Care Manual
Page 49
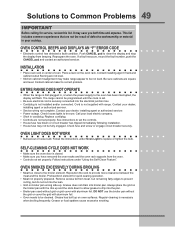
... house lights to correct problem. Call your cooktop. Replace cord/plug. • Controls are not level. • Kitchen cabinet misalignment may make range appear to be programmed until the clock is set properly. Preheat broil element for service, review this list. Always place the grid on broiler pan...on oven surfaces. Cord is not supplied with aluminum foil. Reposition the rack to the oven has been interrupted, the display will flash. The range cannot be cleaned. Self-cleaning cycle does not work • Burned-out or loose bulb. It may not be not level. This list ...
... house lights to correct problem. Call your cooktop. Replace cord/plug. • Controls are not level. • Kitchen cabinet misalignment may make range appear to be programmed until the clock is set properly. Preheat broil element for service, review this list. Always place the grid on broiler pan...on oven surfaces. Cord is not supplied with aluminum foil. Reposition the rack to the oven has been interrupted, the display will flash. The range cannot be cleaned. Self-cleaning cycle does not work • Burned-out or loose bulb. It may not be not level. This list ...
Use and Care Manual
Page 51
... to establish the warranty period should service be repaired in your receipt, delivery slip, or some other cosmetic parts. 11. ELECTROLUX SHALL NOT BE LIABLE FOR CONSEQUENTIAL OR INCIDENTAL DAMAGES SUCH AS PROPERTY DAMAGE AND INCIDENTAL EXPENSES RESULTING FROM ANY BREACH OF THIS ... or exterior of purchase. 12. use or used , and maintained in and free-standing range appliances) is warranted by Electrolux Major Appliances North America, a division of parts other than genuine Electrolux parts or parts obtained from persons other than authorized service companies; In the USA and Puerto...
... to establish the warranty period should service be repaired in your receipt, delivery slip, or some other cosmetic parts. 11. ELECTROLUX SHALL NOT BE LIABLE FOR CONSEQUENTIAL OR INCIDENTAL DAMAGES SUCH AS PROPERTY DAMAGE AND INCIDENTAL EXPENSES RESULTING FROM ANY BREACH OF THIS ... or exterior of purchase. 12. use or used , and maintained in and free-standing range appliances) is warranted by Electrolux Major Appliances North America, a division of parts other than genuine Electrolux parts or parts obtained from persons other than authorized service companies; In the USA and Puerto...
Dimensions
Page 1
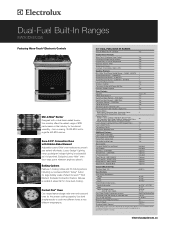
...-2-Fit® Convection Oven with Variable 2-Speed Fan Cooking Modes - Shipping Weight (Approx.) 278 Lbs. Dual-Fuel Built-In Ranges EW30DS6CGS Featuring Wave-Touch® Electronic Controls Min-2-Max® Burner Designed with a dual-flame sealed burner, this cooktop offers the widest... for the utmost cooking capacity. Exclusive Luxury-Hold™ oven door stays put at two different temperatures. 30" DUAL-FUEL BUILT-IN RANGES Sabbath Mode (Star-K® Certified) Yes Control Panel Features Wave-Touch® Electronic Oven Control Professional-Grade Burner Controls Keypad Entry of...
...-2-Fit® Convection Oven with Variable 2-Speed Fan Cooking Modes - Shipping Weight (Approx.) 278 Lbs. Dual-Fuel Built-In Ranges EW30DS6CGS Featuring Wave-Touch® Electronic Controls Min-2-Max® Burner Designed with a dual-flame sealed burner, this cooktop offers the widest... for the utmost cooking capacity. Exclusive Luxury-Hold™ oven door stays put at two different temperatures. 30" DUAL-FUEL BUILT-IN RANGES Sabbath Mode (Star-K® Certified) Yes Control Panel Features Wave-Touch® Electronic Oven Control Professional-Grade Burner Controls Keypad Entry of...
Dimensions
Page 2
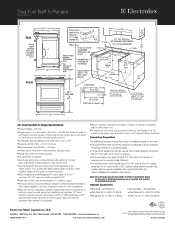
...; 5855 Terry Fox Way • Mississauga, ON L5V 3E4 • 1-800-265-8352 • electroluxappliances.ca EW30DS6CGS 03/11 © 2011 Electrolux Major Appliances, NA High standards of quality at electroluxappliances.ca or supplied with optional Side Filler Kit (refer to nearest... is ideal location for detailed instructions. Refer to either side of unit. • To reduce risk of fire when using overhead cabinetry, install range hood that projects horizontally a recommended minimum of 5" beyond bottom of right cabinet. Optional Accessories • Wok Ring - (318254307). • ...
...; 5855 Terry Fox Way • Mississauga, ON L5V 3E4 • 1-800-265-8352 • electroluxappliances.ca EW30DS6CGS 03/11 © 2011 Electrolux Major Appliances, NA High standards of quality at electroluxappliances.ca or supplied with optional Side Filler Kit (refer to nearest... is ideal location for detailed instructions. Refer to either side of unit. • To reduce risk of fire when using overhead cabinetry, install range hood that projects horizontally a recommended minimum of 5" beyond bottom of right cabinet. Optional Accessories • Wok Ring - (318254307). • ...


