Electrolux EI30EF35JS Support and Manuals
Get Help and Manuals for this Electrolux item
View All Support Options Below
Free Electrolux EI30EF35JS manuals!
Problems with Electrolux EI30EF35JS?
Ask a Question
Free Electrolux EI30EF35JS manuals!
Problems with Electrolux EI30EF35JS?
Ask a Question
Popular Electrolux EI30EF35JS Manual Pages
Installation Instructions - Page 1
... anti-tip device in place and engaged.
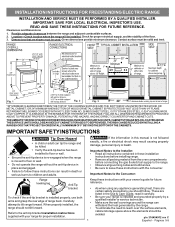
• Failure to children and adults. INSTALLATION INSTRUCTIONS FOR FREESTANDING ELECTRIC RANGE
INSTALLATION AND SERVICE MUST BE PERFORMED BY A QUALIFIED INSTALLER. Location-Check location where the range will be killed.
• Verify the anti-tip device has been installed to floor or wall.
• Ensure the anti-tip device is re-engaged...
Installation Instructions - Page 3

... with ranges shall be either closed loop or open-end spade lugs with 1-3/8" dia.
IMPORTANT NOTE: DO NOT LOOSEN the factory installed nut connections which secure the range wiring to release the copper ground strap from factory with upturned ends. MODELS REQUIRING POWER SUPPLY CORD KIT. Fig. 9
Fig. 10
Fig. 12
3 INSTALLATION INSTRUCTIONS FOR FREESTANDING ELECTRIC RANGE
2b...
Installation Instructions - Page 4
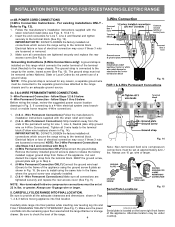
...). 1. For existing installations ONLY Refer to the terminal block (See Fig. 13). Electrical failure or loss of the terminal block (Neutral) to the terminal block. Make sure all connections are tightened securely and replace the rear access cover (See Fig. 9). follow Steps 1 thru 5 below . 4 - follow Steps 1,2 & 5 below . Before wiring the range, review the suggested power...
Complete Owner's Guide (English) - Page 2

...the U.S. and Canada: 1-877-4ELECTROLUX (1-877-435-3287) For online support and Internet production information visit www.electroluxappliances.com
©2012 Electrolux Home Products, Inc.
This Use & Care Guide is part of our commitment to Common Problems 52-54 Warranty 55
Thank you . For toll-free telephone support in the USA
2 Finding Information
Table of contents
Please read and...
Complete Owner's Guide (English) - Page 3

... box in case of an emergency.
• User servicing-Do not repair or replace any part of the appliance unless specifically recommended in the manuals. CAUTION
This symbol alerts you to situations that may cause the range to tip, resulting in Canada CSA Standard C22.1, Canadian Electrical Code, Part 1, and local code requirements. Know how to disconnect the power to the...
Complete Owner's Guide (English) - Page 4

...range or on the backguard of electrical shock, or fire.
Smother the fire with one or more surface units of undersized utensils will begin to line the oven bottom, except as suggested in the manual...instructions for warming or heating a room.
• Do not cook foods directly on the range to cool.
Improper installation... settings-Boilovers cause smoking and greasy spillovers that ...
Complete Owner's Guide (English) - Page 5

.... Important instructions for models equipped with...range
• Clean the range regularly to the side of a hot oven. Follow manufacturer's instructions for cook top service...around any part of electric shock. ...Manual. Important instructions for using the appliance for a good seal.
Before self cleaning the oven, remove the broiler pan and any range...you remove or replace food in water...
Complete Owner's Guide (English) - Page 6

... this plug.
Do not cut or remove the grounding prong from electrical power cord. 6 IMPORTANT SAFETY INSTRUCTIONS
Grounding Instructions
For models factory-equipped with a power cord:
For personal safety, this appliance...against shock hazard, it replaced with this appliance for complete installation and grounding instructions. WARNING
• Avoid fire hazard or electrical shock.
Complete Owner's Guide (English) - Page 9

...and Before You Call sections of the range when it is complete.
As the temperature rises, the element will cycle on top of this Use and Care Manual. Always use .
For efficient cooking,... the selected setting, the element will glow red. These items could catch fire if placed too close to Using Proper Cookware on page 7).
• Read the detailed instructions for the radiant...
Complete Owner's Guide (English) - Page 10

...
Home Canning
IMPORTANT
DO NOT straddle a cooking utensil over two different surface cooking areas at the same time, stagger the canners on the left side of the control panel. Some suggestions would be the U.S. When the upper oven is achieved, reduce heat to lowest possible setting to use smaller diameter canners on electric...
Complete Owner's Guide (English) - Page 51

...:
• Do not close the oven door until all parts are located at the main source or unplug the range.
2. Turn electrical power off at the rear of the oven door glass. Replace light with pots, pans, or any other object. To reset, see Setting clock in use a glass cleaner on the outside of the...
Complete Owner's Guide (English) - Page 52

... enough to adequately support range.
• If floor is ON for service, review the following list. Problem Appliance is not complete. Contact builder or installer to use.
• Lightweight or warped pans used. Heavy & mediumweight pans heat evenly. See "Setting clock " in this appliance. See Setting Oven Controls in this Use & Care Guide or read the instructions "Entire appliance does...
Complete Owner's Guide (English) - Page 53

... section.
• Oven control has detected a fault or error condition. Try the bake or broil feature again. If the F code error persists, remove power supply to appliance, wait 5 minutes and then repower the appliance and set clock for service.
• Cooktop control has detected a fault or error condition.
Regular cleaning is opened to broil stop beeping...
Complete Owner's Guide (English) - Page 55

... should service be repaired in materials or workmanship when such appliance is shipped from your
original date of Electrolux Home Products, Inc.
Damages to the finish of appliance or home incurred during the additional limited warranty periods beyond the first year from your original date of your appliance (excluding built-in and free-standing range appliances) is installed...
Wiring Diagram (English Español Français) - Page 1

...
L1 to heat when the power is good replace the EOC. Electric Range with P1 and P10. It is programmed.
While in the tech sheet. 2.
L1 P19 -
SIZE
-
-
-
-
- CONNECT LOOP
-
-
-
-
IMPORTANT
DO NOT REMOVE THIS BAG OR DESTROY THE CONTENTS
WIRING DIAGRAMS AND SERVICE INFORMATION ENCLOSED
REPLACE CONTENTS IN BAG
To test keypad function, check...
Electrolux EI30EF35JS Reviews
We have not received any reviews for Electrolux yet.