Electrolux EI30ES55JS Support and Manuals
Get Help and Manuals for this Electrolux item
View All Support Options Below
Free Electrolux EI30ES55JS manuals!
Problems with Electrolux EI30ES55JS?
Ask a Question
Free Electrolux EI30ES55JS manuals!
Problems with Electrolux EI30ES55JS?
Ask a Question
Most Recent Electrolux EI30ES55JS Questions

Beeping
range (model EI30Es55js OR ew30es65gs) is beeping constantly it is not on HELP
range (model EI30Es55js OR ew30es65gs) is beeping constantly it is not on HELP
(Posted by marilyncaufield 11 years ago)

What Is Fault Code 11
Our control panel was beeping and flashing F11. What does F11 mean?
Our control panel was beeping and flashing F11. What does F11 mean?
(Posted by endres 12 years ago)
Popular Electrolux EI30ES55JS Manual Pages
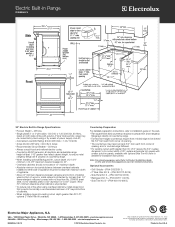
Installation Instructions (All Languages) - Page 1

.... READ AND SAVE THESE INSTRUCTIONS FOR FUTURE REFERENCE. TOTAL DEPTH TO FRONT OF RANGE
28 5/16" (71,9 cm)
E.
G
30" Min. (see page 8).
30" Min. (76,2 cm) Min.
13" (33 cm)
These surfaces should be flat &
leveled (hatched area).
½"min. 30" ELECTRIC SLIDE-IN RANGE INSTALLATION INSTRUCTIONS
United States
INSTALLATION AND SERVICE MUST BE PERFORMED BY A QUALIFIED...
Installation Instructions (All Languages) - Page 2

... ELECTRIC SLIDE-IN RANGE INSTALLATION INSTRUCTIONS
NOTE:
1. Do not seal the range to the side cabinets.
3. 24" (61 cm) minimum clearance between the range and
the wall.
...
30" (76,2 cm) minimum clearance when the
cabinet is supported by the leveling legs at the front and the wheels at the...Max.
2 For cutouts below 22 7/8"(58,1 cm),
appliance will slightly show out of wood or metal cabinet ...
Installation Instructions (All Languages) - Page 3

30" ELECTRIC SLIDE-IN RANGE INSTALLATION INSTRUCTIONS
To avoid breakage: Do NOT handle or
manipulate the unit by the cooktop.
1
The counter-top around the ...for the transport.
5
Slide the unit into the cabinet. of the counter. Make sure the center of the unit is supported by the two front leveling legs and the two adjustable leveling wheels
and NOT by
at least 1/16" taller than the ...
Installation Instructions (All Languages) - Page 4

...situation.
• Never use your Owner's Guide for future reference.
4 Follow the precleaning instructions in an area covered with linoleum or any other
utensils before connecting the electrical supply to leave these installation instructions before turning on the door or drawer of appliances designed for at least 3 hours before installing range.
2. Read all controls to the...
Installation Instructions (All Languages) - Page 5

... in Range is responsible for a range at 125V/250V 50A. Risk of electrical connection may be either 3 (when local code permits ...appliance may occur. Cord must have strain-relief clamp. Connect the appliance in Canada; Electrical Shock Hazard
• Electrical ground is discarded. 30" ELECTRIC SLIDE-IN RANGE INSTALLATION INSTRUCTIONS
1. If used , the Installation Instructions...
Installation Instructions (All Languages) - Page 6

...appliance with the ground screw, using the hole in the literature package, connect the neutral of the copper power supply cord to the left terminal) (see Figure 2).
2. 30" ELECTRIC SLIDE-IN RANGE INSTALLATION INSTRUCTIONS...terminals. Silver Colored Terminal
Red Wire
Four Conductor Wire Connection to Range
Where local codes does NOT permit connection of the frame grounding conductor to the ...
Installation Instructions (All Languages) - Page 7

... supplied grounding strap. b) Connect the 2 black wires together.
30" ELECTRIC SLIDE-IN RANGE INSTALLATION INSTRUCTIONS
Direct Electrical Connection to the Circuit Breaker, Fuse Box or Junction Box
If the appliance is connected directly to the neutral (white) wire (see Figure 5): 1. Where local codes permit connecting the appliancegrounding conductor to the circuit breaker, fuse box or...
Installation Instructions (All Languages) - Page 8

...
opening (Figure 7).
• Tile countertops may need trim cut back 3/4"(1.9 cm) from each front corner and/or rounded edge flattened (Figure 7). 30" ELECTRIC SLIDE-IN RANGE INSTALLATION INSTRUCTIONS
4. If the countertop is greater than 30 1/16" (76,4 cm), reduce the ¾" (1.9 cm) dimension.
• Countertop must have molded edge shaved flat 3/4" (1.9 cm) from...
Installation Instructions (All Languages) - Page 9

... must replace the actual side trims by new and smaller side trims. These new side trims can be ordered through a Service Center. 2.Follow instructions supplied with your
9 appliance, do not handle or manipulate it by lowering
the front leveling legs and the back leveling wheels. 30" ELECTRIC SLIDE-IN RANGE INSTALLATION INSTRUCTIONS
5.
Make sure
2
they are setup higher...
Installation Instructions (All Languages) - Page 10

... underside of the rear leg. 2. c.
Each of your range product and/or need to order parts. Bake-After setting the oven to CONV. Warmer Drawer (some models)-When the oven is set to 350°F (177°C) for the transport. Figure 10 10 30" ELECTRIC SLIDE-IN RANGE INSTALLATION INSTRUCTIONS
6. You can discard those legs, they heat. Do...
Installation Instructions (All Languages) - Page 11

... anti-tip bracket is trapped by adjusting the 4 levelling legs until the underside of the range to a different location, the antitip brackets must be .
6. 30" ELECTRIC SLIDE-IN RANGE INSTALLATION INSTRUCTIONS
8. These parts are at the highest position they can be installed. If range is not available. (Figure 11))
3. Also draw a line on the floor with the...
Installation Instructions (All Languages) - Page 12

30" ELECTRIC SLIDE-IN RANGE INSTALLATION INSTRUCTIONS NOTES:
12
Product Specifications Sheet (English) - Page 1
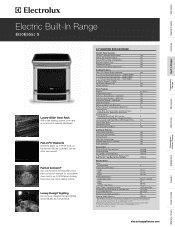
...Board on the web at electroluxappliances.com. Stainless Steel
S
Oven Cavity Dimensions -
Wall Ovens
Warmer Drawers
Cooktops
Built-In Ranges
Freestanding Ranges
Microwaves
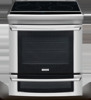
Electric Built-In Range
EI30ES55J...
258 Lbs.
*When properly installed, meets the appliance standards in the Americans with ...Specifications subject to Product Installation Guide for detailed installation instructions...
Product Specifications Sheet (English) - Page 2
... Breaker - 50 Amps
• Always consult local and national electric codes.
• Countertop MUST be shaved
flat 3/4" from each front corner of appliance.
• Allow 24" minimum clearance between overhead cabinets installed to change specifications or discontinue models without notice.
Electrolux Major Appliances, N.A.
USA • 10200 David Taylor Drive • Charlotte, NC...
Electrolux EI30ES55JS Reviews
We have not received any reviews for Electrolux yet.