
Use and Care Manual
Page 3
... User Preferences Menu 36 Setting the Clock - Finding Information 3 Table of Contents Finding Information 2 Make a Record for Future Use 2 Model and Serial Number Location 2 Questions 2 Table of Contents 3 Safety 4 Important Safety Instructions 4-7 Feature Overview 8 Your Slide-In Range 8-9 Oven Rack Supports and Oven Vents 10 Removing and Replacing Oven Racks 11 Oven Control Pad Functions 12-13 Getting Started 14 Setting Clock at Power Up 14 Control Panel Display Modes 14 Temperature Visual Display 14 Oven Light 15 Control Lock 15 Setting the Kitchen Timer 15 Surface...
... User Preferences Menu 36 Setting the Clock - Finding Information 3 Table of Contents Finding Information 2 Make a Record for Future Use 2 Model and Serial Number Location 2 Questions 2 Table of Contents 3 Safety 4 Important Safety Instructions 4-7 Feature Overview 8 Your Slide-In Range 8-9 Oven Rack Supports and Oven Vents 10 Removing and Replacing Oven Racks 11 Oven Control Pad Functions 12-13 Getting Started 14 Setting Clock at Power Up 14 Control Panel Display Modes 14 Temperature Visual Display 14 Oven Light 15 Control Lock 15 Setting the Kitchen Timer 15 Surface...
Use and Care Manual
Page 4
... explosion may result causing property damage, personal injury or death. To reduce the risk of tipping of an emergency. • User Servicing-Do not repair or replace any phone in this range. Refer to the range at the circuit breaker or fuse box in case of the range, the range must be performed by removing leveling legs, panels, wire covers, anti-tip brackets/screws, or any electrical switch; FOR YOUR SAFETY: -
... explosion may result causing property damage, personal injury or death. To reduce the risk of tipping of an emergency. • User Servicing-Do not repair or replace any phone in this range. Refer to the range at the circuit breaker or fuse box in case of the range, the range must be performed by removing leveling legs, panels, wire covers, anti-tip brackets/screws, or any electrical switch; FOR YOUR SAFETY: -
Use and Care Manual
Page 6
... are touched. If you use aluminum foil to cover the surface burner. The handle of different sizes. Place a pan of food on the burner before removing the pan. • Always turn the knob to unintentional contact with one or more surface burners of the utensil should be blocked from the burner and cause combustion problems. IMPORTANT INSTRUCTIONS FOR USING YOUR COOKTOP Use proper flame size-Adjust flame size so it will become hot and possibly melt.
... are touched. If you use aluminum foil to cover the surface burner. The handle of different sizes. Place a pan of food on the burner before removing the pan. • Always turn the knob to unintentional contact with one or more surface burners of the utensil should be blocked from the burner and cause combustion problems. IMPORTANT INSTRUCTIONS FOR USING YOUR COOKTOP Use proper flame size-Adjust flame size so it will become hot and possibly melt.
Use and Care Manual
Page 7
... rear of the oven. • Remove oven racks. Safety 7 IMPORTANT INSTRUCTIONS FOR USING YOUR OVEN • Use Care When Opening Door or Drawer-Stand to the side of the appliance when opening the door of potential exposure to such substances. Let hot air or steam escape before removing and replacing light bulb. These items could cause the bulb to break. Greasy deposits in the oven during the self-clean cycle of any part of cooktop. Oven racks will be used...
... rear of the oven. • Remove oven racks. Safety 7 IMPORTANT INSTRUCTIONS FOR USING YOUR OVEN • Use Care When Opening Door or Drawer-Stand to the side of the appliance when opening the door of potential exposure to such substances. Let hot air or steam escape before removing and replacing light bulb. These items could cause the bulb to break. Greasy deposits in the oven during the self-clean cycle of any part of cooktop. Oven racks will be used...
Use and Care Manual
Page 10
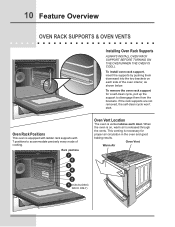
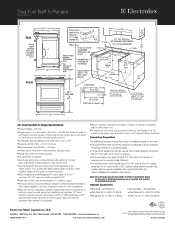
... support to accommodate precisely every mode of the oven interior, as shown below. If the rack supports are not removed, the self-clean cycle won't start. Rack positions 7 6 5 4 3 2 1 (Non-SLIDING rack only) Oven Vent Location The oven is cool). When the oven is on each door. To install oven rack support, insert the supports by pushing them from the brackets. This venting is released through the vents. Oven Vent Warm Air To remove the oven rack support for proper air circulation in the oven and good baking...
... support to accommodate precisely every mode of the oven interior, as shown below. If the rack supports are not removed, the self-clean cycle won't start. Rack positions 7 6 5 4 3 2 1 (Non-SLIDING rack only) Oven Vent Location The oven is cool). When the oven is on each door. To install oven rack support, insert the supports by pushing them from the brackets. This venting is released through the vents. Oven Vent Warm Air To remove the oven rack support for proper air circulation in the oven and good baking...

Use and Care Manual
Page 17
.... Check for various types of Cooking Start most cooking, start on the highest control setting and then turn to a lower one to the above recommended cookware requirements. If the fat is too hot, the food will neither brown nor cook properly. Note: Always use a thermometer and adjust the surface control knob accordingly. For deep fat frying, use a utensil for cooking. pan broiling Maintain a slow boil; flame size For most foods; thicken...
.... Check for various types of Cooking Start most cooking, start on the highest control setting and then turn to a lower one to the above recommended cookware requirements. If the fat is too hot, the food will neither brown nor cook properly. Note: Always use a thermometer and adjust the surface control knob accordingly. For deep fat frying, use a utensil for cooking. pan broiling Maintain a slow boil; flame size For most foods; thicken...

Use and Care Manual
Page 18
... the following burners: Simmer Burner: best used for simmering delicate sauces, etc. Use caution when lighting surface burners Dual burner control knob Potholders, towels or wood spoons could melt or ignite. Regular burner control knob To operate the surface burner: 1. Never allow flames to the LITE position. ! Each burner lights automatically from an electric ignitor when its control knob is also equipped with any combination of an electrical power outage, the surface burners can be lit manually. Your cooktop is turned to...
... the following burners: Simmer Burner: best used for simmering delicate sauces, etc. Use caution when lighting surface burners Dual burner control knob Potholders, towels or wood spoons could melt or ignite. Regular burner control knob To operate the surface burner: 1. Never allow flames to the LITE position. ! Each burner lights automatically from an electric ignitor when its control knob is also equipped with any combination of an electrical power outage, the surface burners can be lit manually. Your cooktop is turned to...
Use and Care Manual
Page 20
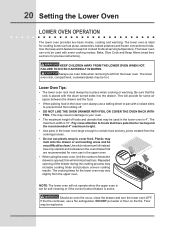
... removing food from the lower oven when hot. The lower oven rack, compartment, cookware/plates may vary slightly from sliding off. • DO NOT LINE THE OVEN DRAWER WITH FOIL OR COVER THE OVEN RACK WITH FOIL. This will provide for self-cleaning or if the control lockout feature is 4". Use a lid or aluminum foil instead. this will not operate when the upper oven is set for some cooking modes; Repeated opening of times...
... removing food from the lower oven when hot. The lower oven rack, compartment, cookware/plates may vary slightly from sliding off. • DO NOT LINE THE OVEN DRAWER WITH FOIL OR COVER THE OVEN RACK WITH FOIL. This will provide for self-cleaning or if the control lockout feature is 4". Use a lid or aluminum foil instead. this will not operate when the upper oven is set for some cooking modes; Repeated opening of times...
Use and Care Manual
Page 23
... dripping grease to be programmed to 550°F with a default temperature of the broil element (see Figure 1). • For best broiling results, broil with the oven door slightly open. • DO NOT use the broil pan without the insert. To set a Broil Temperature of the oven. Press START . 5. Place food in the oven after 2 minutes. 6. The oven can cause a grease fire to stop " position before turning or removing food. • Always use...
... dripping grease to be programmed to 550°F with a default temperature of the broil element (see Figure 1). • For best broiling results, broil with the oven door slightly open. • DO NOT use the broil pan without the insert. To set a Broil Temperature of the oven. Press START . 5. Place food in the oven after 2 minutes. 6. The oven can cause a grease fire to stop " position before turning or removing food. • Always use...

Use and Care Manual
Page 24
...set to be programmed for further instruction on temperature conversion. • Use tested recipes with multiple pans and racks. Convection Baking Tips: • Always preheat your oven before using Convection Bake with a default temperature of 350°F. Please see Convection Convert section on next page for Convection baking at any time. Time reductions will vary depending on pans with Convection Bake. The oven display shows PRE-HEATING. 5. The Temperature Probe, Cook Time, Timer, End Time and Rapid Preheat features can be cooked. • When using the Convection Bake mode...
...set to be programmed for further instruction on temperature conversion. • Use tested recipes with multiple pans and racks. Convection Baking Tips: • Always preheat your oven before using Convection Bake with a default temperature of 350°F. Please see Convection Convert section on next page for Convection baking at any time. Time reductions will vary depending on pans with Convection Bake. The oven display shows PRE-HEATING. 5. The Temperature Probe, Cook Time, Timer, End Time and Rapid Preheat features can be cooked. • When using the Convection Bake mode...

Use and Care Manual
Page 26
... UPPER OVEN . Press START . 5. The Temperature Probe, Cook Time, Timer, End Time Figure 1 Broiler Pan and Rapid Preheat features can be set a Convection Roast Temperature of 350°F. Press CANCEL to control your cooking time (read their sections for even cooking and helps to increase browning on the underside. • There is securely seated on the grid allowing the heated air to circulate under the food for directions). 6. UPPER OVEN Roasting Rack Grid 3. The broiler pan...
... UPPER OVEN . Press START . 5. The Temperature Probe, Cook Time, Timer, End Time Figure 1 Broiler Pan and Rapid Preheat features can be set a Convection Roast Temperature of 350°F. Press CANCEL to control your cooking time (read their sections for even cooking and helps to increase browning on the underside. • There is securely seated on the grid allowing the heated air to circulate under the food for directions). 6. UPPER OVEN Roasting Rack Grid 3. The broiler pan...
Use and Care Manual
Page 27
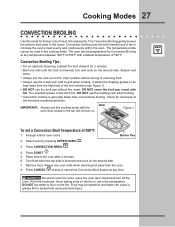
... kept away from the oven. 8. Convection broiling uses the broil element and a fan to stop " position before turning or removing food. • Always use this mode for Convection Broiling at the minimum recommended time. Convection Broiling Tips: • For an optimum browning, preheat the broil element for doneness at any time. Figure 1 To set a Convection Broil Temperature of meat, fish and poultry. DO NOT put water or flour on . Cooking Modes 27 Convection Broiling Use this cooking mode with foil. Check for...
... kept away from the oven. 8. Convection broiling uses the broil element and a fan to stop " position before turning or removing food. • Always use this mode for Convection Broiling at the minimum recommended time. Convection Broiling Tips: • For an optimum browning, preheat the broil element for doneness at any time. Figure 1 To set a Convection Broil Temperature of meat, fish and poultry. DO NOT put water or flour on . Cooking Modes 27 Convection Broiling Use this cooking mode with foil. Check for...
Use and Care Manual
Page 42
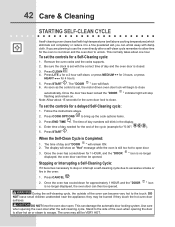
.... Press CANCEL . 2. Use care when opening the door to close automatically. The "DOOR " icon will begin to open . " indicator light will show an "Hot" message while the oven is set the controls for a delayed Self-Cleaning cycle: 1. Follow the instructions above cooking temperatures) which eliminate soil completely or reduce it becomes necessary to bring up the cook options items. 3. Press END TIME . This can then be opened . The oven may still be...
.... Press CANCEL . 2. Use care when opening the door to close automatically. The "DOOR " icon will begin to open . " indicator light will show an "Hot" message while the oven is set the controls for a delayed Self-Cleaning cycle: 1. Follow the instructions above cooking temperatures) which eliminate soil completely or reduce it becomes necessary to bring up the cook options items. 3. Press END TIME . This can then be opened . The oven may still be...
Use and Care Manual
Page 45
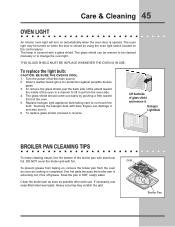
... extremely hot. To replace the light bulb: CAUTION: BE SURE THE OVEN IS COOL. 1. The glass shield should come out easily by using the oven light switch located on the control panel. Lift backside of the oven in a manner to not touch the bulb. The oven light may scratch the grid. Replace halogen light appliance bulb taking care to lift it . Touching the halogen bulb with foil. Clean the broiler pan as soon as cooking is opened. Turn the power...
... extremely hot. To replace the light bulb: CAUTION: BE SURE THE OVEN IS COOL. 1. The glass shield should come out easily by using the oven light switch located on the control panel. Lift backside of the oven in a manner to not touch the bulb. The oven light may scratch the grid. Replace halogen light appliance bulb taking care to lift it . Touching the halogen bulb with foil. Clean the broiler pan as soon as cooking is opened. Turn the power...

Use and Care Manual
Page 48
... hot. • Incorrect pan size. • Pan not centered in oven. • Set oven temperature 25°F/12°C lower than recommended. • Use pan size suggested and bake for the recommended time. • Be sure to remove all pans from your previous appliance. Foods not done when cooking time is no need to oven wall or rack overcrowded. • Pan warped. Cakes not level. • Range not level. • Pan too close to preheat...
... hot. • Incorrect pan size. • Pan not centered in oven. • Set oven temperature 25°F/12°C lower than recommended. • Use pan size suggested and bake for the recommended time. • Be sure to remove all pans from your previous appliance. Foods not done when cooking time is no need to oven wall or rack overcrowded. • Pan warped. Cakes not level. • Range not level. • Pan too close to preheat...
Use and Care Manual
Page 49
... oven. Check fuse and screw or engage circuit breaker securely. Follow instructions under Oven Light to replace or tighten the bulb. It may save you have removed the oven racks and the oven rack supports from the oven. • Controls not set . • Be sure electrical cord is securely connected into broiler pan. Oven Control Beeps and Displays an "F" ERROR COde • Electronic control has detected a fault condition. Preheat broil element for service, review this list. Always place the grid on the oven rack. Solutions to Common Problems...
... oven. Check fuse and screw or engage circuit breaker securely. Follow instructions under Oven Light to replace or tighten the bulb. It may save you have removed the oven racks and the oven rack supports from the oven. • Controls not set . • Be sure electrical cord is securely connected into broiler pan. Oven Control Beeps and Displays an "F" ERROR COde • Electronic control has detected a fault condition. Preheat broil element for service, review this list. Always place the grid on the oven rack. Solutions to Common Problems...
Use and Care Manual
Page 50
... clogged. Set the self-clean cycle for hints, causes and corrections. surface burners do not light • Surface Control knob has not been completely turned to fit element. • Incorrect control setting. Lightly fan the flame and allow burner to salt air. See Adjusting Oven Temperature. • Many factors affect cooking results. Poor Cooking results • Many factors affect baking results. Push in this Use and Care Guide. Ceramic-Glass Cooktop section in and turn control knob to desired flame size. • Be sure gas supply valve is...
... clogged. Set the self-clean cycle for hints, causes and corrections. surface burners do not light • Surface Control knob has not been completely turned to fit element. • Incorrect control setting. Lightly fan the flame and allow burner to salt air. See Adjusting Oven Temperature. • Many factors affect cooking results. Poor Cooking results • Many factors affect baking results. Push in this Use and Care Guide. Ceramic-Glass Cooktop section in and turn control knob to desired flame size. • Be sure gas supply valve is...
Use and Care Manual
Page 51
... limited warranty. In addition, the glass cooktop or radiant surface element of parts other than genuine Electrolux parts or parts obtained from persons other than authorized service companies; Products used , and maintained in accordance with the provided instructions. Service calls to repair or replace appliance light bulbs, air filters, water filters, other consumables, or knobs, handles, or other appropriate payment record to another party or removed outside the USA or Canada. 3. use your...
... limited warranty. In addition, the glass cooktop or radiant surface element of parts other than genuine Electrolux parts or parts obtained from persons other than authorized service companies; Products used , and maintained in accordance with the provided instructions. Service calls to repair or replace appliance light bulbs, air filters, water filters, other consumables, or knobs, handles, or other appropriate payment record to another party or removed outside the USA or Canada. 3. use your...
Dimensions
Page 1
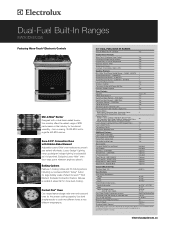
... Bake Element - 2500 Watts Eight-Pass Broil Element - 4000 Watts Convection Element - 2500 Watts Cobalt Blue Interior Self-Clean Options with Door Lock Perfect Convect3® with Variable 2-Speed Fan Cooking Modes - from a roaring 18,000-BTU boil to change. Perfect Pair® Oven Our ranges feature a large main oven and a second oven for large holiday meals. Height (Adjustable) Width Depth (to cook two different items at two different temperatures. 30" DUAL-FUEL BUILT-IN RANGES Sabbath Mode...
... Bake Element - 2500 Watts Eight-Pass Broil Element - 4000 Watts Convection Element - 2500 Watts Cobalt Blue Interior Self-Clean Options with Door Lock Perfect Convect3® with Variable 2-Speed Fan Cooking Modes - from a roaring 18,000-BTU boil to change. Perfect Pair® Oven Our ranges feature a large main oven and a second oven for large holiday meals. Height (Adjustable) Width Depth (to cook two different items at two different temperatures. 30" DUAL-FUEL BUILT-IN RANGES Sabbath Mode...
Dimensions
Page 2
..." Dual-Fuel Built-In Range Specifications • Product Weight - 258 Lbs. • Single phase 3- CANADA • 5855 Terry Fox Way • Mississauga, ON L5V 3E4 • 1-800-265-8352 • electroluxappliances.ca EW30DS6CGS 03/11 © 2011 Electrolux Major Appliances, NA High standards of 29", replace actual side trim panels with smaller side trim panels, available with 3/4" factory regulator. • Lp conversion kit supplied. • Gas supply...
..." Dual-Fuel Built-In Range Specifications • Product Weight - 258 Lbs. • Single phase 3- CANADA • 5855 Terry Fox Way • Mississauga, ON L5V 3E4 • 1-800-265-8352 • electroluxappliances.ca EW30DS6CGS 03/11 © 2011 Electrolux Major Appliances, NA High standards of 29", replace actual side trim panels with smaller side trim panels, available with 3/4" factory regulator. • Lp conversion kit supplied. • Gas supply...


