Installation Instructions (All Languages)
Page 1
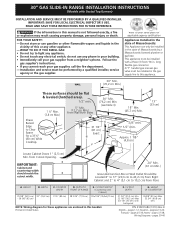
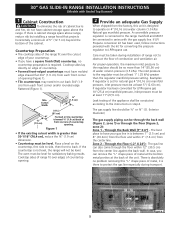
...a Massachusetts licensed plumber or gasfitter. E IMPORTANT: Cabinet and countertop width should be installed in the gas supply line to light any appliance. • Do not touch any phone in the vicinity of Massachusetts by a qualified installer, service agency or the gas supplier. ... A QUALIFIED INSTALLER. pages 37-38; Follow the gas supplier's instructions. • If you cannot reach your gas supplier, call your serial plate for these appliances are enclosed in United States 1 F. Approx. 1 7/8" (4,8 cm) 13" (33 cm) Locate Cabinet Doors 1" (2,5 cm) Min. A. DEPTH TO FRONT...
...a Massachusetts licensed plumber or gasfitter. E IMPORTANT: Cabinet and countertop width should be installed in the gas supply line to light any appliance. • Do not touch any phone in the vicinity of Massachusetts by a qualified installer, service agency or the gas supplier. ... A QUALIFIED INSTALLER. pages 37-38; Follow the gas supplier's instructions. • If you cannot reach your gas supplier, call your serial plate for these appliances are enclosed in United States 1 F. Approx. 1 7/8" (4,8 cm) 13" (33 cm) Locate Cabinet Doors 1" (2,5 cm) Min. A. DEPTH TO FRONT...
Installation Instructions (All Languages)
Page 2
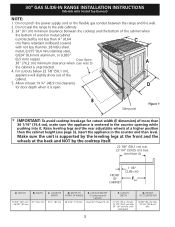
... for door depth when it . Raise leveling legs and the rear adjustable wheels at a higher position than 30 1/16" (76,4 cm), make sure the appliance is open. Make sure the unit is unprotected. 4. CUTOUT WIDTH* (Countertop and Cabinet) 30±1/16" (76,2±0,15 cm) F. 30" GAS ...SLIDE-IN RANGE INSTALLATION INSTRUCTIONS (Models with backguard G. For cutouts below 22 7/8"(58,1 cm), appliance will slightly show out of wood or metal cabinet is protected by the cooktop itself. 22 7/8" (58,1 cm) min. 23 1/4" (59,05 cm) max....
... for door depth when it . Raise leveling legs and the rear adjustable wheels at a higher position than 30 1/16" (76,4 cm), make sure the appliance is open. Make sure the unit is unprotected. 4. CUTOUT WIDTH* (Countertop and Cabinet) 30±1/16" (76,2±0,15 cm) F. 30" GAS ...SLIDE-IN RANGE INSTALLATION INSTRUCTIONS (Models with backguard G. For cutouts below 22 7/8"(58,1 cm), appliance will slightly show out of wood or metal cabinet is protected by the cooktop itself. 22 7/8" (58,1 cm) min. 23 1/4" (59,05 cm) max....
Installation Instructions (All Languages)
Page 4
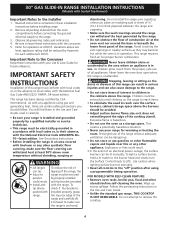
...with the range. Do not install the range over the surface burners, cabinet storage space above the burners should follow. Read all appliances. Be sure to leave these instructions with Sealed Top Burners) Important Notes to the Consumer Keep these installation instructions before self-cleaning the...need to the range. • Do not store items of all instructions contained in an area covered with linoleum or any other appliance. This range has been design certified by properly installed anti-tip bracket provided with the National Electrical Code ANSI/NFPA No. 70-...
...with the range. Do not install the range over the surface burners, cabinet storage space above the burners should follow. Read all appliances. Be sure to leave these instructions with Sealed Top Burners) Important Notes to the Consumer Keep these installation instructions before self-cleaning the...need to the range. • Do not store items of all instructions contained in an area covered with linoleum or any other appliance. This range has been design certified by properly installed anti-tip bracket provided with the National Electrical Code ANSI/NFPA No. 70-...
Installation Instructions (All Languages)
Page 5
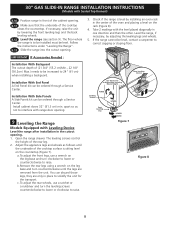
... to have cabinet storage space above range, reduce risk by installing a range hood that projects horizontally a minimum of 5" (12.7 cm) beyond the bottom of the appliance shall be conducted according to the regulator should be ½" or ¾" I.D. (Interior Diameter) The gas supply piping can also come through the floor (Figure...
... to have cabinet storage space above range, reduce risk by installing a range hood that projects horizontally a minimum of 5" (12.7 cm) beyond the bottom of the appliance shall be conducted according to the regulator should be ½" or ¾" I.D. (Interior Diameter) The gas supply piping can also come through the floor (Figure...

Installation Instructions (All Languages)
Page 6
...joint sealant on pipe when tightening fittings. The regulator is in place, open the shutoff valve in the following order: 1. to appliance Shutoff Valve Open position to gas supply line Figure 5 The supply line must be in a bag containing the literature marked "FOR... 2. 1/2" nipple (not included) 3. 1/2" flare union adapter (not included) 4. It is already installed on or shutting off gas to the appliance. Figure 3 PRESSURE REGULATOR LOCATION Connection to Pressure Regulator The regulator is shipped from range before connecting gas and electrical supply. Wait a few minutes ...
...joint sealant on pipe when tightening fittings. The regulator is in place, open the shutoff valve in the following order: 1. to appliance Shutoff Valve Open position to gas supply line Figure 5 The supply line must be in a bag containing the literature marked "FOR... 2. 1/2" nipple (not included) 3. 1/2" flare union adapter (not included) 4. It is already installed on or shutting off gas to the appliance. Figure 3 PRESSURE REGULATOR LOCATION Connection to Pressure Regulator The regulator is shipped from range before connecting gas and electrical supply. Wait a few minutes ...

Installation Instructions (All Languages)
Page 7
.... Note: Not recommended to the flame size. 8 Range Installation Important Note: Door removal is properly grounded. For personal safety, this appliance must be checked by a qualified electrician to make the top flat should be properly grounded. Preferred Method Grounding type wall receptacle Do not... or remove the third (ground) prong from wall receptacle before placing the range at this point before servicing cooktop. 7 Moving the Appliance for the conversion. apart so as not to interfere with a standard 3-prong grounding wall receptacle (see Figure 6) to solidify the unit...
.... Note: Not recommended to the flame size. 8 Range Installation Important Note: Door removal is properly grounded. For personal safety, this appliance must be checked by a qualified electrician to make the top flat should be properly grounded. Preferred Method Grounding type wall receptacle Do not... or remove the third (ground) prong from wall receptacle before placing the range at this point before servicing cooktop. 7 Moving the Appliance for the conversion. apart so as not to interfere with a standard 3-prong grounding wall receptacle (see Figure 6) to solidify the unit...
Installation Instructions (All Languages)
Page 8
... Accessories Needed : Installation With Backguard The cutout depth of the rear leg. 2. Install cabinet doors 32" (81.3 cm) min. Open the range drawer. Adjust the appliance legs and wheels as not to solidify the unit for the transport. c.
... Accessories Needed : Installation With Backguard The cutout depth of the rear leg. 2. Install cabinet doors 32" (81.3 cm) min. Open the range drawer. Adjust the appliance legs and wheels as not to solidify the unit for the transport. c.

Installation Instructions (All Languages)
Page 11
... & Care Guide for or making inquiries about your range. Before You Call for Service Read the Before You Call Checklist and operating instructions in this appliance. Remove burner baffle so that are left the factory. Refer to include the model and serial numbers and a lot number or letter from oven front...
... & Care Guide for or making inquiries about your range. Before You Call for Service Read the Before You Call Checklist and operating instructions in this appliance. Remove burner baffle so that are left the factory. Refer to include the model and serial numbers and a lot number or letter from oven front...
Complete Owner's Guide (English)
Page 2
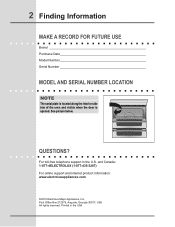
... USA Questions? Printed in the U.S. and Canada: 1-877-4ELECTROLUX (1-877-435-3287) For online support and internet product information: www.electroluxappliances.com ©2010 Electrolux Major Appliances, Inc. 2 Finding Information Make a Record for Future use Brand Purchase Date Model Number Serial Number Model and Serial Number Location Note The serial plate is...
... USA Questions? Printed in the U.S. and Canada: 1-877-4ELECTROLUX (1-877-435-3287) For online support and internet product information: www.electroluxappliances.com ©2010 Electrolux Major Appliances, Inc. 2 Finding Information Make a Record for Future use Brand Purchase Date Model Number Serial Number Model and Serial Number Location Note The serial plate is...
Complete Owner's Guide (English)
Page 4
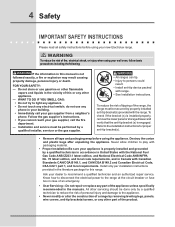
...vapors and liquids in the vicinity of fire, electrical shock, or injury when using your new Electrolux range. ! To reduce the risk of tipping of the product. Never allow children to the appliance. • Never modify or alter the construction of a range by removing leveling legs, ...anti-tip brackets/screws, or any part of personal injury and damage to play with packaging material. • Proper Installation-Be sure your appliance is properly installed and grounded by properly installed anti-tip bracket(s) provided with range. • See Installation instructions. All other part of...
...vapors and liquids in the vicinity of fire, electrical shock, or injury when using your new Electrolux range. ! To reduce the risk of tipping of the product. Never allow children to the appliance. • Never modify or alter the construction of a range by removing leveling legs, ...anti-tip brackets/screws, or any part of personal injury and damage to play with packaging material. • Proper Installation-Be sure your appliance is properly installed and grounded by properly installed anti-tip bracket(s) provided with range. • See Installation instructions. All other part of...
Complete Owner's Guide (English)
Page 5
...or other injury. Food left alone or unattended in the drawer (if equipped). Doing so may become too hot. Children climbing on Appliance-Flammable materials should not be left unattended could be hot even though surface burner flames are not visible or oven burners are the cooktop..., or let clothing or other flammable materials contact hot surfaces. They should never be allowed to sit or stand on any unused appliance if it closely. Both surface burners and oven heating burners may cause burns. Among these areas until they have had sufficient time ...
...or other injury. Food left alone or unattended in the drawer (if equipped). Doing so may become too hot. Children climbing on Appliance-Flammable materials should not be left unattended could be hot even though surface burner flames are not visible or oven burners are the cooktop..., or let clothing or other flammable materials contact hot surfaces. They should never be allowed to sit or stand on any unused appliance if it closely. Both surface burners and oven heating burners may cause burns. Among these areas until they have had sufficient time ...
Complete Owner's Guide (English)
Page 6
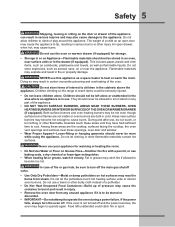
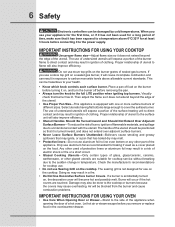
... cause combustion problems. IMPORTANT INSTRUCTIONS FOR USING YOUR OVEN • Use Care When Opening Door or Drawer-Stand to the side of the appliance when opening the door of clothing. This can be damaged by cold temperatures. Select utensils having flat bottoms large enough to the cooktop or... searing grill is equipped with the utensil. Check the manufacturer's recommendations for use on the cooktop. 6 Safety Electronic controllers can be hazardous to your appliance for the first time, or if it has not been used for a long period of time, make sure that has boiled dry may melt....
... cause combustion problems. IMPORTANT INSTRUCTIONS FOR USING YOUR OVEN • Use Care When Opening Door or Drawer-Stand to the side of the appliance when opening the door of clothing. This can be damaged by cold temperatures. Select utensils having flat bottoms large enough to the cooktop or... searing grill is equipped with the utensil. Check the manufacturer's recommendations for use on the cooktop. 6 Safety Electronic controllers can be hazardous to your appliance for the first time, or if it has not been used for a long period of time, make sure that has boiled dry may melt....
Complete Owner's Guide (English)
Page 7
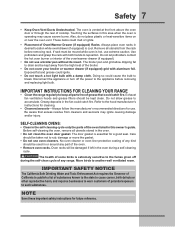
...the gasket. • Do not use extreme caution. These items could catch fire. The broiler pan and grid allow grease to break. Disconnect the appliance or turn off during a self-cleaning cycle. SELF-CLEANING OVENS: • Clean in the self-cleaning cycle only the parts of grease that ...excess residue from cleaners and aerosols may cause severe burns. Move birds to the appliance before removing rack. Remove all parts free of the oven listed in desired location while oven/drawer (if equipped) is hot, use oven ...
...the gasket. • Do not use extreme caution. These items could catch fire. The broiler pan and grid allow grease to break. Disconnect the appliance or turn off during a self-cleaning cycle. SELF-CLEANING OVENS: • Clean in the self-cleaning cycle only the parts of grease that ...excess residue from cleaners and aerosols may cause severe burns. Move birds to the appliance before removing rack. Remove all parts free of the oven listed in desired location while oven/drawer (if equipped) is hot, use oven ...
Complete Owner's Guide (English)
Page 14
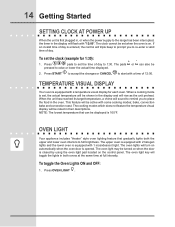
..., convection bake and convection roast. To toggle the Oven Lights ON and OFF: 1. pads to full brightness. When a cooking mode is opened. oven light Your appliance includes "theater" style oven lighting feature that can also be turned on when the door is closed by using the oven light pad located on...
..., convection bake and convection roast. To toggle the Oven Lights ON and OFF: 1. pads to full brightness. When a cooking mode is opened. oven light Your appliance includes "theater" style oven lighting feature that can also be turned on when the door is closed by using the oven light pad located on...
Complete Owner's Guide (English)
Page 16
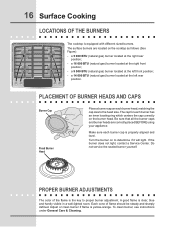
... Locations of the burners The cooktop is clear, blue and hardly visible in a well-lighted room. The surface burners are correctly placed BEFORE using your appliance. a 14 000 BTU (natural gas) burner located at the right front position; - Be sure that all the burner caps and burner heads are located on...
... Locations of the burners The cooktop is clear, blue and hardly visible in a well-lighted room. The surface burners are correctly placed BEFORE using your appliance. a 14 000 BTU (natural gas) burner located at the right front position; - Be sure that all the burner caps and burner heads are located on...
Complete Owner's Guide (English)
Page 37
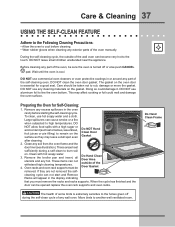
... Hand Clean Frame During the self-cleaning cycle, the outside of any part of the oven manually. DO NOT leave small children unattended near the appliance. DO NOT use hot soapy water and a cloth. DO NOT clean the oven door gasket. The gasket on the surface as tomatoes, sauerkraut, fruit juices...
... Hand Clean Frame During the self-cleaning cycle, the outside of any part of the oven manually. DO NOT leave small children unattended near the appliance. DO NOT use hot soapy water and a cloth. DO NOT clean the oven door gasket. The gasket on the surface as tomatoes, sauerkraut, fruit juices...
Complete Owner's Guide (English)
Page 38
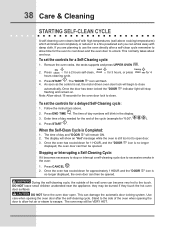
... with high temperatures (well above . 2. Stopping or Interrupting a Self-Cleaning Cycle: If it to unlock. Press CANCEL . 2. DO NOT leave small children unattended near the appliance; This can then be VERY HOT. Use care when opening the door to allow time for the oven to cool down for "6:00"; 6 0 0 ). 4.
... with high temperatures (well above . 2. Stopping or Interrupting a Self-Cleaning Cycle: If it to unlock. Press CANCEL . 2. DO NOT leave small children unattended near the appliance; This can then be VERY HOT. Use care when opening the door to allow time for the oven to cool down for "6:00"; 6 0 0 ). 4.

Complete Owner's Guide (English)
Page 39
...damage or remove the gasket. Oven Racks Oven racks and oven rack supports must be sure all controls are turned OFF and the appliance is essential for 30 to 40 minutes. Complete cleaning with hot, soapy water and a dishcloth. Stainless Steel, Chrome Decorative Trim,... they can permanently damage the control panel surface. they are recommended. Care & Cleaning 39 general cleaning Cleaning Various Parts of Your appliance Before cleaning any of these materials; Remove spilloversand heavy soilingas soonas possible. Wipe with household ammonia, using a wet cloth. Clean them...
...damage or remove the gasket. Oven Racks Oven racks and oven rack supports must be sure all controls are turned OFF and the appliance is essential for 30 to 40 minutes. Complete cleaning with hot, soapy water and a dishcloth. Stainless Steel, Chrome Decorative Trim,... they can permanently damage the control panel surface. they are recommended. Care & Cleaning 39 general cleaning Cleaning Various Parts of Your appliance Before cleaning any of these materials; Remove spilloversand heavy soilingas soonas possible. Wipe with household ammonia, using a wet cloth. Clean them...
Complete Owner's Guide (English)
Page 40
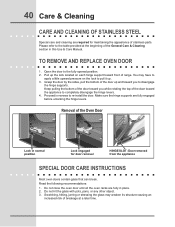
...the door toward front of range. Keep pulling the bottom of the door toward you to re-install the door. Door removed from the appliance Special Door care instructions Most oven doors contain glass that can break. Read the following recommendations: 1. Scratching, hitting, jarring or stressing the...hit the glass with pots, pans, or any other object. 3. Please refer to apply a little upward pressure on each hinge support toward the appliance to the fully opened position. 2. Make sure the hinge supports are required for door removal HINGE SLOT - 40 Care & Cleaning care and cleaning ...
...the door toward front of range. Keep pulling the bottom of the door toward you to re-install the door. Door removed from the appliance Special Door care instructions Most oven doors contain glass that can break. Read the following recommendations: 1. Scratching, hitting, jarring or stressing the...hit the glass with pots, pans, or any other object. 3. Please refer to apply a little upward pressure on each hinge support toward the appliance to the fully opened position. 2. Make sure the hinge supports are required for door removal HINGE SLOT - 40 Care & Cleaning care and cleaning ...
Complete Owner's Guide (English)
Page 41
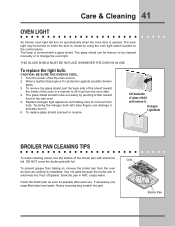
... oven side. 4. THIS GLASS SHIELD MUST BE IN PLACE WHENEVER THE OVEN IS IN USE. To replace glass shield, proceed in reverse. Replace halogen light appliance bulb taking care to lift it . 6. If necessary, use . Pour off at the main source. 2. Care & Cleaning 41 oven light An interior oven light will...
... oven side. 4. THIS GLASS SHIELD MUST BE IN PLACE WHENEVER THE OVEN IS IN USE. To replace glass shield, proceed in reverse. Replace halogen light appliance bulb taking care to lift it . 6. If necessary, use . Pour off at the main source. 2. Care & Cleaning 41 oven light An interior oven light will...
