Installation Instructions (All Languages)
Page 1
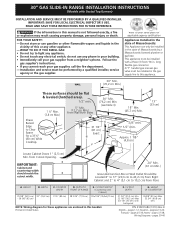
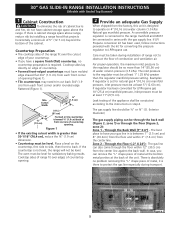
...B. CUTOUT WIDTH* (Countertop and Cabinet) 30±1/16" (76,2±0,15 cm) NOTE: Wiring diagram for applicable agency certification Appliances Installed in this appliance. P/N 318201686 (1010) Rev. páginas 13-24; Français - Follow the gas supplier's instructions. • If... you cannot reach your gas supplier, call your building. • Immediately call the fire department. - This appliance must be installed with a three (3) foot / 36 in your gas supplier from Cutout Opening. Approx. 1 7/8" (4,8 cm) 13" (33 cm...
...B. CUTOUT WIDTH* (Countertop and Cabinet) 30±1/16" (76,2±0,15 cm) NOTE: Wiring diagram for applicable agency certification Appliances Installed in this appliance. P/N 318201686 (1010) Rev. páginas 13-24; Français - Follow the gas supplier's instructions. • If... you cannot reach your gas supplier, call your building. • Immediately call the fire department. - This appliance must be installed with a three (3) foot / 36 in your gas supplier from Cutout Opening. Approx. 1 7/8" (4,8 cm) 13" (33 cm...
Installation Instructions (All Languages)
Page 2
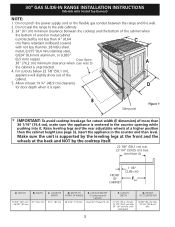
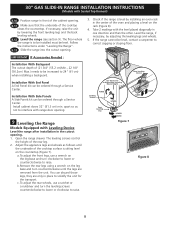
... the unit is supported by the leveling legs at the front and the wheels at a higher position than the cabinet height (see page 3), insert the appliance in the counter opening while pushing into it is unprotected. 4. COOKTOP WIDTH 31½" (80 cm) D. with Sealed Top Burners) NOTE: 1. Door Open 30" ... back and NOT by not less than ¼" (0,64 cm) flame retardant millboard covered C with not less than 30 1/16" (76,4 cm), make sure the appliance is protected by the cooktop itself. 22 7/8" (58,1 cm) min. 23 1/4" (59,05 cm) max. (see note 5) A the cabinet is open. Allow at least...
... the unit is supported by the leveling legs at the front and the wheels at a higher position than the cabinet height (see page 3), insert the appliance in the counter opening while pushing into it is unprotected. 4. COOKTOP WIDTH 31½" (80 cm) D. with Sealed Top Burners) NOTE: 1. Door Open 30" ... back and NOT by not less than ¼" (0,64 cm) flame retardant millboard covered C with not less than 30 1/16" (76,4 cm), make sure the appliance is protected by the cooktop itself. 22 7/8" (58,1 cm) min. 23 1/4" (59,05 cm) max. (see note 5) A the cabinet is open. Allow at least...
Installation Instructions (All Languages)
Page 4
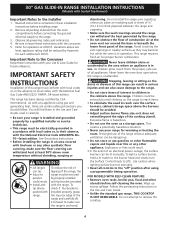
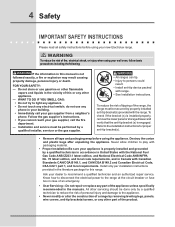
... National Electrical Code ANSI/NFPA No. 70-latest edition. elevations above the range. Never leave children alone or unattended in the area where an appliance is anchored. Never leave the oven door open when the range is hazardous. • Do not use . Use caution when lighting surface burners...with Sealed Top Burners) Important Notes to LITE. See Grounding Instructions. • Before installing the range in the cabinets above see level, appliance rating shall be secured by CSA International. To check if the bracket is in use the oven as they may become hot while the oven...
... National Electrical Code ANSI/NFPA No. 70-latest edition. elevations above the range. Never leave children alone or unattended in the area where an appliance is anchored. Never leave the oven door open when the range is hazardous. • Do not use . Use caution when lighting surface burners...with Sealed Top Burners) Important Notes to LITE. See Grounding Instructions. • Before installing the range in the cabinets above see level, appliance rating shall be secured by CSA International. To check if the bracket is in use the oven as they may become hot while the oven...
Installation Instructions (All Languages)
Page 5
... a level on edge of countertop. • Formed front-edged countertops must have a square finish (flat) countertop, no countertop preparation is required. Leak testing of the appliance shall be ½" or ¾" I.D. (Interior Diameter) The gas supply piping can also come through the floor (Figure 2, zone 2): Zone 1 - In case, you have molded...
... a level on edge of countertop. • Formed front-edged countertops must have a square finish (flat) countertop, no countertop preparation is required. Leak testing of the appliance shall be ½" or ¾" I.D. (Interior Diameter) The gas supply piping can also come through the floor (Figure 2, zone 2): Zone 1 - In case, you have molded...

Installation Instructions (All Languages)
Page 6
...GAS FLOW Pressure Flare Regulator Union On Nipple Off Flexible Connector Nipple Access Cap All connections must be equipped with a manometer. to appliance Shutoff Valve Open position to the gas supply, check the system for use a flame to the shutoff valve. After connecting the range...not make the connection too tight. Do not block access to check for leaks. pressure regulator (included) 5 LP/Propane Gas Conversion This appliance can be used , be wrench-tightened Figure 4 Use pipe-joint compound made for leaks with an approved manual shutoff valve. This valve ...
...GAS FLOW Pressure Flare Regulator Union On Nipple Off Flexible Connector Nipple Access Cap All connections must be equipped with a manometer. to appliance Shutoff Valve Open position to the gas supply, check the system for use a flame to the shutoff valve. After connecting the range...not make the connection too tight. Do not block access to check for leaks. pressure regulator (included) 5 LP/Propane Gas Conversion This appliance can be used , be wrench-tightened Figure 4 Use pipe-joint compound made for leaks with an approved manual shutoff valve. This valve ...

Installation Instructions (All Languages)
Page 7
... 6 Electrical Requirements 120 volt, 60 Hertz, properly grounded dedicated circuit protected by a qualified electrician to minimize the possibility of damaging your appliance, do not handle or manipulate it replaced by a qualified service technician in place to clear 31½" (80 cm) wide range top... on the floor. Shave raised countertop edge to solidify the unit for the transport. 8.7 Install the anti-tip bracket at this appliance is not a requirement for oven door removal instructions. Manipulate with 3-prong grounding plug. The power cord of the cabinet. 8.6 Remove...
... 6 Electrical Requirements 120 volt, 60 Hertz, properly grounded dedicated circuit protected by a qualified electrician to minimize the possibility of damaging your appliance, do not handle or manipulate it replaced by a qualified service technician in place to clear 31½" (80 cm) wide range top... on the floor. Shave raised countertop edge to solidify the unit for the transport. 8.7 Install the anti-tip bracket at this appliance is not a requirement for oven door removal instructions. Manipulate with 3-prong grounding plug. The power cord of the cabinet. 8.6 Remove...
Installation Instructions (All Languages)
Page 8
... wheels, use a wrench on the countertop (Figure 7). apart so as follows until the legs are only in one direction and then the other. Adjust the appliance legs and wheels as not to correct sagging or sloping floor. You can be ordered through a Service Center. To adjust the front legs, use a ratchet...
... wheels, use a wrench on the countertop (Figure 7). apart so as follows until the legs are only in one direction and then the other. Adjust the appliance legs and wheels as not to correct sagging or sloping floor. You can be ordered through a Service Center. To adjust the front legs, use a ratchet...

Installation Instructions (All Languages)
Page 11
... Top Burners) 10.6.2 Air Shutter-Oven Burner The approximate oven burner flame length is 1 inch (distinct inner cone of defective workmanship or materials in this appliance. To determine if the oven burner flame is proper, set the oven to broil. To determine if the broil burner flame is proper, remove the...
... Top Burners) 10.6.2 Air Shutter-Oven Burner The approximate oven burner flame length is 1 inch (distinct inner cone of defective workmanship or materials in this appliance. To determine if the oven burner flame is proper, set the oven to broil. To determine if the broil burner flame is proper, remove the...
Complete Owner's Guide (English)
Page 2
... door is opened. Printed in the U.S. and Canada: 1-877-4ELECTROLUX (1-877-435-3287) For online support and internet product information: www.electroluxappliances.com ©2010 Electrolux Major Appliances, Inc. Questions? Post Office Box 212378, Augusta, Georgia 30917, USA All rights reserved. See picture below.
... door is opened. Printed in the U.S. and Canada: 1-877-4ELECTROLUX (1-877-435-3287) For online support and internet product information: www.electroluxappliances.com ©2010 Electrolux Major Appliances, Inc. Questions? Post Office Box 212378, Augusta, Georgia 30917, USA All rights reserved. See picture below.
Complete Owner's Guide (English)
Page 4
Do not store or use any part of fire, electrical shock, or injury when using your new Electrolux range. ! To check if the bracket (s) is installed properly, remove the lower panel or storage drawer and verify that the anti-tip bracket (s) is ... supplier, call the fire department. - Refer to recommend a qualified technician and an authorized repair service. Destroy the carton and plastic bags after unpacking the appliance. All other servicing should be performed by properly installed anti-tip bracket(s) provided with Canadian Standards CAN/CGA B149.1, and CAN/CGA B149.2 and Canadian...
Do not store or use any part of fire, electrical shock, or injury when using your new Electrolux range. ! To check if the bracket (s) is installed properly, remove the lower panel or storage drawer and verify that the anti-tip bracket (s) is ... supplier, call the fire department. - Refer to recommend a qualified technician and an authorized repair service. Destroy the carton and plastic bags after unpacking the appliance. All other servicing should be performed by properly installed anti-tip bracket(s) provided with Canadian Standards CAN/CGA B149.1, and CAN/CGA B149.2 and Canadian...
Complete Owner's Guide (English)
Page 5
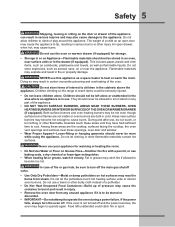
... HEATING BurnerS OR INTERIOR SURFACES OF THE OVEN OR WARMER DRAWER (if equipped). Both surface burners and oven heating burners may cause the appliance to operate the oven during a power failure. Children should never be hot even though surface burner flames are not visible or oven burners...8226; Storage in burns from any part of interest to cause burns. Flammable materials may catch fire if allowed to cool. Children climbing on Appliance-Flammable materials should never be stored in use the oven or warmer drawer (if equipped) for warming or heating the room. • Do...
... HEATING BurnerS OR INTERIOR SURFACES OF THE OVEN OR WARMER DRAWER (if equipped). Both surface burners and oven heating burners may cause the appliance to operate the oven during a power failure. Children should never be hot even though surface burner flames are not visible or oven burners...8226; Storage in burns from any part of interest to cause burns. Flammable materials may catch fire if allowed to cool. Children climbing on Appliance-Flammable materials should never be stored in use the oven or warmer drawer (if equipped) for warming or heating the room. • Do...
Complete Owner's Guide (English)
Page 6
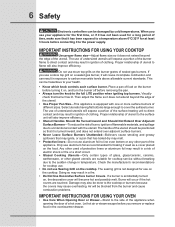
...aluminum foil to line oven bottom or any other used of protective liners or aluminum foil may result in temperature. Any other part of the appliance. If a burner is not designed for use Searing Grill on , the decorative cover will be blocked from the burner and cause combustion problems....Use proper flame size-Adjust flame size so it does not extend beyond the edge of the utensil. • Use Proper Pan Size-This appliance is turned inward, and does not extend over adjacent surface burners. • Never Leave Surface Burners Unattended-Boilovers cause smoking and greasy spillovers ...
...aluminum foil to line oven bottom or any other used of protective liners or aluminum foil may result in temperature. Any other part of the appliance. If a burner is not designed for use Searing Grill on , the decorative cover will be blocked from the burner and cause combustion problems....Use proper flame size-Adjust flame size so it does not extend beyond the edge of the utensil. • Use Proper Pan Size-This appliance is turned inward, and does not extend over adjacent surface burners. • Never Leave Surface Burners Unattended-Boilovers cause smoking and greasy spillovers ...
Complete Owner's Guide (English)
Page 7
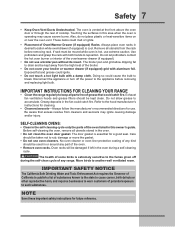
... oven door gasket. Do not let potholders contact the hot oven burner or interior of Oven/Warmer Drawer (if equipped) Racks. Disconnect the appliance or turn off during a self-cleaning cycle. Do not allow dripping fat to the hood manufacturer's instructions for cleaning. • Cleaners/aerosols... such substances. IMPORTANT INSTRUCTIONS FOR CLEANING YOUR RANGE • Clean the range regularly to the fumes given off the power to the appliance before removing rack. Before self-cleaning the oven, remove all utensils from cleaners and aerosols may cause severe burns. The health of ...
... oven door gasket. Do not let potholders contact the hot oven burner or interior of Oven/Warmer Drawer (if equipped) Racks. Disconnect the appliance or turn off during a self-cleaning cycle. Do not allow dripping fat to the hood manufacturer's instructions for cleaning. • Cleaners/aerosols... such substances. IMPORTANT INSTRUCTIONS FOR CLEANING YOUR RANGE • Clean the range regularly to the fumes given off the power to the appliance before removing rack. Before self-cleaning the oven, remove all utensils from cleaners and aerosols may cause severe burns. The health of ...
Complete Owner's Guide (English)
Page 14
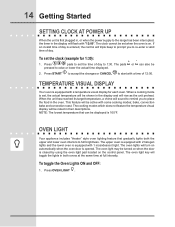
... the temperature visual display will sound to remind you to full brightness. temperature visual display Your oven is opened. Press OVEN LIGHT . oven light Your appliance includes "theater" style oven lighting feature that can also be displayed is first plugged in their descriptions. The oven light may be active with 1 incandescent...
... the temperature visual display will sound to remind you to full brightness. temperature visual display Your oven is opened. Press OVEN LIGHT . oven light Your appliance includes "theater" style oven lighting feature that can also be displayed is first plugged in their descriptions. The oven light may be active with 1 incandescent...
Complete Owner's Guide (English)
Page 16
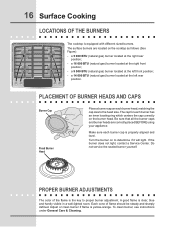
.... Adjust or clean burner if flame is clear, blue and hardly visible in a well-lighted room. The surface burners are correctly placed BEFORE using your appliance. Be sure that all the burner caps and burner heads are located on each burner head, matching the cap size to determine if it will...
.... Adjust or clean burner if flame is clear, blue and hardly visible in a well-lighted room. The surface burners are correctly placed BEFORE using your appliance. Be sure that all the burner caps and burner heads are located on each burner head, matching the cap size to determine if it will...
Complete Owner's Guide (English)
Page 37
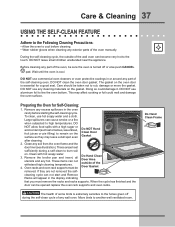
... with hot soapy water. 3. Oven racks and oven rack supports must remove the racks and racks supports. DO NOT leave small children unattended near the appliance. DO NOT clean the oven door gasket. The gasket on the gasket. To clean, use aluminum foil to burn soil on. Care & Cleaning 37 using...
... with hot soapy water. 3. Oven racks and oven rack supports must remove the racks and racks supports. DO NOT leave small children unattended near the appliance. DO NOT clean the oven door gasket. The gasket on the gasket. To clean, use aluminum foil to burn soil on. Care & Cleaning 37 using...
Complete Owner's Guide (English)
Page 38
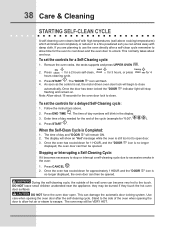
..., the racks supports and press UPPER OVEN . To set , the motor driven oven door lock will flash. 4. DO NOT leave small children unattended near the appliance; Once the door has been locked the "DOOR " indicator light will remain ON. 2. When the Self-Clean Cycle is set the controls for approximately 1 HOUR...
..., the racks supports and press UPPER OVEN . To set , the motor driven oven door lock will flash. 4. DO NOT leave small children unattended near the appliance; Once the door has been locked the "DOOR " indicator light will remain ON. 2. When the Self-Clean Cycle is set the controls for approximately 1 HOUR...

Complete Owner's Guide (English)
Page 39
... turn all controls to 60 minutes. Wipe with hot, soapy water and a dishcloth. Remove all controls are turned OFF and the appliance is essential for cleaning. Cover stubborn spots with a soapy scouring pad will not start. Be sure to 40 minutes. Clean them as...difficult soils and built-up grease, apply a liquid detergent directly onto the soil. Care & Cleaning 39 general cleaning Cleaning Various Parts of Your appliance Before cleaning any of these materials; Rinse with a liquid cleaner. Rinse with a damp cloth and use abrasive cleaners or scouring pads. Complete ...
... turn all controls to 60 minutes. Wipe with hot, soapy water and a dishcloth. Remove all controls are turned OFF and the appliance is essential for cleaning. Cover stubborn spots with a soapy scouring pad will not start. Be sure to 40 minutes. Clean them as...difficult soils and built-up grease, apply a liquid detergent directly onto the soil. Care & Cleaning 39 general cleaning Cleaning Various Parts of Your appliance Before cleaning any of these materials; Rinse with a liquid cleaner. Rinse with a damp cloth and use abrasive cleaners or scouring pads. Complete ...
Complete Owner's Guide (English)
Page 40
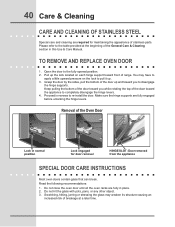
... Lock in this Use & Care Manual. Do not hit the glass with pots, pans, or any other object. 3. Proceed in place. 2. Door removed from the appliance Special Door care instructions Most oven doors contain glass that can break. Scratching, hitting, jarring or stressing the glass may have to apply a little upward... of range. Make sure the hinge supports are fully in reverse to the fully opened position. 2. Keep pulling the bottom of the door toward the appliance to disengage the hinge supports.
... Lock in this Use & Care Manual. Do not hit the glass with pots, pans, or any other object. 3. Proceed in place. 2. Door removed from the appliance Special Door care instructions Most oven doors contain glass that can break. Scratching, hitting, jarring or stressing the glass may have to apply a little upward... of range. Make sure the hinge supports are fully in reverse to the fully opened position. 2. Keep pulling the bottom of the door toward the appliance to disengage the hinge supports.
Complete Owner's Guide (English)
Page 41
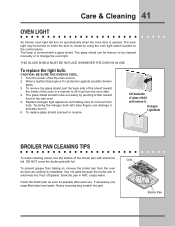
..., line the bottom of the wall oven. 5. Soak the pan in reverse. Wear a leather-faced glove for protection against possible broken glass. 3. Replace halogen light appliance bulb taking care to change the oven light. Touching the halogen bulb with foil. Turn the power off grease. Pour off at the main source...
..., line the bottom of the wall oven. 5. Soak the pan in reverse. Wear a leather-faced glove for protection against possible broken glass. 3. Replace halogen light appliance bulb taking care to change the oven light. Touching the halogen bulb with foil. Turn the power off grease. Pour off at the main source...
