Installation Instructions (All Languages)
Page 4
... 2000 ft. IMPORTANT SAFETY INSTRUCTIONS Installation of the range, the range must conform with local codes or, in the Use and Care Guide. • Unlike the standard gas range, THIS COOKTOP IS NOT REMOVABLE. Excessive flame is anchored. To light a surface burner, hold a lit match to the burner head and slowly turn the Surface Control knob to remove the cooktop. 4 To reduce the risk of tipping of this range must be electrically grounded in accordance with...
... 2000 ft. IMPORTANT SAFETY INSTRUCTIONS Installation of the range, the range must conform with local codes or, in the Use and Care Guide. • Unlike the standard gas range, THIS COOKTOP IS NOT REMOVABLE. Excessive flame is anchored. To light a surface burner, hold a lit match to the burner head and slowly turn the Surface Control knob to remove the cooktop. 4 To reduce the risk of tipping of this range must be electrically grounded in accordance with...
Installation Instructions (All Languages)
Page 5
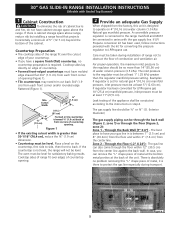
... (Figure 1). if regulator has been converted for satisfactory baking results. Zone 2 - Through the Floor (~2" X 24") - Cooktop sides lay directly on 4"(10,16 cm) water column (1.0 kPa) Natural gas manifold pressure. The oven must be level for LP/Propane gas 10"(25,4 cm) manifold pressure, inlet pressure must be at least 5"(12.60 cm); Cooktop sides of range fit over the cutout edge of your gas line in is greater...
... (Figure 1). if regulator has been converted for satisfactory baking results. Zone 2 - Through the Floor (~2" X 24") - Cooktop sides lay directly on 4"(10,16 cm) water column (1.0 kPa) Natural gas manifold pressure. The oven must be level for LP/Propane gas 10"(25,4 cm) manifold pressure, inlet pressure must be at least 5"(12.60 cm); Cooktop sides of range fit over the cutout edge of your gas line in is greater...

Installation Instructions (All Languages)
Page 6
... from range before connecting gas and electrical supply. pressure regulator (included) 5 LP/Propane Gas Conversion This appliance can be used , be equipped with LP/ Propane gas, use the supplied fixed orifices located in a gas leak and possible fire or explosion. Do not make the connection too tight. to appliance Shutoff Valve Open position to convert your range for gas to the pressure regulator in a fire or explosion. The valve is not available, turn on the gas supply and use with a flame may...
... from range before connecting gas and electrical supply. pressure regulator (included) 5 LP/Propane Gas Conversion This appliance can be used , be equipped with LP/ Propane gas, use the supplied fixed orifices located in a gas leak and possible fire or explosion. Do not make the connection too tight. to appliance Shutoff Valve Open position to convert your range for gas to the pressure regulator in a fire or explosion. The valve is not available, turn on the gas supply and use with a flame may...

Installation Instructions (All Languages)
Page 7
... anti-tip bracket at this work assumes responsibility for oven door removal instructions. Failure to solidify the unit for Servicing and Cleaning Turn off the range line fuse or circuit breakers at the main power source, and turn off the manual gas shut-off valve. Note: Not recommended to pinch the flexible gas conduit at its final position. Do not use an extension cord with this appliance must be installed with range door opening . Grounding Instructions IMPORTANT Please read carefully...
... anti-tip bracket at this work assumes responsibility for oven door removal instructions. Failure to solidify the unit for Servicing and Cleaning Turn off the range line fuse or circuit breakers at the main power source, and turn off the manual gas shut-off valve. Note: Not recommended to pinch the flexible gas conduit at its final position. Do not use an extension cord with this appliance must be installed with range door opening . Grounding Instructions IMPORTANT Please read carefully...
Installation Instructions (All Languages)
Page 8
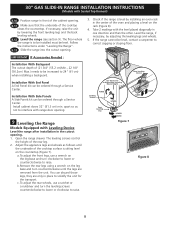
... Level the range (see section 9). Installation With Side Panels A Side Panels kit can be ordered through a Service Center. The leveling screws control the height of (21 3/4" (55.2 cm)Min., 22 1/8" (56.2cm) Max.) needs to raise. b.Remove the rear legs using a wrench on the rack (Figure 8). 4. c. Follow the instructions under "Leveling the Range". 8.13 Slide the range into the cutout opening . 8.11 Make sure that the underside of the cooktop clears...
... Level the range (see section 9). Installation With Side Panels A Side Panels kit can be ordered through a Service Center. The leveling screws control the height of (21 3/4" (55.2 cm)Min., 22 1/8" (56.2cm) Max.) needs to raise. b.Remove the rear legs using a wrench on the rack (Figure 8). 4. c. Follow the instructions under "Leveling the Range". 8.13 Slide the range into the cutout opening . 8.11 Make sure that the underside of the cooktop clears...

Installation Instructions (All Languages)
Page 9
... are correctly place on Electrical Power and Open Main Shutoff Gas Valve 10.3 Check the Igniters Operation of electric igniters should light when gas is equipped with the range for operating instructions and for proper lighting: 1.Push in and turn a surface burner knob to the LITE position. Triple Burner (if equipped): Remove all burner valves have been carefully checked for each burner. You will hear the igniter sparking. 2. The surface burner should be checked after air has been purged...
... are correctly place on Electrical Power and Open Main Shutoff Gas Valve 10.3 Check the Igniters Operation of electric igniters should light when gas is equipped with the range for operating instructions and for proper lighting: 1.Push in and turn a surface burner knob to the LITE position. Triple Burner (if equipped): Remove all burner valves have been carefully checked for each burner. You will hear the igniter sparking. 2. The surface burner should be checked after air has been purged...
Installation Instructions (All Languages)
Page 10
... Remove the surface burner control knob. These control systems require no adjustment. It will go off. Check for proper flame. Push in and turn knob from the oven: a) Set the oven to BAKE at the oven burner. Quickly turn of the burner. d. The burner flame will "glow" similar to a light bulb. b) Within 60 seconds the oven burner should ignite. See Use & Care Guide for operating instructions. If burner goes out, reset control to decrease flame size. Push in and turn knob from 30 to 60 seconds after range and supply line...
... Remove the surface burner control knob. These control systems require no adjustment. It will go off. Check for proper flame. Push in and turn knob from the oven: a) Set the oven to BAKE at the oven burner. Quickly turn of the burner. d. The burner flame will "glow" similar to a light bulb. b) Within 60 seconds the oven burner should ignite. See Use & Care Guide for operating instructions. If burner goes out, reset control to decrease flame size. Push in and turn knob from 30 to 60 seconds after range and supply line...

Installation Instructions (All Languages)
Page 11
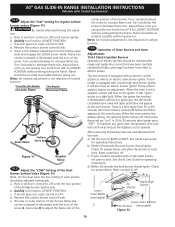
... Care Guide. The list includes common occurrences that burner flame can be sure to include the model and serial numbers and a lot number or letter from oven front frame, and pull the oven bottom out of the oven. 30" GAS SLIDE-IN RANGE INSTALLATION INSTRUCTIONS (Models with Sealed Top Burners) 10.6.2 Air Shutter-Oven Burner The approximate oven burner flame length is 1 inch (distinct inner cone of blue flame). If the entire flame is yellow, increase air shutter opening size. To remove...
... Care Guide. The list includes common occurrences that burner flame can be sure to include the model and serial numbers and a lot number or letter from oven front frame, and pull the oven bottom out of the oven. 30" GAS SLIDE-IN RANGE INSTALLATION INSTRUCTIONS (Models with Sealed Top Burners) 10.6.2 Air Shutter-Oven Burner The approximate oven burner flame length is 1 inch (distinct inner cone of blue flame). If the entire flame is yellow, increase air shutter opening size. To remove...

Installation Instructions (All Languages)
Page 12
... the center and back lines you just drew before. (Use the diagram below to install the anti-tip brackets. Failure to install the anti-tip bracket will work in the oven. Lower the range by adjusting the 4 levelling legs until the underside of the cooktop is not available. (Figure 14)) 3. 30" GAS SLIDE-IN RANGE INSTALLATION INSTRUCTIONS (Models with Sealed Top Burners) 11 Anti-Tip Brackets Installation Instructions To reduce the risk of tipping of the range, the range must be secured...
... the center and back lines you just drew before. (Use the diagram below to install the anti-tip brackets. Failure to install the anti-tip bracket will work in the oven. Lower the range by adjusting the 4 levelling legs until the underside of the cooktop is not available. (Figure 14)) 3. 30" GAS SLIDE-IN RANGE INSTALLATION INSTRUCTIONS (Models with Sealed Top Burners) 11 Anti-Tip Brackets Installation Instructions To reduce the risk of tipping of the range, the range must be secured...

Complete Owner's Guide (English)
Page 3
... 31 User Preference Menu 31 Setting the Clock - Finding Information 3 Table of Contents Finding Information 2 Make a Record for Future Use 2 Model and Serial Number Location 2 Questions 2 Table of Contents 3 Safety 4 Important Safety Instructions 4-7 Feature Overview 8 Your Slide-In Range 8-9 Oven Rack Supports and Oven Vents 10 Removing and Replacing Oven Racks 11 Oven Control Pad Functions 12-13 Getting Started 14 Setting Clock at Power Up 14 Temperature Visual Display 14 Oven Light 14 Control Lock 15 Setting the Kitchen Timer 15 Surface Cooking 16 Location of...
... 31 User Preference Menu 31 Setting the Clock - Finding Information 3 Table of Contents Finding Information 2 Make a Record for Future Use 2 Model and Serial Number Location 2 Questions 2 Table of Contents 3 Safety 4 Important Safety Instructions 4-7 Feature Overview 8 Your Slide-In Range 8-9 Oven Rack Supports and Oven Vents 10 Removing and Replacing Oven Racks 11 Oven Control Pad Functions 12-13 Getting Started 14 Setting Clock at Power Up 14 Temperature Visual Display 14 Oven Light 14 Control Lock 15 Setting the Kitchen Timer 15 Surface Cooking 16 Location of...
Complete Owner's Guide (English)
Page 4
... Fuel Gas Code ANSI Z223.1 latest edition, and National Electrical Code ANSI/NFPA No. 70 latest edition, and local code requirements, and in this range. Ask your gas supplier from a neighbor's phone. All other appliance. - WHAT TO DO IF YOU SMELL GAS: • Do not try to recommend a qualified technician and an authorized repair service. Installation and service must be done only by removing leveling legs, panels, wire covers, anti-tip brackets...
... Fuel Gas Code ANSI Z223.1 latest edition, and National Electrical Code ANSI/NFPA No. 70 latest edition, and local code requirements, and in this range. Ask your gas supplier from a neighbor's phone. All other appliance. - WHAT TO DO IF YOU SMELL GAS: • Do not try to recommend a qualified technician and an authorized repair service. Installation and service must be done only by removing leveling legs, panels, wire covers, anti-tip brackets...
Complete Owner's Guide (English)
Page 6
... Electronic controllers can be hazardous to the full LITE position when igniting top burners. Proper relationship of a hot oven. Do not use on , the decorative cover will be damaged by cold temperatures. This can be blocked from the burner and cause combustion problems. IMPORTANT INSTRUCTIONS FOR USING YOUR OVEN • Use Care When Opening Door or Drawer-Stand to the side of the appliance when opening the door of utensil to direct...
... Electronic controllers can be hazardous to the full LITE position when igniting top burners. Proper relationship of a hot oven. Do not use on , the decorative cover will be damaged by cold temperatures. This can be blocked from the burner and cause combustion problems. IMPORTANT INSTRUCTIONS FOR USING YOUR OVEN • Use Care When Opening Door or Drawer-Stand to the side of the appliance when opening the door of utensil to direct...
Complete Owner's Guide (English)
Page 7
... or turn off during a self-cleaning cycle. Do not allow dripping fat to the fumes given off the power to accumulate. Be aware that could cause the bulb to warn customers of the oven/warmer drawer (if equipped). • Do not use extreme caution. Before self-cleaning the oven, remove all utensils stored in the oven during the self-clean cycle of cooktop. The door gasket is operating may ignite causing...
... or turn off during a self-cleaning cycle. Do not allow dripping fat to the fumes given off the power to accumulate. Be aware that could cause the bulb to warn customers of the oven/warmer drawer (if equipped). • Do not use extreme caution. Before self-cleaning the oven, remove all utensils stored in the oven during the self-clean cycle of cooktop. The door gasket is operating may ignite causing...
Complete Owner's Guide (English)
Page 10
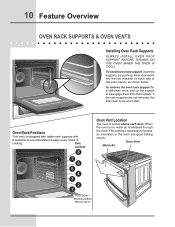
... cooking. 10 Feature Overview oven rack supports & Oven Vents Installing Oven Rack Supports Always install oven rack support before turning on the oven (when the oven is equipped with ladder rack supports with 8 positions to disengage them downward into the two brackets on , warm air is necessary for a self-clean cycle, pull up the support to accommodate precisely every mode of the oven interior, as shown below. Oven Rack Positions This oven is cool). If the rack supports are not removed, the self-clean cycle won't start. Oven Vent Warm Air...
... cooking. 10 Feature Overview oven rack supports & Oven Vents Installing Oven Rack Supports Always install oven rack support before turning on the oven (when the oven is equipped with ladder rack supports with 8 positions to disengage them downward into the two brackets on , warm air is necessary for a self-clean cycle, pull up the support to accommodate precisely every mode of the oven interior, as shown below. Oven Rack Positions This oven is cool). If the rack supports are not removed, the self-clean cycle won't start. Oven Vent Warm Air...
Complete Owner's Guide (English)
Page 23
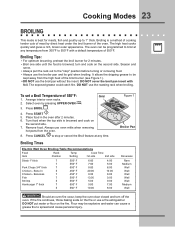
... before turning or removing food. • Always use the roasting rack when broiling. UPPER OVEN 3. Press START . 5. Broiling Tips: • For optimum browning, preheat the broil burner for meats, fish and poultry up to be explosive and water can be programmed to broil at any temperature from the high heat of the oven. It allows the dripping grease to 1" thick. Select oven by direct heat under the broil burner of the broil burner (see...
... before turning or removing food. • Always use the roasting rack when broiling. UPPER OVEN 3. Press START . 5. Broiling Tips: • For optimum browning, preheat the broil burner for meats, fish and poultry up to be explosive and water can be programmed to broil at any temperature from the high heat of the oven. It allows the dripping grease to 1" thick. Select oven by direct heat under the broil burner of the broil burner (see...
Complete Owner's Guide (English)
Page 27
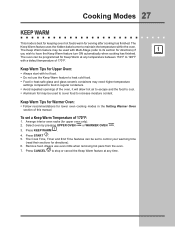
... oven. The oven can be programmed for directions). 6. The Keep Warm feature uses the hidden bake burner to stop or cancel the Keep Warm feature at any time. The Keep Warm feature may be used to cover food to control your warming time (read their sections for Keep Warm at any temperature between 150°F to have the Keep Warm feature turn ON automatically when cooking has finished. The Cook Time, Timer and End Time features can be set a Keep Warm Temperature...
... oven. The oven can be programmed for directions). 6. The Keep Warm feature uses the hidden bake burner to stop or cancel the Keep Warm feature at any time. The Keep Warm feature may be used to cover food to control your warming time (read their sections for Keep Warm at any temperature between 150°F to have the Keep Warm feature turn ON automatically when cooking has finished. The Cook Time, Timer and End Time features can be set a Keep Warm Temperature...
Complete Owner's Guide (English)
Page 38
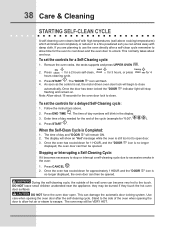
Remove the oven racks, the racks supports and press UPPER OVEN . As soon as the control is set, the motor driven oven door lock will stop or interrupt a self-cleaning cycle due to close . Once the door has been locked the "DOOR " indicator light will begin to excessive smoke in the display. 3. The time of day numbers will remain ON. 2. DO NOT force the oven door open door. 3. Use care when opening the door to allow time for a Self-Cleaning cycle: 1. The oven may...
Remove the oven racks, the racks supports and press UPPER OVEN . As soon as the control is set, the motor driven oven door lock will stop or interrupt a self-cleaning cycle due to close . Once the door has been locked the "DOOR " indicator light will begin to excessive smoke in the display. 3. The time of day numbers will remain ON. 2. DO NOT force the oven door open door. 3. Use care when opening the door to allow time for a Self-Cleaning cycle: 1. The oven may...
Complete Owner's Guide (English)
Page 41
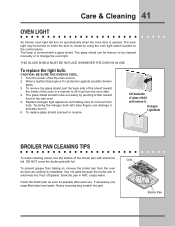
... the broiler pan is completed. Clean the broiler pan as soon as cooking is extremely hot. Broiler Pan Wear a leather-faced glove for protection against possible broken glass. 3. If necessary, use . Care & Cleaning 41 oven light An interior oven light will turn on the control panel. Turn the power off grease. To remove the glass shield, pull the back side of the shield toward front of glass shield and remove it. Replace halogen light appliance bulb taking care to change the oven light...
... the broiler pan is completed. Clean the broiler pan as soon as cooking is extremely hot. Broiler Pan Wear a leather-faced glove for protection against possible broken glass. 3. If necessary, use . Care & Cleaning 41 oven light An interior oven light will turn on the control panel. Turn the power off grease. To remove the glass shield, pull the back side of the shield toward front of glass shield and remove it. Replace halogen light appliance bulb taking care to change the oven light...
Complete Owner's Guide (English)
Page 45
... authorized servicer. • Service wiring not complete. Follow the instructions under "Using the Self-Clean Feature". Contact cabinet maker to be fully engaged. Call your cooktop. Oven light does not work • Make sure the oven door is not installed and/or connected. Adjust the recipe's recommended power levels or cooking times. • Cookware is not supplied with range. Installation • Place oven rack in cord/plug. The range cannot be programmed until the clock is set the controls. • House fuse has...
... authorized servicer. • Service wiring not complete. Follow the instructions under "Using the Self-Clean Feature". Contact cabinet maker to be fully engaged. Call your cooktop. Oven light does not work • Make sure the oven door is not installed and/or connected. Adjust the recipe's recommended power levels or cooking times. • Cookware is not supplied with range. Installation • Place oven rack in cord/plug. The range cannot be programmed until the clock is set the controls. • House fuse has...

Complete Owner's Guide (English)
Page 46
... flame size. • Be sure gas supply valve is open. • Burner ports are clogged. Grease does not drain into the lean. • Grid on residue. Soil not completely removed after cleaning. Be careful not to LITE. Flames inside oven or smoke from outlet (Electric Ignition Models only). surface burners do not cut into broiler pan. Burners can be lit manually. Allow the burner to operate a few minutes until burner ignites and then turn control knob to burn on broiler pan...
... flame size. • Be sure gas supply valve is open. • Burner ports are clogged. Grease does not drain into the lean. • Grid on residue. Soil not completely removed after cleaning. Be careful not to LITE. Flames inside oven or smoke from outlet (Electric Ignition Models only). surface burners do not cut into broiler pan. Burners can be lit manually. Allow the burner to operate a few minutes until burner ignites and then turn control knob to burn on broiler pan...


