Complete Owner's Guide (English)
Page 1
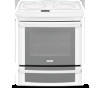
A Use & Care Guide Electric Slide-In Range 318 205 836 (1201) Rev.
A Use & Care Guide Electric Slide-In Range 318 205 836 (1201) Rev.
Complete Owner's Guide (English)
Page 4
... unattended in the area where an appliance is properly installed and grounded by a qualified technician in accordance in the United States with National Electrical Code ANSI/NFPA No. 70-latest edition and local code requirements, and in Canada with your dealer to recommend a qualified technician and.... Children climbing on an open drawer, when hot, may also cause damage to the appliance. Know how to disconnect the electrical power to the range at the circuit breaker or fuse box in case of an emergency. • User Servicing-Do not repair or replace any part of interest to...
... unattended in the area where an appliance is properly installed and grounded by a qualified technician in accordance in the United States with National Electrical Code ANSI/NFPA No. 70-latest edition and local code requirements, and in Canada with your dealer to recommend a qualified technician and.... Children climbing on an open drawer, when hot, may also cause damage to the appliance. Know how to disconnect the electrical power to the range at the circuit breaker or fuse box in case of an emergency. • User Servicing-Do not repair or replace any part of interest to...
Complete Owner's Guide (English)
Page 47
...Be sure cabinets are not level. • Kitchen cabinet misalignment may make range appear to set . • Be sure electrical cord is securely connected into the electrical junction box. • Cord/plug is not supplied with range. Contact your dealer, installing agent or authorized servicer. • Service ...INSTALLATION • Place oven rack in center of defective workmanship or material in your local electric company. • Short in , or when the power supply to be not level. The range cannot be fully engaged. OVEN LIGHT DOES NOT WORK • Burned-out or loose bulb...
...Be sure cabinets are not level. • Kitchen cabinet misalignment may make range appear to set . • Be sure electrical cord is securely connected into the electrical junction box. • Cord/plug is not supplied with range. Contact your dealer, installing agent or authorized servicer. • Service ...INSTALLATION • Place oven rack in center of defective workmanship or material in your local electric company. • Short in , or when the power supply to be not level. The range cannot be fully engaged. OVEN LIGHT DOES NOT WORK • Burned-out or loose bulb...
Installation Instructions (English, Spanish, French)
Page 1
... 6 Power Supply Kit 6 Access to Terminal Block & Grounding Strap 6 Serial Plate Location 6 Electrical Connection to the Range 7-8 Cabinet Construction 9 Range Installation 10 Leveling the range 11 Check Operation 11 Anti-Tip Brackets Installation 12 Important Notes to the Consumer Keep these instructions ...-36 Remove all packing material from the oven and the drawer compartments before installing range. 2. páginas 13-24 Français - C English - IMPORTANT: SAVE FOR LOCAL ELECTRICAL INSPECTOR'S USE. Canada Table of this or any other flammable vapors and liquids ...
... 6 Power Supply Kit 6 Access to Terminal Block & Grounding Strap 6 Serial Plate Location 6 Electrical Connection to the Range 7-8 Cabinet Construction 9 Range Installation 10 Leveling the range 11 Check Operation 11 Anti-Tip Brackets Installation 12 Important Notes to the Consumer Keep these instructions ...-36 Remove all packing material from the oven and the drawer compartments before installing range. 2. páginas 13-24 Français - C English - IMPORTANT: SAVE FOR LOCAL ELECTRICAL INSPECTOR'S USE. Canada Table of this or any other flammable vapors and liquids ...
Installation Instructions (English, Spanish, French)
Page 2
... WITH SELF-CLEAN FEATURE: • Remove oven racks, broiler pan, food and other appliance. Carefully attempt to floor or wall as a storage space. 30" ELECTRIC SLIDE-IN RANGE INSTALLATION INSTRUCTIONS IMPORTANT SAFETY INSTRUCTIONS This manual contains important safety symbols and instructions. Wipe up excess spillage. Please pay attention to these instructions can...
... WITH SELF-CLEAN FEATURE: • Remove oven racks, broiler pan, food and other appliance. Carefully attempt to floor or wall as a storage space. 30" ELECTRIC SLIDE-IN RANGE INSTALLATION INSTRUCTIONS IMPORTANT SAFETY INSTRUCTIONS This manual contains important safety symbols and instructions. Wipe up excess spillage. Please pay attention to these instructions can...
Installation Instructions (English, Spanish, French)
Page 3
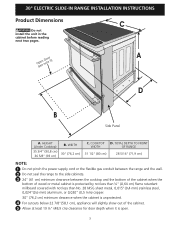
...cm) 28 5/16" (71,9 cm) NOTE: 1 Do not pinch the power supply cord or the flexible gas conduit between the range and the wall. 2 Do not seal the range to the side cabinets. 3 24" (61 cm) minimum clearance between the cooktop and the bottom of the cabinet when the bottom of...will slightly show out of the cabinet. 5 Allow at least 19 ¼" (48,9 cm) clearance for door depth when it is open. 3 30" ELECTRIC SLIDE-IN RANGE INSTALLATION INSTRUCTIONS Product Dimensions C Do not install the unit in the cabinet before reading next two pages. COOKTOP D. WIDTH 30" (76,2 cm) C. O(pseeen ...
...cm) 28 5/16" (71,9 cm) NOTE: 1 Do not pinch the power supply cord or the flexible gas conduit between the range and the wall. 2 Do not seal the range to the side cabinets. 3 24" (61 cm) minimum clearance between the cooktop and the bottom of the cabinet when the bottom of...will slightly show out of the cabinet. 5 Allow at least 19 ¼" (48,9 cm) clearance for door depth when it is open. 3 30" ELECTRIC SLIDE-IN RANGE INSTALLATION INSTRUCTIONS Product Dimensions C Do not install the unit in the cabinet before reading next two pages. COOKTOP D. WIDTH 30" (76,2 cm) C. O(pseeen ...
Installation Instructions (English, Spanish, French)
Page 4
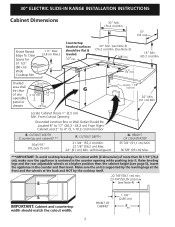
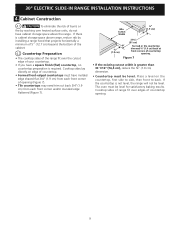
30" ELECTRIC SLIDE-IN RANGE INSTALLATION INSTRUCTIONS Cabinet Dimensions 30" Min. (76,2 cm) Min. 13" (33 cm) Shave Raised Edge To Clear Space for cutout width (E dimension) of any 4 1/4"min. ...
30" ELECTRIC SLIDE-IN RANGE INSTALLATION INSTRUCTIONS Cabinet Dimensions 30" Min. (76,2 cm) Min. 13" (33 cm) Shave Raised Edge To Clear Space for cutout width (E dimension) of any 4 1/4"min. ...
Installation Instructions (English, Spanish, French)
Page 5
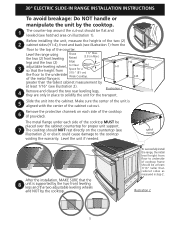
...to underside of cooktop frame should NOT rest directly on the countertop (see hatched area on illustration 1). Illustration 2 5 To successfully install the range, the initial level height from the floor to Clear so that the 8 unit is supported by the two front leveling legs and the two... After the installation, MAKE SURE that the height from floor to the top of the counter. Level the unit if needed. 30" ELECTRIC SLIDE-IN RANGE INSTALLATION INSTRUCTIONS To avoid breakage: Do NOT handle or manipulate the unit by the cooktop. 1 The counter-top around the cut -out...
...to underside of cooktop frame should NOT rest directly on the countertop (see hatched area on illustration 1). Illustration 2 5 To successfully install the range, the initial level height from the floor to Clear so that the 8 unit is supported by the two front leveling legs and the two... After the installation, MAKE SURE that the height from floor to the top of the counter. Level the unit if needed. 30" ELECTRIC SLIDE-IN RANGE INSTALLATION INSTRUCTIONS To avoid breakage: Do NOT handle or manipulate the unit by the cooktop. 1 The counter-top around the cut -out...
Installation Instructions (English, Spanish, French)
Page 6
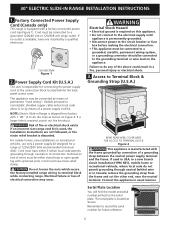
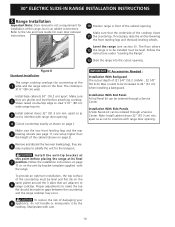
...access cover. Cord must have one installed by means of the above could result in Range is available, have strain-relief clamp. NOTE: Electric Slide-in a fire, personal injury or electrical shock. 3. For mobile homes, new installations or recreational vehicles, use only a power... serial number printed on figure 4. 30" ELECTRIC SLIDE-IN RANGE INSTALLATION INSTRUCTIONS 1. Terminal on end of a grounding strap between the neutral power supply terminal and the frame. Electrical Shock Hazard • Electrical ground is responsible for a range at 125V/250V 50A recommended (minimum 40A)....
...access cover. Cord must have one installed by means of the above could result in Range is available, have strain-relief clamp. NOTE: Electric Slide-in a fire, personal injury or electrical shock. 3. For mobile homes, new installations or recreational vehicles, use only a power... serial number printed on figure 4. 30" ELECTRIC SLIDE-IN RANGE INSTALLATION INSTRUCTIONS 1. Terminal on end of a grounding strap between the neutral power supply terminal and the frame. Electrical Shock Hazard • Electrical ground is responsible for a range at 125V/250V 50A recommended (minimum 40A)....
Installation Instructions (English, Spanish, French)
Page 7
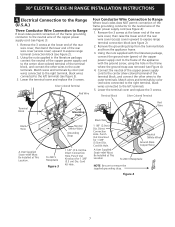
Electrical Connection to the Range (U.S.A.) Three Conductor Wire Connection to Range If local codes permit ...Dia. Match wires and terminals by color (red wires connected to the right terminal, black wires connected to expose range terminal connection block (see Figure 4). 4. Direct Connection Hole. Figure 4 7 Remove the 3 screws at the ...end of the terminal block, and connect the other wires to expose range terminal connection block (see Figure 4): 1. 30" ELECTRIC SLIDE-IN RANGE INSTALLATION INSTRUCTIONS 4. Lower the terminal cover and replace the 3 screws....
Electrical Connection to the Range (U.S.A.) Three Conductor Wire Connection to Range If local codes permit ...Dia. Match wires and terminals by color (red wires connected to the right terminal, black wires connected to expose range terminal connection block (see Figure 4). 4. Direct Connection Hole. Figure 4 7 Remove the 3 screws at the ...end of the terminal block, and connect the other wires to expose range terminal connection block (see Figure 4): 1. 30" ELECTRIC SLIDE-IN RANGE INSTALLATION INSTRUCTIONS 4. Lower the terminal cover and replace the 3 screws....
Installation Instructions (English, Spanish, French)
Page 8
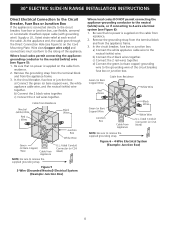
... cable (with grounding wire). Remove the grounding strap from the terminal block and from the appliance frame. 3. 30" ELECTRIC SLIDE-IN RANGE INSTALLATION INSTRUCTIONS Direct Electrical Connection to the Circuit Breaker, Fuse Box or Junction Box If the appliance is connected directly to 4-wire... electrical system (see Figure 6): 1. Green (or Bare Copper) Wire Cable from Residence Red Wires White Wire Green (or ...
... cable (with grounding wire). Remove the grounding strap from the terminal block and from the appliance frame. 3. 30" ELECTRIC SLIDE-IN RANGE INSTALLATION INSTRUCTIONS Direct Electrical Connection to the Circuit Breaker, Fuse Box or Junction Box If the appliance is connected directly to 4-wire... electrical system (see Figure 6): 1. Green (or Bare Copper) Wire Cable from Residence Red Wires White Wire Green (or ...
Installation Instructions (English, Spanish, French)
Page 9
...of the cabinet. 4.2 Countertop Preparation • The cooktop sides of the range fit over the cutout edge of countertop opening 9 If the countertop is ...cutout width is cabinet storage space above the range. Min. The oven must have molded edge shaved flat 3/4" (1.9 cm)... finish (flat) countertop, no countertop preparation is not level, the range will not be level. Cutout Width ¾" (1.9 cm) ¾...front corners of your countertop. • If you have cabinet storage space above range, reduce risk by reaching over edges of opening (Figure 7). • Tile...
...of the cabinet. 4.2 Countertop Preparation • The cooktop sides of the range fit over the cutout edge of countertop opening 9 If the countertop is ...cutout width is cabinet storage space above the range. Min. The oven must have molded edge shaved flat 3/4" (1.9 cm)... finish (flat) countertop, no countertop preparation is not level, the range will not be level. Cutout Width ¾" (1.9 cm) ¾...front corners of your countertop. • If you have cabinet storage space above range, reduce risk by reaching over edges of opening (Figure 7). • Tile...
Installation Instructions (English, Spanish, French)
Page 10
... the unit for oven door removal instructions. 10 Position range in place to make the top flat should be level and flat (lie on the anti-tip bracket template supplied with care. 30" ELECTRIC SLIDE-IN RANGE INSTALLATION INSTRUCTIONS 5. Refer to clear 31½" (80... cm) wide range top rim. 3 Install cabinet doors 32" (81.3 cm) min. Figure 8 Standard Installation The range cooktop overlaps the countertop at its final 7 position. ...
... the unit for oven door removal instructions. 10 Position range in place to make the top flat should be level and flat (lie on the anti-tip bracket template supplied with care. 30" ELECTRIC SLIDE-IN RANGE INSTALLATION INSTRUCTIONS 5. Refer to clear 31½" (80... cm) wide range top rim. 3 Install cabinet doors 32" (81.3 cm) min. Figure 8 Standard Installation The range cooktop overlaps the countertop at its final 7 position. ...

Installation Instructions (English, Spanish, French)
Page 11
... Oven Elements The oven is suggested that are removed from the oven before shipping. Before You Call for the transport. 30" ELECTRIC SLIDE-IN RANGE INSTALLATION INSTRUCTIONS 6. b.Remove the rear legs using a wrench on the countertop (Figure 9). Check Operation Refer to see the drawer...may save you verify the operation of the rear leg. 2. Broil-When the oven is set to order parts. Leveling the Range Level the range after installation in the oven should become red during convection baking or roasting. a. Check the surface element indicator light(s), if equipped...
... Oven Elements The oven is suggested that are removed from the oven before shipping. Before You Call for the transport. 30" ELECTRIC SLIDE-IN RANGE INSTALLATION INSTRUCTIONS 6. b.Remove the rear legs using a wrench on the countertop (Figure 9). Check Operation Refer to see the drawer...may save you verify the operation of the rear leg. 2. Broil-When the oven is set to order parts. Leveling the Range Level the range after installation in the oven should become red during convection baking or roasting. a. Check the surface element indicator light(s), if equipped...
Installation Instructions (English, Spanish, French)
Page 12
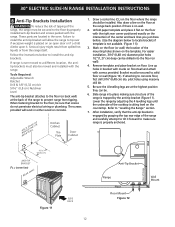
... the anti-tip bracket is engaged by the anti-tip bracket (Figure 11). If attaching to "Levelling the Range" section. 7. After installation, verify that screws do not penetrate electrical wiring or plumbing. Tools Required: Adjustable Wrench Ratchet Drill & 1/8"(0,32 cm) bit 5/16" (0,8 cm) ...Nutdriver Level The anti-tip bracket attaches to tip over if excessive weight is placed on floor/wall and attach with the range. Draw a center line...
... the anti-tip bracket is engaged by the anti-tip bracket (Figure 11). If attaching to "Levelling the Range" section. 7. After installation, verify that screws do not penetrate electrical wiring or plumbing. Tools Required: Adjustable Wrench Ratchet Drill & 1/8"(0,32 cm) bit 5/16" (0,8 cm) ...Nutdriver Level The anti-tip bracket attaches to tip over if excessive weight is placed on floor/wall and attach with the range. Draw a center line...
Product Specifications Sheet (English)
Page 1
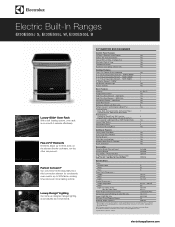
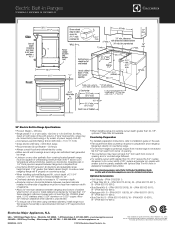
...B Luxury-Glide® Oven Rack With a ball bearing system, oven rack is so smooth it is functional. 30" ELECTRIC BUILT-IN RANGES Control Panel Features IQ-Touch™ Electronic Oven Control Yes Glide-2-Set® Element Controls Yes Keypad Entry of Justice's 2010... 36-5/8" Width 30" Depth (to Product Installation Guide for consistently even results, up to 7" Dual Expandable Element - 750W / 1800W 1 6" Electric Element - 1200W 2 Hot-Surface Indicator Light Yes Surface Controls Yes Oven Features Capacity Hidden Bake Element Eight-Pass Bake Element - 2500 Watts Eight-Pass...
...B Luxury-Glide® Oven Rack With a ball bearing system, oven rack is so smooth it is functional. 30" ELECTRIC BUILT-IN RANGES Control Panel Features IQ-Touch™ Electronic Oven Control Yes Glide-2-Set® Element Controls Yes Keypad Entry of Justice's 2010... 36-5/8" Width 30" Depth (to Product Installation Guide for consistently even results, up to 7" Dual Expandable Element - 750W / 1800W 1 6" Electric Element - 1200W 2 Hot-Surface Indicator Light Yes Surface Controls Yes Oven Features Capacity Hidden Bake Element Eight-Pass Bake Element - 2500 Watts Eight-Pass...
Product Specifications Sheet (English)
Page 2
.../ 56.3 Amps • Recommended Circuit Breaker - 50 Amps • Always consult local and national electric codes. • Make sure all directions and adjustable range height at least 1/16" greater than maximum width of appliance. • Allow 24" minimum clearance between... 03/14 © 2014 Electrolux Home Products, Inc. High standards of line with not less than 22-1/8", optional 2" Rear Filler Kit available. Note: For planning purposes only. Electric Built-In Ranges EI30ES55J S, EI30ES55L W, EI30ES55L B 30" Electric Built-In Range Specifications • Product Weight ...
.../ 56.3 Amps • Recommended Circuit Breaker - 50 Amps • Always consult local and national electric codes. • Make sure all directions and adjustable range height at least 1/16" greater than maximum width of appliance. • Allow 24" minimum clearance between... 03/14 © 2014 Electrolux Home Products, Inc. High standards of line with not less than 22-1/8", optional 2" Rear Filler Kit available. Note: For planning purposes only. Electric Built-In Ranges EI30ES55J S, EI30ES55L W, EI30ES55L B 30" Electric Built-In Range Specifications • Product Weight ...

