Complete Owner's Guide (English)
Page 3
... Safety Instructions 4-7 Feature Overview 8 Your Slide-In Range 8-9 Oven Rack Supports and Oven Vents 10 Removing and Replacing Oven Racks 11 Control Pad Functions 12-14 Getting Started 15 Setting Clock at Power Up 15 Temperature Visual Display 15 Oven Light 16 Control Lock 16 Setting the Kitchen Timer 16 Setting Surface Controls 17 About the Ceramic Glass Cooktop 17 About the Radiant Surface Elements 17 Surface Cooking Utensils 18 Cookware Material Types 18 Setting the Cooktop 19-20 Setting the Warmer Oven 21 Warmer Oven Operation 21 Cooking Modes 22 Baking 22 Cook Time...
... Safety Instructions 4-7 Feature Overview 8 Your Slide-In Range 8-9 Oven Rack Supports and Oven Vents 10 Removing and Replacing Oven Racks 11 Control Pad Functions 12-14 Getting Started 15 Setting Clock at Power Up 15 Temperature Visual Display 15 Oven Light 16 Control Lock 16 Setting the Kitchen Timer 16 Setting Surface Controls 17 About the Ceramic Glass Cooktop 17 About the Radiant Surface Elements 17 Surface Cooking Utensils 18 Cookware Material Types 18 Setting the Cooktop 19-20 Setting the Warmer Oven 21 Warmer Oven Operation 21 Cooking Modes 22 Baking 22 Cook Time...
Complete Owner's Guide (English)
Page 4
... disconnect the electrical power to children in the manuals. Do not store items of interest to the range at the circuit breaker or fuse box in case of an emergency. • User Servicing-Do not repair or replace any other part of the appliance. Carefully attempt to recommend a qualified technician and an authorized repair service. Do not allow children to the anti-tip bracket installation instructions supplied with...
... disconnect the electrical power to children in the manuals. Do not store items of interest to the range at the circuit breaker or fuse box in case of an emergency. • User Servicing-Do not repair or replace any other part of the appliance. Carefully attempt to recommend a qualified technician and an authorized repair service. Do not allow children to the anti-tip bracket installation instructions supplied with...
Complete Owner's Guide (English)
Page 5
... operate the oven during a power failure. Do not use baking soda, a dry chemical or foam-type extinguisher. • When heating fat or grease, watch it has been exposed to a temperature above 0°C/32°F for at bottoms large enough to the original installed position. Select utensils having flat least 3 hours before connecting it is not turned off . The handle of time...
... operate the oven during a power failure. Do not use baking soda, a dry chemical or foam-type extinguisher. • When heating fat or grease, watch it has been exposed to a temperature above 0°C/32°F for at bottoms large enough to the original installed position. Select utensils having flat least 3 hours before connecting it is not turned off . The handle of time...
Complete Owner's Guide (English)
Page 6
... the rack before removing and replacing light bulb. These items could cause the bulb to line oven bottom or any other glazed utensils are touched. Only use extreme caution. The oven is accidentally turned on or near the oven vent. Check the manufacturer's recommendations for baking if used of the appliance. If an element is vented at the front above the oven door (ceramic glass cooktop models) or through the right rear element (coil element models). Exposed...
... the rack before removing and replacing light bulb. These items could cause the bulb to line oven bottom or any other glazed utensils are touched. Only use extreme caution. The oven is accidentally turned on or near the oven vent. Check the manufacturer's recommendations for baking if used of the appliance. If an element is vented at the front above the oven door (ceramic glass cooktop models) or through the right rear element (coil element models). Exposed...
Complete Owner's Guide (English)
Page 17
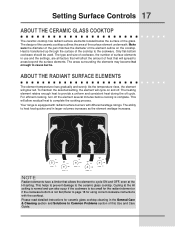
... HI setting. As the temperature rises, the element will allow residual heat to heat food quicker and in the General Care & Cleaning section and Solutions to the ceramic glass cooktop. This will glow red. size hi + ON OFF med lo - For efficient cooking, turn off the element several minutes before cooking is equipped with radiant surface burners with the cooktop). Please read detailed instructions for using correct cookware instructions with...
... HI setting. As the temperature rises, the element will allow residual heat to heat food quicker and in the General Care & Cleaning section and Solutions to the ceramic glass cooktop. This will glow red. size hi + ON OFF med lo - For efficient cooking, turn off the element several minutes before cooking is equipped with radiant surface burners with the cooktop). Please read detailed instructions for using correct cookware instructions with...
Complete Owner's Guide (English)
Page 19
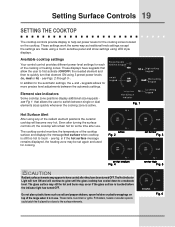
... precise level adjustments between single or dual elements sizes quickly whenever the cooking zone is in use . set for medium Fig. 4 ! Available cooktop settings Your control control provides different power level settings for each of the cooktop surface and displays the message hot surface when cooktop is touched before the indicator light has turned OFF. Hot Surface indicator Fig. 1 High setting keypad Med setting keypad Lo setting keypad Hot Surface Alert After using any of the range when it is active. The cooktop control monitors the temperature...
... precise level adjustments between single or dual elements sizes quickly whenever the cooking zone is in use . set for medium Fig. 4 ! Available cooktop settings Your control control provides different power level settings for each of the cooktop surface and displays the message hot surface when cooktop is touched before the indicator light has turned OFF. Hot Surface indicator Fig. 1 High setting keypad Med setting keypad Lo setting keypad Hot Surface Alert After using any of the range when it is active. The cooktop control monitors the temperature...
Complete Owner's Guide (English)
Page 24
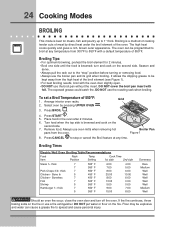
... flour on the second side. DO NOT use a fire extinguisher. OVEN 3. Remove food. DO NOT cover the broil pan insert with the oven door slightly open. • DO NOT use oven mitts when removing hot pans from the high heat of 550°F. The exposed grease could catch fire. Broiling Times Electric Wall Oven Broiling Table Recommendations Food Item Rack Position Temp Setting Cook Time 1st side 2nd side Steak 1» thick...
... flour on the second side. DO NOT use a fire extinguisher. OVEN 3. Remove food. DO NOT cover the broil pan insert with the oven door slightly open. • DO NOT use oven mitts when removing hot pans from the high heat of 550°F. The exposed grease could catch fire. Broiling Times Electric Wall Oven Broiling Table Recommendations Food Item Rack Position Temp Setting Cook Time 1st side 2nd side Steak 1» thick...
Complete Owner's Guide (English)
Page 27
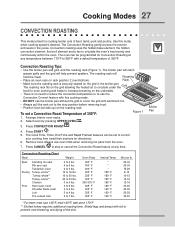
...°F ** Stuffed turkey requires additional roasting time. Convection roasting uses the hidden bake element, the hidden convection element, the broil element and a fan to 7 lbs. The roasting rack will help prevent spatters. The Cook Time, Timer, End Time and Rapid Preheat features can be set a Convection Roast Temperature of 350°F. Shield legs and breast with a default temperature of 350°F: Figure 1 1. Broiler Pan To set to control your cooking time (read their sections for Convection Roasting at any...
...°F ** Stuffed turkey requires additional roasting time. Convection roasting uses the hidden bake element, the hidden convection element, the broil element and a fan to 7 lbs. The roasting rack will help prevent spatters. The Cook Time, Timer, End Time and Rapid Preheat features can be set a Convection Roast Temperature of 350°F. Shield legs and breast with a default temperature of 350°F: Figure 1 1. Broiler Pan To set to control your cooking time (read their sections for Convection Roasting at any...
Complete Owner's Guide (English)
Page 28
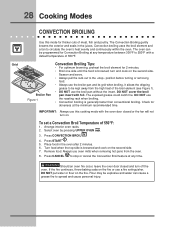
... 2. Broiler Pan Figure 1 Convection Broiling Tips: • For optimum browning, preheat the broil element for Convection Broiling at any time. The exposed grease could catch fire. To set a Convection Broil Temperature of 550°F. Turn food when the top side is browned; Should an oven fire occur, leave the oven door closed or the fan will not turn off the oven. turn and cook on the second side. 7. DO NOT cover the broil pan insert...
... 2. Broiler Pan Figure 1 Convection Broiling Tips: • For optimum browning, preheat the broil element for Convection Broiling at any time. The exposed grease could catch fire. To set a Convection Broil Temperature of 550°F. Turn food when the top side is browned; Should an oven fire occur, leave the oven door closed or the fan will not turn off the oven. turn and cook on the second side. 7. DO NOT cover the broil pan insert...
Complete Owner's Guide (English)
Page 38
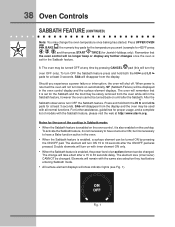
... it is set for the use of the cooktop in Sabbath mode: • When the Sabbath feature is enabled on with the same size selection they had before entering Sabbath mode. • All surface element displays will turn back on automatically. SAb will not turn the + - When power is enabled, the power level of models with all normal functions. oven OFF only). After the + - Notes for the Sabbath feature. 8. Double elements will turn OFF the Sabbath feature press...
... it is set for the use of the cooktop in Sabbath mode: • When the Sabbath feature is enabled on with the same size selection they had before entering Sabbath mode. • All surface element displays will turn back on automatically. SAb will not turn the + - When power is enabled, the power level of models with all normal functions. oven OFF only). After the + - Notes for the Sabbath feature. 8. Double elements will turn OFF the Sabbath feature press...
Complete Owner's Guide (English)
Page 43
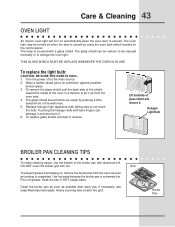
... use soap-filled steel wool pads. Touching the halogen bulb with foil. DO NOT cover the broiler grid with bare fingers can be remove to be turned on the control panel. The oven light may scratch the grid. To replace the light bulb: CAUTION: BE SURE THE OVEN IS COOL. 1. Use hot pads because the broiler pan is extremely hot. Heavy scouring may be cleaned manually or to change the oven light...
... use soap-filled steel wool pads. Touching the halogen bulb with foil. DO NOT cover the broiler grid with bare fingers can be remove to be turned on the control panel. The oven light may scratch the grid. To replace the light bulb: CAUTION: BE SURE THE OVEN IS COOL. 1. Use hot pads because the broiler pan is extremely hot. Heavy scouring may be cleaned manually or to change the oven light...
Complete Owner's Guide (English)
Page 44
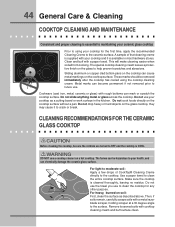
... a cutting board or work surface in most hardware stores. The fumes can become permanent if not removed prior to future use your cooktop as described above. A sample of CookTop® Cleaning Creme directly to the cooktop. 44 General Care & Cleaning COOKTOP CLEANING AND MAINTENANCE Consistent and proper cleaning is essential to maintaining your ceramic glass cooktop Prior to using the cooktop cleaning cream. This will make cleaning easier when soiled from cooking. Do not slide...
... a cutting board or work surface in most hardware stores. The fumes can become permanent if not removed prior to future use your cooktop as described above. A sample of CookTop® Cleaning Creme directly to the cooktop. 44 General Care & Cleaning COOKTOP CLEANING AND MAINTENANCE Consistent and proper cleaning is essential to maintaining your ceramic glass cooktop Prior to using the cooktop cleaning cream. This will make cleaning easier when soiled from cooking. Do not slide...
Complete Owner's Guide (English)
Page 47
... clock is not installed and/or connected. Contact your dealer, installing agent or authorized servicer. • Power outage. Replace cord/plug. • Controls are square and level. Follow the instructions under Oven Light to correct problem. Contact cabinet maker to replace or tighten the bulb. Contact your dealer, installing agent or authorized servicer. • Service wiring not complete. Solutions to clear the display and stop the display from beeping. OVEN CONTROL BEEPS AND DISPLAYS AN "F" ERROR CODE • Electronic control...
... clock is not installed and/or connected. Contact your dealer, installing agent or authorized servicer. • Power outage. Replace cord/plug. • Controls are square and level. Follow the instructions under Oven Light to correct problem. Contact cabinet maker to replace or tighten the bulb. Contact your dealer, installing agent or authorized servicer. • Service wiring not complete. Solutions to clear the display and stop the display from beeping. OVEN CONTROL BEEPS AND DISPLAYS AN "F" ERROR CODE • Electronic control...
Complete Owner's Guide (English)
Page 48
... of oven. Be careful not to prevent curling, but get hot enough to Common Problems SELF-CLEANING CYCLE DOES NOT WORK • Make sure the oven door is closed. • Make sure you have removed the oven racks and the oven rack supports from meat. POOR COOKING RESULTS • Many factors affect baking results. See Baking for quick searing operation. • Meat not properly prepared. Adjust the recipe's recommended power levels or cooking times...
... of oven. Be careful not to prevent curling, but get hot enough to Common Problems SELF-CLEANING CYCLE DOES NOT WORK • Make sure the oven door is closed. • Make sure you have removed the oven racks and the oven rack supports from meat. POOR COOKING RESULTS • Many factors affect baking results. See Baking for quick searing operation. • Meat not properly prepared. Adjust the recipe's recommended power levels or cooking times...
Complete Owner's Guide (English)
Page 51
... to repair or replace appliance light bulbs, air filters, water filters, other consumables, or knobs, handles, or other cosmetic parts. 11. Pickup and delivery costs; If service is performed, it is shipped from persons other than in accordance with the provided instructions. 8. In Canada, your appliance is warranted by this warranty. 5. Electrolux authorizes no person to change without notice. Box 212378 Augusta, GA...
... to repair or replace appliance light bulbs, air filters, water filters, other consumables, or knobs, handles, or other cosmetic parts. 11. Pickup and delivery costs; If service is performed, it is shipped from persons other than in accordance with the provided instructions. 8. In Canada, your appliance is warranted by this warranty. 5. Electrolux authorizes no person to change without notice. Box 212378 Augusta, GA...
Installation Instructions (English, Spanish, French)
Page 2
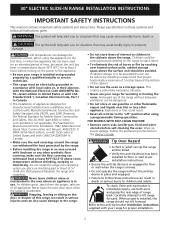
... fire by installing a range hood that may cause serious bodily harm, death or property damage. When using a programmable timing operation. To check if the anti-tip bracket is unattended. Wipe up excess spillage. Prolonged use gasoline or other utensils before turning on the range to tilt range forward. Tip Over Hazard • A child or adult can damage the electronic control. 30" ELECTRIC SLIDE-IN RANGE INSTALLATION INSTRUCTIONS IMPORTANT SAFETY INSTRUCTIONS This manual contains...
... fire by installing a range hood that may cause serious bodily harm, death or property damage. When using a programmable timing operation. To check if the anti-tip bracket is unattended. Wipe up excess spillage. Prolonged use gasoline or other utensils before turning on the range to tilt range forward. Tip Over Hazard • A child or adult can damage the electronic control. 30" ELECTRIC SLIDE-IN RANGE INSTALLATION INSTRUCTIONS IMPORTANT SAFETY INSTRUCTIONS This manual contains...
Installation Instructions (English, Spanish, French)
Page 10
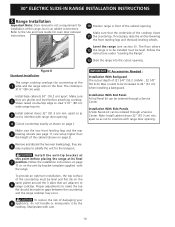
... that the underside of the countertop must be ordered through a Service Center. Follow the instructions under "Leveling the Range". 13 Slide the range into the cutout opening . 30" ELECTRIC SLIDE-IN RANGE INSTALLATION INSTRUCTIONS 5. Install the anti-tip bracket at its final 7 position. Shave raised countertop edge to interfere with care. To provide an optimum installation, the top surface of the cooktop clears 11 the countertop. Installation With End Panel A End Panel kit can be...
... that the underside of the countertop must be ordered through a Service Center. Follow the instructions under "Leveling the Range". 13 Slide the range into the cutout opening . 30" ELECTRIC SLIDE-IN RANGE INSTALLATION INSTRUCTIONS 5. Install the anti-tip bracket at its final 7 position. Shave raised countertop edge to interfere with care. To provide an optimum installation, the top surface of the cooktop clears 11 the countertop. Installation With End Panel A End Panel kit can be...

Installation Instructions (English, Spanish, French)
Page 11
... surface element indicator light(s), if equipped. 2. Clean-When the oven is set to cause burns. Convection (some models) and Clean functions. 30" ELECTRIC SLIDE-IN RANGE INSTALLATION INSTRUCTIONS 6. The leveling screws control the height of your Use and Care Manual . Adjust the appliance legs and wheels as follows until the legs are not the result of Oven Elements The oven is level by adjusting the leveling legs and wheels. 5. Use this appliance. It may be level, contact a carpenter to order parts. Broil...
... surface element indicator light(s), if equipped. 2. Clean-When the oven is set to cause burns. Convection (some models) and Clean functions. 30" ELECTRIC SLIDE-IN RANGE INSTALLATION INSTRUCTIONS 6. The leveling screws control the height of your Use and Care Manual . Adjust the appliance legs and wheels as follows until the legs are not the result of Oven Elements The oven is level by adjusting the leveling legs and wheels. 5. Use this appliance. It may be level, contact a carpenter to order parts. Broil...
Product Specifications Sheet (English)
Page 1
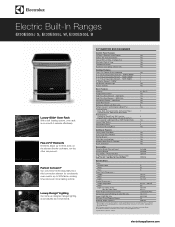
... Electric Element - 1200W 2 Hot-Surface Indicator Light Yes Surface Controls Yes Oven Features Capacity Hidden Bake Element Eight-Pass Bake Element - 2500 Watts Eight-Pass Broil Element - 4000 Watts Convection Element - 2500 Watts Cobalt Blue Interior Self-Clean Options with Door Lock Perfect Convect3® with Variable 2-Speed Fan Cooking Modes - Perfect Convect3® Our convection technology features a third convection element for detailed installation instructions on the United States Access Board's A.D.A./A.B.A. Ft. PN # 318251611 2" Rear Filler Kit, Side Panel Kit, Backguard...
... Electric Element - 1200W 2 Hot-Surface Indicator Light Yes Surface Controls Yes Oven Features Capacity Hidden Bake Element Eight-Pass Bake Element - 2500 Watts Eight-Pass Broil Element - 4000 Watts Convection Element - 2500 Watts Cobalt Blue Interior Self-Clean Options with Door Lock Perfect Convect3® with Variable 2-Speed Fan Cooking Modes - Perfect Convect3® Our convection technology features a third convection element for detailed installation instructions on the United States Access Board's A.D.A./A.B.A. Ft. PN # 318251611 2" Rear Filler Kit, Side Panel Kit, Backguard...
Product Specifications Sheet (English)
Page 2
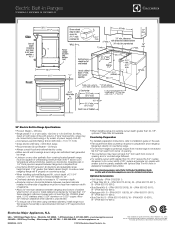
...-wiring or by means of power supply cord kit.) • Connected Load (kW Rating) @ 240 / 208 Volts = 15.3 / 11.7 kW • Amps @ 240 / 208 Volts = 63.8 / 56.3 Amps • Recommended Circuit Breaker - 50 Amps • Always consult local and national electric codes. • Make sure all wall coverings around range can withstand heat generated by not less than 1/4" flame-retardant millboard covered with optional Side Trim Kit...
...-wiring or by means of power supply cord kit.) • Connected Load (kW Rating) @ 240 / 208 Volts = 15.3 / 11.7 kW • Amps @ 240 / 208 Volts = 63.8 / 56.3 Amps • Recommended Circuit Breaker - 50 Amps • Always consult local and national electric codes. • Make sure all wall coverings around range can withstand heat generated by not less than 1/4" flame-retardant millboard covered with optional Side Trim Kit...


