Installation Instructions
Page 1
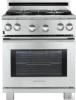
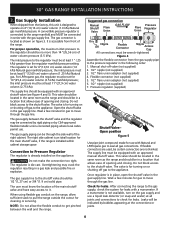
... causing property damage, personal injury or death. WIDTH 29 7/8" ( 75.9 cm) C. DEPTH WITH DOOR OPEN 45 1/2" (115.6 cm) F. page 20 30" GAS RANGE INSTALLATION INSTRUCTIONS INSTALLATION AND SERVICE MUST BE PERFORMED BY A QUALIFIED INSTALLER. do not use gasoline or other appliance. - WALL 29 7/8" Min. (75.9 cm ... SAVE FOR LOCAL ELECTRICAL INSPECTOR'S USE. páginas 11-19 Wiring Diagram - and the wall. 30" (76.2 cm) minimum clearance when the cabinet is Do not seal the range to light any appliance. • Do not touch any phone in United States 1 P/N 318201775 (...
... causing property damage, personal injury or death. WIDTH 29 7/8" ( 75.9 cm) C. DEPTH WITH DOOR OPEN 45 1/2" (115.6 cm) F. page 20 30" GAS RANGE INSTALLATION INSTRUCTIONS INSTALLATION AND SERVICE MUST BE PERFORMED BY A QUALIFIED INSTALLER. do not use gasoline or other appliance. - WALL 29 7/8" Min. (75.9 cm ... SAVE FOR LOCAL ELECTRICAL INSPECTOR'S USE. páginas 11-19 Wiring Diagram - and the wall. 30" (76.2 cm) minimum clearance when the cabinet is Do not seal the range to light any appliance. • Do not touch any phone in United States 1 P/N 318201775 (...
Installation Instructions
Page 2
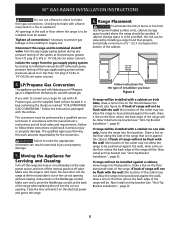
... cooking utensil. Never cover any appliance using a flexible gas connector, it carefully. • Be sure your range for warming or heating the room. 30" GAS RANGE INSTALLATION INSTRUCTIONS IMPORTANT SAFETY INSTRUCTIONS Installation of this range must conform with local codes or, in the absence of the range. This range has been design certified by a qualified installer or service...
... cooking utensil. Never cover any appliance using a flexible gas connector, it carefully. • Be sure your range for warming or heating the room. 30" GAS RANGE INSTALLATION INSTRUCTIONS IMPORTANT SAFETY INSTRUCTIONS Installation of this range must conform with local codes or, in the absence of the range. This range has been design certified by a qualified installer or service...
Installation Instructions
Page 3
... wall receptacle Do not, under any circumstances, cut or remove the third (ground) prong from the oven compartments before servicing range. Do not, under any circumstances, cut , remove, or bypass the grounding prong. Remove all packing material from the power...rating shall be checked by 4 percent for purchase through an Electrolux Service Center at back of the consumer to the Consumer Keep these installation instructions before installing range. 2. Figure 2 Gas Connector 3 30" GAS RANGE INSTALLATION INSTRUCTIONS Important Notes to make sure the receptacle is properly ...
... wall receptacle Do not, under any circumstances, cut or remove the third (ground) prong from the oven compartments before servicing range. Do not, under any circumstances, cut , remove, or bypass the grounding prong. Remove all packing material from the power...rating shall be checked by 4 percent for purchase through an Electrolux Service Center at back of the consumer to the Consumer Keep these installation instructions before installing range. 2. Figure 2 Gas Connector 3 30" GAS RANGE INSTALLATION INSTRUCTIONS Important Notes to make sure the receptacle is properly ...
Installation Instructions
Page 4
... cabinet storage space Connection to check for gas to the appliance. 30" GAS RANGE INSTALLATION INSTRUCTIONS 3. Wait a few minutes for leaks with the gas supply line. The supply line should be equipped with Natural and LP/Propane gas to the pressure regulator in a location that... allows ease of opening and closing . Open the shutoff valve in series with...
... cabinet storage space Connection to check for gas to the appliance. 30" GAS RANGE INSTALLATION INSTRUCTIONS 3. Wait a few minutes for leaks with the gas supply line. The supply line should be equipped with Natural and LP/Propane gas to the pressure regulator in a location that... allows ease of opening and closing . Open the shutoff valve in series with...
Installation Instructions
Page 5
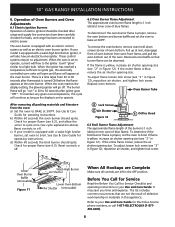
... be . Now install anti-tip bracket (see "Anti-Tip Bracket Installation", page 9). 5 Center Line of the range will be flush with natural gas. Lift the range at the front and slide it out of the cut -out opening without creating undue strain on the floor where ...appliance can result in serious injury or property damage. Now install anti-tip bracket (see figure 6). 30" GAS RANGE INSTALLATION INSTRUCTIONS Do not use a flame to check for leaks from the gas supply piping system during any pressure testing of the system at test pressures greater than 1/2 psig (3.5...
... be . Now install anti-tip bracket (see "Anti-Tip Bracket Installation", page 9). 5 Center Line of the range will be flush with natural gas. Lift the range at the front and slide it out of the cut -out opening without creating undue strain on the floor where ...appliance can result in serious injury or property damage. Now install anti-tip bracket (see figure 6). 30" GAS RANGE INSTALLATION INSTRUCTIONS Do not use a flame to check for leaks from the gas supply piping system during any pressure testing of the system at test pressures greater than 1/2 psig (3.5...
Installation Instructions
Page 6
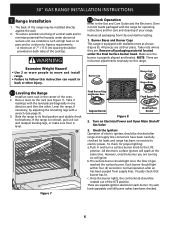
...been checked. 6 NOTE: There are . Visually check that burner has lit. There are turning on Electrical Power and Open Main Shutoff Gas Valve 3. Slide the range to the LITE position. To reduce possible scorching of the cooktop. Remove all packaging material located under abnormal surface unit use conditions such...other injury. 7.2 Check Operation Refer to minimize potential fire hazards under the Dual Surface burner head. c. Make sure the burner is level. 30" GAS RANGE INSTALLATION INSTRUCTIONS 7. Take note where they are no pans and to conform to electric power.
...been checked. 6 NOTE: There are . Visually check that burner has lit. There are turning on Electrical Power and Open Main Shutoff Gas Valve 3. Slide the range to the LITE position. To reduce possible scorching of the cooktop. Remove all packaging material located under abnormal surface unit use conditions such...other injury. 7.2 Check Operation Refer to minimize potential fire hazards under the Dual Surface burner head. c. Make sure the burner is level. 30" GAS RANGE INSTALLATION INSTRUCTIONS 7. Take note where they are no pans and to conform to electric power.
Installation Instructions
Page 7
30" GAS RANGE INSTALLATION INSTRUCTIONS 4. Insert a thin-bladed screwdriver into the hollow valve stem and engage the slotted screw inside. Turn clockwise to OFF. If burner goes out, ...
30" GAS RANGE INSTALLATION INSTRUCTIONS 4. Insert a thin-bladed screwdriver into the hollow valve stem and engage the slotted screw inside. Turn clockwise to OFF. If burner goes out, ...
Installation Instructions
Page 8
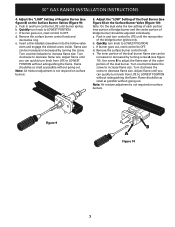
...air shutter opening size. Before You Call for Service Read the Before You Call for Service Checklist and operating instructions in the OFF position. 30" GAS RANGE INSTALLATION INSTRUCTIONS 6. Pull up at the oven burner. If the flame is blue, reduce the air shutter opening size (see "2" in Figure.... To remove the oven bottom, remove oven hold down screws at 300°F. Reset controls to your Use and Care Guide. Check for Electrolux Service phone numbers, or call 1-877-4ELECTROLUX (1-877435-3287). 8 Lower Oven Burner Baffle (removable) Figure 11 Waist-High Burner Air Shutter ...
...air shutter opening size. Before You Call for Service Read the Before You Call for Service Checklist and operating instructions in the OFF position. 30" GAS RANGE INSTALLATION INSTRUCTIONS 6. Pull up at the oven burner. If the flame is blue, reduce the air shutter opening size (see "2" in Figure.... To remove the oven bottom, remove oven hold down screws at 300°F. Reset controls to your Use and Care Guide. Check for Electrolux Service phone numbers, or call 1-877-4ELECTROLUX (1-877435-3287). 8 Lower Oven Burner Baffle (removable) Figure 11 Waist-High Burner Air Shutter ...
Installation Instructions
Page 9
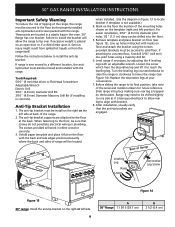
... Adjustable Wrench Electric Drill 3/16" (4.8 mm) Diameter Drill Bit 3/16" (4.8 mm) Diameter Masonry Drill Bit (if installing in the oven. 30" Range has one side as it to concrete floor, first drill 3/16" (4.8 mm) dia. Failure to install the bracket will allow rear leg to...flat on floor and attach the bracket using a masonry drill bit. 6. 30" GAS RANGE INSTALLATION INSTRUCTIONS Important Safety Warning To reduce the risk of tipping of the range, the range must be moved and installed with the range. Unfold paper template and place it . Loosen the screw which fixes the...
... Adjustable Wrench Electric Drill 3/16" (4.8 mm) Diameter Drill Bit 3/16" (4.8 mm) Diameter Masonry Drill Bit (if installing in the oven. 30" Range has one side as it to concrete floor, first drill 3/16" (4.8 mm) dia. Failure to install the bracket will allow rear leg to...flat on floor and attach the bracket using a masonry drill bit. 6. 30" GAS RANGE INSTALLATION INSTRUCTIONS Important Safety Warning To reduce the risk of tipping of the range, the range must be moved and installed with the range. Unfold paper template and place it . Loosen the screw which fixes the...

Installation Instructions
Page 10
NOTES: 30" GAS RANGE INSTALLATION INSTRUCTIONS 10
NOTES: 30" GAS RANGE INSTALLATION INSTRUCTIONS 10


