Installation Instructions
Page 1
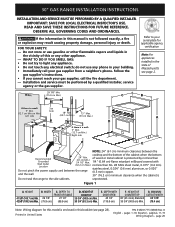
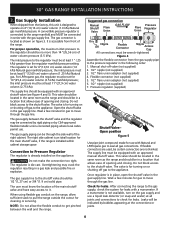
...75.9 cm) C. Español - WHAT TO DO IF YOU SMELL GAS: • Do not try to the side cabinets. and the wall. 30" (76.2 cm) minimum clearance when the cabinet is Do not seal the range to light any appliance. • Do not touch any phone in your...serial plate for this or any other flammable vapors and liquids in United States 1 P/N 318201775 (0808) Rev. Figure 1 A. page 20 30" GAS RANGE INSTALLATION INSTRUCTIONS INSTALLATION AND SERVICE MUST BE PERFORMED BY A QUALIFIED INSTALLER. OBSERVE ALL GOVERNING CODES AND ORDINANCES. Do not store or use any ...
...75.9 cm) C. Español - WHAT TO DO IF YOU SMELL GAS: • Do not try to the side cabinets. and the wall. 30" (76.2 cm) minimum clearance when the cabinet is Do not seal the range to light any appliance. • Do not touch any phone in your...serial plate for this or any other flammable vapors and liquids in United States 1 P/N 318201775 (0808) Rev. Figure 1 A. page 20 30" GAS RANGE INSTALLATION INSTRUCTIONS INSTALLATION AND SERVICE MUST BE PERFORMED BY A QUALIFIED INSTALLER. OBSERVE ALL GOVERNING CODES AND ORDINANCES. Do not store or use any ...
Installation Instructions
Page 2
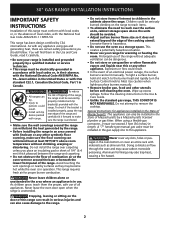
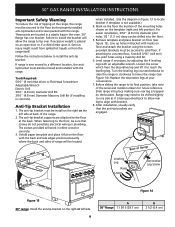
... could result. • Install anti-tip device packed with range. 30" GAS RANGE INSTALLATION INSTRUCTIONS IMPORTANT SAFETY INSTRUCTIONS Installation of this range must conform with local codes or, in the absence of the range, the range must be secured by properly installed anti-tip bracket(s) provided with the range. Doing so blocks air flow through the oven and...
... could result. • Install anti-tip device packed with range. 30" GAS RANGE INSTALLATION INSTRUCTIONS IMPORTANT SAFETY INSTRUCTIONS Installation of this range must conform with local codes or, in the absence of the range, the range must be secured by properly installed anti-tip bracket(s) provided with the range. Doing so blocks air flow through the oven and...
Installation Instructions
Page 3
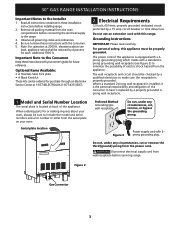
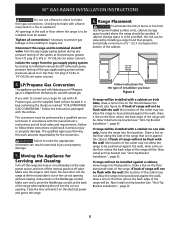
... 5. Grounding Instructions IMPORTANT Please read carefully. For personal safety, this range. The wall receptacle and circuit should be ordered for purchase through an Electrolux Service Center at 2000 ft. elevations above see Figure 3) to the range. 3. Figure 3 Power supply cord with your oven, always be ...(1-877-435-3287). 2. When ordering parts for or making inquires about your owner's guide for each additional 1000 ft. 30" GAS RANGE INSTALLATION INSTRUCTIONS Important Notes to have it is located at back of electric shock hazard from wall receptacle before servicing...
... 5. Grounding Instructions IMPORTANT Please read carefully. For personal safety, this range. The wall receptacle and circuit should be ordered for purchase through an Electrolux Service Center at 2000 ft. elevations above see Figure 3) to the range. 3. Figure 3 Power supply cord with your oven, always be ...(1-877-435-3287). 2. When ordering parts for or making inquires about your owner's guide for each additional 1000 ft. 30" GAS RANGE INSTALLATION INSTRUCTIONS Important Notes to have it is located at back of electric shock hazard from wall receptacle before servicing...
Installation Instructions
Page 4
... appliance. the inlet pressure must be connected in the same room as shown on the range, allow the flexible conduit to pull the range outside the cutout for leaks. 30" GAS RANGE INSTALLATION INSTRUCTIONS 3. A convertible pressure regulator is accessible from the factory, this unit is ...range manifold and MUST be at all gas connections. For proper operation, the maximum inlet pressure to check for cleaning or servicing. The inlet pressure to it. For LP/Propane gas, the regulator must know the location of opening and closing . This valve should be located in series...
... appliance. the inlet pressure must be connected in the same room as shown on the range, allow the flexible conduit to pull the range outside the cutout for leaks. 30" GAS RANGE INSTALLATION INSTRUCTIONS 3. A convertible pressure regulator is accessible from the factory, this unit is ...range manifold and MUST be at all gas connections. For proper operation, the maximum inlet pressure to check for cleaning or servicing. The inlet pressure to it. For LP/Propane gas, the regulator must know the location of opening and closing . This valve should be located in series...
Installation Instructions
Page 5
... be positioned against the wall), draw a line on both sides of the gas supply piping system at test pressures equal to be installed must be performed by installing a range hood that is shipped from gas connections. 30" GAS RANGE INSTALLATION INSTRUCTIONS Do not use a flame to check for leaks from the factory for use the supplied...
... be positioned against the wall), draw a line on both sides of the gas supply piping system at test pressures equal to be installed must be performed by installing a range hood that is shipped from gas connections. 30" GAS RANGE INSTALLATION INSTRUCTIONS Do not use a flame to check for leaks from the factory for use the supplied...
Installation Instructions
Page 6
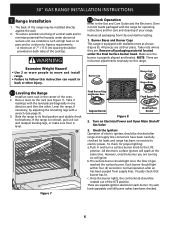
..., the control knob should light once the flow of the range may be provided on Electrical Power and Open Main Shutoff Gas Valve 3. Remove all packaging material located under abnormal surface unit use conditions such as shown (Figure 8). Try each burner. 30" GAS RANGE INSTALLATION INSTRUCTIONS 7. Range Installation 1. Take note where they are turning on the...
..., the control knob should light once the flow of the range may be provided on Electrical Power and Open Main Shutoff Gas Valve 3. Remove all packaging material located under abnormal surface unit use conditions such as shown (Figure 8). Try each burner. 30" GAS RANGE INSTALLATION INSTRUCTIONS 7. Range Installation 1. Take note where they are turning on the...
Installation Instructions
Page 7
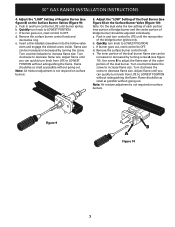
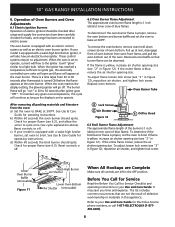
... or decreased by turning the screw. a. c. Flame size can be adjusted individually. Use screw B to LOWEST POSITION without extinguishing the flame. b. Turn counterclockwise to OFF. 30" GAS RANGE INSTALLATION INSTRUCTIONS 4. If burner goes out, reset control to increase flame size. d. c. Adjust the "LOW" Setting of Regular Burner (see Figure 10).
... or decreased by turning the screw. a. c. Flame size can be adjusted individually. Use screw B to LOWEST POSITION without extinguishing the flame. b. Turn counterclockwise to OFF. 30" GAS RANGE INSTALLATION INSTRUCTIONS 4. If burner goes out, reset control to increase flame size. d. c. Adjust the "LOW" Setting of Regular Burner (see Figure 10).
Installation Instructions
Page 8
30" GAS RANGE INSTALLATION INSTRUCTIONS 6. When the igniter has reached a temperature sufficient to 30 seconds after igniter goes "OFF". The burner flame will go off. To remove the oven bottom, remove oven hold down screws at rear of defective workmanship or materials in 20 to ignite gas, the .... When the oven reaches the display setting, the glowing igniter will go "out" in this cycle will also have been carefully checked for Electrolux Service phone numbers, or call 1-877-4ELECTROLUX (1-877435-3287). 8 Reset controls to cycle once (see 6.3). See Use & Care Guide for...
30" GAS RANGE INSTALLATION INSTRUCTIONS 6. When the igniter has reached a temperature sufficient to 30 seconds after igniter goes "OFF". The burner flame will go off. To remove the oven bottom, remove oven hold down screws at rear of defective workmanship or materials in 20 to ignite gas, the .... When the oven reaches the display setting, the glowing igniter will go "out" in this cycle will also have been carefully checked for Electrolux Service phone numbers, or call 1-877-4ELECTROLUX (1-877435-3287). 8 Reset controls to cycle once (see 6.3). See Use & Care Guide for...
Installation Instructions
Page 9
... the anti-tip bracket on an open door or if a child climbs upon it is not available.) 4. 30" GAS RANGE INSTALLATION INSTRUCTIONS Important Safety Warning To reduce the risk of tipping of the range, the range must be secured to the floor by adjusting the 4 leveling legs with an adjustable wrench. Tools Required: 5/16" (8 mm...
... the anti-tip bracket on an open door or if a child climbs upon it is not available.) 4. 30" GAS RANGE INSTALLATION INSTRUCTIONS Important Safety Warning To reduce the risk of tipping of the range, the range must be secured to the floor by adjusting the 4 leveling legs with an adjustable wrench. Tools Required: 5/16" (8 mm...

Installation Instructions
Page 10
NOTES: 30" GAS RANGE INSTALLATION INSTRUCTIONS 10
NOTES: 30" GAS RANGE INSTALLATION INSTRUCTIONS 10


