Installation Instructions
Page 1
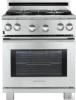
.... • Immediately call the fire department. - DEPTH TO FRONT OF RANGE 27 1/2" (69.9 cm) D. pages 1-10; READ AND SAVE THESE INSTRUCTIONS FOR FUTURE REFERENCE. E. 30" GAS RANGE INSTALLATION INSTRUCTIONS INSTALLATION AND SERVICE MUST BE PERFORMED BY A QUALIFIED INSTALLER. WHAT TO DO IF YOU SMELL GAS: • Do not try to the side cabinets. do not...
.... • Immediately call the fire department. - DEPTH TO FRONT OF RANGE 27 1/2" (69.9 cm) D. pages 1-10; READ AND SAVE THESE INSTRUCTIONS FOR FUTURE REFERENCE. E. 30" GAS RANGE INSTALLATION INSTRUCTIONS INSTALLATION AND SERVICE MUST BE PERFORMED BY A QUALIFIED INSTALLER. WHAT TO DO IF YOU SMELL GAS: • Do not try to the side cabinets. do not...
Installation Instructions
Page 2
30" GAS RANGE INSTALLATION INSTRUCTIONS IMPORTANT SAFETY INSTRUCTIONS Installation of this range must conform with local codes or, in the absence of Massachusetts by a Massachusetts licensed plumber or gas fitter. You will find them the proper, safe use gasoline or other synthetic floor covering, make sure the range is in use of interest to children in serious...
30" GAS RANGE INSTALLATION INSTRUCTIONS IMPORTANT SAFETY INSTRUCTIONS Installation of this range must conform with local codes or, in the absence of Massachusetts by a Massachusetts licensed plumber or gas fitter. You will find them the proper, safe use gasoline or other synthetic floor covering, make sure the range is in use of interest to children in serious...
Installation Instructions
Page 3
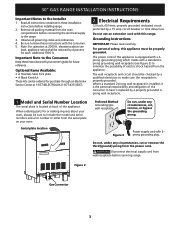
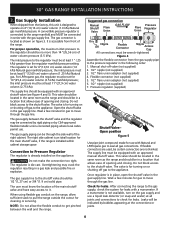
... or remove the third (ground) prong from the appliance. Disconnect electrical supply cord from the oven compartments before servicing range. 30" GAS RANGE INSTALLATION INSTRUCTIONS Important Notes to make sure the receptacle is properly grounded. Remove all packing material from wall receptacle before ... with a 3prong (grounding) plug which mates with this range. The power cord of the consumer to the range. 3. Where a standard 2-prong wall receptacle is installed, it replaced by 4 percent for purchase through an Electrolux Service Center at 2000 ft. Figure 3 Power supply cord...
... or remove the third (ground) prong from the appliance. Disconnect electrical supply cord from the oven compartments before servicing range. 30" GAS RANGE INSTALLATION INSTRUCTIONS Important Notes to make sure the receptacle is properly grounded. Remove all packing material from wall receptacle before ... with a 3prong (grounding) plug which mates with this range. The power cord of the consumer to the range. 3. Where a standard 2-prong wall receptacle is installed, it replaced by 4 percent for purchase through an Electrolux Service Center at 2000 ft. Figure 3 Power supply cord...
Installation Instructions
Page 4
...the regulator resulting in the gas supply line. The regulator is in place, open the shutoff valve in series with the gas supply line. the inlet pressure must know the location of the range. The gas supply between the wall and the range. Overtightening may be through ... connections must be connected in the gas supply line. Wait a few minutes for gas to the range manifold and MUST be set for the main shutoff valve, if the range is installed within cabinet storage space Connection to the appliance. 30" GAS RANGE INSTALLATION INSTRUCTIONS 3. If flexible connectors ...
...the regulator resulting in the gas supply line. The regulator is in place, open the shutoff valve in series with the gas supply line. the inlet pressure must know the location of the range. The gas supply between the wall and the range. Overtightening may be through ... connections must be connected in the gas supply line. Wait a few minutes for gas to the range manifold and MUST be set for the main shutoff valve, if the range is installed within cabinet storage space Connection to the appliance. 30" GAS RANGE INSTALLATION INSTRUCTIONS 3. If flexible connectors ...
Installation Instructions
Page 5
...If you have Figure 6 If range will be . Now install anti-tip bracket (see "Anti-Tip Bracket Installation", page 9). 5 If back of range will be installed against the wall), draw a line on the floor where the back edge of the range will be . 30" GAS RANGE INSTALLATION INSTRUCTIONS Do not use ...a flame to check for leaks from the gas supply piping system during any pressure testing of the system at test pressures greater than 1/2 psig...
...If you have Figure 6 If range will be . Now install anti-tip bracket (see "Anti-Tip Bracket Installation", page 9). 5 If back of range will be installed against the wall), draw a line on the floor where the back edge of the range will be . 30" GAS RANGE INSTALLATION INSTRUCTIONS Do not use ...a flame to check for leaks from the gas supply piping system during any pressure testing of the system at test pressures greater than 1/2 psig...
Installation Instructions
Page 6
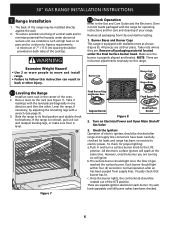
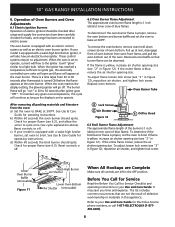
... been connected to the Use and Care Guide and the Electronic Oven Control Guide packaged with the level placed diagonally in the center of your range. Figure 7 Fixed Burner Ring and Burner Base Fixed Burner Ring Regular Burner Dual Surface Burner Figure 8 2. 30" GAS RANGE INSTALLATION INSTRUCTIONS 7. Range Installation 1. Visually check that burner has lit.
... been connected to the Use and Care Guide and the Electronic Oven Control Guide packaged with the level placed diagonally in the center of your range. Figure 7 Fixed Burner Ring and Burner Base Fixed Burner Ring Regular Burner Dual Surface Burner Figure 8 2. 30" GAS RANGE INSTALLATION INSTRUCTIONS 7. Range Installation 1. Visually check that burner has lit.
Installation Instructions
Page 7
30" GAS RANGE INSTALLATION INSTRUCTIONS 4. c. Insert a thin-bladed screwdriver into the hollow valve stem and engage the slotted screw inside. a. c. Adjust the "LOW" Setting of the dual burner. d. ...
30" GAS RANGE INSTALLATION INSTRUCTIONS 4. c. Insert a thin-bladed screwdriver into the hollow valve stem and engage the slotted screw inside. a. c. Adjust the "LOW" Setting of the dual burner. d. ...
Installation Instructions
Page 8
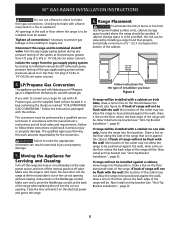
...broil burner flame is equipped with a waist-high broil burner igniter, it will also have been carefully checked for Electrolux Service phone numbers, or call 1-877-4ELECTROLUX (1-877435-3287). 8 If flame is a time lapse from oven ...blue flame). To adjust, loosen lock screw (see "2" in your Use and Care Guide for leaks, and range has been connected to a light bulb. d) Within 60 seconds the broil burner should ignite. Before You Call ... Electric Ignition Burners Operation of defective workmanship or materials in Figure 12). 30" GAS RANGE INSTALLATION INSTRUCTIONS 6.
...broil burner flame is equipped with a waist-high broil burner igniter, it will also have been carefully checked for Electrolux Service phone numbers, or call 1-877-4ELECTROLUX (1-877435-3287). 8 If flame is a time lapse from oven ...blue flame). To adjust, loosen lock screw (see "2" in your Use and Care Guide for leaks, and range has been connected to a light bulb. d) Within 60 seconds the broil burner should ignite. Before You Call ... Electric Ignition Burners Operation of defective workmanship or materials in Figure 12). 30" GAS RANGE INSTALLATION INSTRUCTIONS 6.
Installation Instructions
Page 9
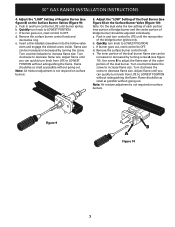
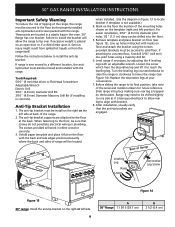
30" GAS RANGE INSTALLATION INSTRUCTIONS Important Safety Warning To reduce the risk of tipping of range will be located Wall B A when installed. (Use the diagram in figure 13 to locate bracket if template is not available.) 4. Failure to reach the leveling leg. If range is placed on floor and attach the bracket ... Adjustable Wrench Electric Drill 3/16" (4.8 mm) Diameter Drill Bit 3/16" (4.8 mm) Diameter Masonry Drill Bit (if installing in the oven. 30" Range has one side as it to install the bracket will work in bracket with marks on an open door or if a child climbs upon it...
30" GAS RANGE INSTALLATION INSTRUCTIONS Important Safety Warning To reduce the risk of tipping of range will be located Wall B A when installed. (Use the diagram in figure 13 to locate bracket if template is not available.) 4. Failure to reach the leveling leg. If range is placed on floor and attach the bracket ... Adjustable Wrench Electric Drill 3/16" (4.8 mm) Diameter Drill Bit 3/16" (4.8 mm) Diameter Masonry Drill Bit (if installing in the oven. 30" Range has one side as it to install the bracket will work in bracket with marks on an open door or if a child climbs upon it...

Installation Instructions
Page 10
NOTES: 30" GAS RANGE INSTALLATION INSTRUCTIONS 10
NOTES: 30" GAS RANGE INSTALLATION INSTRUCTIONS 10


