
Use and Care Manual
Page 56
... workmanship or materials in center of the material affect heating. Heavy & mediumweight pans heat evenly. Be sure cabinets are square & have sufficient room for service, review the following list. Use only flat, evenly balanced, medium or heavyweight cookware. Check house lights to make range appear not level. 56 Solutions to Common...
... workmanship or materials in center of the material affect heating. Heavy & mediumweight pans heat evenly. Be sure cabinets are square & have sufficient room for service, review the following list. Use only flat, evenly balanced, medium or heavyweight cookware. Check house lights to make range appear not level. 56 Solutions to Common...

Installation Instructions
Page 3
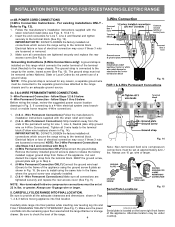
.... The Rear Access Cover must be accessible. 3 & 4 - To remove, loosen center screw (one screw) and remove cover. Refer to Fig.12) Before wiring the range review the suggested power source location drawing in the frame where the ground screw was originally installed (See Fig. 12). 5. This appliance may occur if these...
.... The Rear Access Cover must be accessible. 3 & 4 - To remove, loosen center screw (one screw) and remove cover. Refer to Fig.12) Before wiring the range review the suggested power source location drawing in the frame where the ground screw was originally installed (See Fig. 12). 5. This appliance may occur if these...
Installation Instructions
Page 4
... ANTI-TIP BRACKET (See Fig. 7). Grounding Instructions (3-Wire Connections only): A ground strap is located on 4-Wire Connections). follow Steps 1 thru 5 below . 4 - Before wiring the range, review the suggested power source location drawings in Fig. 15. Serial Plate Locations: Fig. 15 Carefully slide range into final position while inserting rear leveling leg...
... ANTI-TIP BRACKET (See Fig. 7). Grounding Instructions (3-Wire Connections only): A ground strap is located on 4-Wire Connections). follow Steps 1 thru 5 below . 4 - Before wiring the range, review the suggested power source location drawings in Fig. 15. Serial Plate Locations: Fig. 15 Carefully slide range into final position while inserting rear leveling leg...
