
Datasheet
Page 1
...Mode Supports Motorized Pan/Tilt The Edimax IC-7010 series lets you are allowed to access Edimax IC-7010 series by inputting easy-to-memorize URL rather than ordinary Internet cameras allow, making it features Pre-recording & Post-recording that the Edimax IC-7010 will continue to record images... surveillance possible. Simultaneous Multi Users Login The Edimax IC-7010 series allows multiple users to achieve the highest video quality and/or faster video transmission, select either M-JPEG, MPEG4 or H.264 mode depending on your network settings. In order to simultaneously view high quality...
...Mode Supports Motorized Pan/Tilt The Edimax IC-7010 series lets you are allowed to access Edimax IC-7010 series by inputting easy-to-memorize URL rather than ordinary Internet cameras allow, making it features Pre-recording & Post-recording that the Edimax IC-7010 will continue to record images... surveillance possible. Simultaneous Multi Users Login The Edimax IC-7010 series allows multiple users to achieve the highest video quality and/or faster video transmission, select either M-JPEG, MPEG4 or H.264 mode depending on your network settings. In order to simultaneously view high quality...
Quick Install Guide
Page 5
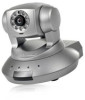
...computers. The Edimax IC-7010 series features extremely high picture quality matched by a high frame rate video streaming because of 5 Before enjoying your package contents 1 x IP Camera 1 x Power Adapter 2 x Detachable Antenna (IC-7010PTn only...The Edimax IC-7010 series features built-in IR (infra red) LED and motorized Pan/Tilt with viewing angle 355 degree horizontally and 120 degree vertically which makes the cameras ...is tailor made to claim the missing contents. 2. Check your new IP camera, please check the package contents. To get the best video quality, ...
...computers. The Edimax IC-7010 series features extremely high picture quality matched by a high frame rate video streaming because of 5 Before enjoying your package contents 1 x IP Camera 1 x Power Adapter 2 x Detachable Antenna (IC-7010PTn only...The Edimax IC-7010 series features built-in IR (infra red) LED and motorized Pan/Tilt with viewing angle 355 degree horizontally and 120 degree vertically which makes the cameras ...is tailor made to claim the missing contents. 2. Check your new IP camera, please check the package contents. To get the best video quality, ...

Quick Install Guide
Page 7
Plug the power adapter to wall socket and connect the power connector to the LAN jack of the IP camera. 7 Connect the Ethernet cable to your local area network, and connect the other end to the power jack located at the back of this IP camera. 2. 4. Hardware Installation Please follow the following instructions to set the camera up: 1.
Plug the power adapter to wall socket and connect the power connector to the LAN jack of the IP camera. 7 Connect the Ethernet cable to your local area network, and connect the other end to the power jack located at the back of this IP camera. 2. 4. Hardware Installation Please follow the following instructions to set the camera up: 1.

Quick Install Guide
Page 10
...received through a wireless network. You can change the aim and focus of choice and rotate the focus ring to a wired network, this LED will flash while video is transmitted. LAN ACT (IC-7010PoE only) Wireless (IC-7010PT & IC-7010PTn only) Focus Ring When the IP Camera is linked to your... direction of the camera by adjusting the camera head's aim and adjusting the focus ring...
...received through a wireless network. You can change the aim and focus of choice and rotate the focus ring to a wired network, this LED will flash while video is transmitted. LAN ACT (IC-7010PoE only) Wireless (IC-7010PT & IC-7010PTn only) Focus Ring When the IP Camera is linked to your... direction of the camera by adjusting the camera head's aim and adjusting the focus ring...

Quick Install Guide
Page 23
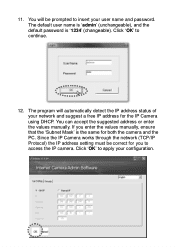
After installation, the system will be listed. Select the one you wish to configure and click on the „Configure Camera‟ icon. 23 On the first page, the cameras found in your network will automatically run the „Administrator Utility‟. 10.
After installation, the system will be listed. Select the one you wish to configure and click on the „Configure Camera‟ icon. 23 On the first page, the cameras found in your network will automatically run the „Administrator Utility‟. 10.
Quick Install Guide
Page 24
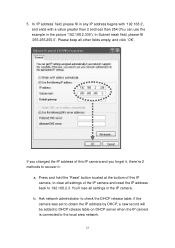
...correct for you enter the values manually, ensure that the „Subnet Mask‟ is „1234‟ (changeable). Since the IP Camera works through the network (TCP/IP Protocol) the IP address setting must be prompted to continue. 12. 11. You will automatically detect the IP address status ...of your network and suggest a free IP address for both the camera and the PC. You can accept the suggested address or enter the values manually. The default user name is „...
...correct for you enter the values manually, ensure that the „Subnet Mask‟ is „1234‟ (changeable). Since the IP Camera works through the network (TCP/IP Protocol) the IP address setting must be prompted to continue. 12. 11. You will automatically detect the IP address status ...of your network and suggest a free IP address for both the camera and the PC. You can accept the suggested address or enter the values manually. The default user name is „...
Manual
Page 4
... 12 IC-7010PoE 13 1.5 Camera Installation 17 1.6 Locate the IP Address of this IP Camera 20 1.7 Using Camera Admin Software to Locate Camera 24 Chapter II: Using Web Management Interface 36 2.1 Camera Settings 36 2.2 Video 40 2.2.1 MJPEG 41 2.2.2 MPEG4 42 2.2.3 H.264 43 2.2.4 OSD 44 2.2.5 Night Vision 45 2.3 Pan and Tilt 46 2.3.1 Preset Points 46 2.3.2 Guard Tour 48 2.4 Network...
... 12 IC-7010PoE 13 1.5 Camera Installation 17 1.6 Locate the IP Address of this IP Camera 20 1.7 Using Camera Admin Software to Locate Camera 24 Chapter II: Using Web Management Interface 36 2.1 Camera Settings 36 2.2 Video 40 2.2.1 MJPEG 41 2.2.2 MPEG4 42 2.2.3 H.264 43 2.2.4 OSD 44 2.2.5 Night Vision 45 2.3 Pan and Tilt 46 2.3.1 Preset Points 46 2.3.2 Guard Tour 48 2.4 Network...

Manual
Page 7
...ideal product for purchasing this IP camera! This camera equips 9 IR-LEDs and will cruise along the path you for all kinds of video surveillance purposes, like home/office safety, kid/pet monitoring, and remote video acquire etc. Besides, Edimax IC-7010 series features high quality and... high frame rate video streaming through advanced video compression. You can point the camera to the position where you wish to stream live video over your network settings. With built-in next section! 7...
...ideal product for purchasing this IP camera! This camera equips 9 IR-LEDs and will cruise along the path you for all kinds of video surveillance purposes, like home/office safety, kid/pet monitoring, and remote video acquire etc. Besides, Edimax IC-7010 series features high quality and... high frame rate video streaming through advanced video compression. You can point the camera to the position where you wish to stream live video over your network settings. With built-in next section! 7...

Manual
Page 8
... and event logging. 8 Video control functions, like brightness and zoom-in real-time clock, date and time information will discover this IP camera in network neighbor automatically. Wired and wireless network (IC-7010PTn only, 802.11b / 802.11g / 802.11n) support Wireless data encryption (WEP / WPA) Supports DHCP and PPPoE protocol, you can also...
... and event logging. 8 Video control functions, like brightness and zoom-in real-time clock, date and time information will discover this IP camera in network neighbor automatically. Wired and wireless network (IC-7010PTn only, 802.11b / 802.11g / 802.11n) support Wireless data encryption (WEP / WPA) Supports DHCP and PPPoE protocol, you can also...

Manual
Page 9
Audio Indicates Audio status LAN When the IP Camera is linked to a wired network, this LED will flash while video is transmitted. (IC-7010 9 ACT The LED will light up . The LED will light up . 1.4 Familiar with Key Components Front View Focus Ring IR LED Microphone Wired & Wireless: Power LED Audio LED LAN LED WLAN LED POE model: Power LED Audio LED ACT LED LAN LED Item Power Description When the camera is powered on and ready for access, this LED will flash while data is transmitted or received through a wired network.
Audio Indicates Audio status LAN When the IP Camera is linked to a wired network, this LED will flash while video is transmitted. (IC-7010 9 ACT The LED will light up . The LED will light up . 1.4 Familiar with Key Components Front View Focus Ring IR LED Microphone Wired & Wireless: Power LED Audio LED LAN LED WLAN LED POE model: Power LED Audio LED ACT LED LAN LED Item Power Description When the camera is powered on and ready for access, this LED will flash while data is transmitted or received through a wired network.

Manual
Page 10
The LED will light up when environment is transmitted or received through a wireless network. IR LEDs Lights up . PoE only) Wireless (IC-7010 PT & IC-7010 PTn only) When the IP Camera is linked to your direction of the camera by adjusting the camera head's aim and adjusting the focus ring. Simply point it in your preference. Focus Ring You can change the aim and focus of choice and rotate the focus ring to a wireless network, this LED will flash while video is too dark Microph one Collects audio 10
The LED will light up when environment is transmitted or received through a wireless network. IR LEDs Lights up . PoE only) Wireless (IC-7010 PT & IC-7010 PTn only) When the IP Camera is linked to your direction of the camera by adjusting the camera head's aim and adjusting the focus ring. Simply point it in your preference. Focus Ring You can change the aim and focus of choice and rotate the focus ring to a wireless network, this LED will flash while video is too dark Microph one Collects audio 10
Manual
Page 17
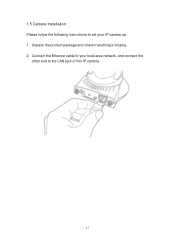
Connect the Ethernet cable to the LAN jack of this IP camera. 17 Unpack the product package and check if anything‟s missing. 2. 1.5 Camera Installation Please follow the following instructions to set your local area network, and connect the other end to your IP camera up. 1.
Connect the Ethernet cable to the LAN jack of this IP camera. 17 Unpack the product package and check if anything‟s missing. 2. 1.5 Camera Installation Please follow the following instructions to set your local area network, and connect the other end to your IP camera up. 1.
Manual
Page 23
... the „Reset‟ button located at the bottom of this IP camera and you changed the IP address of this IP camera, to clear all settings of the IP camera and reset the IP address back to the local area network. 23 You‟ll lose all other fields empty, and click „...;OK‟. Ask network administrator to check the DHCP release table, if the camera was set to obtain the IP address by DHCP, a new record will be added to DHCP release...
... the „Reset‟ button located at the bottom of this IP camera and you changed the IP address of this IP camera, to clear all settings of the IP camera and reset the IP address back to the local area network. 23 You‟ll lose all other fields empty, and click „...;OK‟. Ask network administrator to check the DHCP release table, if the camera was set to obtain the IP address by DHCP, a new record will be added to DHCP release...

Manual
Page 24
The admin software is connected to locate multiple cameras on your local area network. Please insert the user manual CD-ROM supplied in last chapter, you can use camera admin software: 24 1.7 Using Camera Admin Software to Locate Camera If you can‟t connect to the camera by the instructions given in the product package, and the...
The admin software is connected to locate multiple cameras on your local area network. Please insert the user manual CD-ROM supplied in last chapter, you can use camera admin software: 24 1.7 Using Camera Admin Software to Locate Camera If you can‟t connect to the camera by the instructions given in the product package, and the...
Manual
Page 27
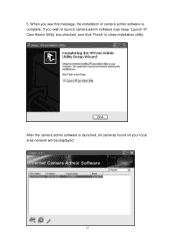
After the camera admin software is complete. 5. When you wish to launch camera admin software now, keep „Launch IP Cam Admin Utility‟ box checked, and click „Finish‟ to close installation utility. If you see this message, the installation of camera admin software is launched, all cameras found on your local area network will be displayed: 27
After the camera admin software is complete. 5. When you wish to launch camera admin software now, keep „Launch IP Cam Admin Utility‟ box checked, and click „Finish‟ to close installation utility. If you see this message, the installation of camera admin software is launched, all cameras found on your local area network will be displayed: 27
Manual
Page 28
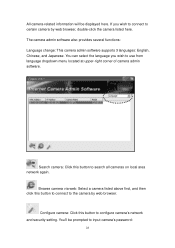
... this button to connect to the camera by web browser, double-click the camera listed here. All camera-related information will be prompted to input camera‟s password: 28 Browse camera via web: Select a camera listed above first, and then click this button to configure camera‟s network and security setting. Configure camera: Click this button to search all...
... this button to connect to the camera by web browser, double-click the camera listed here. All camera-related information will be prompted to input camera‟s password: 28 Browse camera via web: Select a camera listed above first, and then click this button to configure camera‟s network and security setting. Configure camera: Click this button to search all...
Manual
Page 29
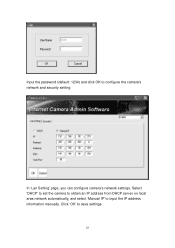
Click „OK‟ to input the IP address information manually. Select „DHCP‟ to set the camera to obtain an IP address from DHCP server on local area network automatically, and select „Manual IP‟ to save settings. 29 Input the password (default: 1234) and click OK to configure the camera‟s network and security setting: In „Lan Setting‟ page, you can configure camera‟s network settings.
Click „OK‟ to input the IP address information manually. Select „DHCP‟ to set the camera to obtain an IP address from DHCP server on local area network automatically, and select „Manual IP‟ to save settings. 29 Input the password (default: 1234) and click OK to configure the camera‟s network and security setting: In „Lan Setting‟ page, you can configure camera‟s network settings.

Manual
Page 41
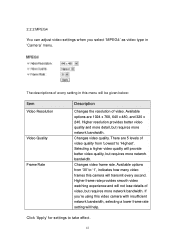
Changes video quality. 2.2.1 MJPEG You can adjust video settings when you ‟re using this video camera with insufficient network bandwidth, selecting a lower frame rate setting will transmit every second. Changes video frame rate. Available options from „Lowest‟..., 640 x 480, and 320 x 240. The descriptions of video, but requires more network bandwidth. Higher frame rate provides smooth video watching experience and will not lose details of every setting in „Camera‟ menu. Click „Apply‟ for settings to „1‟, indicates how ...
Changes video quality. 2.2.1 MJPEG You can adjust video settings when you ‟re using this video camera with insufficient network bandwidth, selecting a lower frame rate setting will transmit every second. Changes video frame rate. Available options from „Lowest‟..., 640 x 480, and 320 x 240. The descriptions of video, but requires more network bandwidth. Higher frame rate provides smooth video watching experience and will not lose details of every setting in „Camera‟ menu. Click „Apply‟ for settings to „1‟, indicates how ...
Manual
Page 42
... rate. Click „Apply‟ for settings to „1‟, indicates how many video frames this camera will transmit every second. Selecting a higher video quality will provide better video quality, but requires more network bandwidth. If you select „MPEG4‟ as video type in this menu will be given below...;Highest‟. There are 1024 x 768, 640 x 480, and 320 x 240. 2.2.2 MPEG4 You can adjust video settings when you ‟re using this video camera with insufficient network bandwidth, selecting a lower frame rate setting will help. Changes video quality.
... rate. Click „Apply‟ for settings to „1‟, indicates how many video frames this camera will transmit every second. Selecting a higher video quality will provide better video quality, but requires more network bandwidth. If you select „MPEG4‟ as video type in this menu will be given below...;Highest‟. There are 1024 x 768, 640 x 480, and 320 x 240. 2.2.2 MPEG4 You can adjust video settings when you ‟re using this video camera with insufficient network bandwidth, selecting a lower frame rate setting will help. Changes video quality.
Manual
Page 43
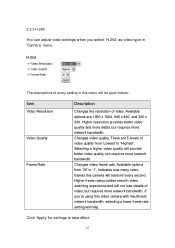
...‟. Changes video quality. Higher frame rate provides smooth video watching experience and will provide better video quality, but requires more network bandwidth. The descriptions of video quality from „30‟ to take effect. 43 Available options are 5 levels of every setting in ...„Camera‟ menu. If you select „H.264‟ as video type in this camera will help. There are 1280 x 1024, 640 x 480, and 320 x 240. 2.2.3 H.264 You can...
...‟. Changes video quality. Higher frame rate provides smooth video watching experience and will provide better video quality, but requires more network bandwidth. The descriptions of video quality from „30‟ to take effect. 43 Available options are 5 levels of every setting in ...„Camera‟ menu. If you select „H.264‟ as video type in this camera will help. There are 1280 x 1024, 640 x 480, and 320 x 240. 2.2.3 H.264 You can...
