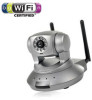
Datasheet
Page 2
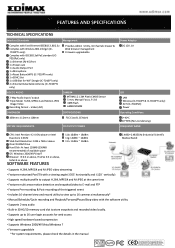
... x 112mm x 108mm FCC Class B, CE Mark SYSTEM REQUIREMENTS RF OUTPUT POWER Power Adapter DC 12V, 1A LED LAN Wireless (IC-7010PT & IC-7010PTn only) ACT (IC-7010PoE) Power Operating Conditions 0~40oC 10~90% (Non-Condensing) FREQUENCY BAND CPU: Intel Pentium 4 2.4 GHz above or Intel Dual... with IEEE802.3af PoE standard (IC7010PoE only) 1 x Ethernet (RJ-45) Port 1 x Power Jack 1 x Audio Output Port 1 x Microphone 1 x Reset Button/WPS (IC-7010PTn only) 1 x SDHC Slot 1 x USB Slot for web access • High speed hardware based compression • Supports Windows 2000/XP/Vista/Windows 7 •...
... x 112mm x 108mm FCC Class B, CE Mark SYSTEM REQUIREMENTS RF OUTPUT POWER Power Adapter DC 12V, 1A LED LAN Wireless (IC-7010PT & IC-7010PTn only) ACT (IC-7010PoE) Power Operating Conditions 0~40oC 10~90% (Non-Condensing) FREQUENCY BAND CPU: Intel Pentium 4 2.4 GHz above or Intel Dual... with IEEE802.3af PoE standard (IC7010PoE only) 1 x Ethernet (RJ-45) Port 1 x Power Jack 1 x Audio Output Port 1 x Microphone 1 x Reset Button/WPS (IC-7010PTn only) 1 x SDHC Slot 1 x USB Slot for web access • High speed hardware based compression • Supports Windows 2000/XP/Vista/Windows 7 •...
Quick Install Guide
Page 15
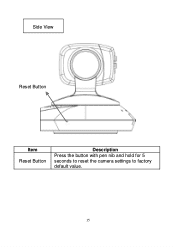
Side View Reset Button Item Reset Button Description Press the button with pen nib and hold for 5 seconds to reset the camera settings to factory default value. 15
Side View Reset Button Item Reset Button Description Press the button with pen nib and hold for 5 seconds to reset the camera settings to factory default value. 15
Manual
Page 15
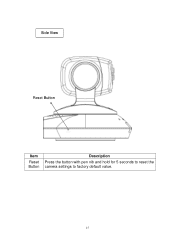
Side View Reset Button Item Reset Button Description Press the button with pen nib and hold for 5 seconds to reset the camera settings to factory default value. 15
Side View Reset Button Item Reset Button Description Press the button with pen nib and hold for 5 seconds to reset the camera settings to factory default value. 15
Manual
Page 23
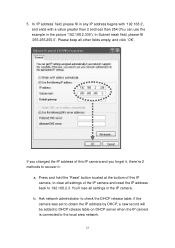
... greater than 2 and less than 254 (You can use the example in the IP camera. Press and hold the „Reset‟ button located at the bottom of the IP camera and reset the IP address back to the local area network. 23 5. b. If you changed the IP address of this IP...
... greater than 2 and less than 254 (You can use the example in the IP camera. Press and hold the „Reset‟ button located at the bottom of the IP camera and reset the IP address back to the local area network. 23 5. b. If you changed the IP address of this IP...

Manual
Page 31
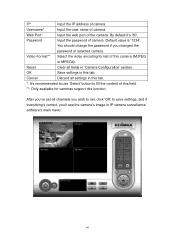
Click „OK‟ to reset the camera. 31 This should be changed. Please try to input the user name and password: Default user name is „admin‟ and password ...
Click „OK‟ to reset the camera. 31 This should be changed. Please try to input the user name and password: Default user name is „admin‟ and password ...

Manual
Page 79
...drive and you to upgrade firmware, clear all settings. PLEASE NOTE THAT THE IP ADDRESS OF THE CAMERA WILL RESET TO DEFAULT VALUE: 192.168.2.3 Clear all settings in this button to reset all settings, reboot the IP camera, and switch LED lights on your computer, click „Upgrade Firmware‟...every setting in the camera. The descriptions of you didn‟t provide the firmware file, you do this, and then click this menu will be reset to default value '192.168.2.3' also. After you selected a proper firmware file from our website, you can upload the firmware file to the ...
...drive and you to upgrade firmware, clear all settings. PLEASE NOTE THAT THE IP ADDRESS OF THE CAMERA WILL RESET TO DEFAULT VALUE: 192.168.2.3 Clear all settings in this button to reset all settings, reboot the IP camera, and switch LED lights on your computer, click „Upgrade Firmware‟...every setting in the camera. The descriptions of you didn‟t provide the firmware file, you do this, and then click this menu will be reset to default value '192.168.2.3' also. After you selected a proper firmware file from our website, you can upload the firmware file to the ...
Manual
Page 99
... „Select‟ button to save settings, and if everything‟s correct, you changed the password of selected camera. Password Input the password of camera. Reset Clear all channels you wish to set, click „OK‟ to fill the content of this camera (MJPEG or MPEG4). IP* Input the IP...
... „Select‟ button to save settings, and if everything‟s correct, you changed the password of selected camera. Password Input the password of camera. Reset Clear all channels you wish to set, click „OK‟ to fill the content of this camera (MJPEG or MPEG4). IP* Input the IP...
Manual
Page 133
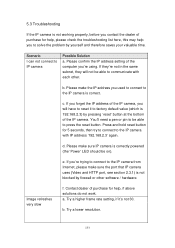
...blocked by firewall or other . Contact dealer of purchase for help you to solve the problem by pressing „reset‟ button at the bottom of the computer you used to connect to reset it ‟s not 30. b. If you forget the IP address of the IP camera, you will not be... able to the IP camera from Internet, please make the IP address you ‟re using. b. Press and hold reset button for 5 seconds, then try to connect to IP camera Possible Solution a. Try a lower resolution. 133 If you‟re trying to connect to ...
...blocked by firewall or other . Contact dealer of purchase for help you to solve the problem by pressing „reset‟ button at the bottom of the computer you used to connect to reset it ‟s not 30. b. If you forget the IP address of the IP camera, you will not be... able to the IP camera from Internet, please make the IP address you ‟re using. b. Press and hold reset button for 5 seconds, then try to connect to IP camera Possible Solution a. Try a lower resolution. 133 If you‟re trying to connect to ...