
Quick Install Guide
Page 8
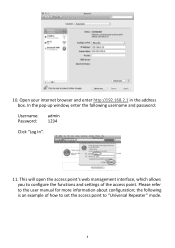
10. Open your internet browser and enter http://192.168.2.1 in the address box. This will open the access point's web management interface, which allows you to configure the functions and settings of how to set the access point to the user manual for more information about configuration; Please refer to "Universal Repeater" mode. 8 the following username and password: Username: admin Password: 1234 Click "Log In". 11. In the pop up window, enter the following is an example of the access point.
10. Open your internet browser and enter http://192.168.2.1 in the address box. This will open the access point's web management interface, which allows you to configure the functions and settings of how to set the access point to the user manual for more information about configuration; Please refer to "Universal Repeater" mode. 8 the following username and password: Username: admin Password: 1234 Click "Log In". 11. In the pop up window, enter the following is an example of the access point.
Quick Install Guide
Page 12
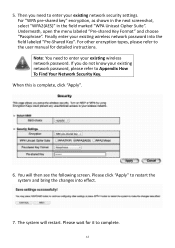
... this is complete, click "Apply". 6. Please click "Apply" to complete. 12 If you need to enter your existing network password, please refer to the user manual for it to restart the system and bring the changes into the field labeled "Pre-Shared Key". ... the following screen. Then you do not know your existing network security settings. You will restart. Note: You need to enter your existing wireless network password into effect. 7. For other encryption types, please refer to Appendix How To Find Your Network Security Key. 5. Underneath, open the menu labeled "Pre...
... this is complete, click "Apply". 6. Please click "Apply" to complete. 12 If you need to enter your existing network password, please refer to the user manual for it to restart the system and bring the changes into the field labeled "Pre-Shared Key". ... the following screen. Then you do not know your existing network security settings. You will restart. Note: You need to enter your existing wireless network password into effect. 7. For other encryption types, please refer to Appendix How To Find Your Network Security Key. 5. Underneath, open the menu labeled "Pre...
Quick Install Guide
Page 16
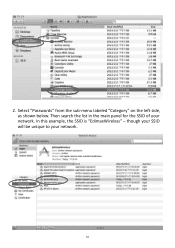
2. though your SSID will be unique to your network. Select "Passwords" from the sub-menu labeled "Category" on the left side, as shown below. Then search the list in the main panel for the SSID of your network. 16 In this example, the SSID is "EdimaxWireless" -
2. though your SSID will be unique to your network. Select "Passwords" from the sub-menu labeled "Category" on the left side, as shown below. Then search the list in the main panel for the SSID of your network. 16 In this example, the SSID is "EdimaxWireless" -

Quick Install Guide
Page 17
Enter your Mac. Check the box labeled "Show password" and you will see the following window. 4. 3. Double click the SSID of your network and you use to enter your administrative password, which you will be asked to log into your password and click "Allow". 17
Enter your Mac. Check the box labeled "Show password" and you will see the following window. 4. 3. Double click the SSID of your network and you use to enter your administrative password, which you will be asked to log into your password and click "Allow". 17
Quick Install Guide
Page 18
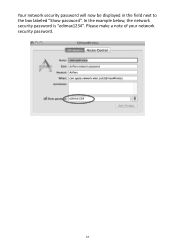
Please make a note of your network security password. 18 In the example below, the network security password is "edimax1234". Your network security password will now be displayed in the field next to the box labeled "Show password".
Please make a note of your network security password. 18 In the example below, the network security password is "edimax1234". Your network security password will now be displayed in the field next to the box labeled "Show password".

Manual
Page 5
... ...44 2-7-3 WPA Pre-shared Key 46 2-7-4 WPA RADIUS 48 2-7-5 802.1x Authentication 50 2-8 Radius Server 52 2-9 MAC Filtering 54 2-10 System Utilities 56 2-10-1 Change Password 56 2-10-2 IP Address of the Wireless Access Point 57 2-10-3 DHCP Server 59 Chapter III: Advanced Configuration 61
... ...44 2-7-3 WPA Pre-shared Key 46 2-7-4 WPA RADIUS 48 2-7-5 802.1x Authentication 50 2-8 Radius Server 52 2-9 MAC Filtering 54 2-10 System Utilities 56 2-10-1 Change Password 56 2-10-2 IP Address of the Wireless Access Point 57 2-10-3 DHCP Server 59 Chapter III: Advanced Configuration 61
Manual
Page 21
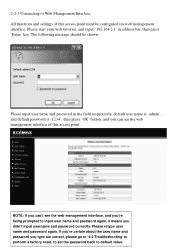
... should be shown: Please input user name and password in address bar, then press 'Enter' key. 2-2-5 Connecting to input user name and password again, it means you didn't input username and password correctly. If you're certain15about the user name and password you type are correct, please go to '4-2 Troubleshooting...to default value. Please start your web browser, and input '192.168.2.1' in the field respectively, default user name is 'admin', and default password is '1234', then press 'OK' button, and you can see the web management interface of this access point: NOTE: If you can't...
... should be shown: Please input user name and password in address bar, then press 'Enter' key. 2-2-5 Connecting to input user name and password again, it means you didn't input username and password correctly. If you're certain15about the user name and password you type are correct, please go to '4-2 Troubleshooting...to default value. Please start your web browser, and input '192.168.2.1' in the field respectively, default user name is 'admin', and default password is '1234', then press 'OK' button, and you can see the web management interface of this access point: NOTE: If you can't...

Manual
Page 47
Click 'Set Security' button when the wireless operating mode you use data encryption, data transferred by radio signals in the air will become unreadable for those people who don't know correct encryption key (encryption password). When you selected is 'AP Bridge-Point to Point', 'AP Bridge-Point to set wireless security: 1. Click 'Security' on the left of wireless security (wireless data encryption). There are two ways to Multi-Point', or 'AP Bridge-WDS'. 41 2-7 Wireless Security This wireless access point provides many types of web management interface. 2.
Click 'Set Security' button when the wireless operating mode you use data encryption, data transferred by radio signals in the air will become unreadable for those people who don't know correct encryption key (encryption password). When you selected is 'AP Bridge-Point to Point', 'AP Bridge-Point to set wireless security: 1. Click 'Security' on the left of wireless security (wireless data encryption). There are two ways to Multi-Point', or 'AP Bridge-WDS'. 41 2-7 Wireless Security This wireless access point provides many types of web management interface. 2.
Manual
Page 48
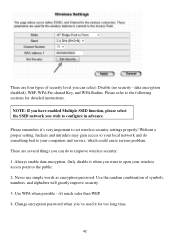
.... Without a proper setting, hackers and intruders may gain access to your local network and do to the public. 2. Never use simple words as encryption password. Change encryption password when you've used it when you want to the following sections for too long time. 42 NOTE: If you have enabled Multiple SSID...
.... Without a proper setting, hackers and intruders may gain access to your local network and do to the public. 2. Never use simple words as encryption password. Change encryption password when you've used it when you want to the following sections for too long time. 42 NOTE: If you have enabled Multiple SSID...
Manual
Page 54
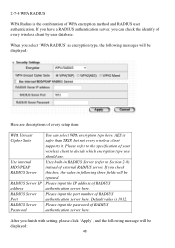
...you can select WPA encryption type here. Default value is safer than TKIP, but not every wireless client supports it. Please input the password of WPA encryption method and RADIUS user authentication. If you have a RADIUS authentication server, you check this box, the value in ... of every setup item: WPA Unicast Cipher Suite Use internal MD5/PEAP RADIUS Server RADIUS Server IP address RADIUS Server Port RADIUS Server Password You can check the identify of every wireless client by user database. 2-7-4 WPA RADIUS WPA Radius is the combination of RADIUS authentication server...
...you can select WPA encryption type here. Default value is safer than TKIP, but not every wireless client supports it. Please input the password of WPA encryption method and RADIUS user authentication. If you have a RADIUS authentication server, you check this box, the value in ... of every setup item: WPA Unicast Cipher Suite Use internal MD5/PEAP RADIUS Server RADIUS Server IP address RADIUS Server Port RADIUS Server Password You can check the identify of every wireless client by user database. 2-7-4 WPA RADIUS WPA Radius is the combination of RADIUS authentication server...
Manual
Page 56
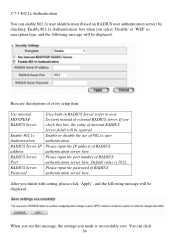
...of every setup item: Use internal MD5/PEAP RADIUS Server Enable 802.1x Authentication RADIUS Server IP address RADIUS Server Port RADIUS Server Password Uses built-in RADIUS Server (refer to next Section) instead of internal RADIUS server fields will be ignored. You can enable 802...you see this box, the value of external RADIUS server. Please input the IP address of RADIUS authentication server here. Please input the password of 802.1x user authentication. 2-7-5 802.1x Authentication You can click 50 Enable or disable the use of RADIUS authentication server here. Default...
...of every setup item: Use internal MD5/PEAP RADIUS Server Enable 802.1x Authentication RADIUS Server IP address RADIUS Server Port RADIUS Server Password Uses built-in RADIUS Server (refer to next Section) instead of internal RADIUS server fields will be ignored. You can enable 802...you see this box, the value of external RADIUS server. Please input the IP address of RADIUS authentication server here. Please input the password of 802.1x user authentication. 2-7-5 802.1x Authentication You can click 50 Enable or disable the use of RADIUS authentication server here. Default...
Manual
Page 59
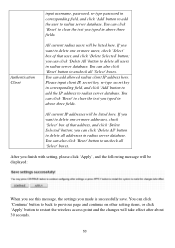
input username, password, re-type password in corresponding field, and click 'Add' button to add the IP address to radius server database. you typed in radius server database. You can click '...
input username, password, re-type password in corresponding field, and click 'Add' button to add the IP address to radius server database. you typed in radius server database. You can click '...
Manual
Page 62
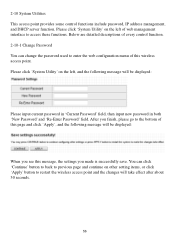
... and the changes will be displayed: When you made is successfully save. Below are detailed descriptions of every control function. 2-10-1 Change Password You can click 'Continue' button to back to previous page and continue on the left , and the following message will be displayed: ...Please input current password in 'Current Password' field, then input new password in both 'New Password' and 'Re-Enter Password' field. After you finish, please go to the bottom of web management interface to enter the ...
... and the changes will be displayed: When you made is successfully save. Below are detailed descriptions of every control function. 2-10-1 Change Password You can click 'Continue' button to back to previous page and continue on the left , and the following message will be displayed: ...Please input current password in 'Current Password' field, then input new password in both 'New Password' and 'Re-Enter Password' field. After you finish, please go to the bottom of web management interface to enter the ...

Manual
Page 72
... have to input ESSID on your local network. Try to the correct IP address of purchase for help. 66 Make sure you really forget the password, do on your dealer of the access point! c. a. b. Change channel number and see if this !), and call your wireless client manually,.... b. If you 're connecting to know what computers do a hard reset. d. This is not a malfunction, if you 're doing this works. a. Password is really slow. Try to reset the access point and see the smoke coming out from access point or A/C power adapter, please disconnect the access...
... have to input ESSID on your local network. Try to the correct IP address of purchase for help. 66 Make sure you really forget the password, do on your dealer of the access point! c. a. b. Change channel number and see if this !), and call your wireless client manually,.... b. If you 're connecting to know what computers do a hard reset. d. This is not a malfunction, if you 're doing this works. a. Password is really slow. Try to reset the access point and see the smoke coming out from access point or A/C power adapter, please disconnect the access...

