
Manual
Page 3
Safety Information ...6 I . Resetting the Wireless Bridge 15 III. Firmware Upgrade ...30 III-7-3. Configuring your computer to use a dynamic IP address 34 IV-1-1-1. How to Find your...-3. Top Panel...4 I -2. LED Status ...5 I-4. QUICK SETUP...8 II-1. WPS Button Setup...8 II-2. iQ Setup ...10 II-3. Hardware Installation ...14 II-4. iQ Setup ...20 III-3. Wireless Advanced...23 III-5. Administrator ...26 III-6. Windows XP...34 IV-1-1-2. Windows 7 ...37 IV-1-1-4. Windows XP...41 IV-1-2-2. Windows 7 ...45 IV-1-2-4. Windows 7 & Windows Vista 52 IV...
Safety Information ...6 I . Resetting the Wireless Bridge 15 III. Firmware Upgrade ...30 III-7-3. Configuring your computer to use a dynamic IP address 34 IV-1-1-1. How to Find your...-3. Top Panel...4 I -2. LED Status ...5 I-4. QUICK SETUP...8 II-1. WPS Button Setup...8 II-2. iQ Setup ...10 II-3. Hardware Installation ...14 II-4. iQ Setup ...20 III-3. Wireless Advanced...23 III-5. Administrator ...26 III-6. Windows XP...34 IV-1-1-2. Windows 7 ...37 IV-1-1-4. Windows XP...41 IV-1-2-2. Windows 7 ...45 IV-1-2-4. Windows 7 & Windows Vista 52 IV...

Manual
Page 4
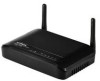
For smart TV's, Blu-ray, gaming or other home entertainment devices, the CV-7428nS enables you for purchasing the Edimax CV-7428nS N300 Universal Wi-Fi Bridge. CV-7428nS wireless bridge - PRODUCT INFORMATION Thank you to bridge a Wi-Fi connection to claim any missing items. - CD with multi-language QIG and user manual - Access key card I -1. I -2. Top Panel 4 Package Contents Before you...
For smart TV's, Blu-ray, gaming or other home entertainment devices, the CV-7428nS enables you for purchasing the Edimax CV-7428nS N300 Universal Wi-Fi Bridge. CV-7428nS wireless bridge - PRODUCT INFORMATION Thank you to bridge a Wi-Fi connection to claim any missing items. - CD with multi-language QIG and user manual - Access key card I -1. I -2. Top Panel 4 Package Contents Before you...
Manual
Page 5
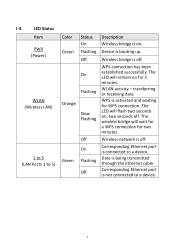
...successfully. The LED will remain on for two minutes. transferring or receiving data. The wireless bridge will flash two seconds on . WLAN activity - Device is being transmitted through the Ethernet cable. Wireless bridge is off . The LED will wait for a WPS connection for 5 minutes. ...to 5) Color Green Orange Green Status On Flashing Off On Flashing Slow Flashing Off On Flashing Off Description Wireless bridge is off. I-3. LED Status Item PWR (Power) WLAN (Wireless LAN) 1 to 5 (LAN Ports 1 to a device. 5 Corresponding Ethernet port is activated and waiting ...
...successfully. The LED will remain on for two minutes. transferring or receiving data. The wireless bridge will flash two seconds on . WLAN activity - Device is being transmitted through the Ethernet cable. Wireless bridge is off . The LED will wait for a WPS connection for 5 minutes. ...to 5) Color Green Orange Green Status On Flashing Off On Flashing Slow Flashing Off On Flashing Off Description Wireless bridge is off. I-3. LED Status Item PWR (Power) WLAN (Wireless LAN) 1 to 5 (LAN Ports 1 to a device. 5 Corresponding Ethernet port is activated and waiting ...
Manual
Page 6
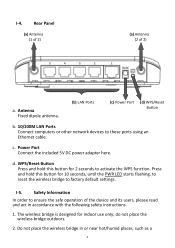
... WPS function. d. Press and hold this button for 10 seconds, until the PWR LED starts flashing, to reset the wireless bridge to ensure the safe operation of 2) a. Power Port Connect the included 5V DC power adapter here. I -4. Safety ...Information In order to factory default settings. The wireless bridge is designed for 2 seconds to these ports using an Ethernet cable. c. do not place the wireless bridge outdoors. 2. Do not place the wireless bridge in accordance with the following safety instructions. 1. I -5. Rear Panel (a) ...
... WPS function. d. Press and hold this button for 10 seconds, until the PWR LED starts flashing, to reset the wireless bridge to ensure the safe operation of 2) a. Power Port Connect the included 5V DC power adapter here. I -4. Safety ...Information In order to factory default settings. The wireless bridge is designed for 2 seconds to these ports using an Ethernet cable. c. do not place the wireless bridge outdoors. 2. Do not place the wireless bridge in accordance with the following safety instructions. 1. I -5. Rear Panel (a) ...

Manual
Page 7
...as it becomes wet for help . The device contains small parts which are no user-serviceable parts inside the wireless bridge. The wireless bridge is firmly secured to the wireless bridge falling from its location, the warranty of purchase and ask for any connected cable with Ethernet port and web ... Google Chrome, Firefox or the latest version of children. 6. Computer with force; Do not pull any reason, do so. Please keep the wireless bridge out of reach of Safari). 7 There are a danger to do not attempt to touch it without switching the power supply off. If you...
...as it becomes wet for help . The device contains small parts which are no user-serviceable parts inside the wireless bridge. The wireless bridge is firmly secured to the wireless bridge falling from its location, the warranty of purchase and ask for any connected cable with Ethernet port and web ... Google Chrome, Firefox or the latest version of children. 6. Computer with force; Do not pull any reason, do so. Please keep the wireless bridge out of reach of Safari). 7 There are a danger to do not attempt to touch it without switching the power supply off. If you...

Manual
Page 8
...on your computer. The WLAN LED should flash slowly 8 II. II-1. Press for two seconds WLAN LED should flash slowly (two seconds on the wireless bridge for 2 seconds to II-2. There are two ways you can be up as an alternative. 1. using the WPS button or using iQ Setup on...a matter of minutes. Plug the power adapter into the device's 5V power port, and plug the adapter into a wall socket. QUICK SETUP Your wireless bridge can quickly setup your root network access point/router does not have a WPS button or if you encounter difficulties establishing a WPS connection, please refer to...
...on your computer. The WLAN LED should flash slowly 8 II. II-1. Press for two seconds WLAN LED should flash slowly (two seconds on the wireless bridge for 2 seconds to II-2. There are two ways you can be up as an alternative. 1. using the WPS button or using iQ Setup on...a matter of minutes. Plug the power adapter into the device's 5V power port, and plug the adapter into a wall socket. QUICK SETUP Your wireless bridge can quickly setup your root network access point/router does not have a WPS button or if you encounter difficulties establishing a WPS connection, please refer to...

Manual
Page 9
...function also. if you are unsure, please consult the user manual of time - The WLAN LED will now be active for 2 minutes. Your wireless bridge is held for different lengths of your root network, to step 2 and try again. So, within two minutes. It is common for a...minutes. Note: Different routers/access points may require you activated WPS on your wireless bridge and root network router/access point within 2 minutes, please press the WPS button on the wireless router/access point of the wireless bridge will remain on to have a secondary function as smart TV, Blu-ray ...
...function also. if you are unsure, please consult the user manual of time - The WLAN LED will now be active for 2 minutes. Your wireless bridge is held for different lengths of your root network, to step 2 and try again. So, within two minutes. It is common for a...minutes. Note: Different routers/access points may require you activated WPS on your wireless bridge and root network router/access point within 2 minutes, please press the WPS button on the wireless router/access point of the wireless bridge will remain on to have a secondary function as smart TV, Blu-ray ...

Manual
Page 10
...is set to use a dynamic IP address. 3. Hardware Installation for how to do this, can be prompted for a username and password, please enter "http://edimax.go" into a wall socket. iQ Setup 1. Plug the power adapter into the device's 5V power port, and plug the adapter into the URL bar. ...to an LAN port on your computer is a simple procedure, and step by step instructions for guidance on using the wireless bridge with your computer to the Ethernet port on the wireless bridge. 2. The PWR LED should light up. Open a web browser, and you will be found in the package contents)...
...is set to use a dynamic IP address. 3. Hardware Installation for how to do this, can be prompted for a username and password, please enter "http://edimax.go" into a wall socket. iQ Setup 1. Plug the power adapter into the device's 5V power port, and plug the adapter into the URL bar. ...to an LAN port on your computer is a simple procedure, and step by step instructions for guidance on using the wireless bridge with your computer to the Ethernet port on the wireless bridge. 2. The PWR LED should light up. Open a web browser, and you will be found in the package contents)...

Manual
Page 11
Windows: Mac: 5. If your selected Wi-Fi network requires a security key, a new field will appear when you do not know your network security key, please refer to IV-1-3. How to Find Your Network Security Key for guidance on how to . Note: If you select your security key. You will be listed - All available Wi-Fi networks will see the iQ Setup screen, as shown below. please select the Wi-Fi network you would like the wireless bridge to connect to find it. 11 Please enter your Wi-Fi network.
Windows: Mac: 5. If your selected Wi-Fi network requires a security key, a new field will appear when you do not know your network security key, please refer to IV-1-3. How to Find Your Network Security Key for guidance on how to . Note: If you select your security key. You will be listed - All available Wi-Fi networks will see the iQ Setup screen, as shown below. please select the Wi-Fi network you would like the wireless bridge to connect to find it. 11 Please enter your Wi-Fi network.

Manual
Page 12
... while the wireless bridge tests the connection. 8. Note: If you are using a different browser, it to your bookmarks. When the test has finished, the following screen will be displayed. Click "NEXT" to continue, and Internet Explorer and Firefox users will be asked to confirm if you wish to add "http://edimax.go " and... add it is not listed, try clicking "Refresh" to refresh the list. 6. We recommend that you copy the URL "http://edimax.go " to your bookmarks manually. 7. Note: If the Wi-Fi network you wish to connect to is recommended that you do so for future use. ...
... while the wireless bridge tests the connection. 8. Note: If you are using a different browser, it to your bookmarks. When the test has finished, the following screen will be displayed. Click "NEXT" to continue, and Internet Explorer and Firefox users will be asked to confirm if you wish to add "http://edimax.go " and... add it is not listed, try clicking "Refresh" to refresh the list. 6. We recommend that you copy the URL "http://edimax.go " to your bookmarks manually. 7. Note: If the Wi-Fi network you wish to connect to is recommended that you do so for future use. ...

Manual
Page 13
9. When you click "APPLY", the system will be displayed. 13 Click "APPLY" to restart the wireless bridge and make the settings take effect, or click "Back" to go back to your Wi-Fi network, and the root AP name and security key will confirm that your wireless bridge is connected to the previous screen. 10. The following screen will also be displayed on the screen. Please wait until the restart completes. 11. The device name and security type will restart.
9. When you click "APPLY", the system will be displayed. 13 Click "APPLY" to restart the wireless bridge and make the settings take effect, or click "Back" to go back to your Wi-Fi network, and the root AP name and security key will confirm that your wireless bridge is connected to the previous screen. 10. The following screen will also be displayed on the screen. Please wait until the restart completes. 11. The device name and security type will restart.

Manual
Page 14
... i 14 II-3. After WPS button setup Connect the wireless bridge to one or more of your network devices, using the wireless bridge with your wired network device, such as smart TV, Blu-ray player or games console. Connect the wireless bridge to one or more of your network devices, using an... (included). Switch on to your network as usual. Hardware Installation I. After iQ Setup After you have completed iQ Setup, disconnect the wireless bridge from your computer and power supply. See Figure i & Figure ii. Please see Hardware Installation for the PWR LED to display on ...
... i 14 II-3. After WPS button setup Connect the wireless bridge to one or more of your network devices, using the wireless bridge with your wired network device, such as smart TV, Blu-ray player or games console. Connect the wireless bridge to one or more of your network devices, using an... (included). Switch on to your network as usual. Hardware Installation I. After iQ Setup After you have completed iQ Setup, disconnect the wireless bridge from your computer and power supply. See Figure i & Figure ii. Please see Hardware Installation for the PWR LED to display on ...

Manual
Page 15
When the green PWR LED begins to flash, release the WPS/Reset button and wait for at least 10 seconds. The device is ready when the PWR LED has stopped flashing, and displays on the rear panel of the device for the device to its factory settings. Figure ii II-4. To do so, press and hold the WPS/Reset button on . 15 Resetting the Wireless Bridge In the event that the wireless bridge malfunctions or stops responding, you can reset the device back to restart.
When the green PWR LED begins to flash, release the WPS/Reset button and wait for at least 10 seconds. The device is ready when the PWR LED has stopped flashing, and displays on the rear panel of the device for the device to its factory settings. Figure ii II-4. To do so, press and hold the WPS/Reset button on . 15 Resetting the Wireless Bridge In the event that the wireless bridge malfunctions or stops responding, you can reset the device back to restart.

Manual
Page 16
... to use a dynamic IP address. Quick Setup or the included QIG, you use the wireless bridge, please make sure your operating system: Windows Open a web browser (Internet Explorer is recommended) and enter "http://www.edimax.go " into the URL bar. This is a simple procedure, and step by step ...username "admin" and the default password "1234". 16 III. Ensure that your wireless bridge is set to configure your computer via an Ethernet cable as detailed in IV-1-1. Mac: Open a web browser and enter "http://www.edimax.go " into the URL bar. Note: Before you can be found in II...
... to use a dynamic IP address. Quick Setup or the included QIG, you use the wireless bridge, please make sure your operating system: Windows Open a web browser (Internet Explorer is recommended) and enter "http://www.edimax.go " into the URL bar. This is a simple procedure, and step by step ...username "admin" and the default password "1234". 16 III. Ensure that your wireless bridge is set to configure your computer via an Ethernet cable as detailed in IV-1-1. Mac: Open a web browser and enter "http://www.edimax.go " into the URL bar. Note: Before you can be found in II...

Manual
Page 19
... will help from the dealer of purchase. The information you see on . This information is an example. Displays the current firmware version. Displays the current wireless operating mode. 19 If you need online help you to perform a firmware upgrade, this screenshot. Displays the hardware version. Note: This screenshot is helpful when...
... will help from the dealer of purchase. The information you see on . This information is an example. Displays the current firmware version. Displays the current wireless operating mode. 19 If you need online help you to perform a firmware upgrade, this screenshot. Displays the hardware version. Note: This screenshot is helpful when...

Manual
Page 20
... device's MAC address. Displays the subnet mask of the default gateway. Displays the IP address of the IP address. Displays the MAC address of the wireless bridge. iQ Setup for this device. A MAC address is a unique, fixed ID for guidance on the iQ Setup process. 20 Displays the current... setting. Displays the IP address of this device, it cannot be modified. Please refer back to identify this wireless bridge). Displays the current status of the LAN interface. ESSID Channel Number Security BSSID (MAC) State IP Address Subnet Mask Default Gateway MAC address Displays the...
... device's MAC address. Displays the subnet mask of the default gateway. Displays the IP address of the IP address. Displays the MAC address of the wireless bridge. iQ Setup for this device. A MAC address is a unique, fixed ID for guidance on the iQ Setup process. 20 Displays the current... setting. Displays the IP address of this device, it cannot be modified. Please refer back to identify this wireless bridge). Displays the current status of the LAN interface. ESSID Channel Number Security BSSID (MAC) State IP Address Subnet Mask Default Gateway MAC address Displays the...
Manual
Page 21
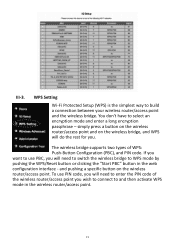
...the WPS/Reset button or clicking the "Start PBC" button in the wireless router/access point. 21 and pushing a specific button on the wireless bridge, and WPS will do the rest for you will need to switch the wireless bridge to and then activate WPS mode in the web configuration interface - ... is the simplest way to select an encryption mode and enter a long encryption passphrase - You don't have to build a connection between your wireless router/access point and the wireless bridge. If you want to enter the PIN code of WPS: Push-Button Configuration (PBC), and PIN code.
...the WPS/Reset button or clicking the "Start PBC" button in the wireless router/access point. 21 and pushing a specific button on the wireless bridge, and WPS will do the rest for you will need to switch the wireless bridge to and then activate WPS mode in the web configuration interface - ... is the simplest way to select an encryption mode and enter a long encryption passphrase - You don't have to build a connection between your wireless router/access point and the wireless bridge. If you want to enter the PIN code of WPS: Push-Button Configuration (PBC), and PIN code.

Manual
Page 22
... have never been set, "unConfigured" will be shown here. This code is the WPS PIN code of the wireless bridge before WPS is activated, the wireless bridge will automatically set , "Configured" will be shown here. Device PIN Code This is used when you don't enable... the security functions of the wireless bridge. Authentication The wireless security authentication mode Mode of the wireless bridge. Enable WPS Check this box to enable or disable WPS Wi-Fi Protected All information related to WPS...
... have never been set, "unConfigured" will be shown here. This code is the WPS PIN code of the wireless bridge before WPS is activated, the wireless bridge will automatically set , "Configured" will be shown here. Device PIN Code This is used when you don't enable... the security functions of the wireless bridge. Authentication The wireless security authentication mode Mode of the wireless bridge. Enable WPS Check this box to enable or disable WPS Wi-Fi Protected All information related to WPS...
Manual
Page 23
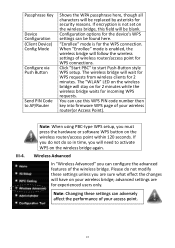
... enabled, the wireless bridge will wait for WPS requests from wireless clients for WPS connections. The wireless bridge will follow the wireless settings of the wireless bridge. You can adversely affect the performance of your wireless bridge; Note: When using PBC-type WPS setup, you can be found here. III-4. The "WLAN" LED on the wireless bridge will have on the wireless bridge, this...
... enabled, the wireless bridge will wait for WPS requests from wireless clients for WPS connections. The wireless bridge will follow the wireless settings of the wireless bridge. You can adversely affect the performance of your wireless bridge; Note: When using PBC-type WPS setup, you can be found here. III-4. The "WLAN" LED on the wireless bridge will have on the wireless bridge, this...

Manual
Page 24
... you don't know what this does, the default value is 2347. WMM (Wi-Fi Multimedia) technology can improve the performance of the wireless radio. Select wireless channel width (bandwidth used by wireless signals from the wireless bridge). When you enable WMM, the wireless bridge will define the priority of the wireless radio. Set the RTS threshold of 24
... you don't know what this does, the default value is 2347. WMM (Wi-Fi Multimedia) technology can improve the performance of the wireless radio. Select wireless channel width (bandwidth used by wireless signals from the wireless bridge). When you enable WMM, the wireless bridge will define the priority of the wireless radio. Set the RTS threshold of 24


