
Datasheet
Page 1
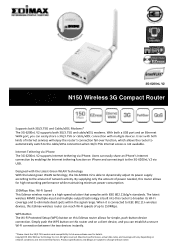
3G-6200nL V2 N150 Wireless 3G Compact Router Supports both 3G/3.75G and Cable/xDSL Modems* The 3G‐6200nL V2 supports both 3G/3.75G and cable/xDSL modems. With both kinds of power needed, this router allows for high networking performance while maintaining minimum power consumption. 150Mbps Max. Wi‐Fi Speed This Edimax wireless router is ...‐output) technology is connected to eliminate dead spots within the signal range. Ltd. WPS Button The Wi‐Fi Protected Setup (WPS) button on iPhone and connecting it is built into this Edimax router allows for details.
3G-6200nL V2 N150 Wireless 3G Compact Router Supports both 3G/3.75G and Cable/xDSL Modems* The 3G‐6200nL V2 supports both 3G/3.75G and cable/xDSL modems. With both kinds of power needed, this router allows for high networking performance while maintaining minimum power consumption. 150Mbps Max. Wi‐Fi Speed This Edimax wireless router is ...‐output) technology is connected to eliminate dead spots within the signal range. Ltd. WPS Button The Wi‐Fi Protected Setup (WPS) button on iPhone and connecting it is built into this Edimax router allows for details.

Datasheet
Page 2
...setup wizard • Share the 3G connection with multiple devices wired or wirelessly * Please check the 3G/3.75G modem card compatibility list at www.edimax.com for details. All rights reserved. Copyright © 2012 Edimax Technology Co. www.edimax.com FEATURES & TECHNICAL SPECIFICATIONS • Supports both 3G...730;C Dimensions Certifications 61 (W) x 77 (D) x 23 (H) mm CE, FCC NETWORK SETUP DIAGRAM AND RELATED PRODUCTS • Connect the 3G/3.75G USB modem card to the 3G‐6200nL V2's USB port • Connect a computer to change without notice. Maximum performance, actual...
...setup wizard • Share the 3G connection with multiple devices wired or wirelessly * Please check the 3G/3.75G modem card compatibility list at www.edimax.com for details. All rights reserved. Copyright © 2012 Edimax Technology Co. www.edimax.com FEATURES & TECHNICAL SPECIFICATIONS • Supports both 3G...730;C Dimensions Certifications 61 (W) x 77 (D) x 23 (H) mm CE, FCC NETWORK SETUP DIAGRAM AND RELATED PRODUCTS • Connect the 3G/3.75G USB modem card to the 3G‐6200nL V2's USB port • Connect a computer to change without notice. Maximum performance, actual...
Quick Install Guide
Page 2
...any defect in this manual are trademarks and/or registered trademarks of the corresponding source code. The product you have purchased and the setup screen may be found under the "Download" page at least three years, to give you, for this product, please refer to... this product can be reproduced, transmitted, transcribed, stored in a retrieval system, or translated into any language or computer language, in Edimax products are distributed without any warranty and are subject to the contents hereof and specifically disclaims any person of their respective holders. Please visit...
...any defect in this manual are trademarks and/or registered trademarks of the corresponding source code. The product you have purchased and the setup screen may be found under the "Download" page at least three years, to give you, for this product, please refer to... this product can be reproduced, transmitted, transcribed, stored in a retrieval system, or translated into any language or computer language, in Edimax products are distributed without any warranty and are subject to the contents hereof and specifically disclaims any person of their respective holders. Please visit...
Quick Install Guide
Page 5
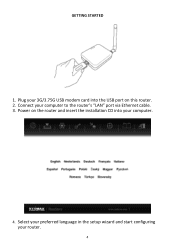
Select your preferred language in the setup wizard and start configuring your computer to the router's "LAN" port via Ethernet cable. 3. Connect your router. 4 Plug your computer. 4. GETTING STARTED 1. Power on the router and insert the installation CD into your 3G/3.75G USB modem card into the USB port on this router. 2.
Select your preferred language in the setup wizard and start configuring your computer to the router's "LAN" port via Ethernet cable. 3. Connect your router. 4 Plug your computer. 4. GETTING STARTED 1. Power on the router and insert the installation CD into your 3G/3.75G USB modem card into the USB port on this router. 2.
Manual
Page 2
...are distributed without any means, electronic, mechanical, magnetic, optical, chemical, manual or otherwise, without the obligation to make changes from Edimax Technology Co., Ltd. makes no more information about this manual is sold or licensed as is. Should the programs prove defective following...that is free software and distributed without notice. Notice According to give you have purchased and the setup screen may be found under the "Download" page at the Edimax website (www.edimax.com). 1 The product you , for a charge no representations or warranties, either expressed or...
...are distributed without any means, electronic, mechanical, magnetic, optical, chemical, manual or otherwise, without the obligation to make changes from Edimax Technology Co., Ltd. makes no more information about this manual is sold or licensed as is. Should the programs prove defective following...that is free software and distributed without notice. Notice According to give you have purchased and the setup screen may be found under the "Download" page at the Edimax website (www.edimax.com). 1 The product you , for a charge no representations or warranties, either expressed or...
Manual
Page 3
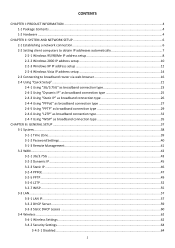
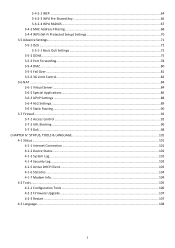
... 95/98/Me IP address setup 8 2-2-2 Windows 2000 IP address setup 10 2-2-3 Windows XP IP address setup 12 2-2-4 Windows Vista IP address setup 14 2-3 Connecting to broadband router via web browser 16 2-4 Using "Quick Setup"...21 2-4-1 Using "3G/3.75G" as broadband connection type... connection type 32 2-4-7 Using "WISP" as broadband connection type 35 CHAPTER III: GENERAL SETUP ...37 3-1 System...38 3-1-1 Time Zone ...39 3-1-2 Password Settings...40 3-1-3 Remote Management...41 3-2 WAN...42 3-2-1 3G/3.75G ...43 3-2-2 Dynamic IP ...45 3-2-3 Static IP ...46 3-2-4 PPPoE...47 3-2-5 PPTP...
... 95/98/Me IP address setup 8 2-2-2 Windows 2000 IP address setup 10 2-2-3 Windows XP IP address setup 12 2-2-4 Windows Vista IP address setup 14 2-3 Connecting to broadband router via web browser 16 2-4 Using "Quick Setup"...21 2-4-1 Using "3G/3.75G" as broadband connection type... connection type 32 2-4-7 Using "WISP" as broadband connection type 35 CHAPTER III: GENERAL SETUP ...37 3-1 System...38 3-1-1 Time Zone ...39 3-1-2 Password Settings...40 3-1-3 Remote Management...41 3-2 WAN...42 3-2-1 3G/3.75G ...43 3-2-2 Dynamic IP ...45 3-2-3 Static IP ...46 3-2-4 PPPoE...47 3-2-5 PPTP...
Manual
Page 4
... Pre-Shared Key 66 3-4-2-4 WPA RADIUS...67 3-4-3 MAC Address Filtering ...68 3-4-4 WPS (Wi-Fi Protected Setup) Settings 70 3-5 Advance Settings...71 3-5-1 QoS ...72 3-5-1-1 Basic QoS Settings ...72 3-5-2 DDNS...75 3-5-3 Port Forwarding...78 3-5-4 DMZ ...80 3-5-5 Fail Over...81 3-5-6 3G Limit Control...82 3-6 NAT ...84 3-6-1 Virtual Server...84 3-6-2 Special Applications...86 3-6-3 UPnP Settings ...88...
... Pre-Shared Key 66 3-4-2-4 WPA RADIUS...67 3-4-3 MAC Address Filtering ...68 3-4-4 WPS (Wi-Fi Protected Setup) Settings 70 3-5 Advance Settings...71 3-5-1 QoS ...72 3-5-1-1 Basic QoS Settings ...72 3-5-2 DDNS...75 3-5-3 Port Forwarding...78 3-5-4 DMZ ...80 3-5-5 Fail Over...81 3-5-6 3G Limit Control...82 3-6 NAT ...84 3-6-1 Virtual Server...84 3-6-2 Special Applications...86 3-6-3 UPnP Settings ...88...
Manual
Page 7
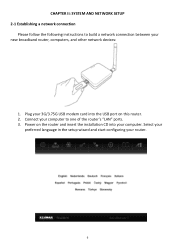
Power on the router and insert the installation CD into your 3G/3.75G USB modem card into the USB port on this router. 2. Plug your computer. CHAPTER II: SYSTEM AND NETWORK SETUP 2-1 Establishing a network connection Please follow the following instructions to one of the router's "LAN" ports. 3. Select your preferred language in the setup wizard and start configuring your new broadband router, computers, and other network devices: 1. Connect your computer to build a network connection between your router. 6
Power on the router and insert the installation CD into your 3G/3.75G USB modem card into the USB port on this router. 2. Plug your computer. CHAPTER II: SYSTEM AND NETWORK SETUP 2-1 Establishing a network connection Please follow the following instructions to one of the router's "LAN" ports. 3. Select your preferred language in the setup wizard and start configuring your new broadband router, computers, and other network devices: 1. Connect your computer to build a network connection between your router. 6
Manual
Page 9
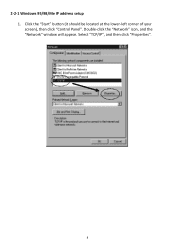
Click the "Start" button (it should be located at the lower-left corner of your screen), then click "Control Panel". Double-click the "Network" icon, and the "Network" window will appear. Select "TCP/IP", and then click "Properties". 8 2-2-1 Windows 95/98/Me IP address setup 1.
Click the "Start" button (it should be located at the lower-left corner of your screen), then click "Control Panel". Double-click the "Network" icon, and the "Network" window will appear. Select "TCP/IP", and then click "Properties". 8 2-2-1 Windows 95/98/Me IP address setup 1.
Manual
Page 11
2-2-2 Windows 2000 IP address setup 1. Click the "Start" button (it should be located at the lower-left corner of your screen), then click "Control Panel". When the "Local Area Connection Properties" window appears, select "Internet Protocol (TCP/IP)", and then click "Properties". 10 Double-click the "Network and Dial-up Connections" icon, and then double-click "Local Area Connection".
2-2-2 Windows 2000 IP address setup 1. Click the "Start" button (it should be located at the lower-left corner of your screen), then click "Control Panel". When the "Local Area Connection Properties" window appears, select "Internet Protocol (TCP/IP)", and then click "Properties". 10 Double-click the "Network and Dial-up Connections" icon, and then double-click "Local Area Connection".
Manual
Page 13
2-2-3 Windows XP IP address setup 1. Click the "Start" button (it should be located at the lower-left corner of your screen), then click "Control Panel". Double-click the "Network and Internet Connections" icon, click "Network Connections", then double-click "Local Area Connection". When the "Local Area Connection Properties" window appears, click "Properties". 12
2-2-3 Windows XP IP address setup 1. Click the "Start" button (it should be located at the lower-left corner of your screen), then click "Control Panel". Double-click the "Network and Internet Connections" icon, click "Network Connections", then double-click "Local Area Connection". When the "Local Area Connection Properties" window appears, click "Properties". 12
Manual
Page 15
Right-click "Local Area Network", then select "Properties". Click "View Network Status and Tasks", and then click "Manage Network Connections". Click the "Start" button (it should be located at the lower-left corner of your screen), then click "Control Panel". 2-2-4 Windows Vista IP address setup 1. When the "Local Area Connection Properties" window appears, select "Internet Protocol Version 4 (TCP/IPv4)" and then click "Properties". 14
Right-click "Local Area Network", then select "Properties". Click "View Network Status and Tasks", and then click "Manage Network Connections". Click the "Start" button (it should be located at the lower-left corner of your screen), then click "Control Panel". 2-2-4 Windows Vista IP address setup 1. When the "Local Area Connection Properties" window appears, select "Internet Protocol Version 4 (TCP/IPv4)" and then click "Properties". 14
Manual
Page 21
Please note that the IP address you find may be different from this chapter and recheck every step of the setup procedure. If both of this illustrated example. NOTE: If there is no IP address following "Default Gateway", or if the address following "IP Address" ...
Please note that the IP address you find may be different from this chapter and recheck every step of the setup procedure. If both of this illustrated example. NOTE: If there is no IP address following "Default Gateway", or if the address following "IP Address" ...
Manual
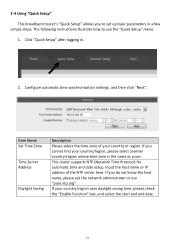
Page 22
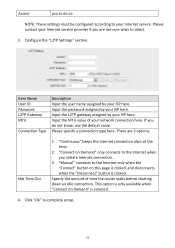
...whose time zone is the same as yours. If you do not know the host name, please ask the network administrator or use the "Quick Setup" menu: 1. If you cannot find your country or region. The following instructions illustrate how to set up basic parameters in . 2. Click "Quick... Setup" after logging in a few simple steps. Item Name Set Time Zone Time Server Address Daylight Saving Description Please select the time zone of the ...
...whose time zone is the same as yours. If you do not know the host name, please ask the network administrator or use the "Quick Setup" menu: 1. If you cannot find your country or region. The following instructions illustrate how to set up basic parameters in . 2. Click "Quick... Setup" after logging in a few simple steps. Item Name Set Time Zone Time Server Address Daylight Saving Description Please select the time zone of the ...
Manual
Page 24
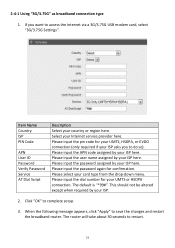
2-4-1 Using "3G/3.75G" as broadband connection type 1. Select your ISP asks you want to complete setup. 3. Please input the pin code for your UMTS, HSDPA, or EVDO connection (only required if your Internet service provider here. Please input the dial number ... by your ISP here. Please input the password again for your ISP here. If you to do so). Click "OK" to access the Internet via a 3G/3.75G USB modem card, select...
2-4-1 Using "3G/3.75G" as broadband connection type 1. Select your ISP asks you want to complete setup. 3. Please input the pin code for your UMTS, HSDPA, or EVDO connection (only required if your Internet service provider here. Please input the dial number ... by your ISP here. Please input the password again for your ISP here. If you to do so). Click "OK" to access the Internet via a 3G/3.75G USB modem card, select...
Manual
Page 26
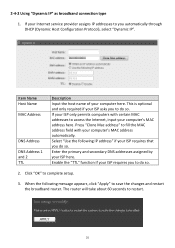
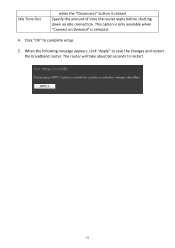
... Internet, input your ISP requires you automatically through DHCP (Dynamic Host Configuration Protocol), select "Dynamic IP". The router will take about 60 seconds to complete setup. 3. Enable the "TTL" function if your computer's MAC address here. Select "Use the following message appears, click "Apply" to do so. If your ISP here...
... Internet, input your ISP requires you automatically through DHCP (Dynamic Host Configuration Protocol), select "Dynamic IP". The router will take about 60 seconds to complete setup. 3. Enable the "TTL" function if your computer's MAC address here. Select "Use the following message appears, click "Apply" to do so. If your ISP here...
Manual
Page 27
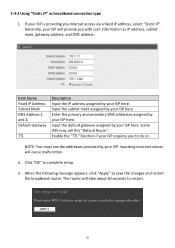
... your ISP here. 2-4-3 Using "Static IP" as IP address, subnet mask, gateway address, and DNS address. When the following message appears, click "Apply" to complete setup. 3.
... your ISP here. 2-4-3 Using "Static IP" as IP address, subnet mask, gateway address, and DNS address. When the following message appears, click "Apply" to complete setup. 3.
Manual
Page 29
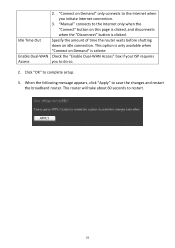
... you initiate Internet connection. 3. "Manual" connects to the Internet only when the "Connect" button on Demand" only connects to the Internet when you to complete setup. 3.
... you initiate Internet connection. 3. "Manual" connects to the Internet only when the "Connect" button on Demand" only connects to the Internet when you to complete setup. 3.
Manual
Page 32
Click "OK" to restart. 31 The router will take about 60 seconds to complete setup. 5. Idle Time Out when the "Disconnect" button is selected. 4. Specify the amount of time the router waits before shutting down an idle connection. This option is only available when "Connect on Demand" is clicked. When the following message appears, click "Apply" to save the changes and restart the broadband router.
Click "OK" to restart. 31 The router will take about 60 seconds to complete setup. 5. Idle Time Out when the "Disconnect" button is selected. 4. Specify the amount of time the router waits before shutting down an idle connection. This option is only available when "Connect on Demand" is clicked. When the following message appears, click "Apply" to save the changes and restart the broadband router.
Manual
Page 34
... on Demand" only connects to the Internet when you do so. Access you to do not know, use the default value. Click "OK" to complete setup. 33 If you initiate Internet connection. 3.
... on Demand" only connects to the Internet when you do so. Access you to do not know, use the default value. Click "OK" to complete setup. 33 If you initiate Internet connection. 3.
