
Quick Install Guide
Page 5
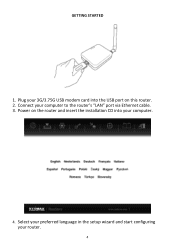
Plug your router. 4 Select your preferred language in the setup wizard and start configuring your 3G/3.75G USB modem card into the USB port on the router and insert the installation CD into your computer to the router's "LAN" port via Ethernet cable. 3. Power on this router. 2. Connect your computer. 4. GETTING STARTED 1.
Plug your router. 4 Select your preferred language in the setup wizard and start configuring your 3G/3.75G USB modem card into the USB port on the router and insert the installation CD into your computer to the router's "LAN" port via Ethernet cable. 3. Power on this router. 2. Connect your computer. 4. GETTING STARTED 1.
Quick Install Guide
Page 6
... in a residential installation. EU Countries Not Intended for certification. Federal Communications Commission (FCC) RF Exposure Requirements SAR compliance has been established in the laptop computer(s) configurations with PCMCIA slot on radio equipment and telecommunication terminal equipment and the mutual recognition of their conformity (R&TTE). EU Countries Intended for Use The ETSI...
... in a residential installation. EU Countries Not Intended for certification. Federal Communications Commission (FCC) RF Exposure Requirements SAR compliance has been established in the laptop computer(s) configurations with PCMCIA slot on radio equipment and telecommunication terminal equipment and the mutual recognition of their conformity (R&TTE). EU Countries Intended for Use The ETSI...
Manual
Page 4
...70 3-5 Advance Settings...71 3-5-1 QoS ...72 3-5-1-1 Basic QoS Settings ...72 3-5-2 DDNS...75 3-5-3 Port Forwarding...78 3-5-4 DMZ ...80 3-5-5 Fail Over...81 3-5-6 3G Limit Control...82 3-6 NAT ...84 3-6-1 Virtual Server...84 3-6-2 Special Applications...86 3-6-3 UPnP Settings ...88 3-6-4 ALG Settings...89 3-6-5 Static Routing...90 3-7 Firewall......102 4-1-3 System Log...102 4-1-4 Security Log ...103 4-1-5 Active DHCP Client...103 4-1-6 Statistics...104 4-1-7 Modem Info...104 4-2 Tools...105 4-2-1 Configuration Tools ...106 4-2-2 Firmware Upgrade...107 4-2-3 Restart ...107 4-3 Language...108 3
...70 3-5 Advance Settings...71 3-5-1 QoS ...72 3-5-1-1 Basic QoS Settings ...72 3-5-2 DDNS...75 3-5-3 Port Forwarding...78 3-5-4 DMZ ...80 3-5-5 Fail Over...81 3-5-6 3G Limit Control...82 3-6 NAT ...84 3-6-1 Virtual Server...84 3-6-2 Special Applications...86 3-6-3 UPnP Settings ...88 3-6-4 ALG Settings...89 3-6-5 Static Routing...90 3-7 Firewall......102 4-1-3 System Log...102 4-1-4 Security Log ...103 4-1-5 Active DHCP Client...103 4-1-6 Statistics...104 4-1-7 Modem Info...104 4-2 Tools...105 4-2-1 Configuration Tools ...106 4-2-2 Firmware Upgrade...107 4-2-3 Restart ...107 4-3 Language...108 3
Manual
Page 7
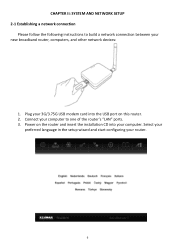
Select your preferred language in the setup wizard and start configuring your new broadband router, computers, and other network devices: 1. Plug your 3G/3.75G USB modem card into the USB port on the router and insert the installation CD into your computer. Power on this router. 2. CHAPTER II: SYSTEM AND NETWORK SETUP 2-1 Establishing a network connection Please follow the following instructions to one of the router's "LAN" ports. 3. Connect your computer to build a network connection between your router. 6
Select your preferred language in the setup wizard and start configuring your new broadband router, computers, and other network devices: 1. Plug your 3G/3.75G USB modem card into the USB port on the router and insert the installation CD into your computer. Power on this router. 2. CHAPTER II: SYSTEM AND NETWORK SETUP 2-1 Establishing a network connection Please follow the following instructions to one of the router's "LAN" ports. 3. Connect your computer to build a network connection between your router. 6
Manual
Page 8
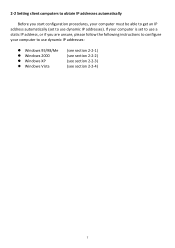
2-2 Setting client computers to obtain IP addresses automatically Before you are unsure, please follow the following instructions to configure your computer must be able to get an IP address automatically (set to use a static IP address, or if you start configuration procedures, your computer to use dynamic IP addresses: Windows 95/98/Me Windows 2000 Windows XP Windows Vista (see section 2-2-1) (see section 2-2-2) (see section 2-2-3) (see section 2-2-4) 7 If your computer is set to use dynamic IP addresses).
2-2 Setting client computers to obtain IP addresses automatically Before you are unsure, please follow the following instructions to configure your computer must be able to get an IP address automatically (set to use a static IP address, or if you start configuration procedures, your computer to use dynamic IP addresses: Windows 95/98/Me Windows 2000 Windows XP Windows Vista (see section 2-2-1) (see section 2-2-2) (see section 2-2-3) (see section 2-2-4) 7 If your computer is set to use dynamic IP addresses).
Manual
Page 17
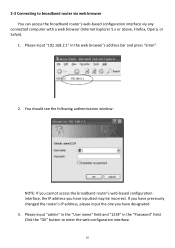
... input "192.168.2.1" in the "Password" field. Click the "OK" button to broadband router via web browser You can access the broadband router's web-based configuration interface via any connected computer with a web browser (Internet Explorer 5.x or above, Firefox, Opera, or Safari). 1. If you have previously changed the router's... input the one you have designated. 3. You should see the following authentication window: NOTE: If you cannot access the broadband router's web-based configuration interface, the IP address you have inputted may be incorrect. 2-3 Connecting to enter the web...
... input "192.168.2.1" in the "Password" field. Click the "OK" button to broadband router via web browser You can access the broadband router's web-based configuration interface via any connected computer with a web browser (Internet Explorer 5.x or above, Firefox, Opera, or Safari). 1. If you have previously changed the router's... input the one you have designated. 3. You should see the following authentication window: NOTE: If you cannot access the broadband router's web-based configuration interface, the IP address you have inputted may be incorrect. 2-3 Connecting to enter the web...
Manual
Page 19
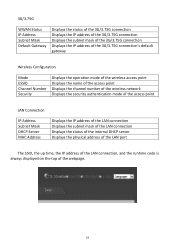
... IP Address Subnet Mask Default Gateway Displays the status of the 3G/3.75G connection Displays the IP address of the 3G/3.75G connection Displays the subnet mask of the 3G/3.75G connection Displays the IP address of the 3G/3.75G connection's default gateway Wireless Configuration Mode ESSID Channel Number Security Displays the operation mode of...
... IP Address Subnet Mask Default Gateway Displays the status of the 3G/3.75G connection Displays the IP address of the 3G/3.75G connection Displays the subnet mask of the 3G/3.75G connection Displays the IP address of the 3G/3.75G connection's default gateway Wireless Configuration Mode ESSID Channel Number Security Displays the operation mode of...
Manual
Page 21
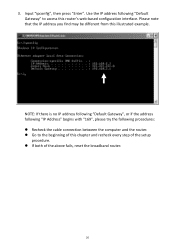
... access this illustrated example. 3. Input "ipconfig", then press "Enter". Please note that the IP address you find may be different from this router's web-based configuration interface. NOTE: If there is no IP address following "Default Gateway", or if the address following "IP Address" begins with "169", please try the following...
... access this illustrated example. 3. Input "ipconfig", then press "Enter". Please note that the IP address you find may be different from this router's web-based configuration interface. NOTE: If there is no IP address following "Default Gateway", or if the address following "IP Address" begins with "169", please try the following...
Manual
Page 22
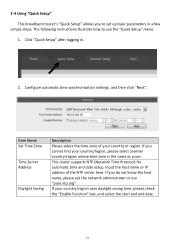
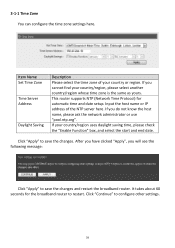
... Zone Time Server Address Daylight Saving Description Please select the time zone of the NTP server here. If you cannot find your country or region. Configure automatic time synchronization settings, and then click "Next". This router supports NTP (Network Time Protocol) for automatic time and date setup. The following instructions illustrate...
... Zone Time Server Address Daylight Saving Description Please select the time zone of the NTP server here. If you cannot find your country or region. Configure automatic time synchronization settings, and then click "Next". This router supports NTP (Network Time Protocol) for automatic time and date setup. The following instructions illustrate...
Manual
Page 26
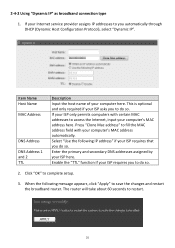
... address automatically. Click "OK" to you to restart. 25 If your ISP only permits computers with your ISP requires you automatically through DHCP (Dynamic Host Configuration Protocol), select "Dynamic IP". If your ISP asks you do so. This is optional and only required if your Internet service provider assigns IP addresses...
... address automatically. Click "OK" to you to restart. 25 If your ISP only permits computers with your ISP requires you automatically through DHCP (Dynamic Host Configuration Protocol), select "Dynamic IP". If your ISP asks you do so. This is optional and only required if your Internet service provider assigns IP addresses...
Manual
Page 31
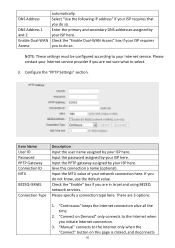
... the MTU value of your ISP here. Please specify a connection type here. "Manual" connects to your Internet service. NOTE: These settings must be configured according to the Internet only when the "Connect" button on Demand" only connects to select. 3. Input the PPTP gateway assigned by your ISP here....the "Enable Dual-WAN Access" box if your Internet service provider if you are not sure what to the Internet when you do so. Configure the "PPTP Settings" section. There are in Israel and using BEZEQ network services. Enter the primary and secondary DNS addresses assigned by your ...
... the MTU value of your ISP here. Please specify a connection type here. "Manual" connects to your Internet service. NOTE: These settings must be configured according to the Internet only when the "Connect" button on Demand" only connects to select. 3. Input the PPTP gateway assigned by your ISP here....the "Enable Dual-WAN Access" box if your Internet service provider if you are not sure what to the Internet when you do so. Configure the "PPTP Settings" section. There are in Israel and using BEZEQ network services. Enter the primary and secondary DNS addresses assigned by your ...
Manual
Page 34
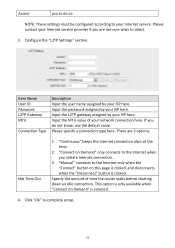
Configure the "L2TP Settings" section. Input the password assigned by your network connection here. "Manual" connects to the Internet only when the "Connect" button on this ... of time the router waits before shutting down an idle connection. "Continuous" keeps the Internet connection alive all the time. 2. NOTE: These settings must be configured according to the Internet when you initiate Internet connection. 3. Please contact your ISP here. If you do so. "Connect on Demand" is clicked. Please specify...
Configure the "L2TP Settings" section. Input the password assigned by your network connection here. "Manual" connects to the Internet only when the "Connect" button on this ... of time the router waits before shutting down an idle connection. "Continuous" keeps the Internet connection alive all the time. 2. NOTE: These settings must be configured according to the Internet when you initiate Internet connection. 3. Please contact your ISP here. If you do so. "Connect on Demand" is clicked. Please specify...
Manual
Page 36
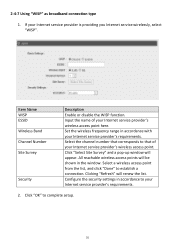
... "Select Site Survey" and a pop-up window will renew the list. Select a wireless access point from the list, and click "Done" to complete setup. 35 Configure the security settings in the window. Clicking "Refresh" will appear. Set the wireless frequency range in accordance with your Internet service provider is providing you...
... "Select Site Survey" and a pop-up window will renew the list. Select a wireless access point from the list, and click "Done" to complete setup. 35 Configure the security settings in the window. Clicking "Refresh" will appear. Set the wireless frequency range in accordance with your Internet service provider is providing you...

Manual
Page 38
Refer to the following list for further instructions: System WAN LAN Wireless Advance Settings NAT Firewall (See section 3-1) (See section 3-2) (See section 3-3) (See section 3-4) (See section 3-5) (See section 3-6) (See section 3-7) 37 Click "General Setup" after logging in "General Setup". 1. All available setup items will appear under the "General Setup" tab. 3. CHAPTER III: GENERAL SETUP You can perform advanced configuration of this broadband router in . 2.
Refer to the following list for further instructions: System WAN LAN Wireless Advance Settings NAT Firewall (See section 3-1) (See section 3-2) (See section 3-3) (See section 3-4) (See section 3-5) (See section 3-6) (See section 3-7) 37 Click "General Setup" after logging in "General Setup". 1. All available setup items will appear under the "General Setup" tab. 3. CHAPTER III: GENERAL SETUP You can perform advanced configuration of this broadband router in . 2.
Manual
Page 39
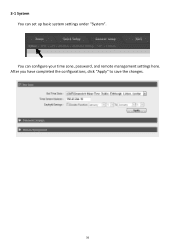
3-1 System You can configure your time zone, password, and remote management settings here. After you have completed the configurations, click "Apply" to save the changes. 38 You can set up basic system settings under "System".
3-1 System You can configure your time zone, password, and remote management settings here. After you have completed the configurations, click "Apply" to save the changes. 38 You can set up basic system settings under "System".
Manual
Page 40
... cannot find your country/region, please select another country/region whose time zone is the same as yours. Click "Apply" to configure other settings. 39 3-1-1 Time Zone You can configure the time zone settings here. If you do not know the host name, please ask the network administrator or use "pool.ntp...
... cannot find your country/region, please select another country/region whose time zone is the same as yours. Click "Apply" to configure other settings. 39 3-1-1 Time Zone You can configure the time zone settings here. If you do not know the host name, please ask the network administrator or use "pool.ntp...
Manual
Page 41
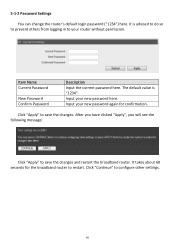
... password ("1234") here. Input your new password here. It takes about 60 seconds for confirmation. Input your new password again for the broadband router to configure other settings. 40 After you have clicked "Apply", you will see the following message: Click "Apply" to your router without permission. It is "1234". Item...
... password ("1234") here. Input your new password here. It takes about 60 seconds for confirmation. Input your new password again for the broadband router to configure other settings. 40 After you have clicked "Apply", you will see the following message: Click "Apply" to your router without permission. It is "1234". Item...
Manual
Page 42
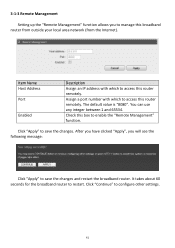
... broadband router. Check this router remotely. Click "Continue" to enable the "Remote Management" function. After you have clicked "Apply", you to access this box to configure other settings. 41 Assign a port number with which to save the changes.
... broadband router. Check this router remotely. Click "Continue" to enable the "Remote Management" function. After you have clicked "Apply", you to access this box to configure other settings. 41 Assign a port number with which to save the changes.
Manual
Page 45
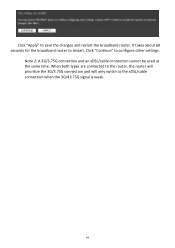
Click "Continue" to the xDSL/cable connection when the 3G/43.75G signal is weak. 44 When both types are connected to the router, the router will prioritize the 3G/3.75G connection and will only switch to configure other settings. It takes about 60 seconds for the broadband router to save the changes and restart the broadband router. Click "Apply" to restart. Note 2: A 3G/3.75G connection and an xDSL/cable connection cannot be used at the same time.
Click "Continue" to the xDSL/cable connection when the 3G/43.75G signal is weak. 44 When both types are connected to the router, the router will prioritize the 3G/3.75G connection and will only switch to configure other settings. It takes about 60 seconds for the broadband router to save the changes and restart the broadband router. Click "Apply" to restart. Note 2: A 3G/3.75G connection and an xDSL/cable connection cannot be used at the same time.
Manual
Page 46
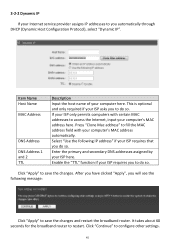
...access the Internet, input your computer's MAC address here. Enable the "TTL" function if your ISP requires you automatically through DHCP (Dynamic Host Configuration Protocol), select "Dynamic IP". Click "Continue" to restart. If your ISP only permits computers with your computer's MAC address automatically. Item Name...so. This is optional and only required if your ISP asks you do so. It takes about 60 seconds for the broadband router to configure other settings. 45 Click "Apply" to save the changes. Select "Use the following message: Click "Apply" to save the changes ...
...access the Internet, input your computer's MAC address here. Enable the "TTL" function if your ISP requires you automatically through DHCP (Dynamic Host Configuration Protocol), select "Dynamic IP". Click "Continue" to restart. If your ISP only permits computers with your computer's MAC address automatically. Item Name...so. This is optional and only required if your ISP asks you do so. It takes about 60 seconds for the broadband router to configure other settings. 45 Click "Apply" to save the changes. Select "Use the following message: Click "Apply" to save the changes ...