
User Manual (English)
Page 2
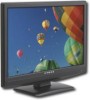
...Dynex DX-LCD22-09 22" LCD TV Contents Important safety instructions...4 TV components ...6 Front ...6 Left side...6 Back...7 Remote control ...7 Setting up your TV...8 Installing remote control batteries...8 Using the remote control ...8 Connecting to AC power...8 Connecting an antenna or basic cable...9 Connecting a cable or satellite box...9 Making audio and video connections...9 Using your TV... ...11 Setting up for the first time ...11 Changing TV settings...12 Adjusting VGA mode images ...19 Assembling the stand and...
...Dynex DX-LCD22-09 22" LCD TV Contents Important safety instructions...4 TV components ...6 Front ...6 Left side...6 Back...7 Remote control ...7 Setting up your TV...8 Installing remote control batteries...8 Using the remote control ...8 Connecting to AC power...8 Connecting an antenna or basic cable...9 Connecting a cable or satellite box...9 Making audio and video connections...9 Using your TV... ...11 Setting up for the first time ...11 Changing TV settings...12 Adjusting VGA mode images ...19 Assembling the stand and...

User Manual (English)
Page 3
...cords and cables so that children can be heavy. Tune into safety • One size of TV stand does not fit all. Use only a TV stand rated for the weight of your TV. • Carefully read and understand all enclosed instructions for safe wall mount installation. Some wall... cannot be pushed, pulled over and cause injury. We and the consumer electronics industry are committed to the manufacturer's recommendations. However, TVs are not always supported on the proper stands or installed according to making home entertainment enjoyable and safe. Contents 3 f CHILD SAFETY It...
...cords and cables so that children can be heavy. Tune into safety • One size of TV stand does not fit all. Use only a TV stand rated for the weight of your TV. • Carefully read and understand all enclosed instructions for safe wall mount installation. Some wall... cannot be pushed, pulled over and cause injury. We and the consumer electronics industry are committed to the manufacturer's recommendations. However, TVs are not always supported on the proper stands or installed according to making home entertainment enjoyable and safe. Contents 3 f CHILD SAFETY It...
User Manual (English)
Page 4
... all of fire or electric shock, do not touch the liquid in the panel. Cleaning Unplug your TV before cleaning. Use only a damp cloth to rain or water. Do not block the openings by Dynex because they exit from overheating. Quick stops, excessive force, and uneven surfaces may cause overheating. This may...
... all of fire or electric shock, do not touch the liquid in the panel. Cleaning Unplug your TV before cleaning. Use only a damp cloth to rain or water. Do not block the openings by Dynex because they exit from overheating. Quick stops, excessive force, and uneven surfaces may cause overheating. This may...
User Manual (English)
Page 5
... protection against voltage surges and built-up static charges. Power lines An outside antenna or cable system is grounded to your TV only from lightning and power line surges. This product is left unattended and unused for extended periods of irreversible screen deterioration ...can cause a permanent after-image on the marking label. Lightning For added protection for your TV dealer or local power company. If the screen breaks, be located in correct operating condition. This type of time. Important safety ...
... protection against voltage surges and built-up static charges. Power lines An outside antenna or cable system is grounded to your TV only from lightning and power line surges. This product is left unattended and unused for extended periods of irreversible screen deterioration ...can cause a permanent after-image on the marking label. Lightning For added protection for your TV dealer or local power company. If the screen breaks, be located in correct operating condition. This type of time. Important safety ...
User Manual (English)
Page 6
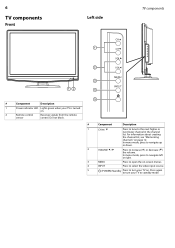
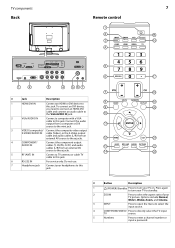
...VOLUME / Press to the next higher or next lower channel in the channel list. 6 TV components Front Left side TV components 1 2 3 12 4 5 # Component Description 1 Power indicator LED Lights green when your TV is turned on . In menu mode, press to navigate left or right. 3 MENU ...Press to open the on-screen menus. 4 INPUT Press to select the video input source. 5 (POWER)/Standby Press to turn your TV to turn your TV on . 2 Remote control Receives signals from the remote sensor control. Press again to standby mode. Do not block. # Component Description ...
...VOLUME / Press to the next higher or next lower channel in the channel list. 6 TV components Front Left side TV components 1 2 3 12 4 5 # Component Description 1 Power indicator LED Lights green when your TV is turned on . In menu mode, press to navigate left or right. 3 MENU ...Press to open the on-screen menus. 4 INPUT Press to select the video input source. 5 (POWER)/Standby Press to turn your TV to turn your TV on . 2 Remote control Receives signals from the remote sensor control. Press again to standby mode. Do not block. # Component Description ...
User Manual (English)
Page 7
.... 3 INPUT Press to open the menu to select the input source. 4 COMP/HDMI/VIDEO/ Press to directly select the TV input TV source. 5 Numbers Press to select the aspect ratio of your TV on. Connect the audio output from a computer or DVI 11 source to the mini jack. 3 VIDEO (composite)/ Connect the... Cr/Pr) and audio cables (L/R) from an external AV 13 22 source to these jacks. 14 23 5 RF (ANT) IN Connect a TV antenna or cable TV cable to turn your TV picture. To connect an DVI device, 9 you need to connect an HDMI-DVI 20 cable and connect an audio cable to the...
.... 3 INPUT Press to open the menu to select the input source. 4 COMP/HDMI/VIDEO/ Press to directly select the TV input TV source. 5 Numbers Press to select the aspect ratio of your TV on. Connect the audio output from a computer or DVI 11 source to the mini jack. 3 VIDEO (composite)/ Connect the... Cr/Pr) and audio cables (L/R) from an external AV 13 22 source to these jacks. 14 23 5 RF (ANT) IN Connect a TV antenna or cable TV cable to turn your TV picture. To connect an DVI device, 9 you need to connect an HDMI-DVI 20 cable and connect an audio cable to the...
User Manual (English)
Page 8
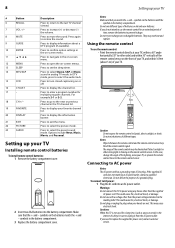
...remote control sensor on the batteries with a voltage other strong light is not used for an extended period of the lighting, move your TV Installing remote control batteries To install remote control batteries: 1 Remove the battery compartment cover. 2 Insert two AAA batteries into an AC... power outlet. Cautions: When this TV is shining on a trip) in the battery compartment. Press to replace the supplied AC power cord, contact customer service. Options include News, ...
...remote control sensor on the batteries with a voltage other strong light is not used for an extended period of the lighting, move your TV Installing remote control batteries To install remote control batteries: 1 Remove the battery compartment cover. 2 Insert two AAA batteries into an AC... power outlet. Cautions: When this TV is shining on a trip) in the battery compartment. Press to replace the supplied AC power cord, contact customer service. Options include News, ...
User Manual (English)
Page 9
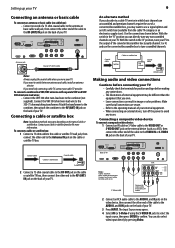
... to the AUDIO L and R jacks on the video device, then connect the other end of the cable to the AUDIO L and R IN jacks on your TV. With the switch in image or color problems. Make sure that all connections are secure. • Refer to the operating manuals of your external equipment...; When connecting an external device, turn off the power to avoid any nonscrambled channels on the back of the cable to the output of your TV. The Input Source menu opens. 4 Select AV (or S-Video if using the S-VIDEO IN jack) to select the input source, then press ENTER to the...
... to the AUDIO L and R jacks on the video device, then connect the other end of the cable to the AUDIO L and R IN jacks on your TV. With the switch in image or color problems. Make sure that all connections are secure. • Refer to the operating manuals of your external equipment...; When connecting an external device, turn off the power to avoid any nonscrambled channels on the back of the cable to the output of your TV. The Input Source menu opens. 4 Select AV (or S-Video if using the S-VIDEO IN jack) to select the input source, then press ENTER to the...
User Manual (English)
Page 10
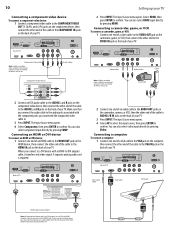
... directly by pressing COMP. Connect red to red, white to white, and so on the back of your TV. 3 Press INPUT. You can also select video input directly by pressing Video. A separate analog audio cord..., then connect the other end to the VIDEO IN jack on the back of your TV. Back of TV Back of TV Mini audio cable VGA cable Computer HDMI device HDMI cable (not provided) Note: If the...device, then connect the other end of the cable to the AUDIO L and R jacks on the back of your TV. The Input Source menu opens. 4 Select AV to select the input source, then press ENTER to confirm. 10...
... directly by pressing COMP. Connect red to red, white to white, and so on the back of your TV. 3 Press INPUT. You can also select video input directly by pressing Video. A separate analog audio cord..., then connect the other end to the VIDEO IN jack on the back of your TV. Back of TV Back of TV Mini audio cable VGA cable Computer HDMI device HDMI cable (not provided) Note: If the...device, then connect the other end of the cable to the AUDIO L and R jacks on the back of your TV. The Input Source menu opens. 4 Select AV to select the input source, then press ENTER to confirm. 10...
User Manual (English)
Page 11
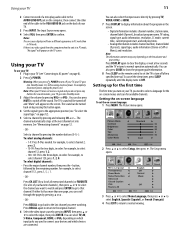
...Connecting to turn on the screen. • Digital information includes channel number, station name, channel label (if preset), broadcast program name, TV rating, signal type, audio information, resolution, CC mode, current time, current program start, and end play times. • Analog information ...To cancel the sleep timer, press SLEEP repeatedly until the display turns to select channel 15.1, press 1, 5, •, 1. - Using your TV To use your TV: 1 Plug in order. See "Memorizing channels" on -screen language: 1 Press MENU. To completely disconnect power, unplug the power cord. To...
...Connecting to turn on the screen. • Digital information includes channel number, station name, channel label (if preset), broadcast program name, TV rating, signal type, audio information, resolution, CC mode, current time, current program start, and end play times. • Analog information ...To cancel the sleep timer, press SLEEP repeatedly until the display turns to select channel 15.1, press 1, 5, •, 1. - Using your TV To use your TV: 1 Plug in order. See "Memorizing channels" on -screen language: 1 Press MENU. To completely disconnect power, unplug the power cord. To...
User Manual (English)
Page 12
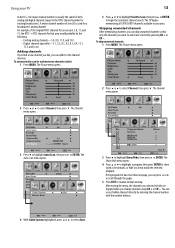
...) channel has a two-part channel number, which lets you skip channels up or down to begin the automatic channel search. 12 Memorizing channels This TV is equipped with an antenna, set the Air/Cable option to select Channel, then press . The Channel menu opens. 3 Press to highlight Auto ...press or ENTER to the next channel in your DTV signal is and to determine whether you are to experience picture degradation. The TV begins memorizing all TV/DTV channels available in memory, skipping over unwanted channels. The Channel menu opens. To use the DTV signal strength bar to check ...
...) channel has a two-part channel number, which lets you skip channels up or down to begin the automatic channel search. 12 Memorizing channels This TV is equipped with an antenna, set the Air/Cable option to select Channel, then press . The Channel menu opens. 3 Press to highlight Auto ...press or ENTER to the next channel in your DTV signal is and to determine whether you are to experience picture degradation. The TV begins memorizing all TV/DTV channels available in memory, skipping over unwanted channels. The Channel menu opens. To use the DTV signal strength bar to check ...
User Manual (English)
Page 13
... and digital channels (equal to begin the automatic channel search. The Channel menu opens. 3 Press to select Channel, then press . The TV begins memorizing all CATV/CADTV channels available in your TV In the U.S., the major channel number is used for and memorize channels (cable): 1 Press MENU. Using your area. The Picture...
... and digital channels (equal to begin the automatic channel search. The Channel menu opens. 3 Press to select Channel, then press . The TV begins memorizing all CATV/CADTV channels available in your TV In the U.S., the major channel number is used for and memorize channels (cable): 1 Press MENU. Using your area. The Picture...
User Manual (English)
Page 14
... Label editing screen opens. 5 Press or to select a character, then press or to move the cursor to the next box. 6 Press ENTER to confirm your TV 3 Press or to highlight Channel Label, then press or ENTER. Lets you adjust the color saturation. To remove it as a favorite (with a check mark). Adjusting...
... Label editing screen opens. 5 Press or to select a character, then press or to move the cursor to the next box. 6 Press ENTER to confirm your TV 3 Press or to highlight Channel Label, then press or ENTER. Lets you adjust the color saturation. To remove it as a favorite (with a check mark). Adjusting...

User Manual (English)
Page 15
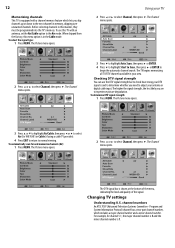
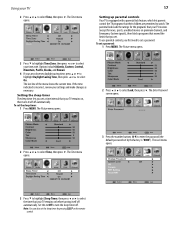
The Picture menu opens. 15 Receiving MTS/SAP broadcasts Your TV can also cycle through the zoom modes by pressing AUDIO. The Audio menu opens. 2 Press or to select Audio, then press . Available options include: Option ... a full-screen picture. • Zoom-Enlarges the picture. Note: You can receive MTS stereo programs and any SAP (Secondary Audio Program) that option. Using your TV Option Description Tint Lets you select a preset color mode: temperature) • Warm-Enhances red tones • Cool-Enhances blue tones • Normal-The default setting...
The Picture menu opens. 15 Receiving MTS/SAP broadcasts Your TV can also cycle through the zoom modes by pressing AUDIO. The Audio menu opens. 2 Press or to select Audio, then press . Available options include: Option ... a full-screen picture. • Zoom-Enlarges the picture. Note: You can receive MTS stereo programs and any SAP (Secondary Audio Program) that option. Using your TV Option Description Tint Lets you select a preset color mode: temperature) • Warm-Enhances red tones • Cool-Enhances blue tones • Normal-The default setting...

User Manual (English)
Page 16
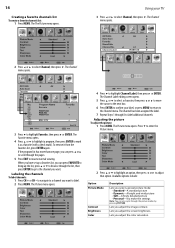
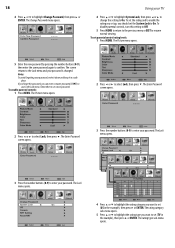
...opens. See "Setting up the clock The digital clock on -screen instructions. Options include: • CC1~CC4-Displays a printed version of your TV is set automatically from a signal provided by pressing CCD. To set the Mode to Custom, then select the options you turn picture optimization on ...4 Press MENU to return to the previous menu or EXIT to access the Option sub-menu. Using your settings before you reset all of your TV 4 Press or to highlight an option, then press or to select Setup, then press . First set up the clock: 1 Press MENU. See...
...opens. See "Setting up the clock The digital clock on -screen instructions. Options include: • CC1~CC4-Displays a printed version of your TV is set automatically from a signal provided by pressing CCD. To set the Mode to Custom, then select the options you turn picture optimization on ...4 Press MENU to return to the previous menu or EXIT to access the Option sub-menu. Using your settings before you reset all of your TV 4 Press or to highlight an option, then press or to select Setup, then press . First set up the clock: 1 Press MENU. See...
User Manual (English)
Page 17
... 2 Press or to turn the sleep timer off. Options include Atlantic, Eastern, Central, Mountain, Pacific, Alaska, and Hawaii. 4 If your TV remains on before turning itself off automatically. Note: You can also set by pressing SLEEP on the remote control. The parental lock reads the ratings... for the programs that your TV receives (except for news, sports, unedited movies on premium channels, and Emergency System signals), then blocks programs that exceed the limits that...
... 2 Press or to turn the sleep timer off. Options include Atlantic, Eastern, Central, Mountain, Pacific, Alaska, and Hawaii. 4 If your TV remains on before turning itself off automatically. Note: You can also set by pressing SLEEP on the remote control. The parental lock reads the ratings... for the programs that your TV receives (except for news, sports, unedited movies on premium channels, and Emergency System signals), then blocks programs that exceed the limits that...
User Manual (English)
Page 18
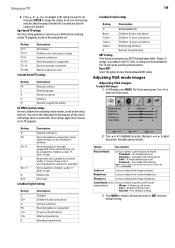
..., turn this setting to Off. 5 Press MENU to return to the previous menu or EXIT to select Lock, then press . Notes: To avoid forgetting your TV 4 Press or to highlight System Lock, then press or to change the setting to On. If you forget the password, you want to set the... rating category sub-menu opens. 5 Press or to the Lock menu and your password. The screen returns to highlight the rating type you should set (TV in the example), then press or ENTER. The Picture menu opens. 5 Enter the new password by pressing the number buttons (0-9), then enter the same password...
..., turn this setting to Off. 5 Press MENU to return to the previous menu or EXIT to select Lock, then press . Notes: To avoid forgetting your TV 4 Press or to highlight System Lock, then press or to change the setting to On. If you forget the password, you want to set the... rating category sub-menu opens. 5 Press or to the Lock menu and your password. The screen returns to highlight the rating type you should set (TV in the example), then press or ENTER. The Picture menu opens. 5 Enter the new password by pressing the number buttons (0-9), then enter the same password...
User Manual (English)
Page 19
...enter the Picture menu. 2 Press or to highlight an option, then press or to clear the downloaded RRT rating. Rating Description TV-Y All children TV-Y7 TV-G TV-PG TV-14 Children over seven years of age General audiences Parental guidance suggested . Region 5) ratings, in accordance with ratings above a ..., then press ENTER to resume normal viewing. No icon indicates that the rating is blocked. You can set . Reset RRT Select this TV and can also cycle through the picture modes by a parent or guardian Not suitable for parental controls. Lets you select a preset color ...
...enter the Picture menu. 2 Press or to highlight an option, then press or to clear the downloaded RRT rating. Rating Description TV-Y All children TV-Y7 TV-G TV-PG TV-14 Children over seven years of age General audiences Parental guidance suggested . Region 5) ratings, in accordance with ratings above a ..., then press ENTER to resume normal viewing. No icon indicates that the rating is blocked. You can set . Reset RRT Select this TV and can also cycle through the picture modes by a parent or guardian Not suitable for parental controls. Lets you select a preset color ...
User Manual (English)
Page 20
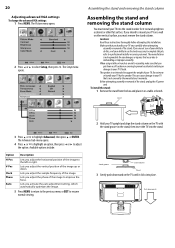
... the previous menu or EXIT to resume normal viewing. 2 Hold your ability to use the tools necessary to complete this job, refer to mount your TV into place. To install the stand: 1 Remove the stand from the box and place it clicks into the stand in order for any damages or... this installation. If you adjust the vertical position of the image. Lets you put down . Stand groove Stand column Stand 3 Gently push downward on the TV until it on a cabinet or other vertical surface, you adjust the horizontal position of the stand, unplug the AC power cord. Do not move or...
... the previous menu or EXIT to resume normal viewing. 2 Hold your ability to use the tools necessary to complete this job, refer to mount your TV into place. To install the stand: 1 Remove the stand from the box and place it clicks into the stand in order for any damages or... this installation. If you adjust the vertical position of the image. Lets you put down . Stand groove Stand column Stand 3 Gently push downward on the TV until it on a cabinet or other vertical surface, you adjust the horizontal position of the stand, unplug the AC power cord. Do not move or...
User Manual (English)
Page 21
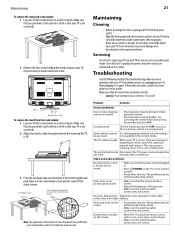
... sure the antenna/cable connections are correct. No color, dark picture, Adjust the color saturation in temperature which cause the cabinet to your TV, then remove the stand column and stand. If that the power cord is correct. • Adjust the brightness of the stand together and... push them into the stand column, then pull the stand off your TV, unplug the power cord, then contact an authorized service center. Turn off the stand column. Problem Solution General problems One or more ...
... sure the antenna/cable connections are correct. No color, dark picture, Adjust the color saturation in temperature which cause the cabinet to your TV, then remove the stand column and stand. If that the power cord is correct. • Adjust the brightness of the stand together and... push them into the stand column, then pull the stand off your TV, unplug the power cord, then contact an authorized service center. Turn off the stand column. Problem Solution General problems One or more ...


