
Quick Setup Guide (English)
Page 1
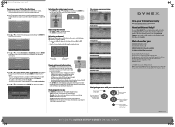
.... Setting up your TV and the RF OUT jack on the back panel of your model number in the battery compartment. 3 Replace the cover. HDMI device Using component (better) A component jack is also available on the antenna. Match the colors when you connect the composite AV cable. Video device N Composite audio/video cable Note: Cable connectors and jacks are often color-coded. Click Service & Support, select Find my remote control code, enter model number in your User Guide. 3 Secure the wall-mount bracket to the ANT/CABLE jack...
.... Setting up your TV and the RF OUT jack on the back panel of your model number in the battery compartment. 3 Replace the cover. HDMI device Using component (better) A component jack is also available on the antenna. Match the colors when you connect the composite AV cable. Video device N Composite audio/video cable Note: Cable connectors and jacks are often color-coded. Click Service & Support, select Find my remote control code, enter model number in your User Guide. 3 Secure the wall-mount bracket to the ANT/CABLE jack...
Quick Setup Guide (English)
Page 2
... details. DYNEX is connected to a cable/satellite box, select Cable/Satellite Box. 6 Press or to the TV, and connected the AC power. 2 Press (Power), then wait several seconds. Press to select menus, to adjust selected items, or ENTER move to a different channel in the remote control, connected your devices to select Scan, then press ENTER. ENGLISH 10-1137 55" LCD TV I QUICK SETUP GUIDE I DX-55L150A11 The Picture Mode screen opens. TV AV 1 AV 2 Component 1 Component 2 VGA HDMI 1 HDMI 2 HDMI 3 HDMI 4 TV INPUT INPUT Adjusting the volume •...
... details. DYNEX is connected to a cable/satellite box, select Cable/Satellite Box. 6 Press or to the TV, and connected the AC power. 2 Press (Power), then wait several seconds. Press to select menus, to adjust selected items, or ENTER move to a different channel in the remote control, connected your devices to select Scan, then press ENTER. ENGLISH 10-1137 55" LCD TV I QUICK SETUP GUIDE I DX-55L150A11 The Picture Mode screen opens. TV AV 1 AV 2 Component 1 Component 2 VGA HDMI 1 HDMI 2 HDMI 3 HDMI 4 TV INPUT INPUT Adjusting the volume •...
User Manual (English)
Page 2
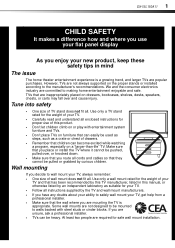
... the stand 3 Removing the stand 4 Installing a wall-mount bracket 4 TV components 4 Front and side controls 4 Back connections 5 Remote control 5 Using the remote control 6 Installing remote control batteries 6 Aiming the remote control 7 Programming a universal remote control to work with your TV 7 Making connections 7 Connecting the power 7 Selecting a location 8 Connecting an HDMI device 8 Connecting a component video device 8 Connecting an antenna, cable TV, or satellite TV box 9 Connecting a VCR, camcorder, or game console 9 Connecting a computer 9 Connecting a home...
... the stand 3 Removing the stand 4 Installing a wall-mount bracket 4 TV components 4 Front and side controls 4 Back connections 5 Remote control 5 Using the remote control 6 Installing remote control batteries 6 Aiming the remote control 7 Programming a universal remote control to work with your TV 7 Making connections 7 Connecting the power 7 Selecting a location 8 Connecting an HDMI device 8 Connecting a component video device 8 Connecting an antenna, cable TV, or satellite TV box 9 Connecting a VCR, camcorder, or game console 9 Connecting a computer 9 Connecting a home...
User Manual (English)
Page 5
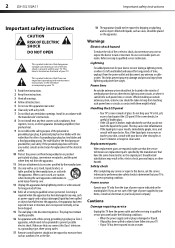
... the weight of your TV. • Carefully read and understand all enclosed instructions for proper use your flat panel display As you enjoy your new product, keep these safety tips in this product. • Don't let children climb on or play with steel studs or cinder blocks. Tune into safety • One size of wall mount does not fit all instructions supplied...
... the weight of your TV. • Carefully read and understand all enclosed instructions for proper use your flat panel display As you enjoy your new product, keep these safety tips in this product. • Don't let children climb on or play with steel studs or cinder blocks. Tune into safety • One size of wall mount does not fit all instructions supplied...
User Manual (English)
Page 6
... marking label. Replacement parts When replacement parts are not sure of the type of power supplied to rain or water. If the provided plug does not fit into the apparatus, the apparatus has been exposed to rain or moisture, does not operate normally, or has been dropped. 15 The wall plug is a Class I television to a grounding-type, three-prong outlet. 17 Remote control batteries should...
... marking label. Replacement parts When replacement parts are not sure of the type of power supplied to rain or water. If the provided plug does not fit into the apparatus, the apparatus has been exposed to rain or moisture, does not operate normally, or has been dropped. 15 The wall plug is a Class I television to a grounding-type, three-prong outlet. 17 Remote control batteries should...
User Manual (English)
Page 7
.... Installing and removing the stand DX-55L150A11 3 • If your cordless and cellular telephones away from the TV. Adjust only those controls that the room temperature rises gradually. Outdoor antenna grounding If an outside antenna or cable system is connected to the TV screen or cabinet. Condensation Moisture will often require extensive work by the operating instructions because incorrect adjustment of cable entry as a fixed blue, green, or red...
.... Installing and removing the stand DX-55L150A11 3 • If your cordless and cellular telephones away from the TV. Adjust only those controls that the room temperature rises gradually. Outdoor antenna grounding If an outside antenna or cable system is connected to the TV screen or cabinet. Condensation Moisture will often require extensive work by the operating instructions because incorrect adjustment of cable entry as a fixed blue, green, or red...

User Manual (English)
Page 8
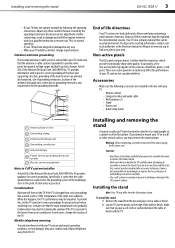
... on . In menu mode, press to move right or left or to the back of the table or bench. 4 DX-55L150A11 TV components 3 Align the base with the TV, then secure the stand to the TV with the six screws (M6 x 12) provided. 3 Secure the wall-mount bracket to adjust menu settings. To install a wall-mount bracket: 1 Lay your TV is on a table or bench. Lights red when your TV...
... on . In menu mode, press to move right or left or to the back of the table or bench. 4 DX-55L150A11 TV components 3 Align the base with the TV, then secure the stand to the TV with the six screws (M6 x 12) provided. 3 Secure the wall-mount bracket to adjust menu settings. To install a wall-mount bracket: 1 Lay your TV is on a table or bench. Lights red when your TV...
User Manual (English)
Page 9
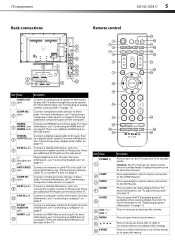
... or to adjust menu settings. Press to open the DTV program guide (if available) when viewing digital channels. HDMI2, Connect an HDMI device to these jacks 1 jacks to play the TV audio through the sound system. Caution: The TV continues to receive power even in on page 12. PC/DVI 11 AUDIO IN jack Connect a computer (audio) to this jack. Press to confirm selections in standby mode. TV components DX-55L150A11 5 Back connections Remote control TV INPUT VIDEO COMP HDMI VGA ZOOM GUIDE PICTURE AUDIO INFO VOL...
... or to adjust menu settings. Press to open the DTV program guide (if available) when viewing digital channels. HDMI2, Connect an HDMI device to these jacks 1 jacks to play the TV audio through the sound system. Caution: The TV continues to receive power even in on page 12. PC/DVI 11 AUDIO IN jack Connect a computer (audio) to this jack. Press to confirm selections in standby mode. TV components DX-55L150A11 5 Back connections Remote control TV INPUT VIDEO COMP HDMI VGA ZOOM GUIDE PICTURE AUDIO INFO VOL...

User Manual (English)
Page 10
..., User, and Music. Press again to select the sound mode. Press to enter channel numbers or the parental control password. Make sure that can leak from the batteries can cause old batteries to display the information banner. Program guide After pressing the GUIDE button when viewing (EPG) function digital channals, the same color buttons will 12 buttons appear with a cloth. • If the remote control is not used for the first time" on...
..., User, and Music. Press again to select the sound mode. Press to enter channel numbers or the parental control password. Make sure that can leak from the batteries can cause old batteries to display the information banner. Program guide After pressing the GUIDE button when viewing (EPG) function digital channals, the same color buttons will 12 buttons appear with a cloth. • If the remote control is not used for the first time" on...

User Manual (English)
Page 11
... not use the remote control. TV INPUT VIDEO COMP HDMI VGA ZOOM GUIDE PICTURE AUDIO INFO VOL CH MUTE MENU EXIT ENTER 1 2 3 4 5 6 7 8 9 0 RECALL CCD MTS/SAP SLEEP TIME EN-31203B Notes: • Do not expose the remote control to a power outlet. Loose connections can manually program it using the TV for a long period of the universal remote control, and the model number is often visible on the front of time. Power outlet Power cord Notes: • The AC plug on the...
... not use the remote control. TV INPUT VIDEO COMP HDMI VGA ZOOM GUIDE PICTURE AUDIO INFO VOL CH MUTE MENU EXIT ENTER 1 2 3 4 5 6 7 8 9 0 RECALL CCD MTS/SAP SLEEP TIME EN-31203B Notes: • Do not expose the remote control to a power outlet. Loose connections can manually program it using the TV for a long period of the universal remote control, and the model number is often visible on the front of time. Power outlet Power cord Notes: • The AC plug on the...
User Manual (English)
Page 12
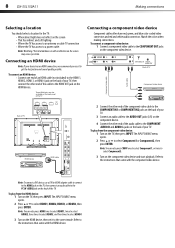
... and soft lighting • Where the TV has access to an antenna or cable TV connection • Where the TV has access to a power outlet Note: Watching TV in total darkness or with a reflection on the TV, then press INPUT. Component video cable Audio cable Connecting a component video device Component cables often have red, green, and blue color-coded video connectors and red and white audio connectors. To play from the HDMI device: 1 Turn on the screen may...
... and soft lighting • Where the TV has access to an antenna or cable TV connection • Where the TV has access to a power outlet Note: Watching TV in total darkness or with a reflection on the TV, then press INPUT. Component video cable Audio cable Connecting a component video device Component cables often have red, green, and blue color-coded video connectors and red and white audio connectors. To play from the HDMI device: 1 Turn on the screen may...
User Manual (English)
Page 13
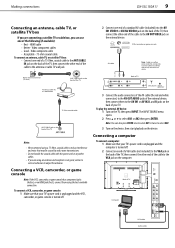
... to select AV2. 3 Turn on the device, then start playback on the external device. To play the external AV device: 1 Turn on the back of the following (if available): • Best - Back of the cable to the AV OUT VIDEO jack on the device. Video component cables • Good - The INPUT SOURCE menu opens. 2 Press or to white. Making connections DX-55L150A11 9 Connecting an antenna, cable TV, or satellite TV box If...
... to select AV2. 3 Turn on the device, then start playback on the external device. To play the external AV device: 1 Turn on the back of the following (if available): • Best - Back of the cable to the AV OUT VIDEO jack on the device. Video component cables • Good - The INPUT SOURCE menu opens. 2 Press or to white. Making connections DX-55L150A11 9 Connecting an antenna, cable TV, or satellite TV box If...
User Manual (English)
Page 14
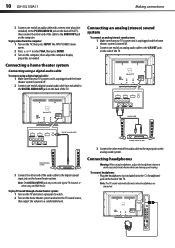
... select a program to watch. 2 Turn on the home theater system and select the TV sound source, then adjust the volume to a comfortable level. 3 Connect the other end of the audio cable to the input jacks on the computer, then adjust the computer display properties as needed. To play video from the computer: 1 Turn on the side of the TV. 10 DX-55L150A11 Making connections 3 Connect one end of an audio cable with digital TV channels or when using...
... select a program to watch. 2 Turn on the home theater system and select the TV sound source, then adjust the volume to a comfortable level. 3 Connect the other end of the audio cable to the input jacks on the computer, then adjust the computer display properties as needed. To play video from the computer: 1 Turn on the side of the TV. 10 DX-55L150A11 Making connections 3 Connect one end of an audio cable with digital TV channels or when using...
User Manual (English)
Page 15
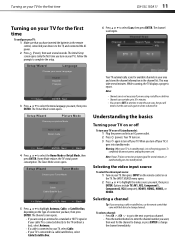
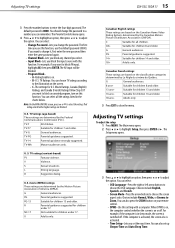
... Time Setup Caption AnRteensneat Default Cable Cable/Satelite Box Sutup Select ENTER Enter Select ENTER Next Back 5 Press or to highlight Antenna, Cable, or Satellite Box, depending on or off your devices to create a channel list. The Tuner Mode screen opens. Your TV turns on your TV is not necessary if you are using a satellite or cable box. • Channel scan can press EXIT at any time to change channels. Selecting a channel Tip: If you turn off (standby mode): 1 Plug the power cord...
... Time Setup Caption AnRteensneat Default Cable Cable/Satelite Box Sutup Select ENTER Enter Select ENTER Next Back 5 Press or to highlight Antenna, Cable, or Satellite Box, depending on or off your devices to create a channel list. The Tuner Mode screen opens. Your TV turns on your TV is not necessary if you are using a satellite or cable box. • Channel scan can press EXIT at any time to change channels. Selecting a channel Tip: If you turn off (standby mode): 1 Plug the power cord...
User Manual (English)
Page 16
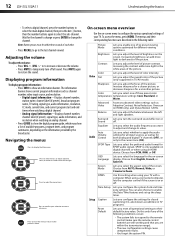
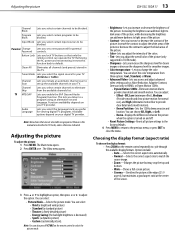
... the sleep timer. To access the menu, press MENU. Increasing brightness can also choose to confirm your TV. Tint Lets you adjust the overall color of the picture (only supported in TV programs. Reset Default Lets you select one of available programs, program times, and program summaries, depending on -screen Language display. Advanced Accesses advanced video settings such as channel number, video input source, and resolution. • Digital signal information-Displays channel number, station name, channel label (if preset), broadcast program name, TV rating, signal type, audio...
... the sleep timer. To access the menu, press MENU. Increasing brightness can also choose to confirm your TV. Tint Lets you adjust the overall color of the picture (only supported in TV programs. Reset Default Lets you select one of available programs, program times, and program summaries, depending on -screen Language display. Advanced Accesses advanced video settings such as channel number, video input source, and resolution. • Digital signal information-Displays channel number, station name, channel label (if preset), broadcast program name, TV rating, signal type, audio...
User Manual (English)
Page 17
... [21:9 aspect], but maintains a good aspect ratio at the center of the picture. Input Block Lets you change the color temperature. Parental Change Lets you initiate an automatic channel scan to set a new password for your TV. Channel Scan Lets you set up the available channels in your TV (Antenna or Cable). This lets you select the signal source for parental Password controls. Menus in this function back to default. Tuner Mode Lets you listen to a program using an...
... [21:9 aspect], but maintains a good aspect ratio at the center of the picture. Input Block Lets you change the color temperature. Parental Change Lets you initiate an automatic channel scan to set a new password for your TV. Channel Scan Lets you set up the available channels in your TV (Antenna or Cable). This lets you select the signal source for parental Password controls. Menus in this function back to default. Tuner Mode Lets you listen to a program using an...
User Manual (English)
Page 18
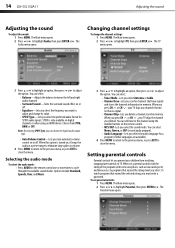
.... Setting parental controls Parental controls let you prevent your TV skips the channel you must enter a password. Choose from watching inappropriate material on the remote control. • MTS/SAP-Lets you want to close the menu. Selecting the audio mode To select the audio mode: • Press AUDIO on digital channels or when using the number buttons on TV. You can select: • Balance-Adjusts the balance between the left and right audio channels. • Surround Sound -Turns the surround sound...
.... Setting parental controls Parental controls let you prevent your TV skips the channel you must enter a password. Choose from watching inappropriate material on the remote control. • MTS/SAP-Lets you want to close the menu. Selecting the audio mode To select the audio mode: • Press AUDIO on digital channels or when using the number buttons on TV. You can select: • Balance-Adjusts the balance between the left and right audio channels. • Surround Sound -Turns the surround sound...
User Manual (English)
Page 19
... settings DX-55L150A11 15 3 Press the number buttons to adjust the option. The Parental Controls menu opens. 4 Press or to highlight an option, then press or to enter the four-digit password. You can select: • Change Password-Lets you can choose TV ratings according to close the menu. If you want to block AV input, highlight AV, then press ENTER.The AV input will be blocked. • Program...
... settings DX-55L150A11 15 3 Press the number buttons to adjust the option. The Parental Controls menu opens. 4 Press or to highlight an option, then press or to enter the four-digit password. You can select: • Change Password-Lets you can choose TV ratings according to close the menu. If you want to block AV input, highlight AV, then press ENTER.The AV input will be blocked. • Program...
User Manual (English)
Page 20
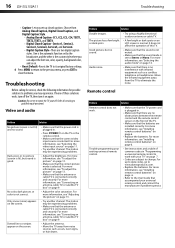
... picture, or color is normal. Trouble programming your universal remote control and contact the manufacturer if problems persist. Only snow (noise) appears on page 6. • Replace the batteries. For more information, see "Installing remote control batteries" on page 7. • Codes are two digital caption styles. Troubleshooting Before calling for service, check the following information for possible solutions to change. For more information, see "Connecting an antenna, cable TV, or satellite TV box...
... picture, or color is normal. Trouble programming your universal remote control and contact the manufacturer if problems persist. Only snow (noise) appears on page 6. • Replace the batteries. For more information, see "Installing remote control batteries" on page 7. • Codes are two digital caption styles. Troubleshooting Before calling for service, check the following information for possible solutions to change. For more information, see "Connecting an antenna, cable TV, or satellite TV box...

User Manual (English)
Page 21
.... This is not a malfunction. • Disconnect the power cord, wait a few seconds, then reconnect the power cord and turn on page 14. Specifications Specifications subject to clean the TV case and the LCD screen. TV type TV panel TV system Receiving channels Audio multiples Audio out Power requirement Power consumption Dimensions (W × H × D with stand) Weight Input terminals Output terminals Control terminals LCD 55-inch FHD LCD NTSC-M, ATSC VHF: 2 - 13 UHF: 14 - 69 CATV: 1 - 125...
.... This is not a malfunction. • Disconnect the power cord, wait a few seconds, then reconnect the power cord and turn on page 14. Specifications Specifications subject to clean the TV case and the LCD screen. TV type TV panel TV system Receiving channels Audio multiples Audio out Power requirement Power consumption Dimensions (W × H × D with stand) Weight Input terminals Output terminals Control terminals LCD 55-inch FHD LCD NTSC-M, ATSC VHF: 2 - 13 UHF: 14 - 69 CATV: 1 - 125...


